Semantic HTML
Get a better understanding of how semantic HTML can improve a webpage and search engines interaction by using new semantic HTML5 tags in a web page creation.
Mar 22, 2019 • 12 Minute Read
Semantics
There are over a billion websites on the Internet. Many of them are made a long time ago and have not been updated with HTML features. As such, search engines move past these websites, and viewers find these websites difficult to read.
One of the most important features of HTML5 is its semantics. Semantic HTML refers to syntax that makes the HTML more comprehensible by better defining the different sections and layout of web pages. It makes web pages more informative and adaptable, allowing browsers and search engines to better interpret content. For example, instead of using div id="header" you can use a header tag.
In this guide, you will learn how to use new semantic HTML5 tags in a web page creation and how to make content more informative for machines.
Semantic HTML Page Layout
Let's first consider a basic HTML page template, written in non-semantic HTML:
      <html>
    <head>
        <title>Example</title>
    </head>
    <body>
        <div id="header">
            Here goes logo, navigation, etc.
        </div>
        <div id="main-content">
            A place for website's main content
        </div>
        <div id="footer">
            Footer information, links, etc.
        </div>
    </body>
</html>
Now consider the example of semantic HTML shown below:
      <html>
    <head>
        <title>Example</title>
    </head>
    <body>
        <header>
            Here goes logo, navigation, etc.
        </header>
        <main>
            A place for website's main content
        </main>
        <footer>
            Footer information, links, etc.
        </footer>
    </body>
</html>
The main difference: we have replaced div tags with 3 new tags: header, main, and footer. header, main, and footer tags are semantic because they are used to represent different sections on an HTML page. These are more descriptive than div tags which make partitioning webpages into tangible sections difficult.
In HTML5, there is the nav tag, which replaces the former jack-of-all-trades, div, to wrap links that make a navigation menu. For instance, the navigation menu can be inserted within the header section:
      <header>
    <img src="logo.png" alt="logo"/>
    <nav>
        <a href="index.html">Home</a>
        <a href="services.html">Services</a>
        <a href="contact.html">Contact</a>
        <a href="about.html">About Us</a>
    </nav>
</header>```

but, it also can be added after the _header_ section:

```HTML
<header>
    <img src="logo.png" alt="logo" />
</header>
<nav>
    <a href="index.html">Home</a>
    <a href="services.html">Services</a>
    <a href="contact.html">Contact</a>
    <a href="about.html">About Us</a>
</nav>
Generally, the navigation menu can be put anywhere on a page, it just needs to be wrapped with the ``. However, it shouldn't be put inside main, unless the navigation is specific for that page. This restriction exists because main elements should only be specific for the page, while header and footer are generally shareable among similar pages.
Main Content
To add some content into the main section, we can use new HTML5 tags, such as article and section. These tags simplify the structure of main, making it look like:
      <main>
    <article>
        <h1>JavaScript Basics</h1>
        <p>JavaScript is a rich and expressive language...</p>
        <section>
            <h2>Syntax Basics</h2>
            <p>Understanding statements, variable naming, whitespace...</p>
        </section>
        <section>
            <h2>Operators</h2>
            <p>Operators allow you to manipulate values...</p>
        </section>
        <section>
            <h2>Conditional Code</h2>
            <p>Sometimes you only want to run a block of code under certain conditions...</p>
        </section>
    </article>
</main>
The article tag is used for wrapping an autonomous content on a page. A content is autonomous if it can be removed from the page and put on some another page. The article tag can contain several section tags inside it, like in our example. An article is actually an autonomous section.
The section tag is similar to the div tag, but it is more meaningful since it wraps logical groups of related content (e.g. a chapter of an article). The section tag can be also used to wrap the article itself, but we have the article tag for that purpose.
Additional Content
Aside section
An additional content, unimportant for understanding an article, but related to the article, can be inserted into the aside section. For instance, it could be information about how many people read the article, who is the author of the article, and so on. In that case, the HTML code of the article would take the following structure:
      <main>
    <article>
        <h1>JavaScript Basics</h1>
        <p>JavaScript is a rich and expressive language...</p>
        <section>
            <h2>Syntax Basics</h2>
            <p>Understanding statements, variable naming, whitespace...</p>
        </section>
        <section>
            <h2>Operators</h2>
            <p>Operators allow you to manipulate values...</p>
        </section>
        <section>
            <h2>Conditional Code</h2>
            <p>Sometimes you only want to run a block of code under certain conditions...</p>
        </section>
        <aside>
            <p>Viewed by 1503 people</p>
            <p>Author: John Smith</p>
        </aside>
    </article>
</main>
As seen above, the aside allows search engines to quickly pull information like author, views, and date. This tag can be also used to enclose additional content that is related to a whole page, not just to a particular article. For example, aside can wrap a sidebar, ad, footnote, and so on.
Figures
Figure elements on a web page can be enclosed with the figure and figcaption tags.
The figure tag is used to mark up photos, code blocks, diagrams, charts, illustrations, and other graphic content. Generally, this tag encloses content that can be moved away into an appendix. Only images related to the content of a page should be within the figure tag (e.g. a logo image). Therefore, images like banner ads shouldn't be inside that tag. However, there is a way to add semantics to a banner ad which we will cover that in the Microdata section of this guide.
The figcaption tag represents a caption or legend for a figure. It's optional and can be omitted. Only one figcaption tag can be nested into the figure tag. Even if a figure contains multiple images, there can be only one figcaption for all of them.
For instance, photos of people who liked the article could be enclosed with the figure tag. Since that information is not crucial to webpage functionality, it can be nested into the aside section of the article.
      <aside>
    <p>Viewed by 1503 people</p>
    <p>Author: John Smith</p>
    <figure>
        <img src="John Doe.png" alt="John Doe"/>
        <img src="Maggie Smith.png" alt="Maggie Smith"/>
        <img src="Tom Hardy.png" alt="Tom Hardy"/>
        <figcaption>People who liked the article</figcaption>
    </figure>
</aside>
The logo in the header section should be enclosed with the figure tag, as well, so our header section will finally have the following code:
      <header>
    <figure>
        <img src="logo.png" alt="logo"/>
    </figure>
    <nav>
        <a href="index.html">Home</a>
        <a href="services.html">Services</a>
        <a href="contact.html">Contact</a>
        <a href="about.html">About Us</a>
    </nav>
</header>
Notice how the partitioning in the page makes the code more comprehensible and possibly improves browser and search engine content parsing.
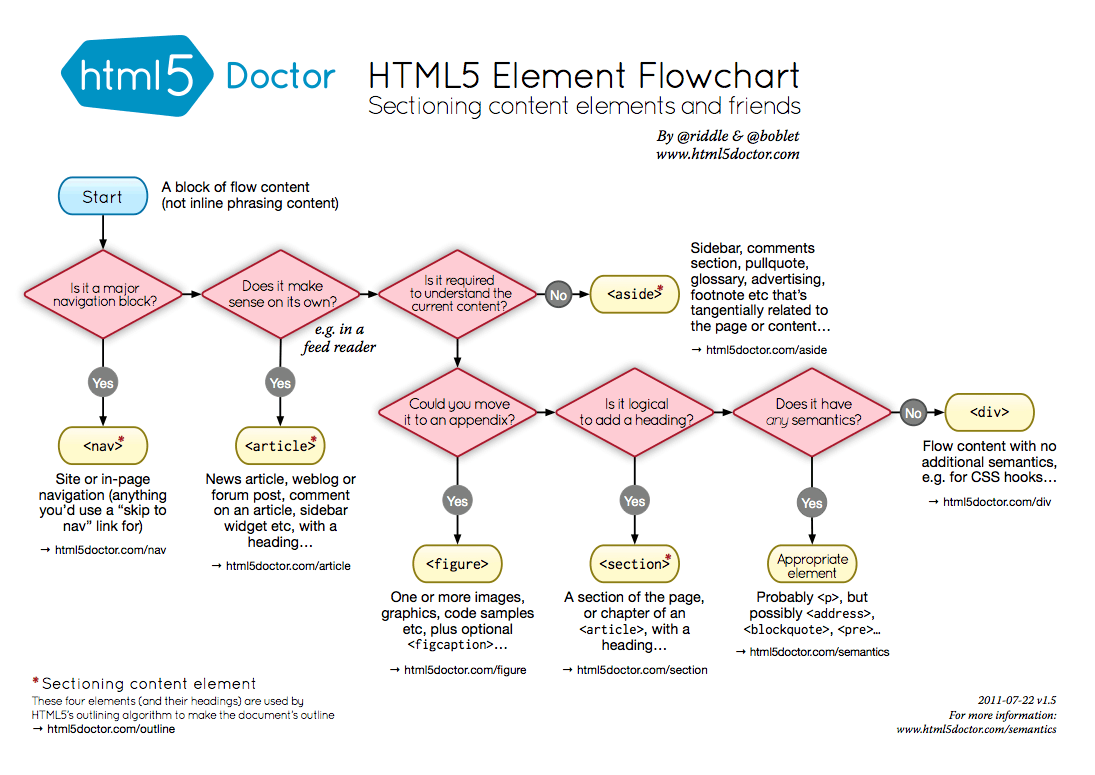
HTML5 Element Flowchart
If you are unsure which semantic tag to use in a particular case, you can always follow this great flowchart made by authors of HTML5Doctor.
Microdata
Microdata provides additional information about the content of a web page and helps search engines and screen readers operate on the site. Microdata can be added as attributes to any HTML tag. For instance, let's add some data about the author of the article in our example. The aside section of the article will have the following code:
      <aside>
    <p>Viewed by 1503 people</p>
    <p>Author: John Smith, Senior Software Developer at Google, Mountain View, California</p>
</aside>
With microdata included, the HTML code of the aside section will be:
      <aside>
    <p>Viewed by 1503 people</p>
    <p itemscope itemtype="http://schema.org/Person">
        Author:
        <span itemprop="name">John Smith</span>,
        <span itemprop="jobTitle">Senior Software Developer</span>
        at
        <span itemprop="worksFor" itemscope itemtype="https://schema.org/Corporation">
            <span itemtype="name">Google</span>,
        </span>
        <span itemprop="address" itemscope itemtype="http://schema.org/PostalAddress">
            <span itemprop="addressLocality">Mountain View</span>,
            <span itemprop="addressRegion">California</span>
        </span>
    </p>
</aside>
There is obviously much more data in the code above than in the previous code, but there is also much more information for machines. As you could notice, we used the following microdata attributes: itemscope, itemtype and itemprop. So, what do all these attributes mean?
itemscope indicates a new group of microdata. A group of microdata is called item. Items contain pairs of properties and values. The type of an item is specified by itemtype. This is actually a URL to a web page that contains information about the item. On that page, we can see all the properties the item could have.
We usually use only several properties to describe an item and we define these using the itemprop attribute. A value of a property can be a new item (like address in our example).
We mentioned before in this tutorial that a banner can be described with microdata. So, the HTML code for that should look like this:
      <div itemscope itemtype="https://schema.org/WPAdBlock">
    <a href="site.com" itemprop="url"><img src="banner.gif" alt="banner" itemprop="image" /></a>
</div>
There is a very useful tool for generating microdata called the Microdata generator. It can save time and teach you how to use microdata properly for various items.
Browser Support
According to this table, the HTML5 semantic tags are supported well in the latest browsers versions. For some older versions of the Internet Explorer, Firefox and Safari we can use the HTML5 Shiv or Modernizr (which includes the HTML5 Shiv).
Additional Resources
For more information about this topic, you can read these very useful articles:
Conclusion
This guide covered several advantages of using semantic HTML. We created a semantic HTML layout and used microdata to add more information to the content of the web page.
Hopefully, this guide gave you an understanding of how semantic HTML can improve a webpage and search engines interaction. And with more browsers taking on HTML5, semantic tags will inevitably become more common, so mastering them now could hold reward in the future.