Advanced Workflows for Building Rock Solid Ionic Apps Part 2: Mountain
Build your next Ionic App with ease with our 3 part guide on creating advanced worflows that will take your Ionic app development to the next level. In part 2 of this Ionic tutorial series, you'll learn about testing, sub-generators, plugins and eco-system integrations. Start learning today!
Dec 15, 2018 • 16 Minute Read
Prologue
In the second part of our series on developing Ionic apps with Generator-M-Ionic, you'll be learning about wonderful ingredients like testing, sub-generators, plugins, and ecosystem integration into platforms like the Ionic Platform. We are building on the project we created in Part 1 of this series.
Cross-platform HTML5 app development is hard
Even with awesome tools like Generator-M-Ionic, Angular JS, Cordova, Ionic (which supports iOS, Android, the mobile web, and Windows (since Ionic 1.2), cross-platform HTML5 app development can be a pain.
Here's why: maybe your app should run on phones and tablets with a different, specifically designed layout and workflow for either case. Ah, and what the customer forgot to tell you: obviously it should also run in the browser! "It's built using web technologies anyways, isn't it?" your customer asks. Maybe even on desktops using Electron? Uff ... You'll be optimizing and testing a lot!
And when that's taken care of, there's a lot of complex topics like handling translations, offline data, persistence, and data syncing between devices or the backend of your app which you have to handle to keep customers satisfied.
These things need to be thoroughly coded while you juggle certificates and licenses when building for the different app stores, trying to integrate complicated Push services or coding custom Cordova plugins and hooks. Worst of all, if customer requirements change, you're back to the drawing board.
I know. We've been through all of this. That's why we built Generator-M-Ionic, a trust-worthy and powerful coding companion so that you can focus on the real challenges. And development shouldn't be one of them!
Are you ready to climb Serious-App-Development Mountain? Let's go.
Quality assurance
You've set up your project, created your first commit, and discovered that you're ready to start coding. Whether you are coding alone or in a team, you'll want to take some measures to ensure that your code is of high quality. Generator-M-Ionic has got you covered here:
Linting
Your Generator-M-Ionic project comes with established coding guidelines and workflows already baked in using ESLint. On every iteration of gulp watch Gulp will check all your application JavaScript files for guideline violations.
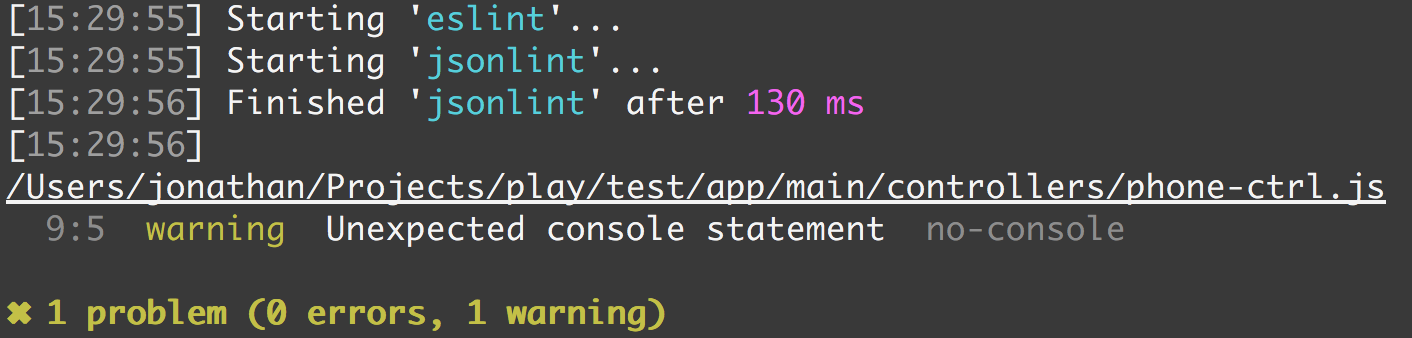
To get linting notifications as you develop in your editor or to learn how to configure the default set of rules, check out our ESLint Guide. If you are working with JSON files in your app/ folder (for instance, to handle translations), the generator's linting will validate those too! This keeps your development trouble free.
Testing
Another area where you don't have to deal with the hassle of setting up and configuring everything yourself is unit testing (with Karma) and end-to-end testing (with Protractor). Your sample app even comes with a ready-to-use test-suite that you can try out right now by running:
      gulp karma
# and
gulp protractor
The relevant files for the test setup are these:
      test/
  └── karma/
  └── protractor/
karma.conf.js
protractor.conf.js
Our Testing Guide can help you get started with writing your own unit and end-to-end tests for your app. Once you have that mastered, the Husky Hooks Guide explains how you can run linting and tests automatically before you git commit or git push.
Coding
Now for the actual development. You'll probably want to:
- add your own Angular components using our subgenerators
- controllers, templates, directives, services, filters, constants, ... or even whole modules
- add some Sass to spice up your app's styling
- add Cordova Plugins to use with ngCordova for that real app-feeling
- add some additional bower packages for special tasks
We will go through each of these tasks briefly to give you a general idea of how things work. For more detailed explanations, visit our Documentation.
Adding Angular components
Our array of subgenerators allows you to create the most important Angular components very easily. If applicable they also generate sample test files so you can start testing right away.
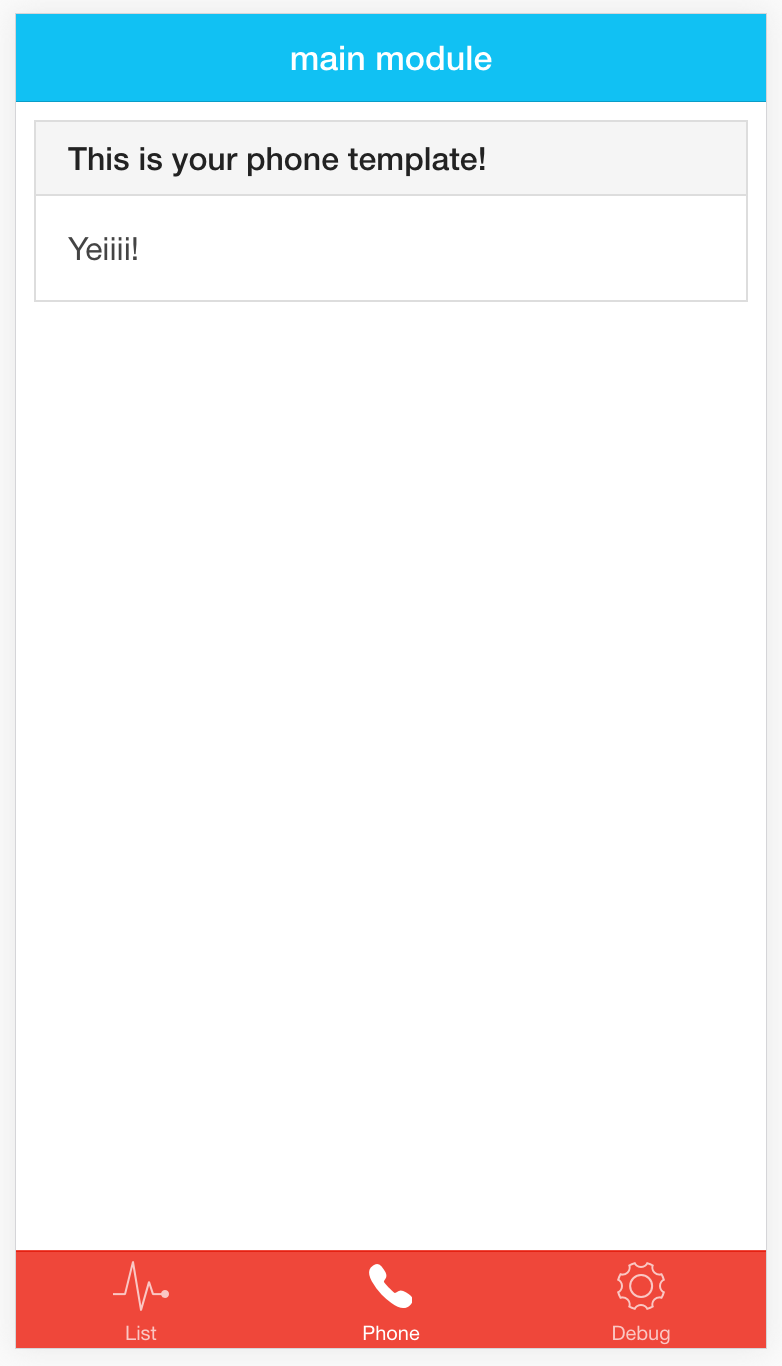
For instance, we use the pair-subgenerator a lot. It creates a controller, with a test file and a template with the same name.
yo m-ionic:pair phone

Now we only need to add a state to the main.js:
      .state('main.phone', {
  url: '/phone',
  views: {
    'tab-phone': {
      templateUrl: 'main/templates/phone.html',
      controller: 'PhoneCtrl as ctrl'
    }
  }
})
Then add a navigation item in our tabs.html file, which you'll find in app/main/templates/, to bring it all together:
      <!-- List Tab -->
<ion-tab title="Phone" icon-off="ion-ios-telephone-outline"
  icon-on="ion-ios-telephone"
  ui-sref="main.phone">
  <ion-nav-view name="tab-phone"></ion-nav-view>
</ion-tab>
That's it. A new navigation item, a new route, controller, test file and template in about two minutes. Here's the result:
Adding Sass
This is an even easier task. Every module you generate comes with a default Sass file. For your main module this would be main.scss and it's located in app/main/styles/. Open it and add some Sass:
      ion-list {
  ion-item {
    color:red;
  }
}
Upon saving, your gulp watch task will automatically compile and inject the resulting CSS, even reload your browser. Not sassy enough? As your project grows larger, you may want to split your Sass in multiple files. Find out how in our Sass integration Guide.
Adding plugins
If we don't add some nice Cordova Plugins to our app, it won't be a real hybrid app. So let's do it!
Your project comes with a local installation of the latest version of the Cordova CLI, which you can invoke through Gulp. We install it locally, so you don't have to worry about hunting for file, project, and version. The syntax is almost exactly the same as using a global CLI installation. For instance, to install the Cordova camera plugin, run:
gulp --cordova "plugin add cordova-plugin-camera --save"
You want to develop your app for Windows as well? Install the appropriate Cordova Platform requirements and type:
gulp --cordova "platform add windows --save"
Don't forget to call --save in order to persist new plugins and platforms in the config.xml!
Our Development Introduction has a dedicated part on using the Cordova CLI wrapper.
Now that we installed a new plugin, we want to use it! ngCordova is declared as a dependency for every module you create using the generator. Thus you can just start using the plugins right away.
Refer to the main module declaration in your main.js to see how it's done. So in my PhoneCtrl I'll only have to inject the $cordovaCamera service in order to access the plugin and that's all:
      angular.module('main')
.controller('PhoneCtrl', function ($cordovaCamera) {

  var options = {
    destinationType: Camera.DestinationType.FILE_URI,
    sourceType: Camera.PictureSourceType.CAMERA,
  };

  $cordovaCamera.getPicture(options)
  .then(function(imageURI) {
    console.log(imageURI);
  });
});
Adding new plugins has never been so simple!
In some cases you need to extend your ESLint configuration because some plugins expose JavaScript globals that you might want to use (like Camera in the example above). Or you might prefer to access your plugins through the cordova global because ngCordova is not always up to date with the latest plugin versions or may not support the plugin you want to use. In order to use those globals without ESLint complaining, augment the globals section of your app/.eslintrc:
      //..
"globals": {
  "angular": true,
  "ionic": true,
  "localforage": true,
  // add those
  "cordova": true,
  "Camera": true
},
//..
Bower packages
And last, but not least, you'll probably want some more bower packages that go with your app. Maybe your app needs to support different languages. For that, we at M-Way Solutions usually use angular-translate. Install it by running:
bower install angular-translate --save
The --save flag will persist that package in the bower.json. Sometimes to ensure that your changes take effect, it is necessary to restart gulp watch. Then the only thing left to do is to mark the module as a dependency in your main.js module declaration:
      'use strict';
angular.module('main', [
  'ionic',
  'ngCordova',
  'ui.router',
  // add this one
  'pascalprecht.translate'
])
Now you got your translations! Refer to their documentation to learn more.
Browser or device?
Up until now we have only seen our app in the browser using gulp watch. But at least when you are working with plugins you may want to test your app on a device or emulator. If you have your system correctly set up according to the Cordova Platform Guides, this should be easy:
- Connect your device to your machine
- Make sure that device and machine are on the same network
- Start the livereload command and keep it running:
      # run on a connected device with livereload
gulp --livereload "run ios"
# run on an emulator with livereload
gulp --livereload "run --emulate android"
The best part about using livereload is that you can make changes to your code and see the changes immediately on the device (hence the command's being called "live reload"). Just as with gulp watch, but on the device! You'll only have to run the command again if you make changes to the Cordova files (config.xml, Platforms, Plugins).
Your glorious app is ready to be tested on your device!
If you don't want to rely on your development machine to keep the livereload command running, you can run a full build of your app which is then pushed onto your device.
      gulp --cordova "run ios"
# or
gulp --cordova "run android"
Two things happen when you run this command:
- Gulp will build your app using gulp build
- this takes care of all the JavaScript, HTML and CSS and puts it into the www/ folder
- Gulp will call Cordova with the supplied attributes and
- takes the contents of the www/ folder and builds a Cordova app from it
- the app is then pushed onto your device
The implicit run of gulp build, for which Cordova commands it will run as well as build options like minification, are explained in our Development Introduction in more detail.
gulp watch-build
Usually gulp build will build your app without any problems and everything should work just as if you run gulp watch. However sometimes it will be necessary to debug the web app part of your build. Since this is a little cumbersome to do when the app's already on your device, there's a convenient intermediate step:
gulp watch-build
This is just like gulp watch but only for the www/ folder. It builds your app into that folder and then opens a browser windows showing the built version of your app. This allows you do quickly find out why your app doesn't build properly. Adding the --no-build flag enables you to watch the current version in the www/ folder. Of course this command also works with --no-open and all the other flags that work with gulp watch as well.
Ecosystems
I bet you start feeling like a real pro already. And you should! We're getting close to orbit. Although you're more and more becoming a seasoned astronaut, there are some things you just don't want to build yourself every time: push services, user management, or other backend services, for instance.
Luckily there's a series of choices of platforms to handle those tasks for you: the Ionic Platform is popular and feature-rich. It can be integrated into your project using the Ionic CLI as described in the Ionic Platform Integration Guide. For enterprise customers, we offer our Relution Enterprise Mobility Management platform and there are many other options.
The Ecosystems section of our Guides lists some of these platforms with nice set up guides, generated sample code and templates. Most of the work we've done for you already, so focusing on building your app is easier than ever.
Congratulations!
You have conquered app-development-mountain and learned how to season your app with a lot of interesting spices: sub-generators, Sass, plugins, ecosystems and bower packages. Be proud! Ascend your development skills to out-of-this-world levels in part 3 of this series by owning environments, proxies and build tools, handling app icons, splash screens, continuous integration and build variables. And at the very end, see what the future of Generator-M-Ionic has to offer for you!
Get in touch
Feedback, ideas, comments regarding this blog post or any of the features discussed here are very welcome at our Generator-M-Ionic's Github repository or the Generator-M-Ionic Gitter Chat.
Credits
Author: Jonathan Grupp
Headline illustrations: Christian Kahl
Special thanks to Volker Hahn, Mathias Maier & Tim Lancina
Originally published July 6, 2016 on the Ionic Blog in a slightly modified version.
Advance your tech skills today
Access courses on AI, cloud, data, security, and more—all led by industry experts.
