Develop a Microservice Using Ariadne GraphQL with Django
With a robust API, a backend system can serve several frontend clients. They could be web or mobile-based clients.
Oct 19, 2020 • 8 Minute Read
Introduction
Most modern applications are developed in a decoupled manner. The front end and backend are separate applications, often connected via an application programming interface (API). This makes knowledge of APIs and API development paramount.
With a robust API, a backend system can serve several frontend clients. They could be web or mobile-based clients.
This guide assumes you have a basic understanding of APIs and Django web framework and at least intermediate-level proficiency in Python and GraphQL.
An introductory guide on Django can be found here.
Ariadne GraphQL
Ariadne GraphQL is an interpretation of graphql for Python. It was developed by the software house Mirumee. Its main aim was to address the shortcomings of graphene.
To install Ariadne and the GraphQL core, run the command below on your terminal.
pip install ariadne graphql-core
Sample App
For this exercise, you will develop a Django app that displays data from the default Sqlite3 database. The data is a list of schools and their populations.
To get started, start a new Django project by running the below command.
django-admin startproject school_list
Next, create an app and name it school_stats using the below command.
python3 manage.py startapp school_stats
The app is now set up. What remains is to develop the school model, the Ariadne GraphQL schema that consists of queries and mutations and to configure the URL to show the GraphQL playground interface. The code block below shows the model and what fields make up the database table. Copy the code block into the models.py file.
      from django.db import models

class School(models.Model):
   school_name = models.CharField(max_length=20)
   school_population = models.IntegerField(default=100)
   added_on = models.DateTimeField(auto_now_add=True)

   def __str__(self):
       return self.school_name
The model needs data. To add the data, you will need to access the admin panel. This requires superuser access. The next step is to create a superuser account using the following command.
python manage.py createsuperuser
This will be an interactive process where you will give essential details and register your user. For the app and model to be visible, they need to be registered with the Django project and admin.py. To register the app and also Ariadne, a third-party app, add their names to the list of installed apps in settings.py.
Copy the list below to your settings.py and replace the existing list.
      INSTALLED_APPS = [
    'django.contrib.admin',
    'django.contrib.auth',
    'django.contrib.contenttypes',
    'django.contrib.sessions',
    'django.contrib.messages',
    'django.contrib.staticfiles',
    'school_stats',
    "ariadne.contrib.django",
]
To ensure the School model is visible on the admin pane, register it in the admin.py file. Add the code block below to your admin.py file.
      from django.contrib import admin
from .models import School
admin.site.register(School)
GraphQL Schema and Resolver
The first step in developing the GraphQL part is developing the schema. In your schema, you will have a mutation for adding schools, a School input object, a query for viewing schools, and a School object that will be returned as a result of the query. Since the schema is simple, you can do an in-file schema. The code block below defines the schema and assigns the type_defs variable. Within the school_stats app, create a file and name it resolver.py. Add the following block.
      type_defs= """

type Query{
    all_schools: [School]
}

type School {
    id: ID
    school_name: String!
    school_population: Int!

}
type Mutation{
    add_school(input: SchoolInput): SchoolResults

}
input SchoolInput {
    school_name: String
    school_population: Int
}
  type SchoolResults {
        created: Boolean!
        school: School
        err: String
}

"""
GraphQL Query
To set up the query, you need to return data from the model. This requires a query resolver for the query all_schools created in the schema. In your resolver.py file, add the following function.
      from ariadne import QueryType, make_executable_schema, MutationType
from .models import School
query = QueryType()

@query.field('all_schools')
def resolve_schools(*_):
    return School.objects.all()
GraphQL Mutation
Similar to the queries, set up a resolver for the mutation that will create a record in the database.
      mutation = MutationType()

@mutation.field('add_school')
def resolve_add_school(_,info, input):

    school = School.objects.create(school_name=input['school_name'], school_population=input['school_population'])
    return {'created': True, 'school': school, 'err': None}
Make Schema Executable
To execute the schema and make it available for use in the GraphQL playground, add the following line of code.
schema = make_executable_schema(type_defs, query, mutation)
URL Configuration
To configure the URL, configure the main project's urls.py file to direct any traffic to the school_stats app using the path function, as in the code block below.
      from django.urls import path, include
from django.contrib import admin
urlpatterns = [
    path('admin/', admin.site.urls),
    path('', include('school_stats.urls')),

]
Next, create a urls.py file and load the graphQL view and schema to the default URL.
      from django.urls import path, include
from ariadne.contrib.django.views import GraphQLView
from .resolver import schema
urlpatterns = [
    path('graphql/', GraphQLView.as_view(schema=schema), name='graphql'),
    path('', GraphQLView.as_view(schema=schema), name='graphql'),
]
Run the App
When all has been set up, the final step is migrating the changes and running the server. To make migrations, run the command:
python manage.py makemigrations
To migrate the model changes into the default database, run the command:
python manage.py migrate
To start the server and run the app, run the command:
python manage.py runserver
API Screens
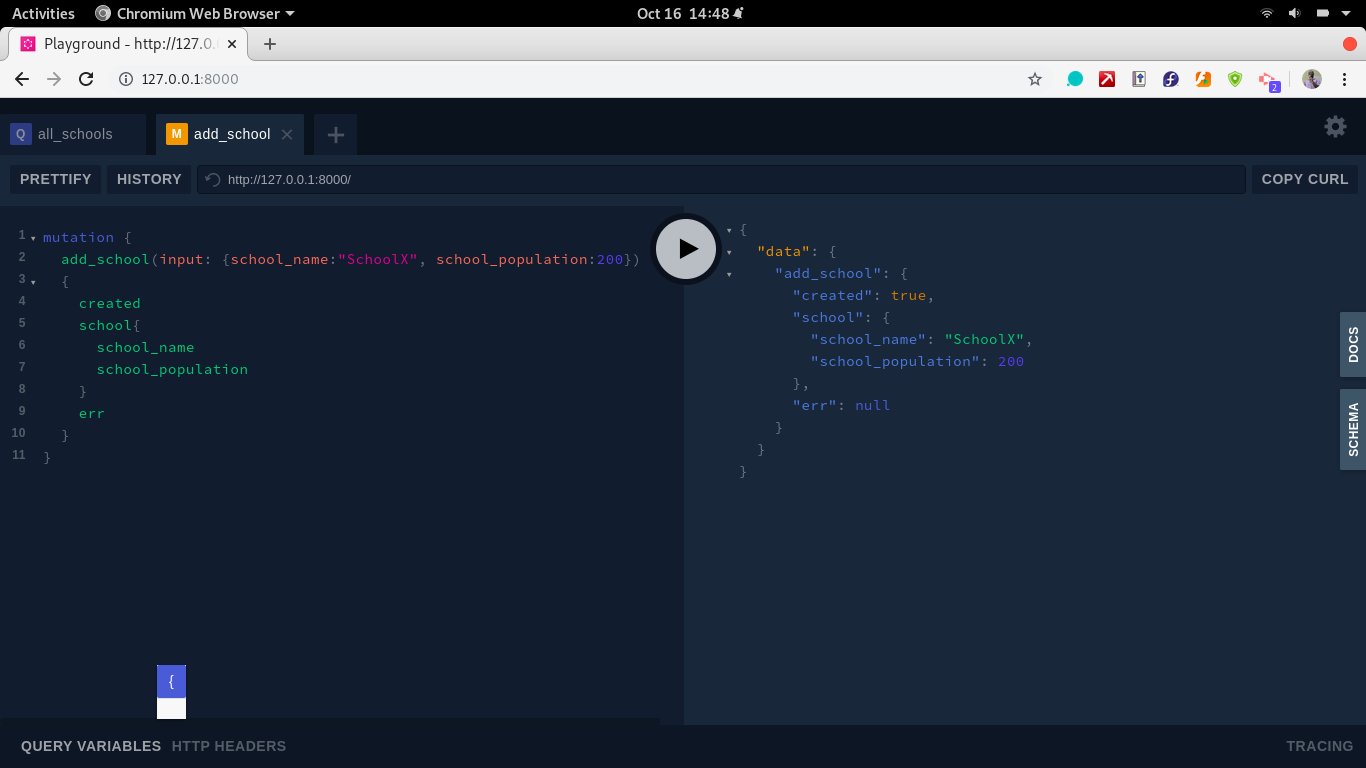
Sample Mutation
In the GraphQL playground, execute the below mutation to create a record. To create more records, change the variables.
      mutation {
  add_school(input: {school_name:"SchoolZ", school_population:330})
  {
    created
    school{
      school_name
      school_population
    }
    err
  }
}
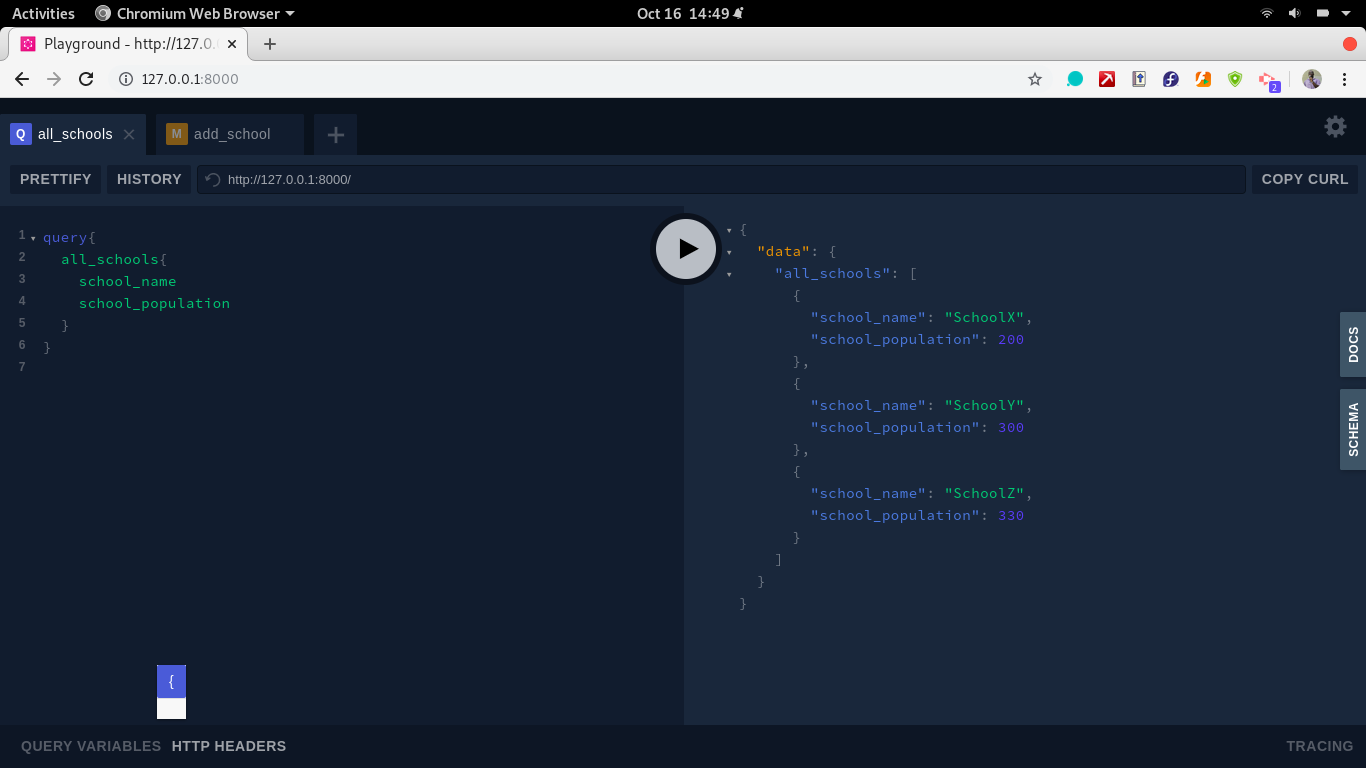
Sample Query
      query{
  all_schools{
    school_name
    school_population
  }
}
Conclusion
The vital skill of API development can be applied in job positions such as backend developer, API/middleware developer, and full stack developer.
Ariadne GraphQL is a relatively new package, and it has some interesting use cases. To further build on these basics, follow these Django integration and Flask integration guides to learn how to use Django, Flask and Ariadne GraphQL to develop a microservice.
Advance your tech skills today
Access courses on AI, cloud, data, security, and more—all led by industry experts.
