Sharing Excel Workbooks
Learn how to protect an Excel file, address accessibility issues, and control what changes people can make to it before you share it with them.
Sep 14, 2020 • 6 Minute Read
Introduction
If you have been working on Windows OS, then you must have found yourself working in Microsoft Excel at least once. Excel is used not only by accountants, statisticians, and analysts, but regular computer users, too. If you have never worked in Excel, Pluralsight provides you a lot of courses as well as written content that can get you started with it.
As a prerequisite for this guide, it is assumed that you have a basic working knowledge of Excel. In this guide, you will learn how to protect a file and control what changes people can make to it before you share it with them.
Inspecting your Document
In this section, you will learn to identify issues with your file, reveal hidden content, and check the compatibility of your file with other Excel versions.
Checking Accessibility
Assume you have an Excel file (.xlsx) consisting of two sheets.
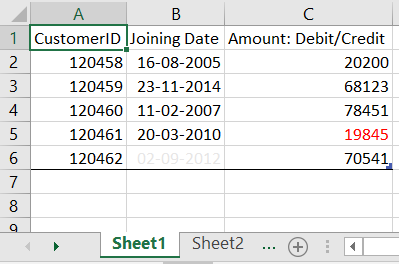
The data in Sheet1 is in a table format and the last column's cells are in Numbers format. With a quick glance, you can see that cell B6 has a problematic color contrast and cell C5 is missing a minus sign and instead uses red to indicate a negative number. To list all such issues automatically, you can use the Check Accessibility feature provided by Excel under the path File -> Info -> Check for Issues.
Here's the report of Check Accessibility feature on this file:
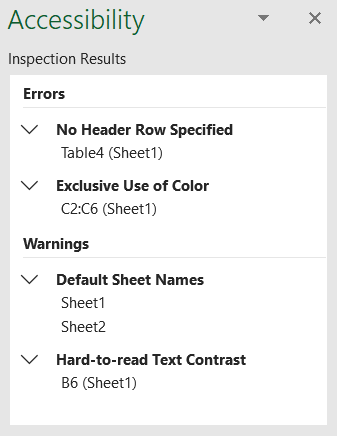
As you can observe, there were not only those two issues, but also the table has no specified header row and both the sheets have default names. If you have formatted your data this way intentionally, then you can proceed to share the file with others. Otherwise, you can work on the issues listed under the inspection results.
Inspecting Document for Hidden Content
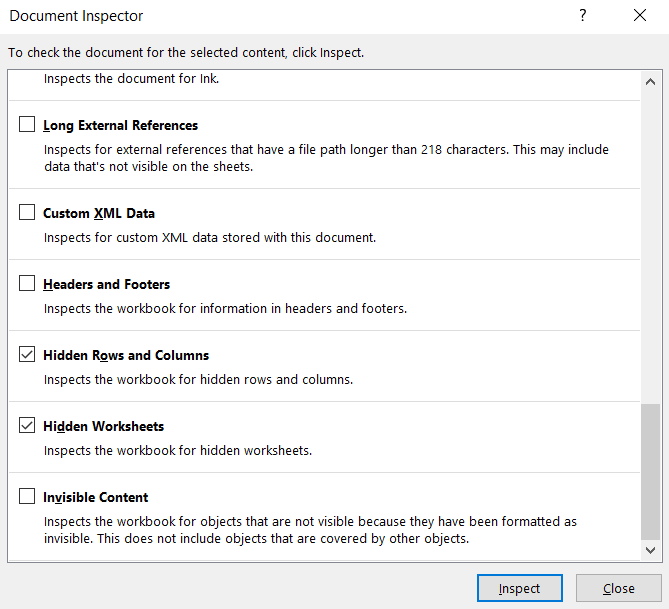
If you have received an Excel file and need to list out all of the hidden content, then you can use the Inspect Document feature available in the same path discussed above.
Consider the same file from the previous section but modified as follows:
- Column Joining Date is hidden
- Rows 3 and 4 are hidden
- Sheet 2 is hidden
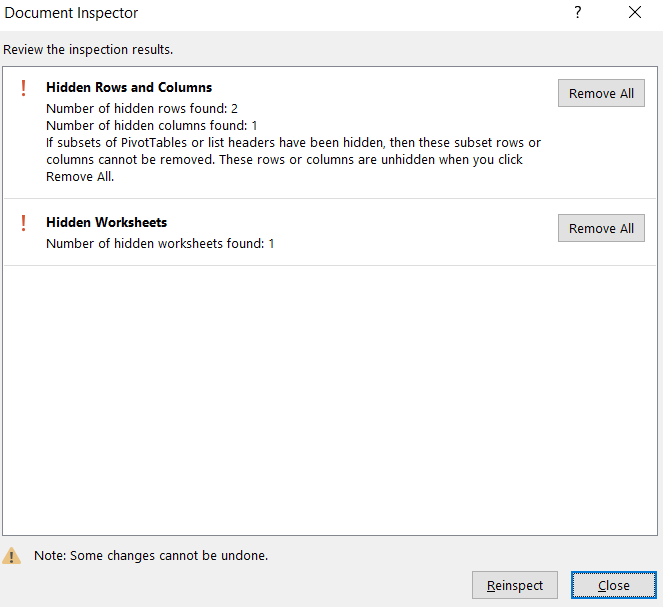
To reveal all of the above, hidden content, select Hidden Rows and Columns and Hidden Worksheets from the Document Inspector dialog box available after you click on the Inspect Document feature.
Click Inspect, which will reveal the information regarding the hidden content as shown below:
Checking Compatibility of the File with Other Excel Versions
Sometimes your audience doesn't have the same Excel version as you. To make sure that important information is not lost, you can use the Check Compatibility feature.
Here're the results of this feature on the previously modified file with hidden content:

Protecting Your Workbook
In this section, you will learn various ways to protect your workbook when others have access to it. The features in this section are available under the path File -> Info -> Protect Workbook.
Marking your File as Read-Only or Final
If you have created a file that you are about to share with others and want no editing from their end, you can mark the file as read-only by selecting the Always Open Read-Only feature. This will allow others to view it but perform no actions such as copying, deleting, or adding new content to the file.
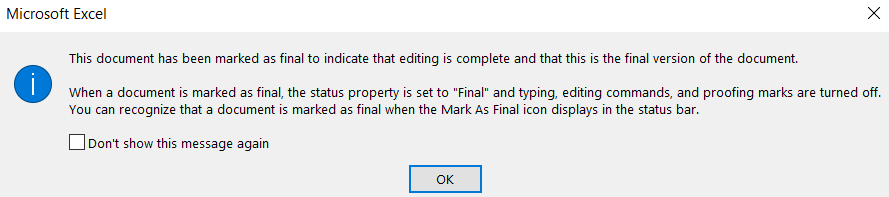
On the other hand, if you have made a final version of your file, select Mark as Final. This will pop-up the following dialog box stating that no more edits will be performed in the file:
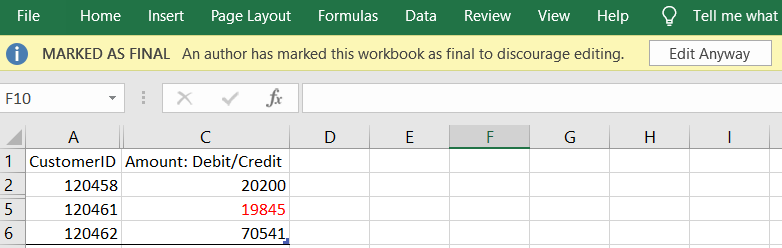
Once you click OK, you will notice a yellow header on the top of your sheet:
You can also mark a document as both read-only and final. Here's what its Info menu would look like:
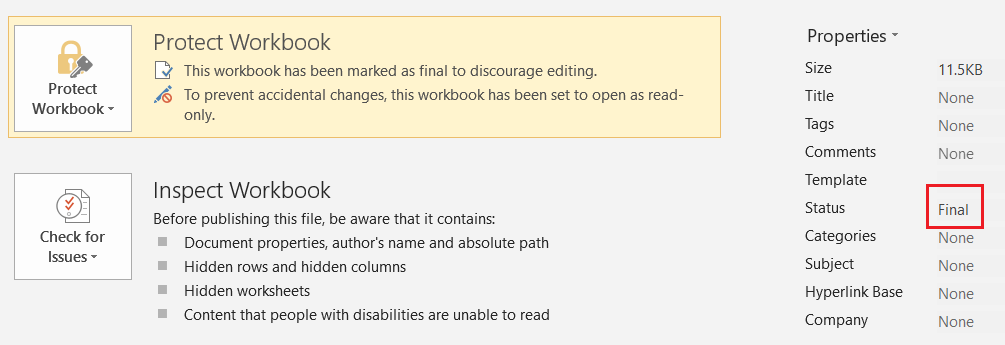
In the above image, notice that the Status property has been assigned with a value Final.
Securing Your File with a Password
When you want to share a file containing sensitive information, you can always protect it by applying a password.
Select the Encrypt with Password feature under the Protect Workbook menu and enter your password. Excel will ask you to enter the same password one more time for confirmation. Remember, your password is case-sensitive, so be careful about uppercase and lowercase letters.
To remove the password, click the Encrypt the Password feature. A dialog box will appear with your existing password. Delete the complete password and click OK.
Protecting your Workbook Structure
If you want other people who have access to your file to add content to existing sheets without adding new sheets or deleting the existing ones, you can apply the Protect Workbook Structure feature, which will ask for an optional password. To remove this feature, once again click on it and all workbook structure related restrictions will be removed.
Conclusion
In this guide, you have learned a few ways to protect an Excel file before sharing it with others. You also learned how to identify potential issues with your files, such as hidden information, accessibility issues, and much more. To learn more on this topic, head over to the Distributing Excel Workbooks course available on Pluralsight.
Advance your tech skills today
Access courses on AI, cloud, data, security, and more—all led by industry experts.
