Getting Started with Image Classification Using Google Teachable Machine
This guide will use Google Teachable Machine to build a simple image classification script in Python.
Sep 18, 2020 • 7 Minute Read
Introduction
Image classification is an increasingly lucrative sector in the general computer vision space. More and more business use cases are being discovered and datasets built. Such use cases range from agriculture to healthcare and many more verticals. Some image datasets can be explored in the kaggle repository.
This all means that there is an increased demand for practitioners with knowledge of image classification services. To bridge the gap, many services, mainly cloud-based, have been developed to do the heavy lifting for developers in terms of developing an image classification machine learning (ML) model. Some, such as Google's Teachable Machine, give you, the developer, a level of configurability, while others provide their services via an API. These include Google's Cloud Vision, Imagga, and IBM Watson, among others.
This guide will use Teachable Machine to build a simple image classification script in Python. It assumes that you have at least intermediate level knowledge of Python, working knowledge of keras, and beginner knowledge of machine learning for image classification.
Google Teachable Machine
Google's Teachable Machine is a web-based resource for training and developing ML models for image classification, sound classification, and pose classification for full-body poses. The resource allows you to either export your model for use in your app or publish it online where Google hosts the model for free and provides a URL.
Sample App
In this guide, we will consider a sample use case of plant disease classification. Consider a scenario where you would like to develop an application to help maize farmers identify the type of disease affecting their maize crops.
Practice Dataset
We will use a free dataset from Kaggle that can be found here.
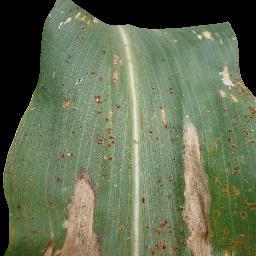
Sample image of common rust on a maize leaf
Generating the Image Classification Model
On the train page, select image project since you are dealing with image classification.
The next interface is very intuitive. You have a minimum of two classes in which you can either turn on the webcam and record pictures of the items you wish to classify or upload images.
Each class should be correctly labeled in the class placeholder. In some cases, there may be more than two classes. To add more, click the Add a class button.
In the maize farmers scenario, you will have four classes: The healthy class, the northern leaf blight class, the common rust class, and the gray leafspot class.
Machine learning is as good as the data input. For this reason, upload as many images per class as possible from the train/ folder of the plant diseases dataset. Be certain that the images and class names correspond and are correct.
After uploading training images and annotating the class names, click the train model button and await results. You can open the Advanced tab and tweak parameters such as learning rate to your liking and gauge if this improves the performance of the model.
Finally, preview your model by clicking the preview button and uploading a test image to confirm whether the model performs as expected.
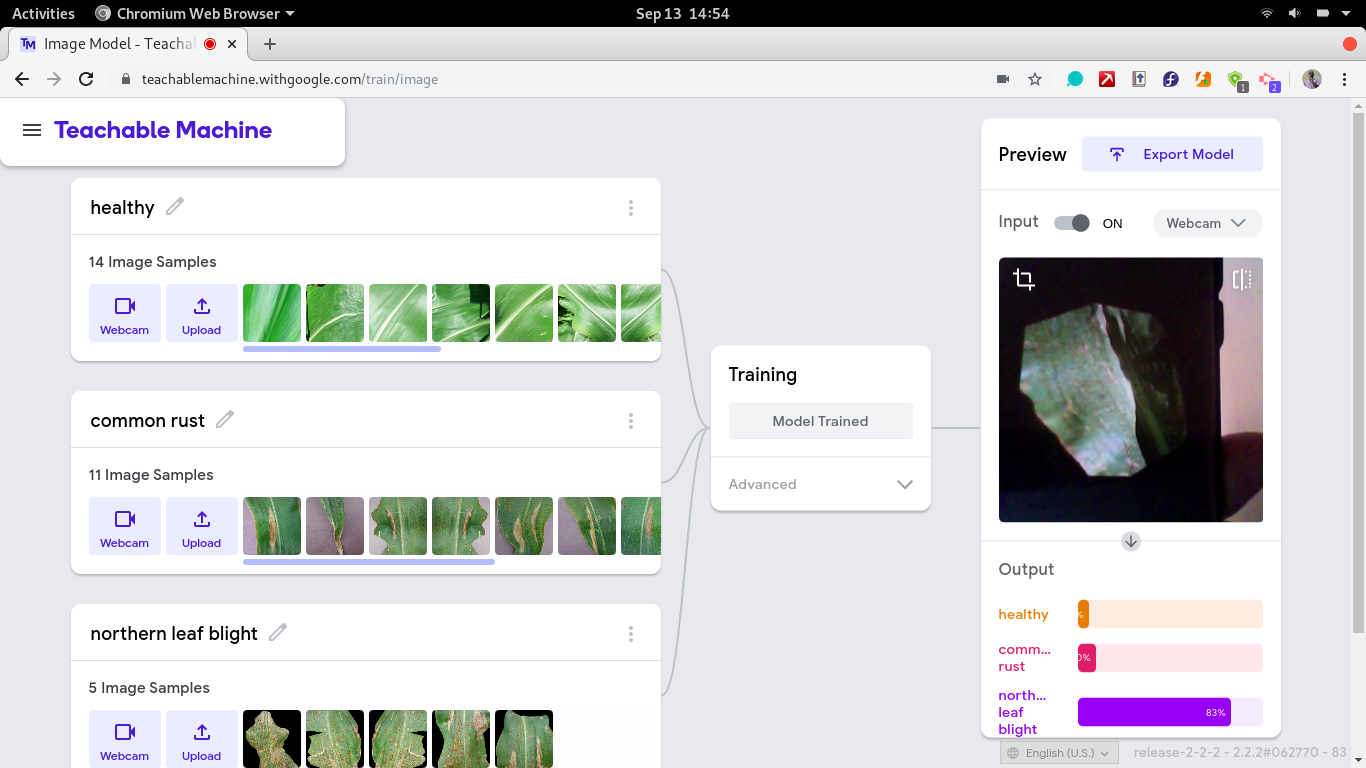
To use the model in your application, you can either upload it and host it online or download the model weights. For this guide, download the model weights file.
Python Script
Once you have the weight file in .h5 format, the next step is to develop a script that will take an image and use the model to predict the class the image belongs to. Below is a sample script provided by the Teachable Machine team.
      import tensorflow.keras
from PIL import Image, ImageOps
import numpy as np

# Disable scientific notation for clarity
np.set_printoptions(suppress=True)

# Load the model
model = tensorflow.keras.models.load_model('keras_model.h5')

# Create the array of the right shape to feed into the keras model
# The 'length' or number of images you can put into the array is
# determined by the first position in the shape tuple, in this case 1.
data = np.ndarray(shape=(1, 224, 224, 3), dtype=np.float32)

# Replace this with the path to your image
image = Image.open('test_photo.jpg')

#resize the image to a 224x224 with the same strategy as in TM2:
#resizing the image to be at least 224x224 and then cropping from the center
size = (224, 224)
image = ImageOps.fit(image, size, Image.ANTIALIAS)

#turn the image into a numpy array
image_array = np.asarray(image)

# display the resized image
image.show()

# Normalize the image
normalized_image_array = (image_array.astype(np.float32) / 127.0) - 1

# Load the image into the array
data[0] = normalized_image_array

# run the inference
prediction = model.predict(data)
print(prediction)
Source: Teachable Machine
Since the model predicts using values, the download also consists of a file denoting what each value represents. For example, 0 may represent class 1, 1 class 2, and so on.
Conclusion
You have now developed a skill in image classification. This is vital in any role that involves the development of computer vision-based applications or services. To further build on this guide, explore Teachable Machine for audio and pose classification.
For practice, fully develop the script in this project and convert it to a web-based project using either Flask or Streamlit. A code along with a github repo for this project can be found here, and a working version of the app can be found on the web.
Advance your tech skills today
Access courses on AI, cloud, data, security, and more—all led by industry experts.
