Getting Started with PubNub BLOCKS
Learn how Pubnub BLOCKS handle server operations in real-time applications and serverless functions in this tutorial. Get familiar with the PubNub console and more!
Jan 10, 2019 • 29 Minute Read
Introduction
Serverless architectures are a popular trend right now.
When thinking of serverless computing, names like Amazon AWS Lambda or Windows Azure Functions may come to mind, but there are many other companies also focusing on this model. Take PubNub, for example.
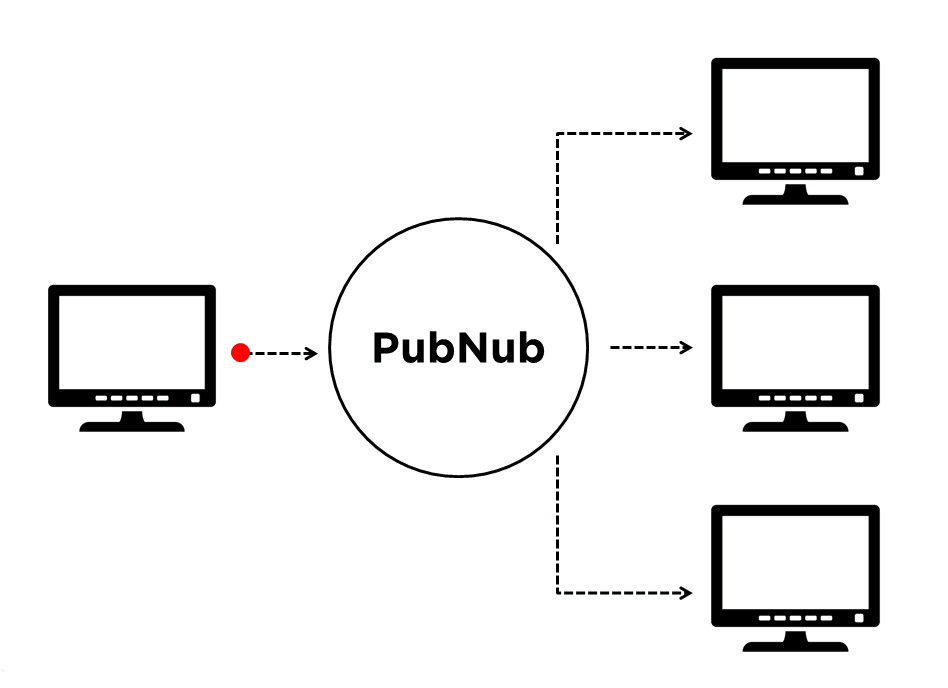
PubNub allows you to build real-time applications by providing APIs for publish/subscribe messaging, online presence detection, and mobile push notifications among other features.
Using PubNub, you can publish a message (data) into channels so the applications or devices subscribed to that channel receive the message in real-time:
That works great, and many times, that would be all you need for your real-time applications.
However, what if we need to process the message before or after we send it? We will have to add a server to be in charge of that processing. The result would look something like this:
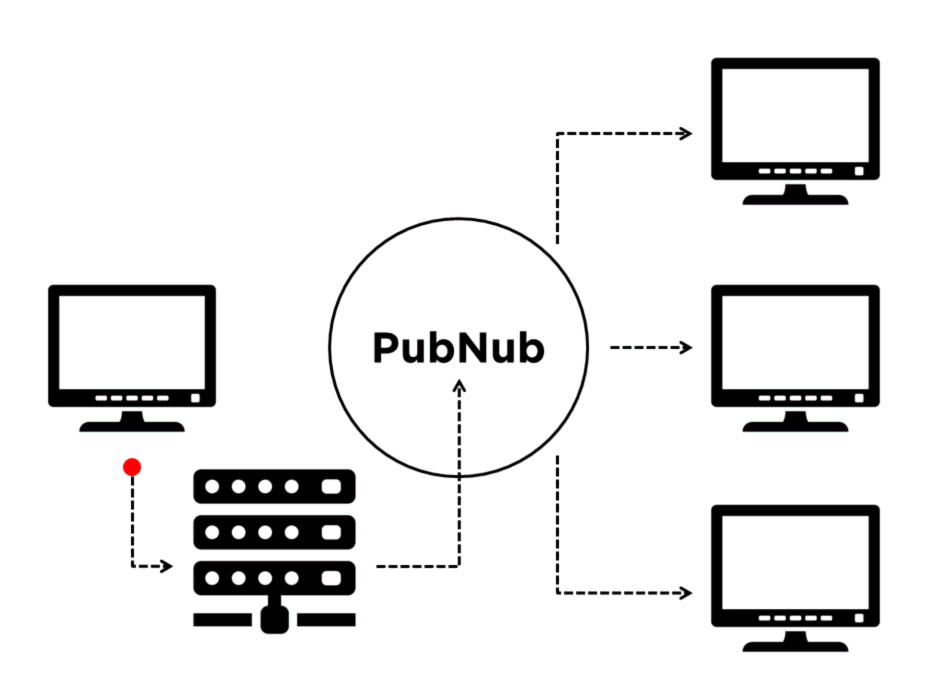
This might not be an issue for applications that need servers anyway. But, wouldn't be great if someone else could take care of problems like server management and scaling entirely?
That is where PubNub BLOCKS enters the equation.
Sending Data with BLOCKS
With BLOCKS (in uppercase to refer to the PubNub feature), instead of simply passing messages, you can set up a piece of code (an event handler) to process a message before or after it's published:
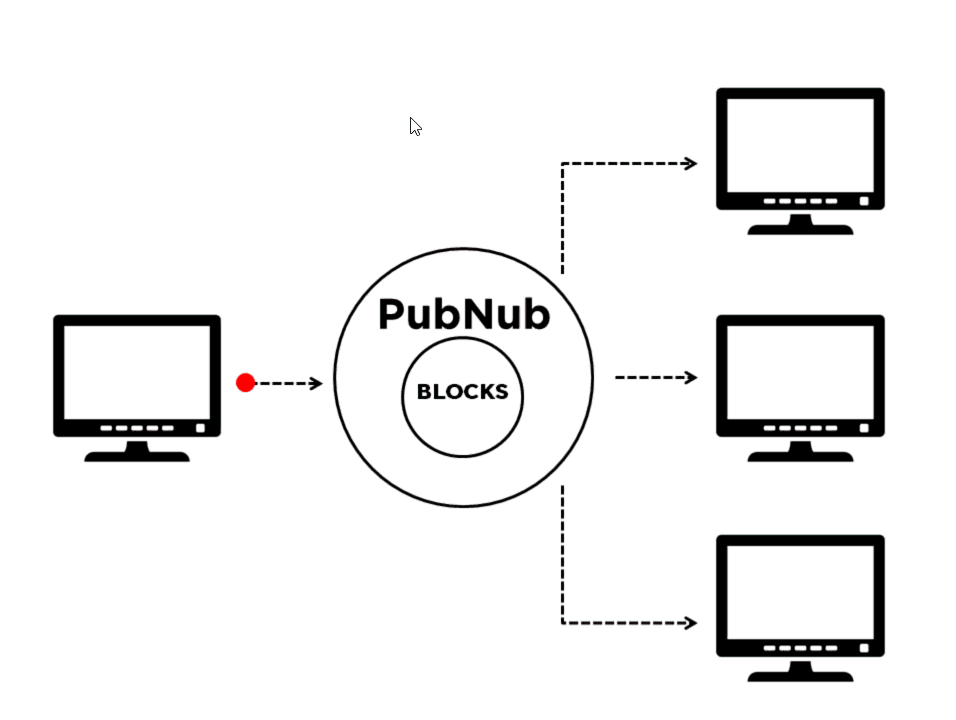
This block is deployed as a serverless function, or a microservice, in the PubNub network. You simply have to create it in JavaScript, deploy it, and PubNub will handle the rest.
Here are some things you can do with a block:
- Alter the message by adding a new attribute, or modifying or deleting an existing one.
- Call a web service.
- Store and retrieve data in a key-value store.
- Chain and forward messages between BLOCKS.
There's even a catalog of pre-built blocks that allows you to integrate the functionality of external APIs for things like notifications, geocoding, machine learning, and much more.
Let's get to know the concepts and features of BLOCKS with two examples. As an easy example, let's create a block to reverse strings. After that, we'll build a more complex block that takes a URL and calls an API to generate a QR code to return its base64 representation, storing the result in a database to only call the API when necessary.
Let's get started!
Creating your first block
Log into your PubNub account or sign up if you don't have one.
In your dashboard, create a new app and give it a name:

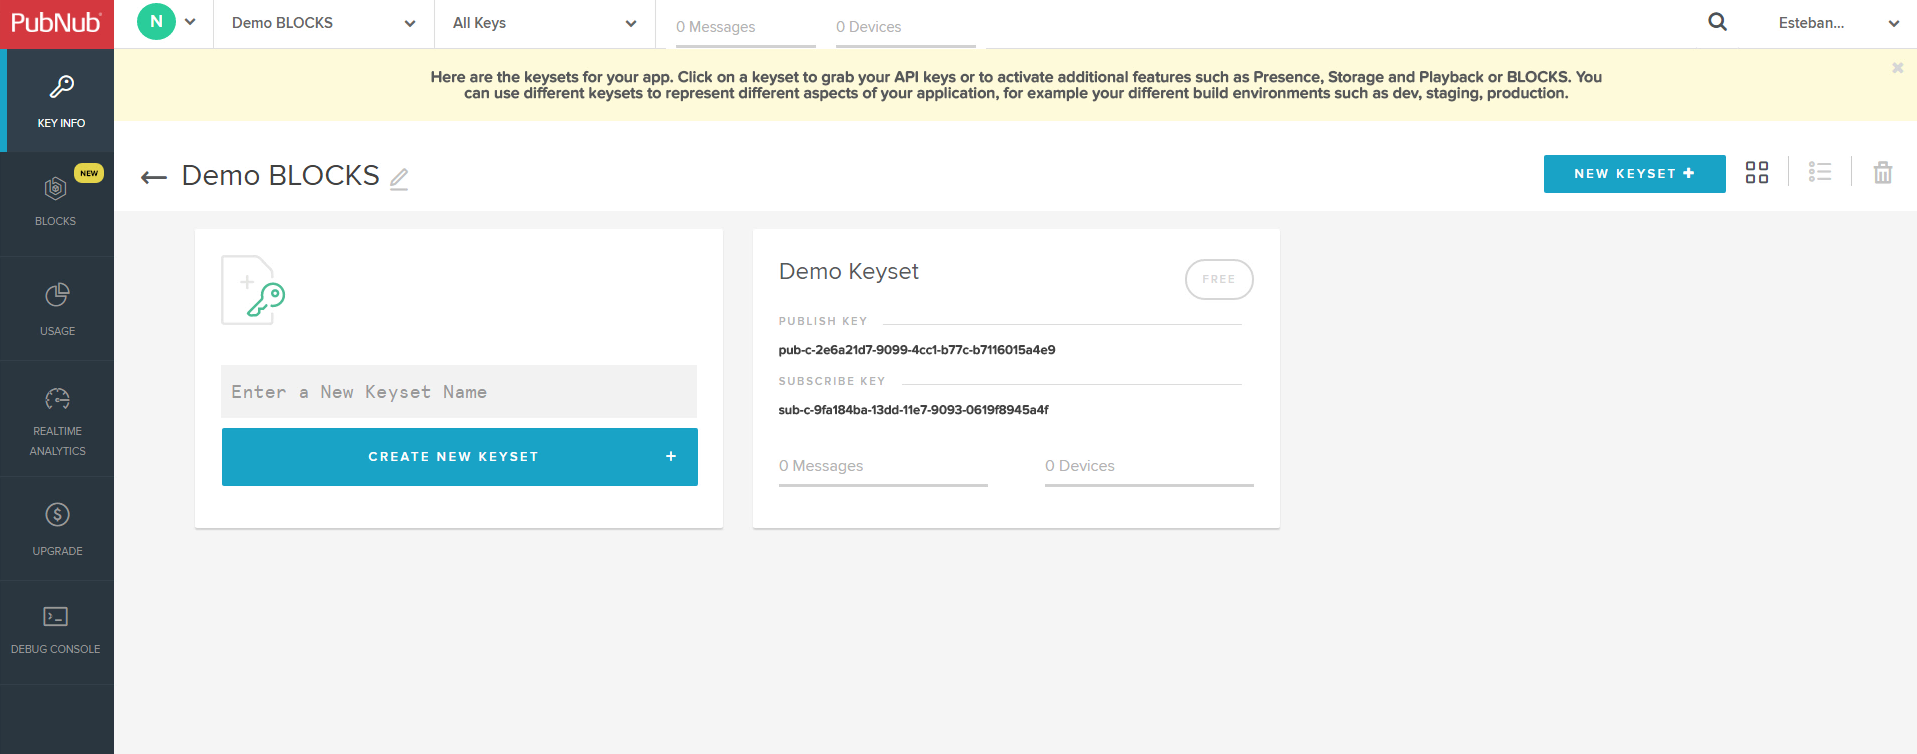
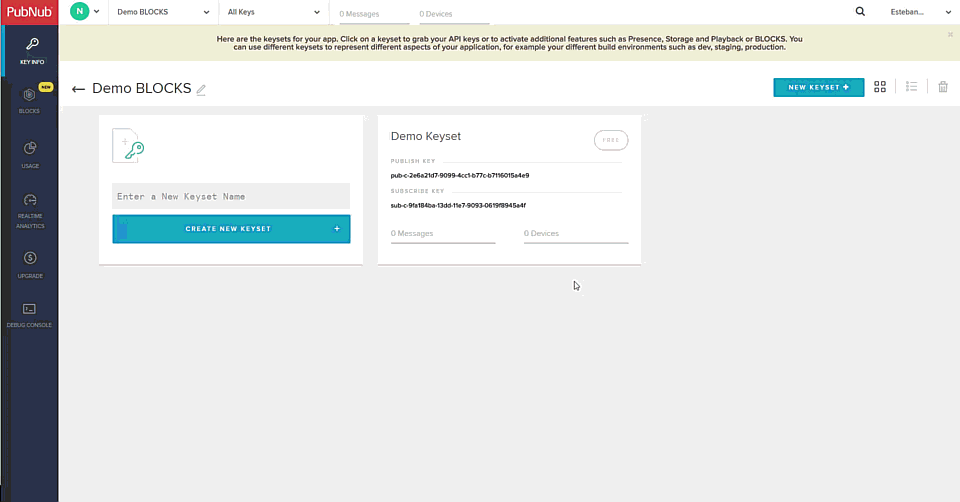
Click on the app to show the key information that is created automatically (you can create another keyset if you want):
Now, the first thing you need to do is enable the BLOCKS functionality on a keyset. Click on the keyset, scroll down to Application add-ons, enable the PubNub BLOCKS option and save the change:
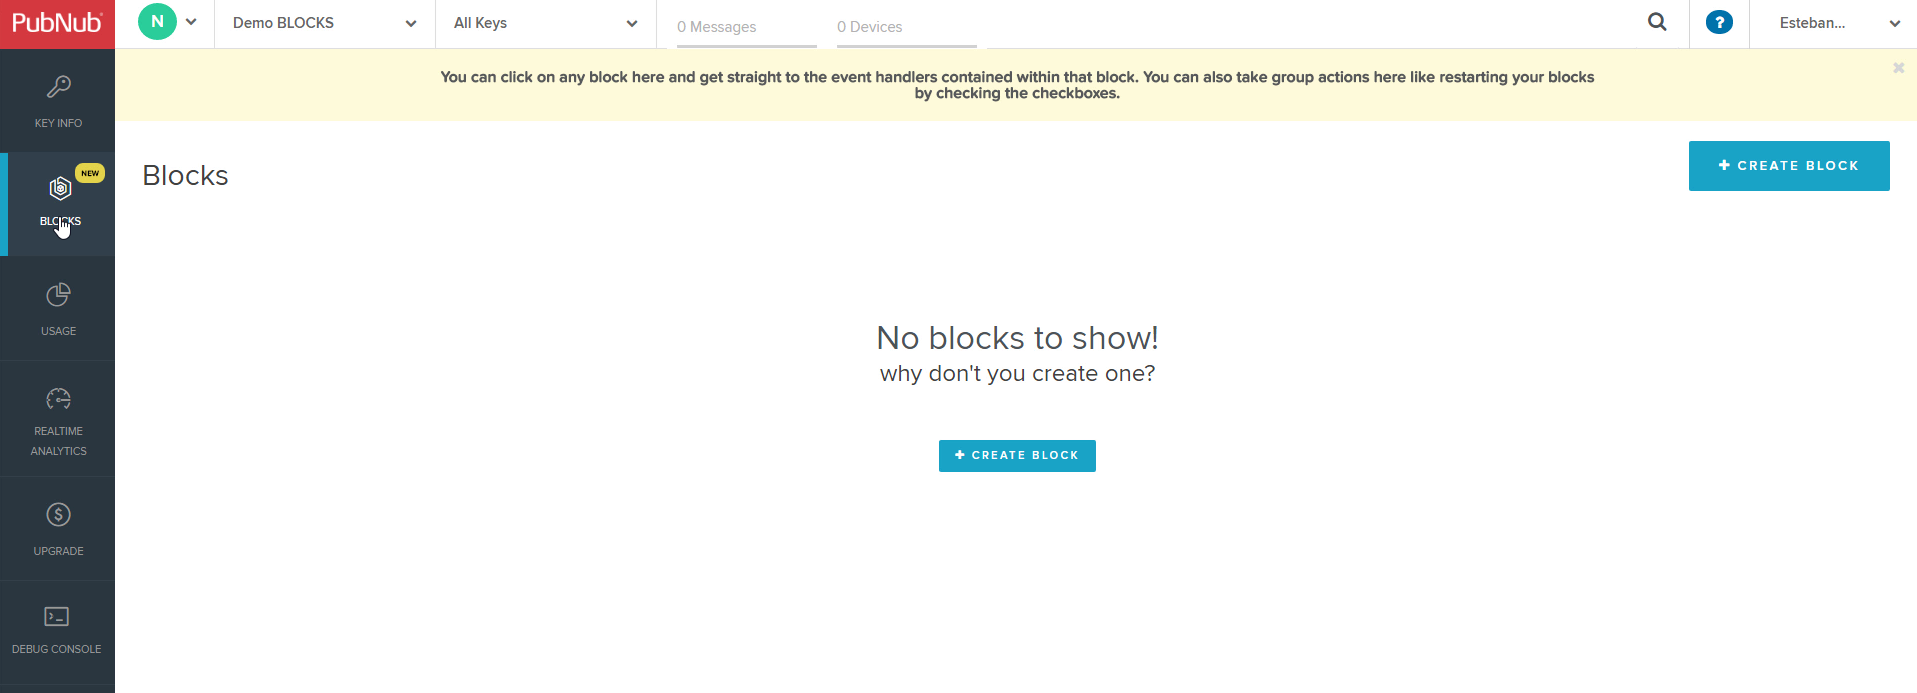
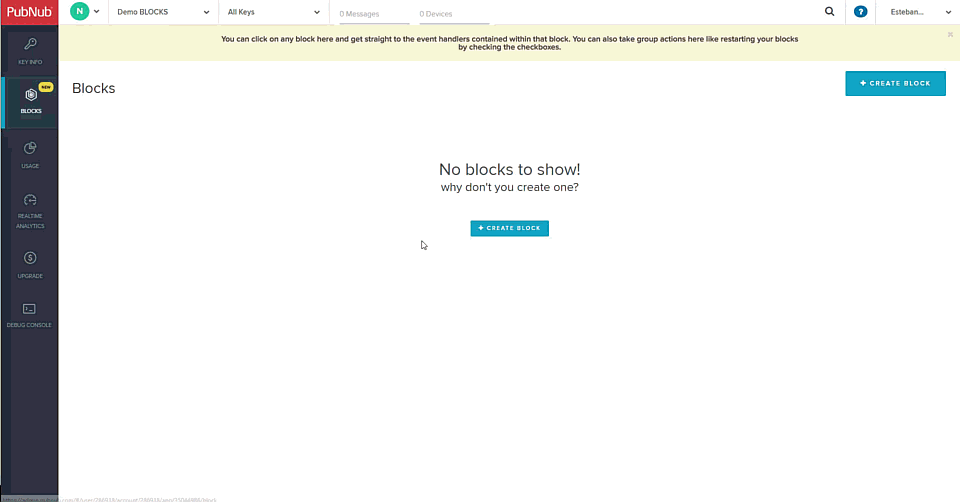
Next, choose BLOCKS on the left menu. The following screen will be shown:
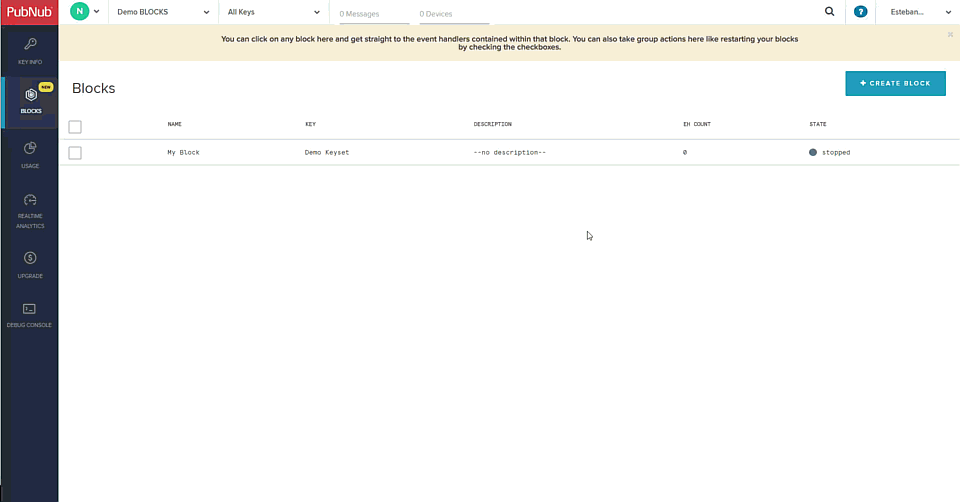
Click on Create Block, enter a name and a description (optional), choose the keyset where you enable the BLOCKS functionality, and click Create. Your chosen name must be unique for all BLOCKS under the given keyset.
The result looks like this:
Event Handlers
A block acts as a container for Event Handlers (EH). An Event Handler contains the JavaScript program that will run against the message.
Let's create one. You'll have two options, create the EH manually or from some pre-defined templates. Let's choose the latter option for now. Click on the block row and then on Guide me:
In the window that shows up, you'll have to enter a name, a type, and the channel where the messages on which the EH will be triggered will be sent:
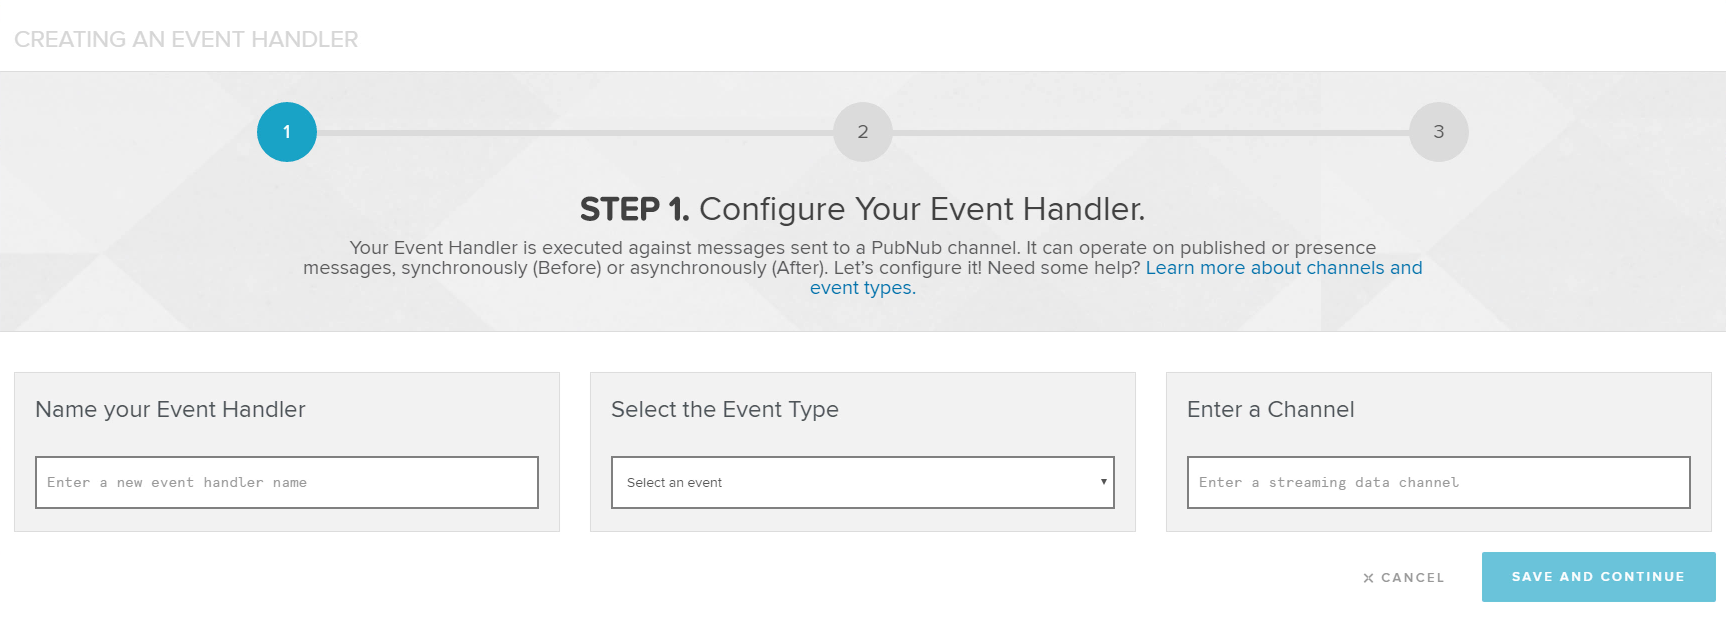
Three types of Event Handlers are supported:
- Before Publish or Fire. Messages are processed by the EH code before they are forwarded on to subscribers of the channel in a synchronous (blocking) way.
- After Publish or Fire. Messages are delivered to subscribers in parallel to the EH code running against the message in an asynchronous (non-blocking) way.
- After Presence. When a presence event is triggered, a copy of the same presence event is made available to the associated EH code for processing in an asynchronous (non-blocking) way. You can know more about Event Handler Types and its rules and limits here.
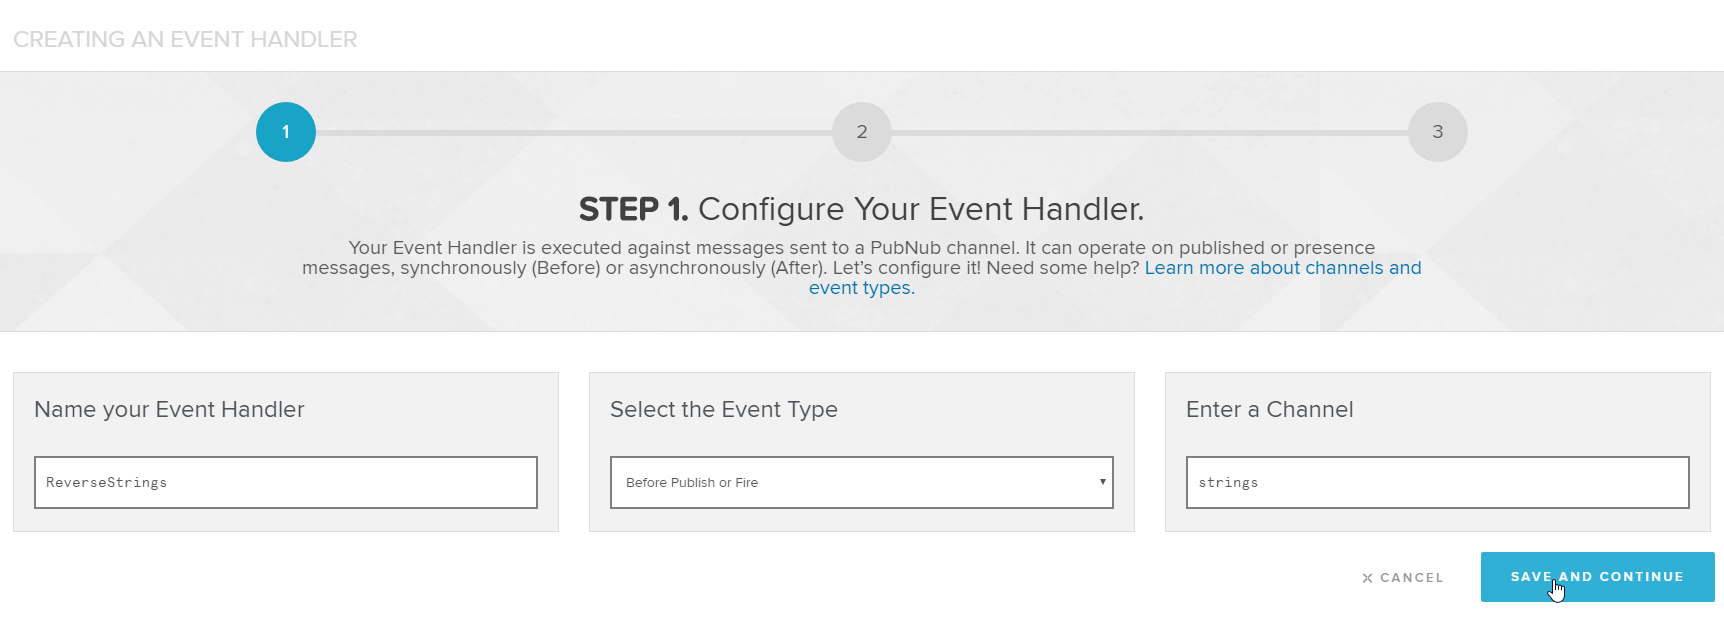
For our example, let's choose Before Publish or Fire as the event type, the channel strings and then click on Save and Continue:
Next, and depending on the chosen event type, some code sample for different use cases will be shown:
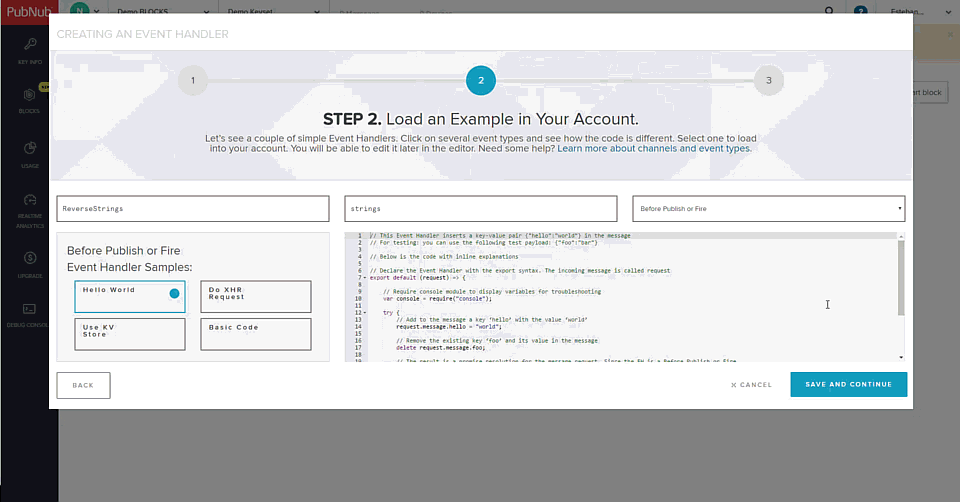
Choose the Hello World sample and confirm your choices to start editing:
Coding your first block
Let's start by analyzing the code of the Hello world example.
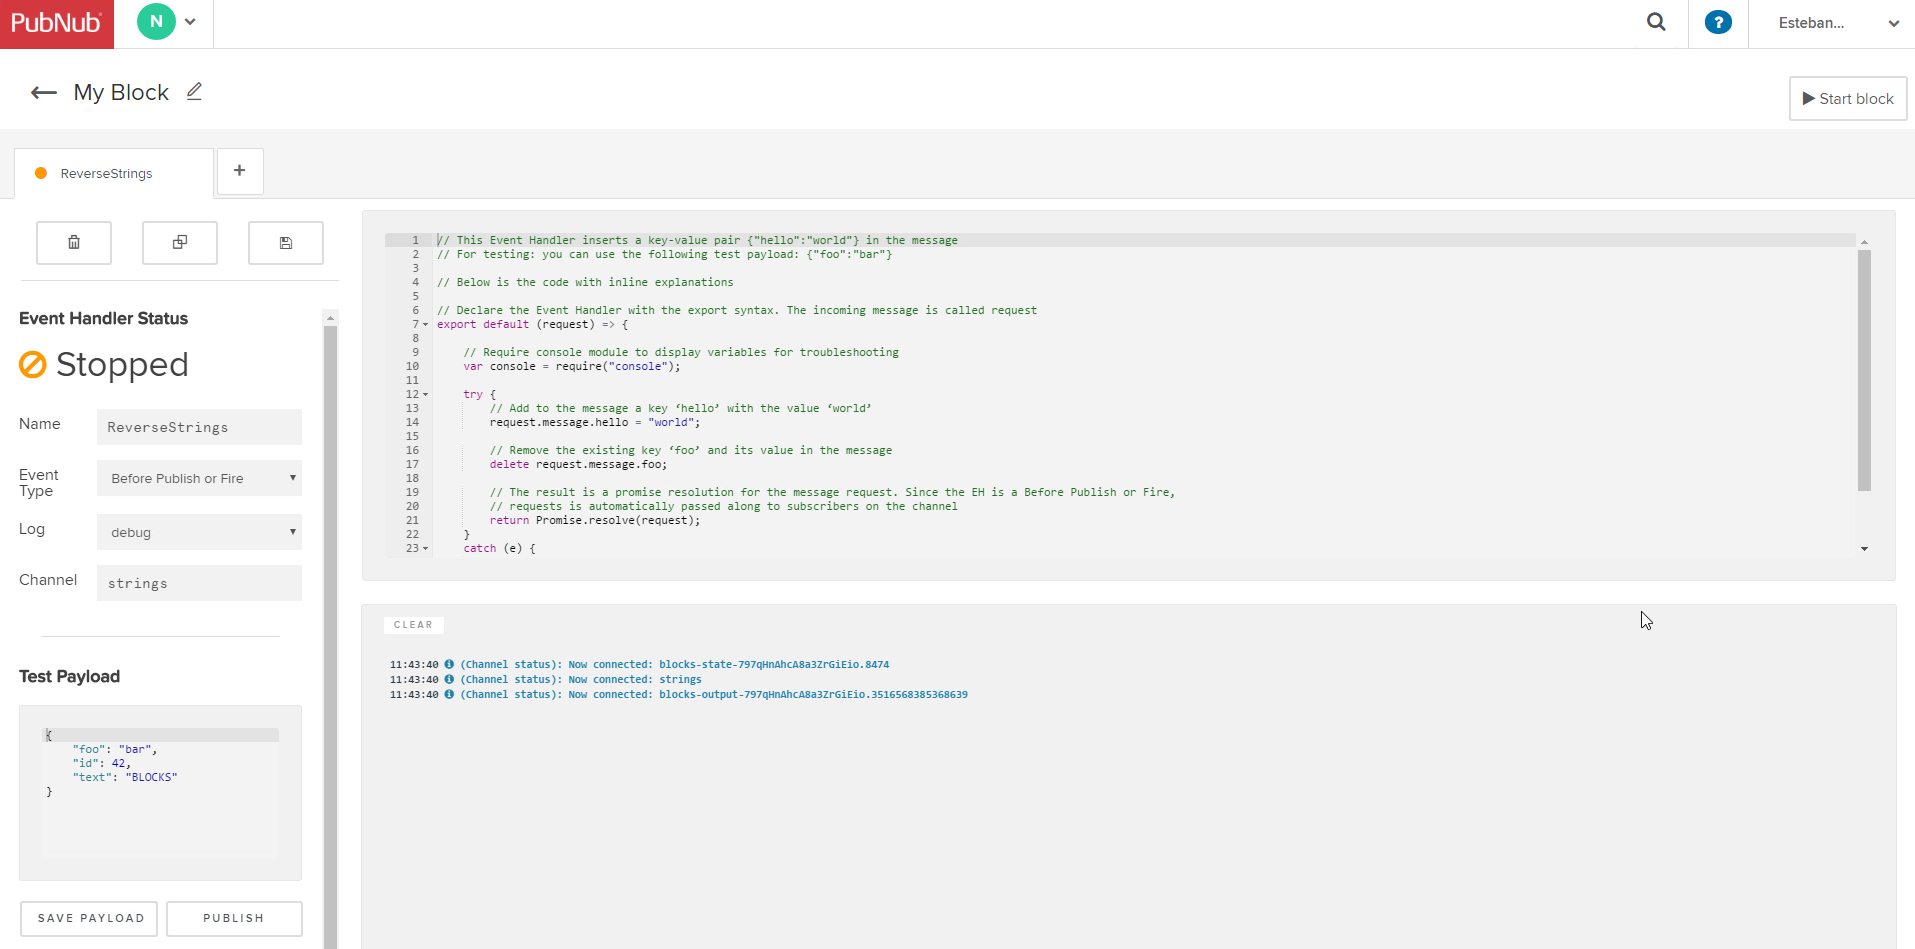
An Event Handler is implemented as a JavaScript module with a default export function:
      export default (request) => {
    ...
}
This function takes in a request object that has a message attribute as its parameter, and it must return either the request object or a promise that resolves to the value of the request object:
      export default (request) => {
    ...
	// Either of the following are valid return values:
	// return request;
	// return request.abort(); (returns a promise that resolves to the value of the request object, with an error code)
	// return request.ok(); (returns a promise that resolves to the value of the request object)
	return Promise.resolve(request);
}
Using CommonJS's require syntax, you can use modules to add functionality to your program:
      export default (request) => {
    var console = require('console');
    ...
}
Currently, the following modules are supported:
- Advanced Math. Global (lat-long) coordinate and geometry functions.
- Codec/auth. An encoder for HTTP basic auth credentials.
- Codec/base64. An encoder and decoder for Base64 strings.
- Codec/query_string. An encoder and decoder for URI query parameters.
- Console. The equivalent to the console object found in many Javascript frameworks.
- Crypto. Module that handles encryption and decryption operations on messages in an Event Handler.
- KV Store. Module that handles interactions with the Key/Value Store. The Key/Value Store that acts as a database for your block. This database is globally distributed and eventually consistent. Data in the KV DB is shared at a subscriber key level.
- PubNub. The PubNub module allows you leverage some of the other native client SDK features supported by the PubNub Data Stream Network. Currently, publish, time and fire are supported.
- Utils. A module containing basic helper methods to generate random numbers and check if a variable is a number.
- XHR. Module that sends HTTP(S) requests to a remote web server and loads the response data back to the Event Handler.
You can add properties to the message:
      export default (request) => {
    ...
	request.message.hello = "world";
	...
}
Or remove a property:
      export default (request) => {
    ...
	delete request.message.foo;
	...
}
All right, now that we know how the code works, let's add the property reverseStr to a message like the following:
      {
    "str": "bar"
}
For simplicity, we'll use a naive technique to reverse the string. The final code should look like this:
      export default request => {
  // Require console module to display variables for troubleshooting
  var console = require("console");

  try {
    // Add to the message a key ‘hello’ with the value ‘world’
    request.message.reverseStr = request.message.str
      .split("")
      .reverse()
      .join("");

    // The result is a promise resolution for the message request. Since the EH is a Before Publish or Fire,
    // requests is automatically passed along to subscribers on the channel
    return Promise.resolve(request);
  } catch (e) {
    // Handler error
    console.error("Uncaught exception:", e);
  }
};
Now, save the code by clicking the save button at the top-left, click the button Start block at the top-right corner and test the block with a sample payload by clicking the Publish button at the bottom:
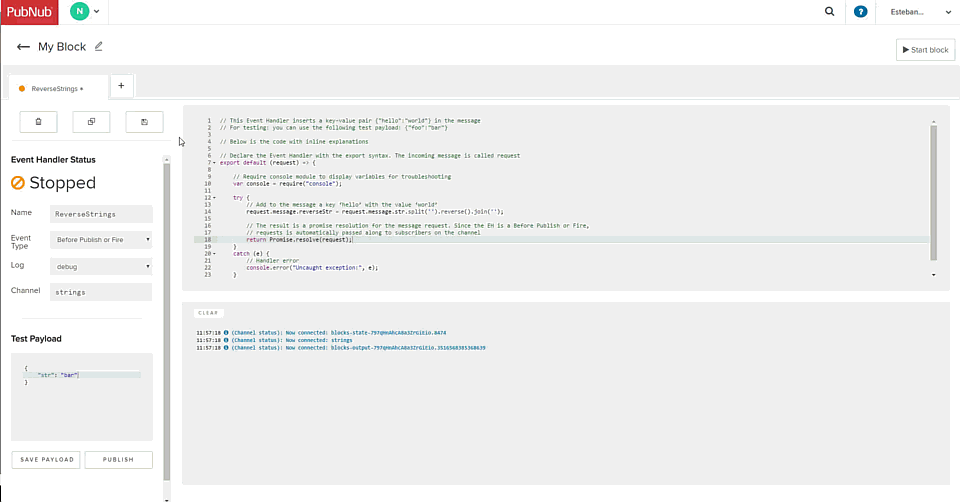
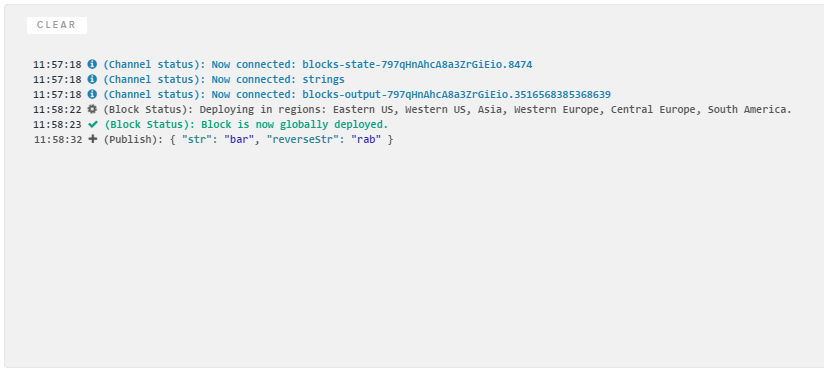
The output will be shown in the console:
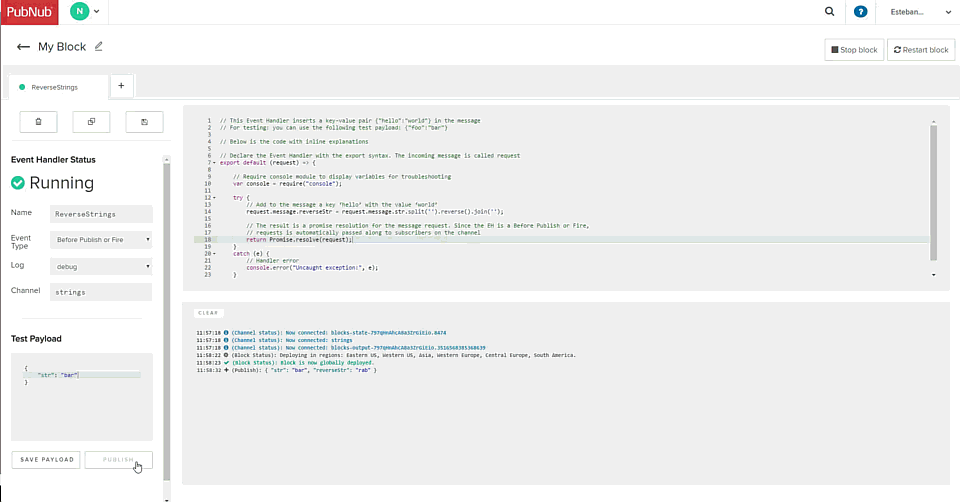
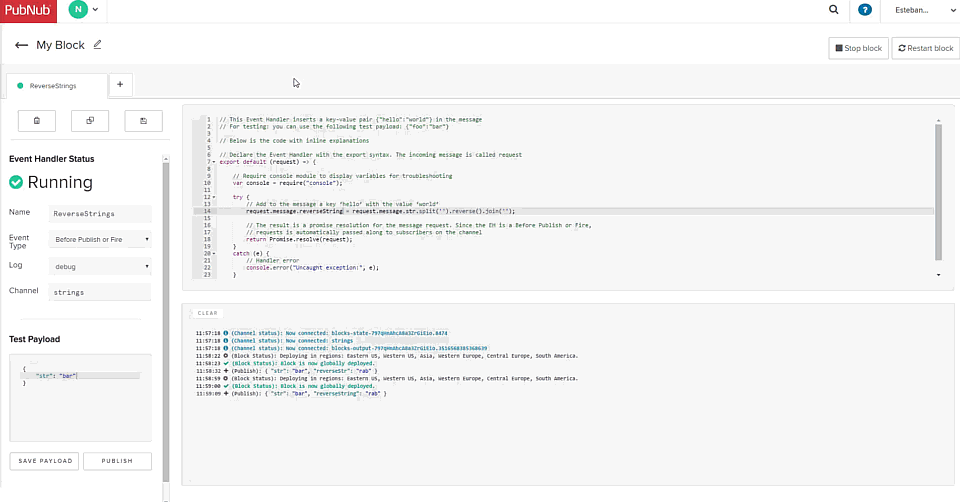
If you modify the code, you'll have to save and restart the block:
We can also create a simple HTML page with some JavaScript code to test our block. Save this code as an HTML file. Make sure to include your PubNub info where necessary:
      <!DOCTYPE html>
<html>
<head>
	<meta charset=utf-8 />
	<title>PubNub</title>
</head>
<body>
	<input id="txtStr" type="text" />
	<button id="btnPublish">Publish</button>
	<br/><br/>
	<div id="reversed"></div>

	<!-- Include the PubNub Library -->
	<script src="https://cdn.pubnub.com/sdk/javascript/pubnub.4.5.0.js"></script>

	<script type="text/javascript">
		// Using Immediately-Invoked Function Expression (IIFE) to limit variable scope
		(function() {
			var CHANNEL = 'strings';
			var txtStr = document.getElementById('txtStr');
			var btnPublish = document.getElementById('btnPublish');
			var reversed = document.getElementById('reversed');

			<!-- Instantiate PubNub -->
			var pubnub = new PubNub({
				publishKey: 'YOUR_PUBLISH_KEY',
				subscribeKey: 'YOUR_SUBSCRIBE_KEY'
			});

			// Subscribe to the demo_tutorial channel
			pubnub.addListener({
				message: function(messageObj){
					var msg = messageObj.message;
					console.log(msg)
					reversed.innerText = msg.reverseString;
				}
			});

			pubnub.subscribe({
				channels: [CHANNEL]
			});

			// Publish a simple message to the demo_tutorial channel
			btnPublish.addEventListener('click', function( event ){
				pubnub.publish({
					message: {
						"str": txtStr.value
					},
					channel: CHANNEL
				});
			});

		})();

	</script>
</body>
</html>
And test it in a browser:

Advanced BLOCK
Now that you know the basics, let's do something more complex.
We're going to assume the messages contain a valid URL, like this:
      {
	"url": "https://google.com"
}
Using the QR Code API, we're going to create a QR image from a URL and then convert the QR to add to the message its base64 representation. Lastly, we will save this representation to the key-value store. This way, next time the message contains the same URL, we can get it from there instead of calling the API.
You can find the final code of this event handler in this gist in case you need it.
All right, create another Before Publish or Fire EH (no need to use the guided process):
Now let's modify the code to log the request, call the API with some sample data, and log its response to see how it looks:
      export default request => {
  const pubnub = require("pubnub");
  const kvstore = require("kvstore");
  const xhr = require("xhr");

  console.log(request); // Log the request envelope passed

  return xhr
    .fetch(
      `https://api.qrserver.com/v1/create-qr-code/?size=150x150&data=Example`,
      {}
    )
    .then(response => {
      console.log(response);

      return request.ok();
    });
};
Publish a message. You should get something like the following:
      12:06:34  js: { "verb": "publish", "pubkey": "pub-c-2e6a21d7-9099-4cc1-b77c-b7116015a4e9", "subkey": "sub-c-9fa184ba-13dd-11e7-9093-0619f8945a4f", "timetoken": null, "timetoken_v1": null, "timetoken_v2": null, "version": "v1", "meta": { "clientip": "189.196.255.59", "origin": "ps8.pubnub.com", "useragent": "Mozilla/5.0 (Windows NT 10.0; WOW64) AppleWebKit/537.36 (KHTML, like Gecko) Chrome/56.0.2924.87 Safari/537.36" }, "params": { "uuid": "4aca78b8-312d-475b-9142-d935cc6b6906", "pnsdk": "PubNub-JS-Web/3.16.3", "timestamp": "1490724394", "signature": "j8XyUFtpb7jILr_TnWB6Y_b84Rr3ryzNko5jY6JPBo4=" }, "uri": "/publish/pub-c-2e6a21d7-9099-4cc1-b77c-b7116015a4e9/sub-c-9fa184ba-13dd-11e7-9093-0619f8945a4f/0/qr/0/%7B%22foo%22%3A%22bar%22%2C%22id%22%3A42%2C%22text%22%3A%22BLOCKS%22%7D", "channels": [ "qr" ], "callback": "0", "message": { "foo": "bar", "id": 42, "text": "BLOCKS" } }
12:06:35  js: { "body": "�PNG\r
\u001a
\u0000\u0000\u0000\rIHDR\u0000\u0000\u0000�\u0000\u0000\u0000�\u0001\u0003\u0000\u0000\u0000\u0006���\u0000\u0000\u0000\u0006PLTE���\u0000\u0000\u0000U��~\u0000\u0000\u0000�IDATH�͖�\r�0\fD\u001d�H�\b��ђ�\u0018�\u0011()P��\u0004��E��E�\u001e\u0014'�l#�\u0012E\u0011�\u0004�m���c\u00104/E��͋�\u0013�����_�Yi����\u0013��M�.��\u001c�.?�\u0000\u000f�z|8�����h\u0006}\u0010f���\\������Ɛ�j���Z���3Gk�\u00174f��
f��b2A�P7�s�'2Y�����\u0010\u001e���EOٕ?\u0016�:�(\b�U\u001f�{<�\u0017�[�G2�y���\u0018d��O�\u0007�]u��*�u?c_�cW|���    �\u0011�\u0000�\u000f�@\u0000\u0000\u0000\u0000IEND�B`�", "$buffer": { "type": "Buffer", "data": [ 137, 80, 78, 71, 13, 10, 26, 10, 0, 0, 0, 13, 73, 72, 68, 82, 0, 0, 0, 150, 0, 0, 0, 150, 1, 3, 0, 0, 0, 6, 207, 227, 161, 0, 0, 0, 6, 80, 76, 84, 69, 255, 255, 255, 0, 0, 0, 85, 194, 211, 126, 0, 0, 0, 221, 73, 68, 65, 84, 72, 137, 205, 150, 177, 13, 133, 48, 12, 68, 29, 165, 72, 201, 8, 140, 146, 209, 146, 209, 24, 133, 17, 40, 41, 80, 140, 207, 4, 137, 255, 69, 157, 195, 69, 136, 30, 20, 39, 251, 108, 35, 242, 18, 69, 17, 139, 4, 213, 109, 246, 251, 206, 99, 16, 52, 47, 69, 143, 180, 205, 139, 221, 19, 145, 185, 176, 174, 207, 95, 209, 89, 105, 146, 190, 194, 228, 19, 172, 215, 77, 226, 46, 255, 181, 28, 206, 46, 63, 151, 0, 15, 253, 122, 124, 56, 187, 163, 189, 244, 251, 104, 6, 125, 16, 102, 185, 154, 214, 92, 155, 165, 140, 201, 236, 204, 198, 144, 167, 106, 143, 157, 199, 90, 244, 249, 231, 51, 71, 107, 192, 23, 52, 102, 231, 180, 10, 102, 142, 191, 98, 50, 65, 165, 80, 55, 235, 115, 248, 39, 50, 89, 183, 176, 179, 172, 225, 16, 30, 187, 251, 188, 69, 79, 217, 149, 63, 22, 131, 58, 236, 40, 8, 203, 85, 31, 187, 123, 60, 187, 23, 165, 91, 201, 71, 50, 157, 121, 139, 169, 250, 24, 100, 179, 254, 79, 163, 7, 147, 93, 117, 235, 250, 42, 151, 117, 63, 99, 95, 202, 99, 87, 124, 133, 189, 196, 9, 128, 17, 156, 0, 247, 15, 137, 64, 0, 0, 0, 0, 73, 69, 78, 68, 174, 66, 96, 130 ] }, "headers": { "date": "Tue, 28 Mar 2017 18:06:38 GMT", "server": "Apache/2", "vary": "Accept-Encoding,User-Agent", "content-length": "296", "connection": "close", "content-type": "image/png" }, "url": "https://api.qrserver.com/v1/create-qr-code/?size=150x150&data=Example", "status": 200, "statusText": "OK", "ok": true, "bodyUsed": false }
12:06:35  (Publish): { "foo": "bar", "id": 42, "text": "BLOCKS" }
You can see that the request object contains not just the message, but the interesting part is the API's response.
You can know about more options for creating a QR code here. However, by default, the API will return a PNG image in the body of the response.
To get the base64 representation of the image, we could use the Codec/base64:
      const base64Codec = require("codec/base64");
console.log(base64Codec.btoa("hello")); // aGVsbG8=
However, this btoa function is designed for string data rather than for binary data. Luckily, the response contains a buffer, an array of bytes representing the image. We can use that buffer to implement a function to convert it to a base64 string.
We're going to use the implementation from Jon Leighton (there's no need to include it inside the exported function):
      // https://gist.github.com/jonleighton/958841
const base64ArrayBuffer = function(arrayBuffer) {
	var base64    = '';
	var encodings = 'ABCDEFGHIJKLMNOPQRSTUVWXYZabcdefghijklmnopqrstuvwxyz0123456789+/';

	var bytes         = new Uint8Array(arrayBuffer);
	var byteLength    = bytes.byteLength;
	var byteRemainder = byteLength % 3;
	var mainLength    = byteLength - byteRemainder;

	var a, b, c, d;
	var chunk;

	// Main loop deals with bytes in chunks of 3
	for (var i = 0; i < mainLength; i = i + 3) {
		// Combine the three bytes into a single integer
		chunk = (bytes[i] << 16) | (bytes[i + 1] << 8) | bytes[i + 2];

		// Use bitmasks to extract 6-bit segments from the triplet
		a = (chunk & 16515072) >> 18; // 16515072 = (2^6 - 1) << 18
		b = (chunk & 258048)   >> 12; // 258048   = (2^6 - 1) << 12
		c = (chunk & 4032)     >>  6; // 4032     = (2^6 - 1) << 6
		d = chunk & 63;               // 63       = 2^6 - 1

		// Convert the raw binary segments to the appropriate ASCII encoding
		base64 += encodings[a] + encodings[b] + encodings[c] + encodings[d];
	}

	// Deal with the remaining bytes and padding
	if (byteRemainder == 1) {
		chunk = bytes[mainLength];

		a = (chunk & 252) >> 2; // 252 = (2^6 - 1) << 2

		// Set the 4 least significant bits to zero
		b = (chunk & 3)   << 4; // 3   = 2^2 - 1

		base64 += encodings[a] + encodings[b] + '==';
	 } else if (byteRemainder == 2) {
		chunk = (bytes[mainLength] << 8) | bytes[mainLength + 1];

		a = (chunk & 64512) >> 10; // 64512 = (2^6 - 1) << 10
		b = (chunk & 1008)  >>  4; // 1008  = (2^6 - 1) << 4

		// Set the 2 least significant bits to zero
		c = (chunk & 15)    <<  2; // 15    = 2^4 - 1

		base64 += encodings[a] + encodings[b] + encodings[c] + '=';
	}

	return base64;
};

export default (request) => {
	...
};
Then, let's import the modules we're going to use:
      const base64ArrayBuffer = ...

export default (request) => {

    const xhr = require("xhr");
    const console = require('console');
    const db = require('kvstore');
    const queryStringCodec = require('codec/query_string');

	...
};
Now let's extract the URL from the message and encode it with the help of the Codec/query_string along with a size parameter of value 150x150. The image should not be large since the entire process is going to be done in memory. This is one way that you could code this up:
      const base64ArrayBuffer = ...

export default (request) => {
	...

	try {
        const url = request.message.url;
        const apiParams = queryStringCodec.stringify({
            data: url,
            size: '150x150',
        });

		...

  } catch (e) {
    console.error('Uncaught exception:', e);
  }

};
Next, let's see if the database contains the URL from a previous execution:
      const base64ArrayBuffer = ...

export default (request) => {
	...

	try {
        ...

		return db.get(url).then((obj) => {
			let promise;

            if (!obj) {
				...
			} else {
                ...
            }

			...
		});

  } catch (e) {
    console.error('Uncaught exception:', e);
  }

};
Inside the promise of db.get, we're going to return another promise that will resolve to the result of the function. For that, we have to handle the cases when the object for the URL doesn't exist yet and when it already exists, and since we're dealing with asynchronous code, both cases have to work with promises.
If the object for the URL doesn't exist, we will create a promise to call the API and save the object to the database:
      const base64ArrayBuffer = ...

export default (request) => {
	...

	try {
        ...

		return db.get(url).then((obj) => {
			let promise;

            if (!obj) {
				console.log(`The QR code for ${url} does not exist. Creating it...`);
                promise = new Promise((resolve) =>
                    xhr.fetch(`https://api.qrserver.com/v1/create-qr-code/?${apiParams}`, {})
                    .then((response) => {
                        //console.log(response);

                        const base64 = base64ArrayBuffer(response["$buffer"].data);
                        const newObj = {
                            imgBase64: base64,
                            contentType: response.headers["content-type"],
                        };
                        db.set(url, newObj).catch((err) => {
                            console.log("An error occured saving the object.", err);
                        });

                        resolve(newObj);
                    })
                );
			}
			...
		});

  } catch (e) {
    console.error('Uncaught exception:', e);
  }

};
In the above code, we generate the base-64 string using the buffer data from the response so that we can create an object with this string and the content type. Then, we save this object to the database and use it to resolve the promise.
If there's an object for the URL already in the database, we just create a promise resolving to that object.
      const base64ArrayBuffer = ...

export default (request) => {
	...

	try {
        ...

		return db.get(url).then((obj) => {
			let promise;

            if (!obj) {
				...
			} else {
                console.log(`The QR code for ${url} already exists...`);
                promise = Promise.resolve(obj);
            }
		});

  } catch (e) {
    console.error('Uncaught exception:', e);
  }

};
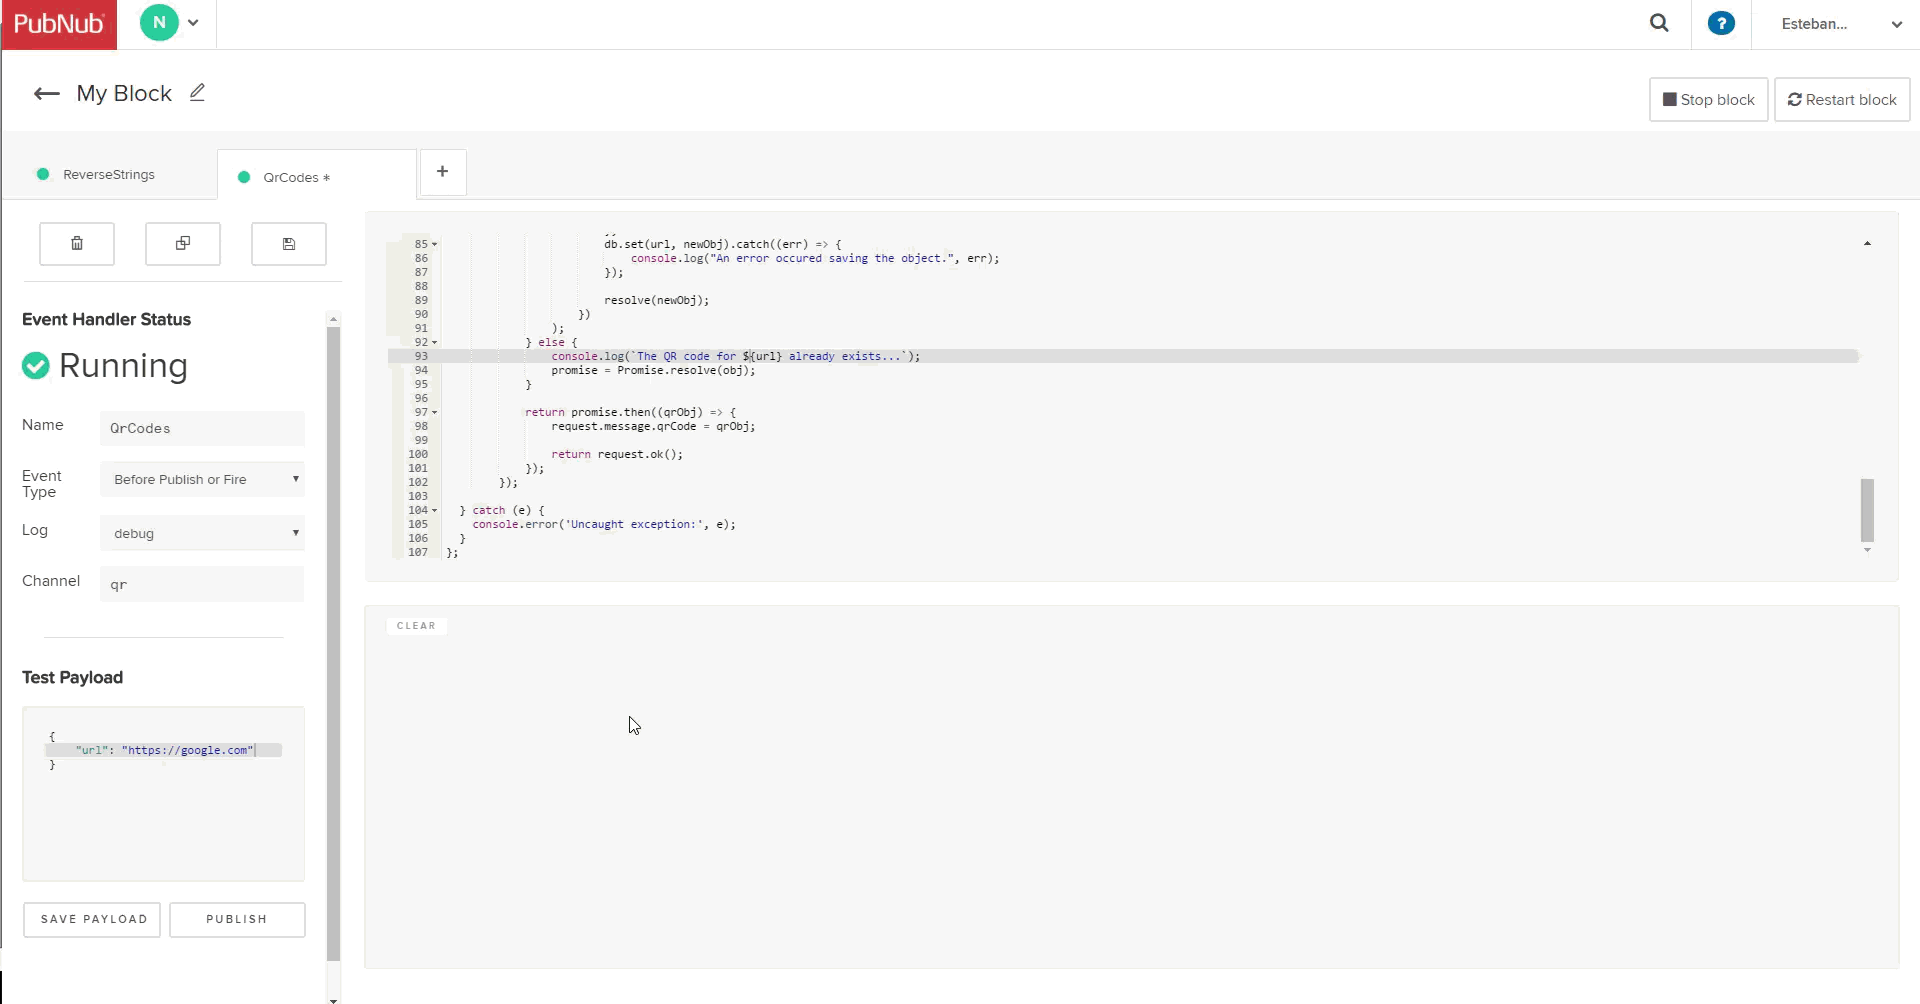
This way, in either case, we return a promise so we can add the object to the message asynchronously and end the function:
      const base64ArrayBuffer = ...

export default (request) => {
	...

	try {
        ...

		return db.get(url).then((obj) => {
			let promise;

			if (!obj) {
				...
			} else {
				...
			}

            return promise.then((qrObj) => {
                request.message.qrCode = qrObj;

                return request.ok();
            });
		});

  } catch (e) {
    console.error('Uncaught exception:', e);
  }

};
And we're done. Save the changes, restart the block, enter a valid payload, and test it:
The output in the console should be something like this:
      12:10:28  js: "data=https%3A%2F%2Fgoogle.com&size=150x150"
12:10:30  js: "The QR code for https://google.com does not exist. Creating it..."
12:10:31  (Publish): { "url": "https://google.com", "qrCode": { "imgBase64": "iVBORw0KGgoAAAANSUhEUgAAAJYAAACWAQMAAAAGz+OhAAAABlBMVEX///8AAABVwtN+AAABGUlEQVRIib2VuxHDMAxDqXOhUiNoFC+Wi+LNNIpHSKnCFwSk7PzLiLw0eU0YCABFfkwBp05XiWtoWb+0v7MTfydVXGeCli8iwYklbKlOgOSl5QVYPBl3UYHdmcqg2jsy05444uM9xrLuNbKm2r/6byx7DNbvQA1k3GVLuk7Lt7ie+fFhdPcmMzNtqhM4MUmYYJkWLlKwlubEqsgMyzRUgODD6HHtEst0hNrt/6xYOWt+wRAdbz6enfSJqTMXAXadXVhSX5EdIPgx68m9NLSyPFifzeqCi7y0x1h29CT03+fDa+NZvwvqcYJ9Fxf2vL/FtH+/yaMZbY4bM233yI/Z/eUWVic+THqRVM2Wxjr4sO41u4OXaNiH/Zg7sgnRK+SD8voAAAAASUVORK5CYII=", "contentType": "image/png" } }
If you repeat the test with the same payload, the object should be fetched from the database:
      12:10:41  (Publish): { "url": "https://google.com", "qrCode": { "imgBase64": "iVBORw0KGgoAAAANSUhEUgAAAJYAAACWAQMAAAAGz+OhAAAABlBMVEX///8AAABVwtN+AAABGUlEQVRIib2VuxHDMAxDqXOhUiNoFC+Wi+LNNIpHSKnCFwSk7PzLiLw0eU0YCABFfkwBp05XiWtoWb+0v7MTfydVXGeCli8iwYklbKlOgOSl5QVYPBl3UYHdmcqg2jsy05444uM9xrLuNbKm2r/6byx7DNbvQA1k3GVLuk7Lt7ie+fFhdPcmMzNtqhM4MUmYYJkWLlKwlubEqsgMyzRUgODD6HHtEst0hNrt/6xYOWt+wRAdbz6enfSJqTMXAXadXVhSX5EdIPgx68m9NLSyPFifzeqCi7y0x1h29CT03+fDa+NZvwvqcYJ9Fxf2vL/FtH+/yaMZbY4bM233yI/Z/eUWVic+THqRVM2Wxjr4sO41u4OXaNiH/Zg7sgnRK+SD8voAAAAASUVORK5CYII=", "contentType": "image/png" } }
12:10:41  js: "data=https%3A%2F%2Fgoogle.com&size=150x150"
12:10:41  js: "The QR code for https://google.com already exists..."
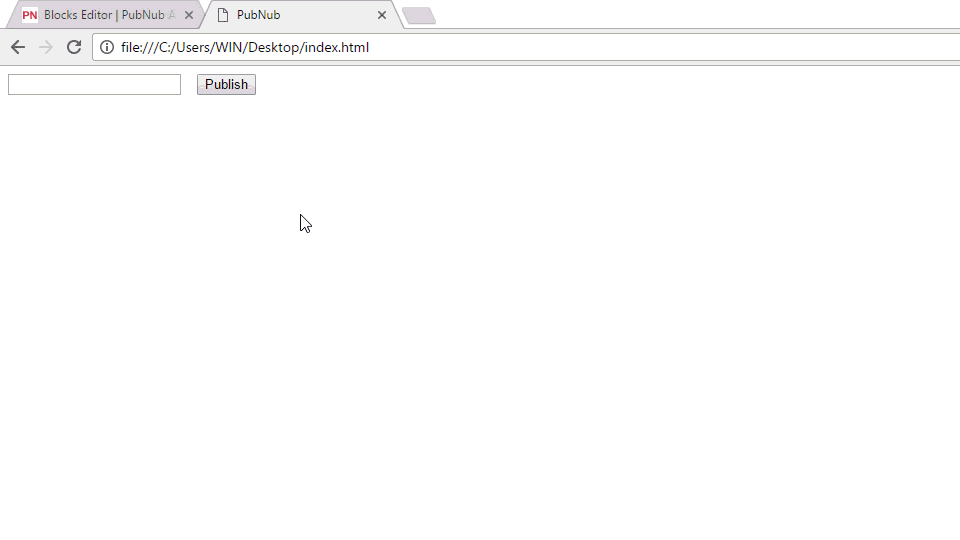
If you want to test it with an HTML file, use the following code (replacing your PubNub info):
      <!DOCTYPE html>
<html>
<head>
	<meta charset=utf-8 />
	<title>PubNub</title>
</head>
<body>
	<input id="txtUrl" type="text" />
	<button id="btnPublish">Publish</button>
	<br/><br/>
	<img id="img" />

	<!-- Include the PubNub Library -->
	<script src="https://cdn.pubnub.com/sdk/javascript/pubnub.4.5.0.js"></script>

	<script type="text/javascript">
		// Using Immediately-Invoked Function Expression (IIFE) to limit variable scope
		(function() {
			var CHANNEL = 'qr';
			var txtUrl = document.getElementById('txtUrl');
			var btnPublish = document.getElementById('btnPublish');
			var img = document.getElementById('img');

			<!-- Instantiate PubNub -->
			var pubnub = new PubNub({
				publishKey: 'YOUR_PUBLISH_KEY',
				subscribeKey: 'YOUR_SUBSCRIBE_KEY'
			});

			// Subscribe to the demo_tutorial channel
			pubnub.addListener({
				message: function(messageObj){
					var msg = messageObj.message;
					console.log(msg)
					img.setAttribute( 'src', 'data:' + msg.qrCode.contentType + ';base64,' + msg.qrCode.imgBase64);
				}
			});

			pubnub.subscribe({
				channels: [CHANNEL]
			});

			// Publish a simple message to the demo_tutorial channel
			btnPublish.addEventListener('click', function( event ){
				pubnub.publish({
					message: {
						"url": txtUrl.value
					},
					channel: CHANNEL
				});
			});

		})();

	</script>
</body>
</html>
This will use the base64 string as the source of an img element with the format:
data:image/png;base64,[BASE64_STRING]
Open it in a browser and see the result:
Conclusion
Real-time applications and serverless functions are a great combination, and Pubnub BLOCKS are an excellent tool for handling server operations.
Although you don't have a full JavaScript (or Node.js) environment inside a block, you can do a lot of things with this technology. There's a plethora of functionality that this guide didn't cover. You can find out more about in the official BLOCKS documentation
And don't forget the existing BLOCKS catalog. There's a growing collection of blocks that you can use to get started. Just import them to your account and modify them to your needs.
Credits
Advance your tech skills today
Access courses on AI, cloud, data, security, and more—all led by industry experts.
