How to Activate Animation When the Content Scrolls into View
Learn how to activate animation when the content scrolls into view in this tutorial using Bootstrap and jQuery plugins web development tools.
Jan 10, 2019 • 6 Minute Read
Introduction
One of the most popular troubles that I saw about web development was: how to activate animation when the content scrolls into view? To be honest I've tried to found the best solution around a couple of days. Finding solution is very easy but if you are going to develop a template for example and sell it then you face some problems. Most jQuery plugins that help to solve this problem aren't free for commercial purposes. So you need to purchase a license. In this tutorial, I will show the best way to make it work by using Bootstrap and free jQuery plugins. After developing your product you can use it for commercial purposes freely. Here are the steps that we need to do:
Creating our progress bar with description
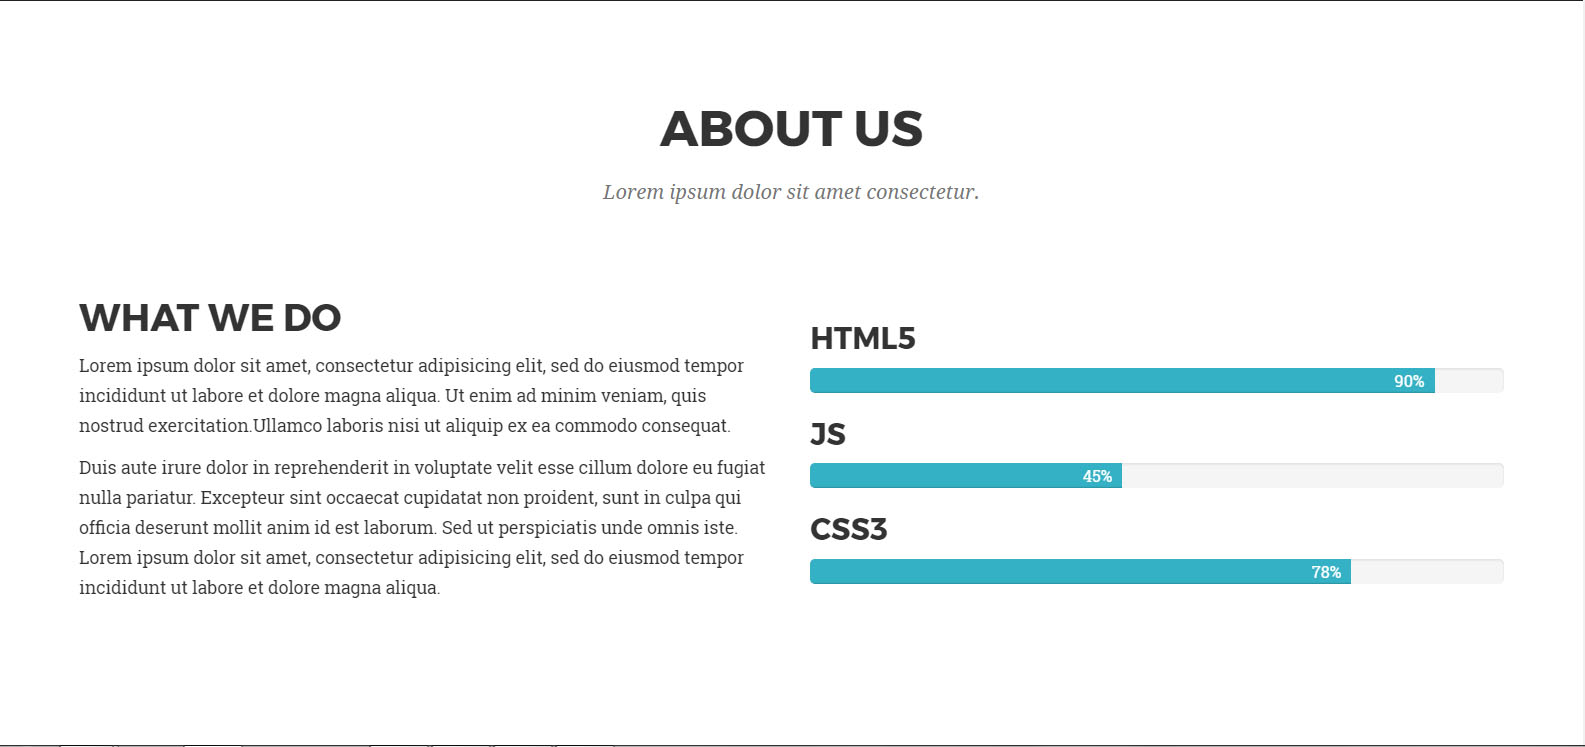
Let's create a progress bar. In this case, our final result will look like an about us section on the template.
We are going to start with HTML.
      <section id="about-us">
<div class="container">
<div class="row">
<div class="col-lg-12 text-center">
<h2 class="section-heading">About Us</h2>
<h3 class="section-subheading text-muted">Lorem ipsum dolor sit amet consectetur.</h3>
</div>
</div>
<div class="row">
<div class="col-sm-6">
<div class="about-info">
<h2>About us</h2>
<p style="color: #333">Lorem ipsum dolor sit amet, consectetur adipisicing elit, sed do eiusmod tempor incididunt ut labore et dolore magna aliqua. Ut enim ad minim veniam, quis nostrud exercitation.Ullamco laboris nisi ut aliquip ex ea commodo consequat. </p>
<p style="color: #333">Duis aute irure dolor in reprehenderit in voluptate velit esse cillum dolore eu fugiat nulla pariatur. Excepteur sint occaecat cupidatat non proident, sunt in culpa qui officia deserunt mollit anim id est laborum. Sed ut perspiciatis unde omnis iste. Lorem ipsum dolor sit amet, consectetur adipisicing elit, sed do eiusmod tempor incididunt ut labore et dolore magna aliqua.</p>
</div>
</div>
<div class="col-sm-6">
<h3 class="progress-title">HTML5</h3>
<div class="progress">
<div class="progress-bar" style="background-color: #34b1c4; width: 90%;">
<div class="progress-value">90%</div>
</div>
</div>
<h3 class="progress-title">JS</h3>
<div class="progress">
<div class="progress-bar" style="background-color: #34b1c4; width: 45%;">
<div class="progress-value">45%</div>
</div>
</div>
<h3 class="progress-title">CSS3</h3>
<div class="progress">
<div class="progress-bar" style="background-color: #34b1c4; width: 78%;">
<div class="progress-value">78%</div>
</div>
</div>
</div>
</div>
</div>
</section>
Styling our progress bar
Let's style it and see how it will look.
      #about-us {
background-color: white;
padding: 60px 0;
}

#about-us h2 {
margin-top: 0;
color: #333;
}

#about-us .lead {
font-size: 16px;
margin-bottom: 10px;
}

#about-us h1 {
margin-bottom: 30px;
}

.progress-title{
    font-size: 16px;
    font-weight: 700;
    color: #000;
    margin: 0 0 10px 0;
}

.progress{
    height: 20px;
    line-height: 15px;
    border-radius: 5px;
    background: #f0f0f0;
    margin-bottom: 30px;
    box-shadow: none;
    overflow: visible;
}

.progress-bar{
    position: relative;
    border-radius: 0;
    opacity: 0;
}

.progress .progress-value{
    display: block;
    font-size: 13px;
    color: #fff;
    position: absolute;
    top: 0;
    right: 8px;
}

@-webkit-keyframes animate-positive{
    0% { width: 0%; }
}
@keyframes animate-positive{
    0% { width: 0%; }
}
As you may notice in the scipt above we have created a keyframe for animating our progress bar. Here is how this section looks like.
Making animating process correctly
At the moment it will animate until you will scroll to that section. For solving this problem we will use Waypoints jQuery plugin which is free to use. Download Waypoints and add the jquery.waypoints.min.js file in your js folder.
After doing that include this link in your index.html
<script src="js/jquery.waypoints.min.js"></script>
Then let's write this code in your js file.
      $(document).ready(function() {
$('.progress-bar').waypoint(function() {
$('.progress-bar').css({
animation: "animate-positive 2s",
opacity: "1"
});
}, { offset: '75%' });
A percentage offset refers to a percentage of the window's height. An offet of '75%' will trigger when the top of the element is 75% of the way from the top of the window. At this point animation will be activated and a progress bar will be filled. Easy right?
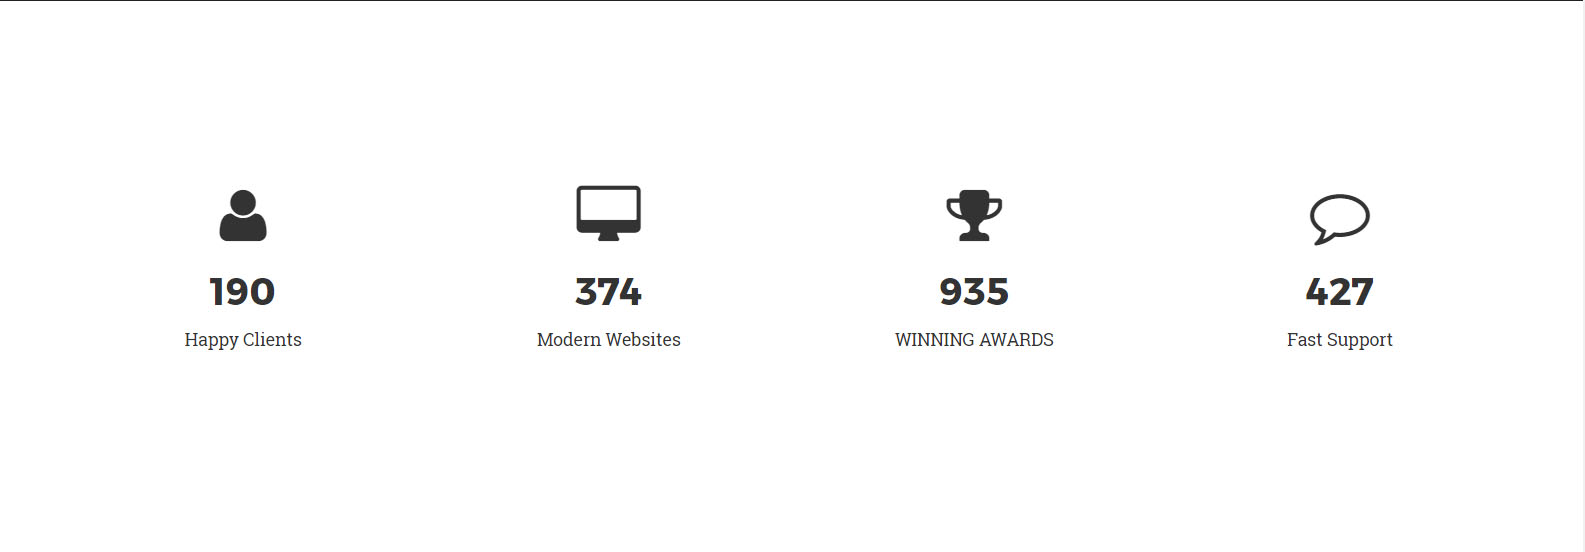
Adding stats counter section to make it more attractive
Now as a bonus we will add stats counter section.
Let's write a HTML part.
      <section id="features" class="counter">
<div class="container">
<div class="row count">
<div class="col-sm-3 col-xs-6">
<i class="fa fa-user"></i>
<h2 class="statistic-counter">190</h2>
<p>Happy Clients</p>
</div>
<div class="col-sm-3 col-xs-6">
<i class="fa fa-desktop"></i>
<h2 class="statistic-counter">374</h2>
<p>Modern Websites</p>
</div>
<div class="col-sm-3 col-xs-6">
<i class="fa fa-trophy"></i>
<h2 class="statistic-counter"935</h2>
<p>WINNING AWARDS</p>
</div>
<div class="col-sm-3 col-xs-6">
<i class="fa fa-comment-o"></i>
<h2 class="statistic-counter">427</h2>
<p>Fast Support</p>
</div>
</div>
</div>
</section><!--/#features-->
Now like we did for the progress bar need to style counter section
      #features {
  text-align: center;
}

#features i {
  font-size: 48px;
}

#features h3 {
  margin-top: 15px;
  font-size: 30px;
  margin-bottom: 7px;
  color: #fff;
}
Here is how it looks.
Animating stats counter
For making a counter to work we need to integrate Counter-Up jQuery plugin.
We need to do download jquery.counterup.min.js and after adding it in the js folder include this line in index.html
<script src="js/jquery.counterup.min.js"></script>
then write those few lines of code
      jQuery('.statistic-counter').counterUp({
delay: 10,
time: 2000
});
Conclusion
Everything was done. You can customize it and include in your templates.
Advance your tech skills today
Access courses on AI, cloud, data, security, and more—all led by industry experts.
