Reactrb Showcase
Learn how to build a simple Rails application showcasing HyperReact in this step-by-step, free tutorial. Learn how to display a video with Bootstrap CSS and more!
May 11, 2019 • 38 Minute Read
HyperLoop Showcase
This is a simple Rails application showcasing HyperReact (a wrapper for the React.js library for creating user interfaces), Opal, NPM, Webpack, React-Bootstrap, HyperMesh (gives your HyperReact components CRUD access to your server-side ActiveRecord models and implements push notifications), and other associated technologies.
This Showcase application will mix native React and HyperReact components, be styled by Bootstrap CSS (using React-Bootstrap), display a video (using a native React component), and use HyperMesh to handle data for an Events feed app.
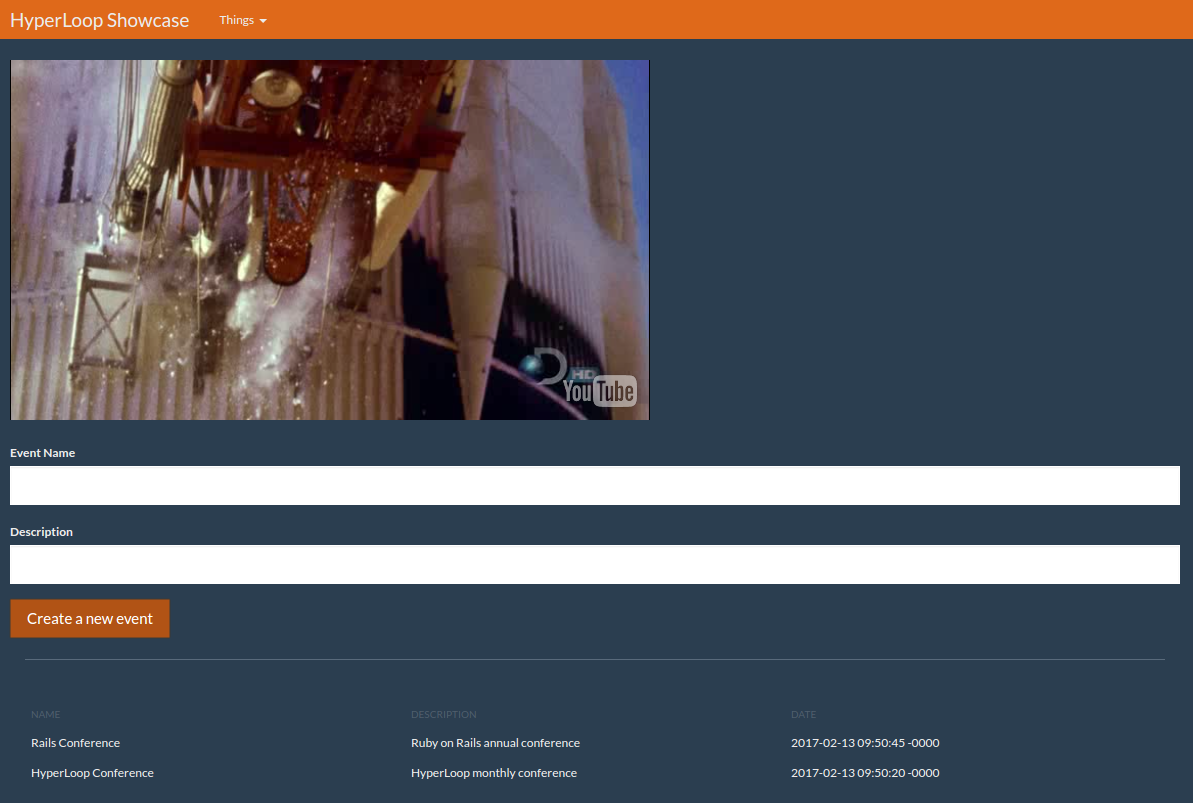
The Showcase application will look like this:
Technologies Highlighted in This Showcase Application
- Rails 5.0.1 with Ruby 2.3.1 for the back end.
- NPM and Webpack to manage front end assets.
- HyperRails to install HyperReact and Opal in Rails 4.x or 5.x.
- HyperReact to use React with Rails and to write reactive UI components with Ruby's elegance.
- React-Bootstrap to show how to use native React components in HyperReact.
- HyperMesh between Rails models and the front end and to magically push changed data between all connected clients.
- HyperReact Hot-Reloader and Opal IRB for programmer joy and hot-loading with developing.
Introduction
Introductions to HyperReact
HyperReact Help and Questions
- Gitter.im for general questions, discussion, and interactive help.
- Stack Overflow tag reactrb for specific problems.
- Github Issues for bugs, feature enhancements, etc.
- Further reading at the end of this tutorial.
Using NPM and Webpack Alongside Rails
Ruby libraries are distributed as gems, and are managed in your Rails app using the Gemfile and bundler.
In the JavaScript world things are still evolving but I have found that the easiest way to manage JavaScript libraries is by using NPM (Node Package Manager) and Webpack. Pretty much every front end library is packaged with NPM these days so it is easy to get help and most things just work.
Happily NPM, Webpack, Rails, and HyperReact can all play together very nicely.
This guide requires that Ruby, Rails, NPM, and Webpack are installed. Please see their websites for installation instructions.
Step 1: Creating a New Rails Application
      rails new hyperloop-showcase
	cd hyperloop-showcase
	bundle install
Update your Database config file for accessing your Database properly: config/database.yml.
Then, execute:
rails db:create
You should have an empty Rails application:
bundle exec rails s
And in your browser:
http://localhost:3000/
You should see the Rails Welcome aboard page. Great, Rails is now installed. Let's get started with the interesting stuff.
Step 2: Adding HyperReact and HyperMesh
There are two ways to achieve that:
- Using HyperLoop installation generator
- Manually
Automatic Installation of HyperReact and HyperMesh
Add the HyperRails gem, which is a set of generators which will easily configure the other Hyperloop gems :
      #Gemfile

  gem 'hyper-rails'
Then run:
bundle install
Now let’s get the HyperRails generator to install Hyperloop :
      rails g hyperloop:install --all
bundle update
HyperRails will add all the necessary Gem’s and configuration to our new Rails app.
We still need to modify the app/views/components.rb and add the two lines require 'reactrb/auto-import' and require 'react/react-source' :
      #app/views/components.rb

require 'opal'

require 'reactrb/auto-import'
require 'react/react-source'
require 'hyper-react'
if React::IsomorphicHelpers.on_opal_client?
  require 'opal-jquery'
  require 'browser'
  require 'browser/interval'
  require 'browser/delay'
  # add any additional requires that can ONLY run on client here
end

require 'hyper-mesh'
require 'models'

require_tree './components'
If you are interested in the steps the generator has completed, please see the following section.
Manual Installation of HyperReact and HyperMesh
Step 2.1: Add the Gems
In your Gemfile
      #Gemfile

	gem 'react-rails', '1.4.2'
	gem 'hyper-rails', '0.4.1'
	gem 'opal-rails', '0.9.1'
	gem 'opal-browser', '0.2.0'
	gem 'hyper-react', '0.11.0'
	gem 'hyper-mesh', '0.5.3'
	gem 'hyper-router', '2.4.0'
	gem 'therubyracer', platforms: :ruby
Then run:
bundle update
Step 2.2: Add the Components Directory and Manifest
Your React components will go into the app/views/components/ directory of your rails app.
Within your app/views directory you need to create a components.rb manifest.
Files required in app/views/components.rb will be made available to the server side rendering system as well as the browser.
      #app/views/components.rb

require 'opal'

require 'reactrb/auto-import'
require 'react/react-source'
require 'hyper-react'
if React::IsomorphicHelpers.on_opal_client?
  require 'opal-jquery'
  require 'browser'
  require 'browser/interval'
  require 'browser/delay'
  # add any additional requires that can ONLY run on client here
end

require 'hyper-mesh'
require 'models'

require_tree './components'
Step 2.3: Client Side Assets
Typically, the client will need all the above assets plus other files that are client only. Notably jQuery is a client-only asset.
NOTE: You can update your existing application.js file, or convert it to Ruby syntax, and name it application.rb. The example below assumes you are using Ruby syntax. However, if you are using application.js then use the standard //= require '...' format and load your components with Opal.load('components');.
Assuming you are using the Ruby syntax (application.rb), in assets/javascript/application.rb require your components manifest as well as any additional browser only assets.
      #assets/javascript/application.js

//= require 'components'
//= require 'react_ujs'
//= require 'jquery'
//= require 'jquery_ujs'
//= require 'turbolinks'
//= require_tree .

Opal.load('components');
Step 2.4: Update application.rb
Finally, you will need to update your application.rb to ensure everything works in production:
      #config/application.rb
...
  class Application < Rails::Application
    # Settings in config/environments/* take precedence over those specified here.
    # Application configuration should go into files in config/initializers
    # -- all .rb files in that directory are automatically loaded.
    config.eager_load_paths += %W(#{config.root}/app/models/public)
    config.autoload_paths += %W(#{config.root}/app/models/public)
    config.assets.paths << ::Rails.root.join('app', 'models').to_s
  end
...
Step 2.5: Update routes.rb
      #routes.rb

mount HyperMesh::Engine => '/rr'
Step 2.6: Create app/models/models.rb
      #app/models/models.rb

require_tree './public' if RUBY_ENGINE == 'opal'
Step 2.7: Create app/models/public
Create a new folder: app/models/public.
Step 2.8: Create app/policies/application_policy.rb
      #app/policies/application_policy.rb

	# Policies regulate access to your public models
	# The following policy will open up full access (but only in development)
	# The policy system is very flexible and powerful.  See the documentation
	# for complete details.
	class ApplicationPolicy
	  # Allow any session to connect:
	  always_allow_connection
	  # Send all attributes from all public models
	  regulate_all_broadcasts { |policy| policy.send_all }
	  # Allow all changes to public models
	  allow_change(to: :all, on: [:create, :update, :destroy]) { true }
	end if Rails.env.development?
Step 3: Creating the First Components
Let's create the component via the generator:
rails g hyperloop:component Home::Show
This will add a new Component at app/views/components/home/show.rb
      #app/views/components/home/show.rb

module Components
  module Home
    class Show < React::Component::Base

      # param :my_param
      # param param_with_default: "default value"
      # param :param_with_default2, default: "default value" # alternative syntax
      # param :param_with_type, type: Hash
      # param :array_of_hashes, type: [Hash]
      # collect_all_other_params_as :attributes  #collects all other params into a hash

      # The following are the most common lifecycle call backs,
      # the following are the most common lifecycle call backs# delete any that you are not using.
      # call backs may also reference an instance method i.e. before_mount :my_method

      before_mount do
        # any initialization particularly of state variables goes here.
        # this will execute on server (prerendering) and client.
      end

      after_mount do
        # any client only post rendering initialization goes here.
        # i.e. start timers, HTTP requests, and low level jquery operations etc.
      end

      before_update do
        # called whenever a component will be re-rerendered
      end

      before_unmount do
        # cleanup any thing (i.e. timers) before component is destroyed
      end

      def render
        div do
          "Home::Show"
        end
      end
    end
  end
end
Add a route to your routes.rb:
      #routes.rb

root 'home#show'
Create the file app/controllers/home_controller.rb and add a show method. This will render the component using the render_component helper.
      #app/controllers/home_controller.rb

class HomeController < ApplicationController
    def show
		render_component
    end
end
Fire up the server with:
bundle exec rails s
Refresh your browser and, if all has gone well, you should be rewarded with Home::Show in your browser. If you open your JavaScript console, you can also check which version of React has been loaded.
React.version;
Remember this value, as we will need to use it later.
Step 4: Managing Front End Assets with Webpack
There are five steps to this process:
- Adding Webpack to your Rails project
- Setting up Webpack
- Using Webpack to build your client and server bundles
- Installing React and ReactDOM via NPM
- Adding Webpack bundles to the Rails asset pipeline
Step 4.1: Adding Webpack to Your Rails Project
Run these three commands:
npm init
Press enter at each prompt to leave the fields empty. Agree when asked if it is okay to write the package.json file. This will create an empty package.json (which is similar to a Gemfile) in your root folder.
npm install webpack --save-dev
This installs Webpack and creates a node_modules folder. This folder contains hundreds of JavaScript dependencies.
npm install webpack -g
This enables us to run Webpack from the command line.
Our project does not need all the dependencies in the node_modules folder, so let’s tell git to ignore them by adding a .gitignore file:
      #/.gitignore

/node_modules
Step 4.2: Setting up Webpack
Now that we have Webpack, we need to add three boilerplate files to configure it. As you add more JavaScript packages, you will be updating these files. Again, this is similar to updating your Gemfile when you add new gems to a project. Run npm view webpack version if you are unsure which version you have. Add webpack.config.js to the root of your project:
For Webpack 1.x versions:
      // webpack.config.js

var path = require("path");

module.exports = {
  context: __dirname,
  entry: {
    client_only: "./webpack/client_only.js",
    client_and_server: "./webpack/client_and_server.js"
  },
  output: {
    path: path.join(__dirname, "app", "assets", "javascripts", "webpack"),
    filename: "[name].js",
    publicPath: "/webpack/"
  },
  module: {
    loaders: [
      // add any loaders here
    ]
  },
  resolve: {
    root: path.join(__dirname, "..", "webpack")
  }
};
For Webpack 2.x versions:
      // webpack.config.js

var path = require("path");

module.exports = {
  context: __dirname,
  entry: {
    client_only: "./webpack/client_only.js",
    client_and_server: "./webpack/client_and_server.js"
  },
  output: {
    path: path.join(__dirname, "app", "assets", "javascripts", "webpack"),
    filename: "[name].js",
    publicPath: "/webpack/"
  },
  module: {
    loaders: [
      // add any loaders here
    ]
  },
  resolve: {
    modules: [path.join(__dirname, "src"), "node_modules"]
  }
};
Then create a folder called webpack in your application root directory and add the following two files:
      // webpack/client_only.js

// any packages that depend specifically on the DOM go here
// for example the Webpack CSS loader generates code that will break prerendering
console.log("client_only.js loaded");
      // webpack/client_and_server.js

// all other packages that you can run on both server (prerendering) and client go here
// most well behaved packages can be required here
console.log("client_and_server.js loaded");
Step 4.3: Using Webpack to Build Your Client and Server Bundles
Simply run this command:
webpack
You should see a result something like this:
      Hash: 756a1dc4a11c8fccd0a4
Version: webpack 1.14.0
Time: 55ms
               Asset     Size  Chunks             Chunk Names
client_and_server.js  1.61 kB       0  [emitted]  client_and_server
      client_only.js  1.61 kB       1  [emitted]  client_only
   [0] ./webpack/client_and_server.js 214 bytes {0} [built]
   [0] ./webpack/client_only.js 206 bytes {1} [built]
Our client_and_server.js and client_only.js bundles are built and ready to be included in our application. If you look in your app/assets/javascripts/webpack folder you should see the two files there. Note that these bundles are empty at the moment, as we have not added any JavaScript components yet. We will do that in another step.
Step 4.4: Adding Webpack Bundles to the Rails Asset Pipeline
Finally we need to require these two bundles in our rails asset pipeline. Edit app/assets/javascripts/application.js and add:
      // app/assets/javascripts/application.js

//= require 'webpack/client_only'
Then edit app/views/components.rb and directly after require 'hyper-react' add the following two lines:
      #app/views/components.rb

require 'webpack/client_and_server.js'
And remove the following line:
      #app/views/components.rb

require 'react/react-source'
Step 4.5: Installing React and ReactDOM
This step is really simple because we have NPM installed. Just run these two commands to install React:
npm install react --save
To install ReactDOM:
npm install react-dom --save
Note how this modifies your package.json and installs React and ReactDOM in your node_modules folder.
Next, we need to require them into client_and_server.js:
      // webpack/client_and_server.js

ReactDOM = require("react-dom");
React = require("react");
And finally, we need to run webpack to add them to the bundle:
webpack
The output should look something like this:
      Hash: db338e21dcc44f66e5b5
Version: webpack 1.14.0
Time: 737ms
               Asset     Size  Chunks             Chunk Names
client_and_server.js   740 kB       0  [emitted]  client_and_server
      client_only.js  1.61 kB       1  [emitted]  client_only
   [0] ./webpack/client_and_server.js 271 bytes {0} [built]
   [0] ./webpack/client_only.js 206 bytes {1} [built]
    + 177 hidden modules
Note that client_and_server.js has gone from 1.61kB to 740kB because it now includes the source of React and ReactDOM.
Now run bundle exec rails s and refresh the browser. Look at the console and you should see something like this:
      client_and_server.js loaded
client_only.js loaded
client_and_server.js loaded
************************ React Prerendering Context Initialized Show ***********************
************************ React Browser Context Initialized ****************************
Reactive record prerendered data being loaded: [Object]
Congratulations! You are ready to begin adding Javascript packages to your application.
Step 5: Working with Native React Components
Now we can reap the rewards of all the hard work above. We have everything setup to easily add front-end components and work with them in HyperReact. Let's jump in and add a native React component that plays a video.
Step 5.1: Adding a Video Player to Your Site
We are going to use Pete Cook's React rplayr
First install the component via NPM:
npm install react-player --save
Next, we need to require it in webpack/client_and_server.js
      //webpack/client_and_server.js

ReactPlayer = require("react-player");
Next, run Webpack so it can be bundled:
webpack
And then finally add it to the Show component:
      #app/views/components/home/show.rb

def render
  div do
    ReactPlayer(url:  'https://www.youtube.com/embed/FzCsDVfPQqk',
      playing: true
    )
  end
end
Refresh your browser and you should have a video. How simple was that!
Step 5.2: Working with React-Bootstrap
We will be using React-Bootstrap which is a native React library
The main purpose for React-Bootstrap is that it abstracts away verbose HTML and CSS code into React components. This makes it a lot cleaner for React JSX developers. One of the very lovely things about Hyperloop is that we already work in beautiful Ruby. To emphasize this point, consider the following:
Sample 1 - In HTML (Without React-Bootstrap):
      <button id="something-btn" type="button" class="btn btn-success btn-sm">
      Something
    </button>
    $('#something-btn').click(someCallback);
Sample 2 - In JSX (With React-Bootstrap Components):
      <Button bsStyle="success" bsSize="small" onClick={someCallback}>
      Something
    </Button>
Sample 3 - In Hyperloop (Without React-Bootstrap):
      button.btn_success.btn_sm {'Something'}.on(:click) do
    	someMethod
    end
Sample 4 - In Hyperloop (With React-Bootstrap):
      React-Bootstrap::Button(bsStyle: 'success' bsSize: "small") {'Something'}.on(:click) do
    	someMethod
    end
As you can see, sample 3 and 4 are not that different. As a Hyperloop developer, I actually prefer sample 3, but if I were a JavaScript or JSX developer, I would completely understand the advantage of abstracting Bootstrap CSS into React Components so I don't have to work directly with CSS and JavaScript. This is not the case with HyperReact, however, as CSS classes are added to HTML elements with simple dot notation:
span.pull_right {}
Which compiles to (note the conversion from _ to -):
<span class='pull-right'></span>
So I hear you ask: Why, if I prefer the non-React-Bootstrap syntax, am I worrying about React-Bootstrap? For one very simple reason: components like Navbar and Modal that require bootstrap.js will not work with React on its own, so without the React-Bootstrap project you would need to implement all that functionality yourself. The React-Bootstrap project has re-implemented this functionality as React components.
Let's implement a Navbar in this project using React-Bootstrap in HyperReact. First, we need to install Bootstrap and React-Bootstrap:
npm install bootstrap react-bootstrap --save
Note: The --save option will update the package.json file.
And then we need to require it in webpack/client_and_server.js by adding this line:
      //webpack/client_and_server.js

ReactBootstrap = require("react-bootstrap");
Run the
webpack
command again, and restart your rails server.
If you refresh your browser now and open the JavaScript console, we will be able to interact with React-Bootstrap by typing in the JavaScript console: ReactBootstrap.
You will see the React-Bootstrap object with all of its components like Accordion, Alert, Badge, Breadcrumb, etc. This is great news. React-Bootstrap is installed and ready to use. Accessing the JavaScript object in this way is a great way to see what you have to work with. Sometimes the documentation of a component is not as accurate as actually seeing what you have in the component itself.
To make sure everything is working, let's add a Button to our our Show component like this:
      #app/views/components/home/show.rb

module Components
  module Home
    class Show < React::Component::Base
      def render
        ReactBootstrap::Button(bsStyle: 'success', bsSize: "small") do
          'Success'
        end.on(:click) do
          alert('you clicked me!')
        end
      end
    end
  end
end
Notice that we reference ReactBoostrap in Ruby using the same identifier that was in the require statement in our client_and_server.js Webpack bundle. The first time HyperReact hits the ReactBootstrap constant it will not be defined. This triggers a search of the Javascript name space for something that looks either like a component or library of components. It then defines the appropriate module or component class wrapper in Ruby.
Visit your page and, if all is well, you will see a clickable button. However it will not have any style. This is because React-Bootstrap does not automatically depend on any particular style sheet, so we will have to supply one. An easy way to do this is to just copy the CSS file from the Bootstrap repo and stuff it into our rails assets directory. However, with a little upfront work, we can get Webpack to do it all for us.
First let's add four Webpack loaders using npm:
npm install css-loader file-loader style-loader url-loader --save-dev
Notice we use --save-dev instead of just --save, as these packages are only used in the development process.
Now, edit your webpack.config.js file and update the loaders section so it looks like this:
For Webpack 1.x versions
      //webpack.config.js

var path = require("path");

module.exports = {
...
    module: {
      loaders: [
        { test: /\.css$/,
          loader: "style-loader!css-loader"
        },
        { test: /\.(woff|woff2)(\?v=\d+\.\d+\.\d+)?$/,
          loader: 'url?limit=10000&mimetype=application/font-woff'
        },
        { test: /\.ttf(\?v=\d+\.\d+\.\d+)?$/,
          loader: 'url?limit=10000&mimetype=application/octet-stream'
        },
        { test: /\.eot(\?v=\d+\.\d+\.\d+)?$/,
          loader: 'file'
        },
        { test: /\.svg(\?v=\d+\.\d+\.\d+)?$/,
          loader: 'url?limit=10000&mimetype=image/svg+xml'
        }
      ]
    },
...
};
For Webpack 2.x versions
      //webpack.config.js

var path = require("path");

module.exports = {
...
    module: {
      rules: [
      { test: /\.css$/,
        use: [
          {
            loader: "style-loader"
          },
          {
            loader: "css-loader"
          }
        ]
      },
      { test: /\.(woff|woff2)(\?v=\d+\.\d+\.\d+)?$/,
        loader: 'url-loader?limit=10000&mimetype=application/font-woff'
      },
      { test: /\.ttf(\?v=\d+\.\d+\.\d+)?$/,
        loader: 'url-loader?limit=10000&mimetype=application/octet-stream'
      },
      { test: /\.eot(\?v=\d+\.\d+\.\d+)?$/,
        loader: 'file-loader'
      },
      { test: /\.svg(\?v=\d+\.\d+\.\d+)?$/,
        loader: 'url-loader?limit=10000&mimetype=image/svg+xml'
      }
    ]
    },
...
};
We have setup Webpack to use the style loader for processing a CSS file when one is required. Because the Bootstrap CSS file will require font face files, we also have four font loaders. Now, when any CSS file is required, we will have everything we need neatly packaged up.
We are now ready to require CSS files and have Webpack build a complete bundle including the CSS and any fonts referenced.
To bundle in the Bootstrap CSS file add this line to webpack/client_only.js
      //webpack/client_only.js

require("bootstrap/dist/css/bootstrap.css");
And install the Bootstrap package:
npm install bootstrap --save
Now run
webpack
to update our bundles and restart your server. Our button is now properly styled and you should be rewarded with a nice Bootstrap-styled green Success Button.
Now that everything is loaded, let's update our component to use a few more of the Bootstrap components. Update your Show component so that it looks like this:
      #app/views/components/home/show.rb

module Components
  module Home
    class Show < React::Component::Base

      def say_hello(i)
        alert "Hello from number #{i}"
      end

      def render
        div do
          ReactBootstrap::Navbar(bsStyle: :inverse) do
            ReactBootstrap::Nav() do
              ReactBootstrap::NavbarBrand() do
                a(href: '#') { 'Hyperloop Showcase' }
              end
              ReactBootstrap::NavDropdown(
                eventKey: 1,
                title: 'Things',
                id: :drop_down
              ) do
                (1..5).each do |n|
                  ReactBootstrap::MenuItem(href: '#',
                    key: n,
                    eventKey: "1.#{n}"
                  ) do
                    "Number #{n}"
                  end.on(:click) { say_hello(n) }
                end
              end
            end
          end
          div.container do
            ReactPlayer(url: 'https://www.youtube.com/embed/FzCsDVfPQqk',
              playing: true
            )
          end
        end
      end
    end
  end
end
A few things to notice in the code above:
We add React-Bootstrap components simply by ReactBootstrap::Name where Name is the JavaScript component you want to render. All the components are documented in the React-Bootstrap documentation
See with div.container we are mixing in CSS style which will compile into <div class='container'>
Also notice how I have added an .on(:click) event handler to the MenuItem component while setting href: '#' as this will allow us to handle the event instead of navigating to a new page.
So far we have a very basic application which is looking OK and showing a video. Time to do something a little more interesting. Let's add Post and Comment functionality which will let us explore ReactiveRecord!
Step 5.3: Using a Bootstrap Theme
We are going to replace the Bootstrap original theme with the Bootswatch Superhero theme.
Install the bootswatch package with NPM:
npm install bootswatch
Modify the webpack/client_only.js file:
      //webpack/client_only.js

require("bootswatch/superhero/bootstrap.min.css");
Then run:
webpack
Restart your Rails app and refresh your browser.
Step 6: Working with HyperMesh and ActiveRecord
HyperMesh uses a large subset of the ActiveRecord API modified only when necessary to accommodate the asynchronous nature of the client. You can access your ActiveRecord models just like you would in models, controllers, or in ERB or HAML view templates. As much as possible, HyperMesh follows the syntax and semantics of ActiveRecord.
Read more details about HyperMesh here: HyperMesh ActiveRecord.
Step 6.1: Creating the Models
rails g model Planevent
And then, before you run the migration, let's flesh them out a little so they look like this:
      # db/migrate/..create_planevents.rb

class CreatePlanevents < ActiveRecord::Migration[5.0]
  def change
    create_table :planevents do |t|
      t.string :planeventtitle
      t.text :description
      t.timestamps
    end
  end
end
Now run the migration:
rails db:migrate
Step 6.2: Making Your Models Accessible to HyperMesh
HyperMesh needs to 'see' your models because a representation of them gets compiled into JavaScript along with your HyperReact components so they are accessible in your client-side code.
Move planevent.rb to models/public.
For Rails 5.x only, move app/models/application_record.rb to app/models/public/.
Step 6.3: Accessing Your Models in HyperReact Components
To get started, let's create a new component which will display a list of Events under the video:
      # views/components/home/show.rb

div.container do
  ReactPlayer(url: 'https://www.youtube.com/embed/FzCsDVfPQqk', playing: true)
  br # line break
  PlaneventsList()
end
Note that to place a HyperReact component, you either need to include ( ) or { }, so planeventsList() or PlaneventsList { } would be valid but just PlaneventsList would not.
Next let's create the PlaneventsList component:
      #app/views/components/home/planeventslist.rb

module Components
  module Home
    class PlaneventsList < React::Component::Base

      define_state new_planevent: Hash.new { |h, k| h[k] = '' }

      before_mount do
        # note that this will lazy load posts
        # and only the fields that are needed will be requested
        @planevents = Planevent.all
        @planevent_attributes = Hash[ 'planeventtitle' => 'Event Name', 'description' => 'Description']
      end

      def render
        div.container do
        	div.row do
          		new_planevent
          	end

          	hr

          	div.row do
          		table_render
          	end

        end
      end

      def table_render

          div.col_md_12 do
            br
            table(class: "table table-hover") do
              thead do
                tr do
                  td.text_muted.small(width: '33%') { "NAME" }
                  td.text_muted.small(width: '33%') { "DESCRIPTION" }
                  td.text_muted.small(width: '33%') { "DATE" }
                end
              end
              tbody do
                @planevents.reverse.each do |planevent|
                  PlaneventsListItem(planevent: planevent)
                end
              end
            end
          end

      end

      def new_planevent

      	@planevent_attributes.each do |attribute, value|

	        ReactBootstrap::FormGroup() do

	        	ReactBootstrap::ControlLabel() do
					value
				end
				ReactBootstrap::FormControl(
					value: state.new_planevent[attribute],
					type: :text,
					).on(:change) { |e|
						state.new_planevent![attribute] = e.target.value
					}
	        end
	     end

        ReactBootstrap::Button(bsStyle: :primary) do
          "Create an new event"
        end.on(:click) { save_new_planevent }

      end

      def save_new_planevent

        Planevent.create(state.new_planevent) do |result|
          # note that save is a promise so this code will only run after the save
          # yet react will move onto the code after this (before the save happens)
          alert "unable to save" unless result == true
        end
        state.new_planevent.clear

      end
    end

    class PlaneventsListItem < React::Component::Base
      param :planevent

      def render

      	tr do
          td(width: '33%') { params.planevent.planeventtitle }
          td(width: '33%') { params.planevent.description }
          td(width: '33%') { params.planevent.created_at.to_s }
        end

      end

    end
  end
end
Things to note in the code above:
Note that we fetch the ReactiveRecord Planevent collection in before_mount. Setting this here instead of in after_mount means that we do not need to worry about @planevents being nil as the collection will always contain at least one entry with the actual records being lazy loaded when needed.
Note how we are binding the state variable new_planevent to the FormControl and then setting its value based on the value being passed to the .on(:change) block. This is a standard React pattern.
Also see that we are saving the new planevent such that ReactiveRecord's save returns a promise. This means that the block after save is only evaluated when it returns, yet React would have moved on to the rest of the code.
Finally note that there is no code which checks to see if there are new planevents -- the list of Planevents remains magically up-to-date. Welcome to the wonderful world of HyperReact and HyperMesh!
Refresh your browser and you should have your Showcase app working.
Step 7: Working with HyperMesh and Push Notifications
The HyperMesh ReactiveRecord part is the data layer between one client and its server. HyperMesh also uses push notifications to push changed records to all connected ReactiveRecord clients.
You need to add an initializer config/initializers/hyper_mesh.rb
      #config/initializers/hyper_mesh.rb

HyperMesh.configuration do |config|
  config.transport = :simple_poller
end
Restart your server, open two browser windows and be amazed to see any new planevents added to one session magically appearing in the other!
Step 8: Working with HyperReact Hot Reloader and Opal IRB
Before we go any further, let's install two fantastic tools written by Forrest Chang:
Opal Hot Reloader is for pure programmer joy (not having to reload the page to compile your source) and the Opal Console is incredibly useful to test how Ruby code compiles to JavaScript.
We are also going to add the Foreman gem to run our Rails server and the Hot Reloader service for us.
Add the following lines to your gemfile and run bundle:
      #gemfile

gem 'opal_hot_reloader', git: 'https://github.com/fkchang/opal-hot-reloader.git'
gem 'foreman'
bundle install
Modify your components.rb, adding the following lines inside the if statement so they only run on the client and not as part of the server pre-rendering process:
      #app/views/components.rb

if React::IsomorphicHelpers.on_opal_client?
  ...
  require 'opal_hot_reloader'
  OpalHotReloader.listen(25222, true)
end
Then create a Procfile in your Rails app root so the Hot Reloader service will start whenever you start your server:
      #Procfile

rails: bundle exec rails server -p 3000
hotloader: opal-hot-reloader -p 25222 -d app/views/components
To start both servers:
bundle exec foreman start
Refresh your browser and edit your planeventslist.rb:
      ReactBootstrap::Button(bsStyle: :primary) do
  "New Event"
end.on(:click) { save_new_planevent }
Save and you should see the button text change magically in your browser without having to refresh. Pure joy.
- Note that there is a bug in PUMA 3.7.0, so if you are using this version of PUMA, the app will load at localhost:5000 instead of localhost:3000.
Further Reading
Other HyperReact Tutorials and Examples
HyperReact Is Powered by React
HyperReact is powered by React HyperReact and friends are in most cases simple DSL Ruby wrappers to the underlying native JavaScript libraries and React Components. It is really important to have a solid grip on how these technologies work to complement your understanding of HyperReact. Most searches for help on Google will take you to examples written in JSX or ES6 JavaScript but you will learn over time to translate this into HyperReact equivalents. To make headway with HyperReact you do need a solid understanding of the underlying philosophy of React and its component based architecture. The 'Thinking in React' tutorial below is an excellent place to start.
Make sure you see the Flux Store Tutorial in HyperReact above for an example of how to communicate between grandparent and child components.
Opal under the Covers
HyperReact is a DSL wrapper of React which uses Opal to compile Ruby code to ES5 native JavaScript. If you have not used Opal before then you should at a minimum read the excellent guides as they will teach you enough to get you started with HyperReact.
Advance your tech skills today
Access courses on AI, cloud, data, security, and more—all led by industry experts.
