Real-time SMS Sentiment Visualization with Twilio, Fanout Cloud, and Isomorphic React
Learn how to leverage Twilio, Fanout Cloud, and Isomorphic React in building a real-time sms sentiment vizualization app based in Node.js with Express.
Dec 15, 2018 • 40 Minute Read
Introduction
In this tutorial, we're going to build an application to visualize, in real-time, SMS messages sent to a Twilio phone number using sentiment analysis provided by the Marchex Sentiment Analysis plugin.
We'll be using Node.js with Express for the web server, ngrok for exposing our local server publicly, Fanout Cloud for the real-time functionality, and (isomorphic) React for the view.
When a SMS is sent to the Twilio Number, information about the SMS is sent to our Node.js server.
Then, we extract the relevant information and publish it to a Fanout Cloud's channel. The channel information is received in a web page that shows the information in this way:

Notice how the background changes depending on the sentiment. Moreover, there are transitions when new messages appear. The design was inspired by this pen.
The gauge comes from Epoch, a real-time charting library that uses jQuery. Some would say React and jQuery should never be used together (because of the way React creates its components). We could have chosen another gauge component with better React integration, but React can play well with libraries like jQuery. Sometimes, you have no option but to use a jQuery plugin in a React application. Not just that, Epoch charts look better than others.
Finally, with a couple of modifications, we'll make this application isomorphic, or universal.
The source code of the final version of the application is available on Github.
Let's start by setting up the required components for our application.
Requirements
Twilio
We'll need a trial account from Twilio. Go to https://www.twilio.com/try-twilio to open one.
When your personal phone number has been verified, you can get a Twilio phone number here:
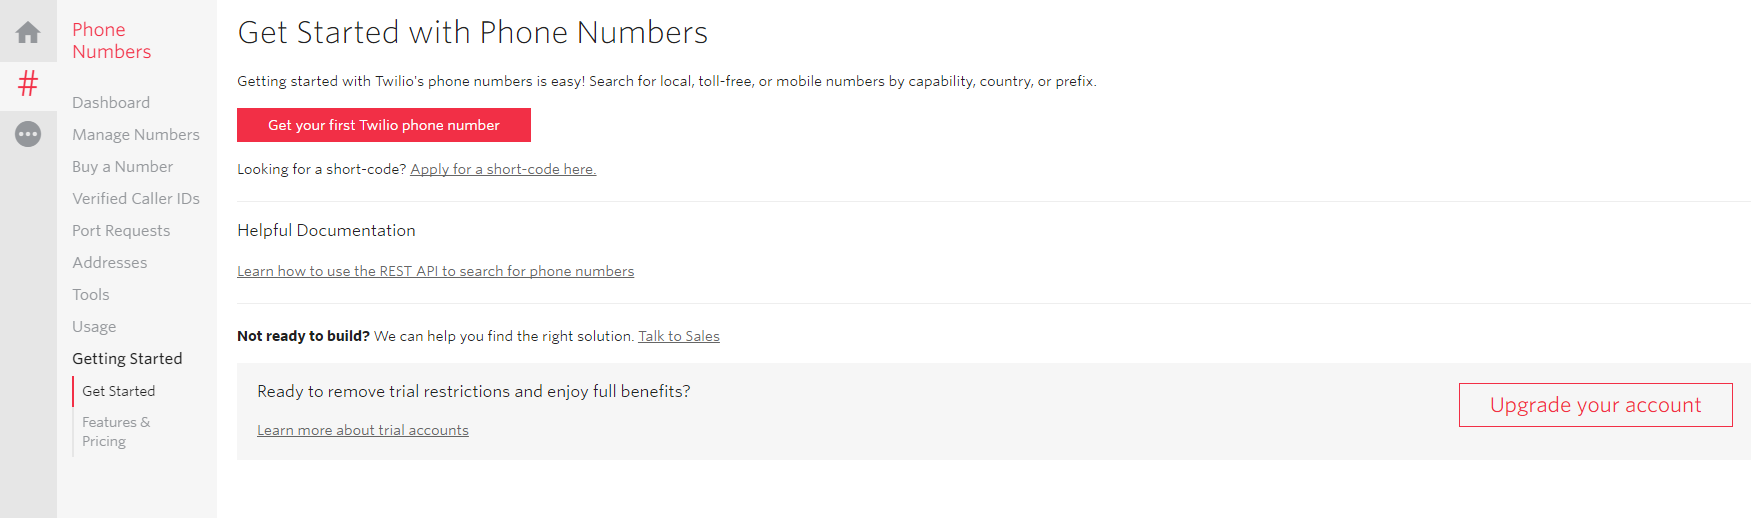
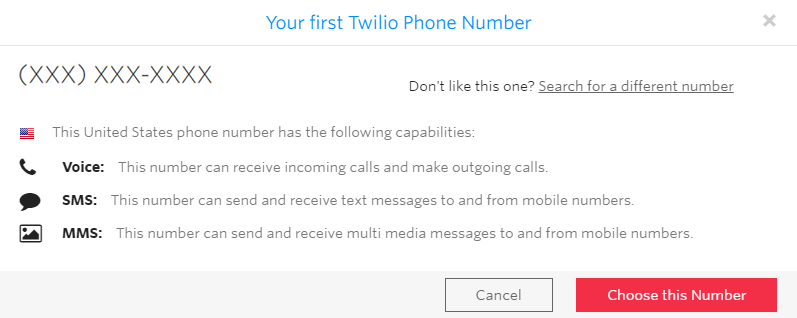
Make sure to choose a phone number with SMS capabilities:
Now go to Messaging - Programmable SMS - Add-ons:
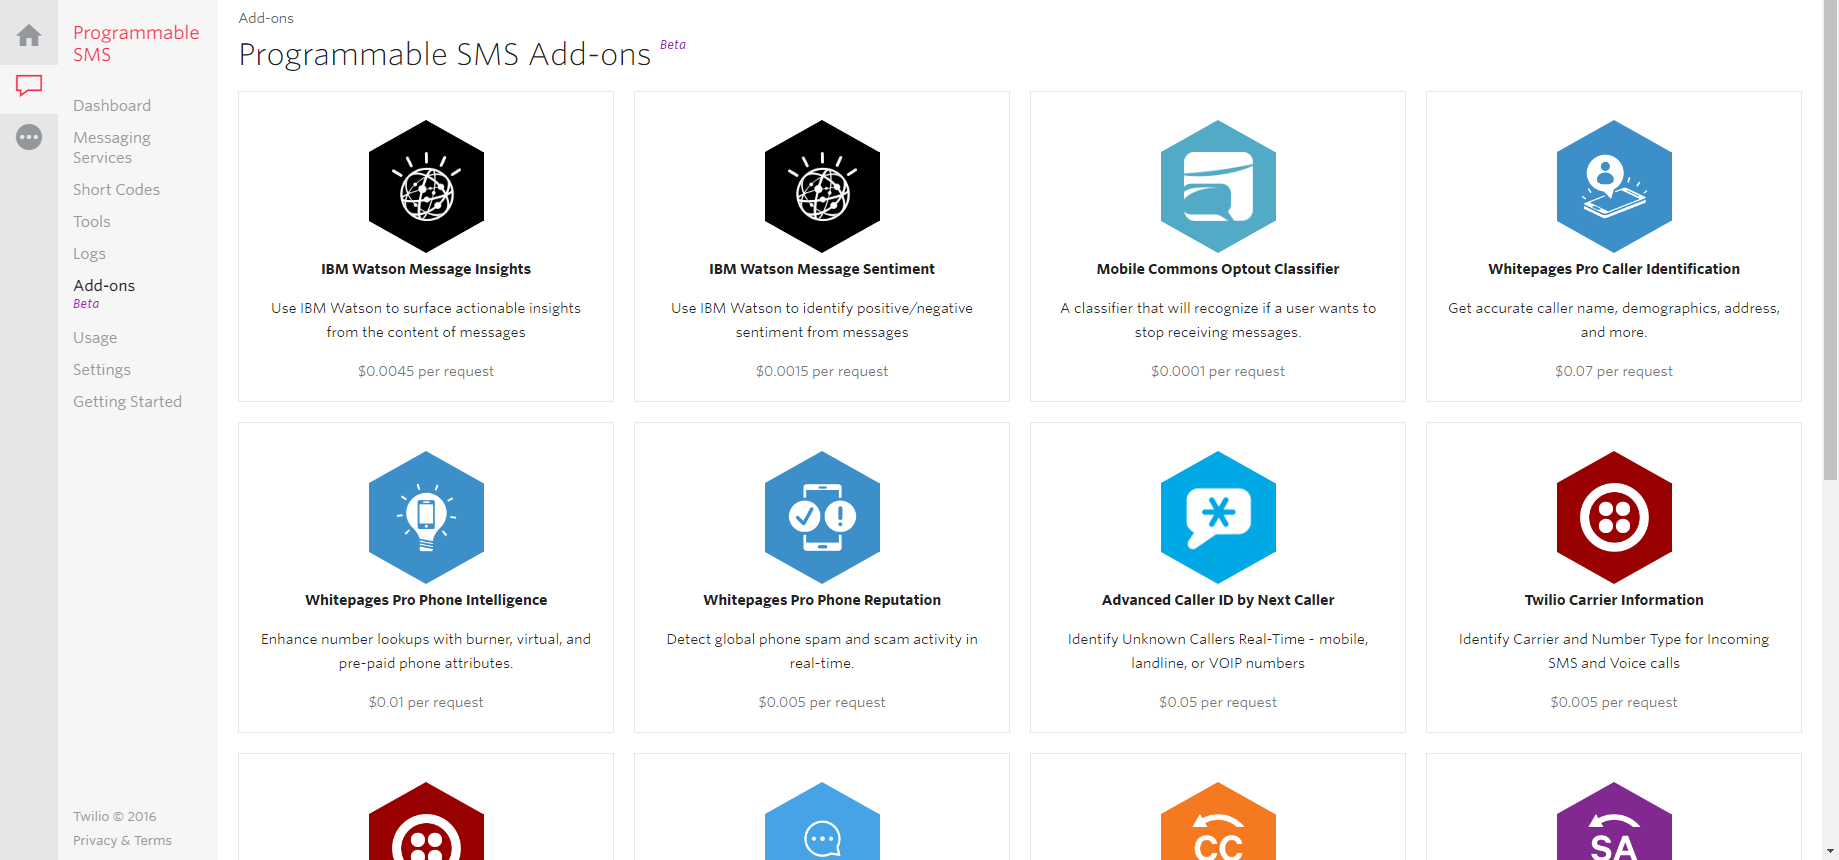
Choose the plug-in called Marchex Sentiment Analysis for SMS:
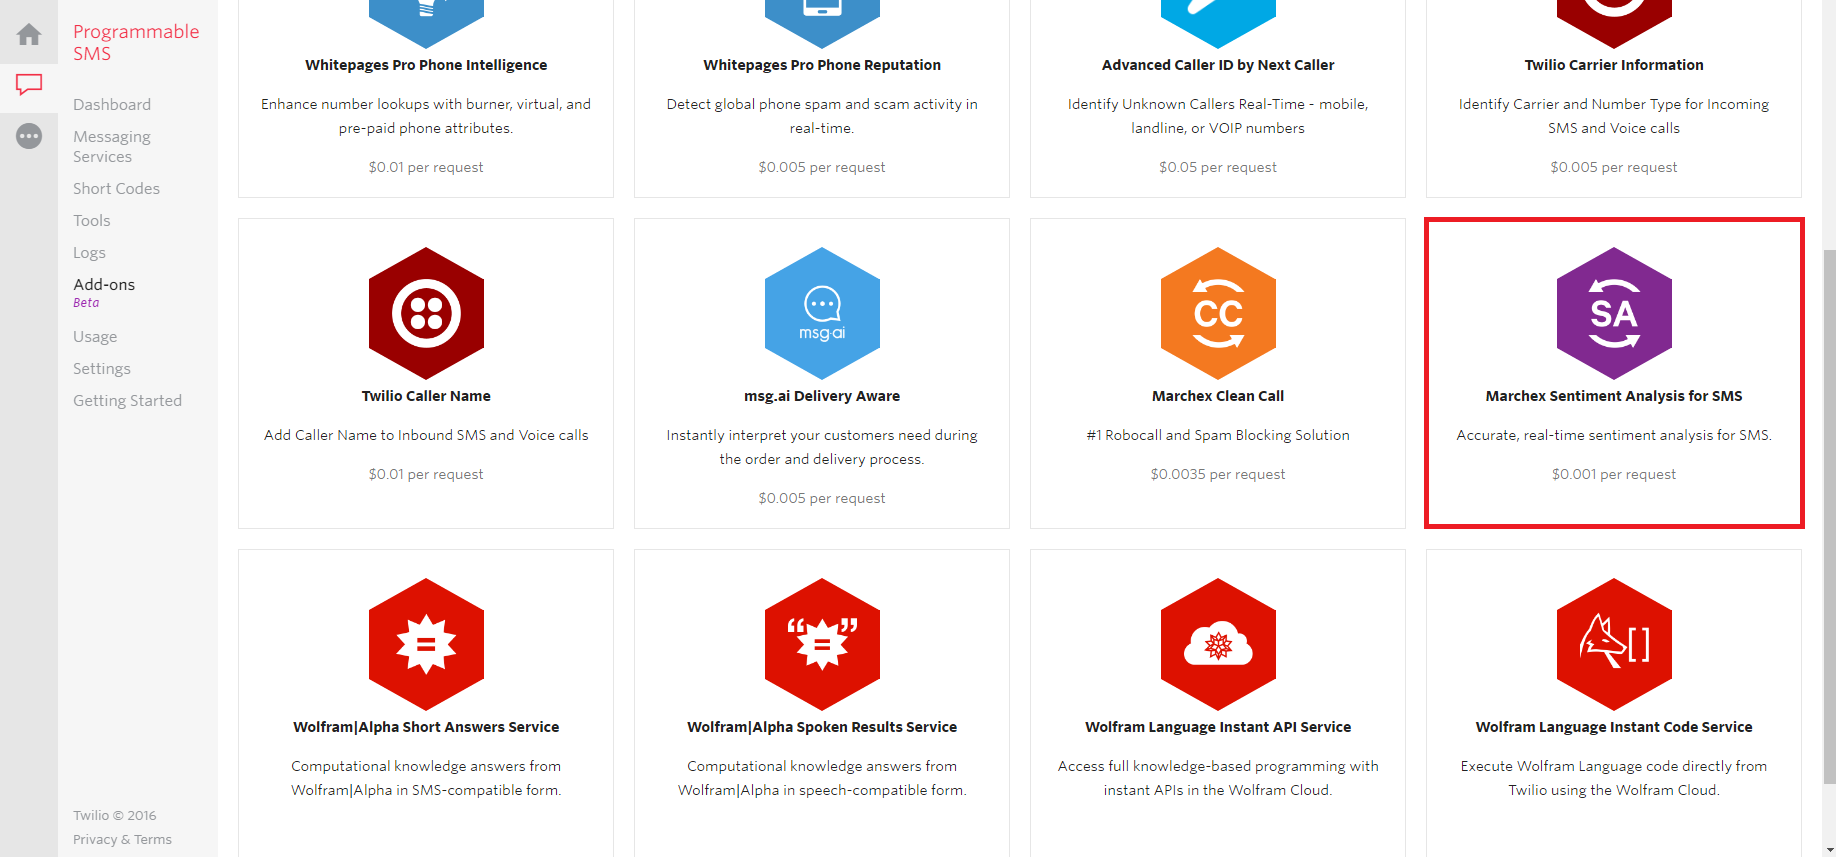
The Marchex Sentiment Analysis add-on takes an SMS message and computes a sentiment score between 0.0 and 1.0, where 0.0 is most negative sentiment and 1.0 is the most positive sentiment:

Press the Install button and agree to the terms of the service. You'll see the following screen as confirmation:
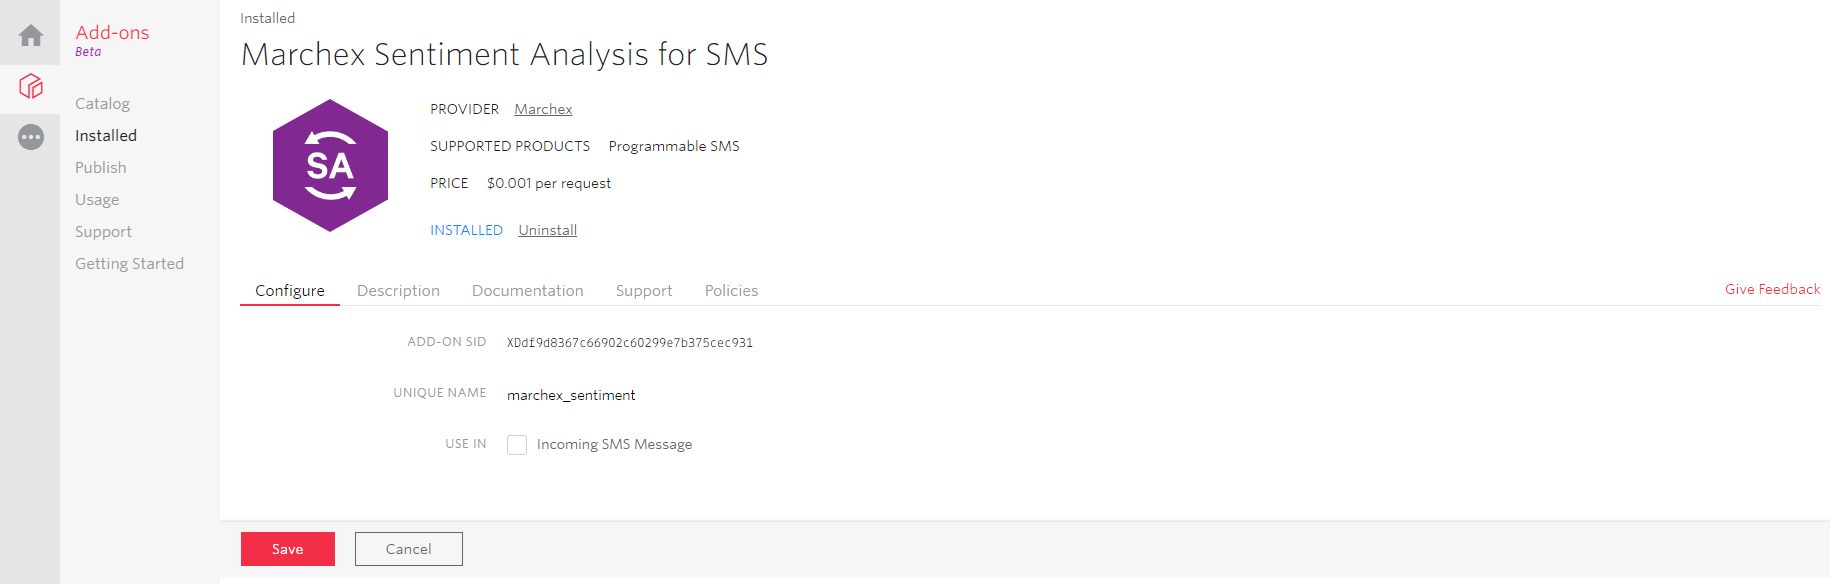
Check the Use In Incoming SMS Message option and press the Save button.
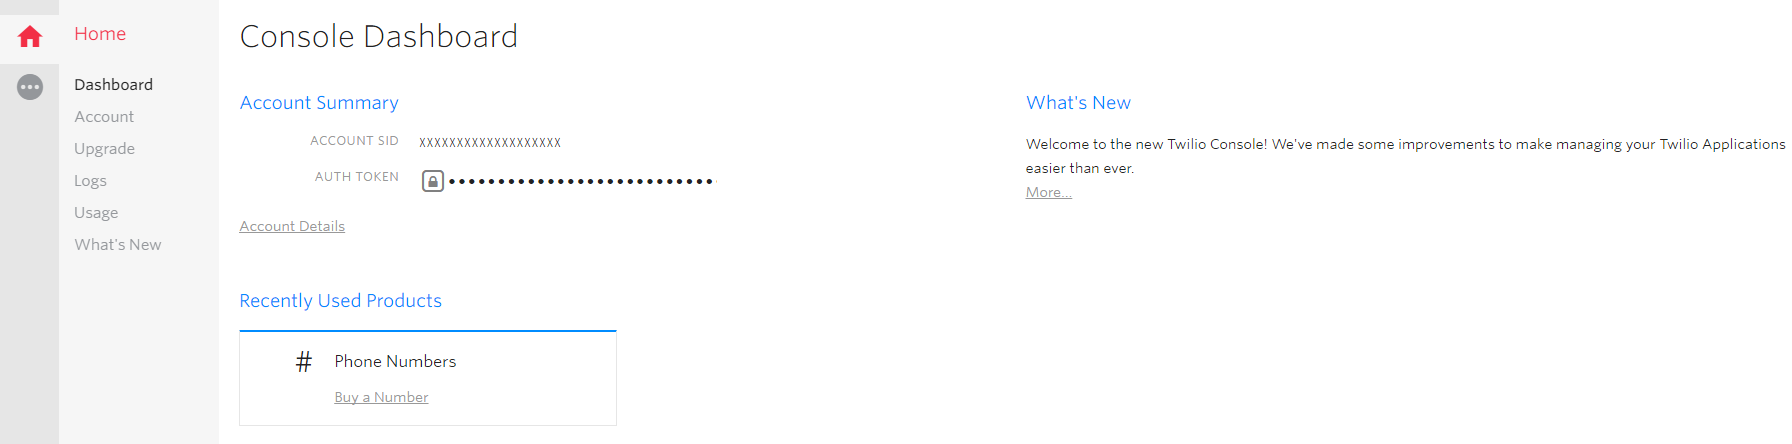
Finally, go to your console and copy your Auth Token, you may need it later:
Ngrok
When an SMS is sent to our Twilio number, a webhook will be triggered (think of it as a callback). This means an HTTP request will be made to our server, so we'll either need to deploy our application on the cloud or keep it locally and use a service like ngrok.
Ngrok proxies external requests to your local machine by creating a secure tunnel and giving you a public URL.
It is a Go program, distributed as a single executable file (with no additional dependencies). So for now, just download it from https://ngrok.com/download and unzip the compressed file.
Fanout Cloud
We'll need a Fanout account, sign up here.
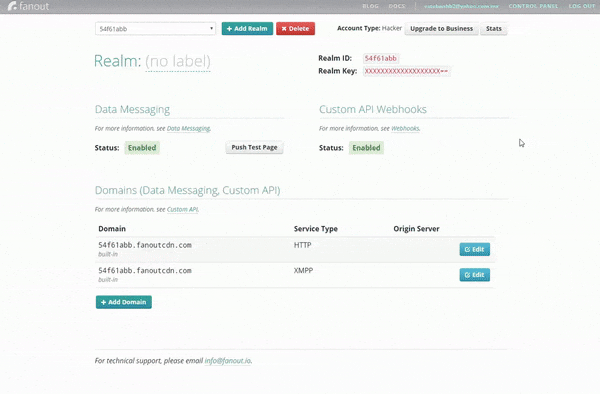
When the account is activated, go to your dashboard:
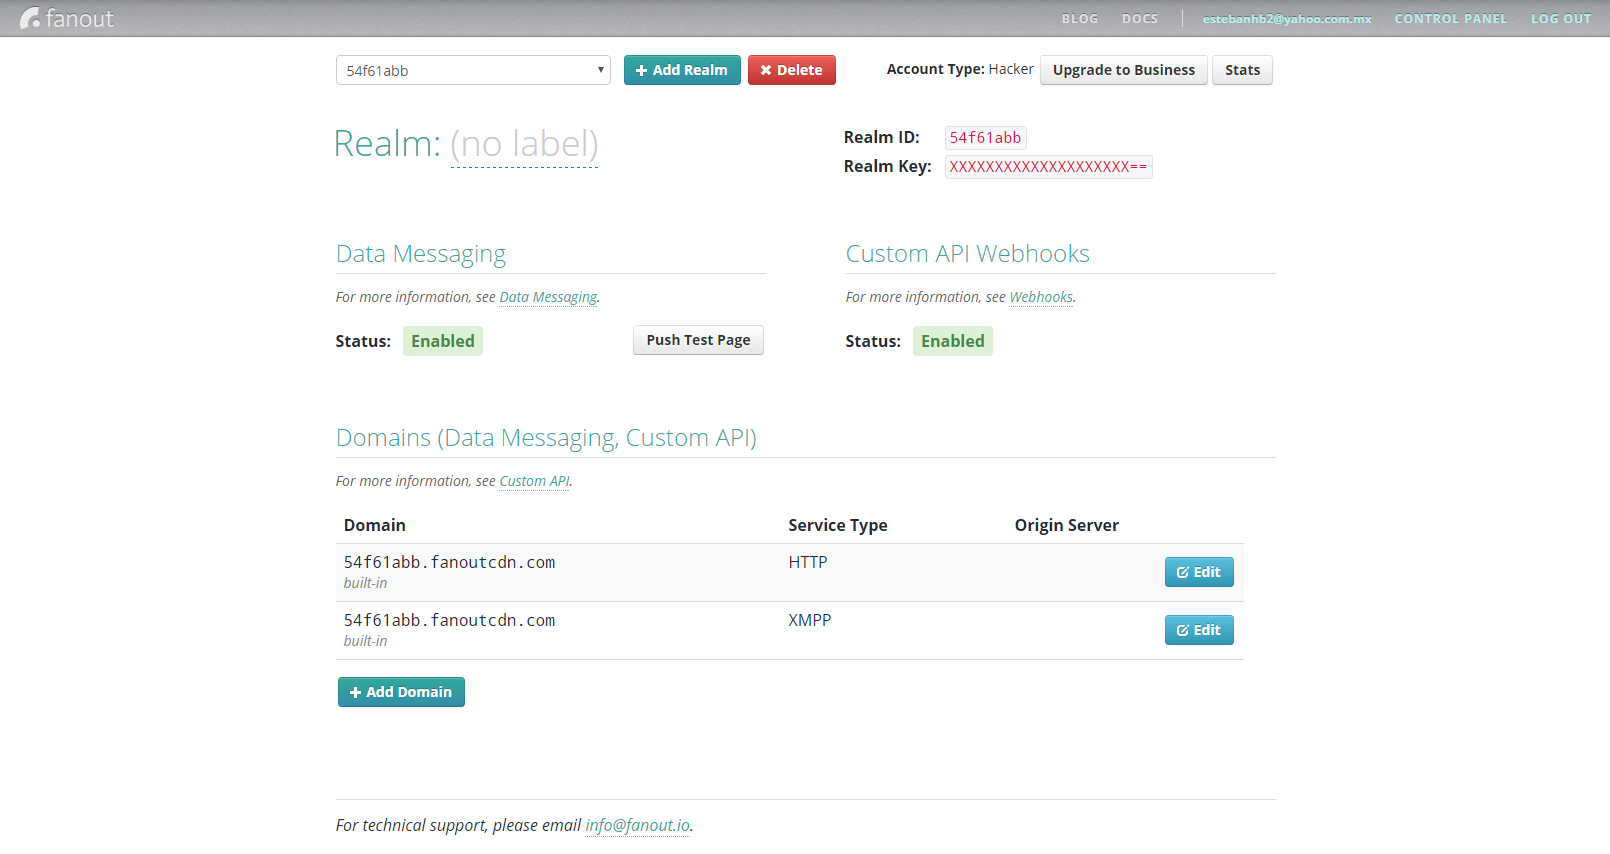
To copy your Realm ID and Realm Key, we'll need them later.
Node.js
You'll also need to have Node.js version 4.4 or higher and npm installed. You can download an installer for your platform here.
Now that we have all we need, let's create the app.
Setting up the application
Create a new directory and cd into it:
mkdir sms-sentiment && cd sms-sentiment
We're going to use ECMAScript 2015 so let's set up Babel to transform this syntax to one most browsers can understand by creating the configuration file .babelrc:
echo '{ "presets": ["react", "es2015", "stage-0"] }' > .babelrc
Babel 6.x does not ship with any transformations enabled, so you need to explicitly tell it what transformations to run by using a preset.
The first two are self-descriptive. The stage-x presets are changes to the language that haven’t been approved to be part of a release of Javascript.
The TC39 categorizes proposals into 4 stages:
- stage-0 - Strawman: just an idea, possible Babel plugin.
- stage-1 - Proposal: this is worth working on.
- stage-2 - Draft: initial spec.
- stage-3 - Candidate: complete spec and initial browser implementations.
- stage-4 - Finished: will be added to the next yearly release.
stage-0 includes all plugins from presets of all levels. stage-1 includes all plugins from presets 1 to 4 and so on.
To execute Babel and bundle our scripts with their dependencies, we'll use Webpack and npm. Let's install Webpack (globally):
npm install -g webpack
(Don't forget to add sudo if you're working on Linux.)
Now add a package.json configuration file with:
npm init
Alternatively, if you want to accept all the defaults:
npm init -y
Next, install the Babel dependencies and presets (and a polyfill to emulate a full ES2015 environment) with:
      npm install --save-dev babel-core babel-loader
npm install --save-dev babel-preset-es2015 babel-preset-react babel-preset-stage-0 babel-polyfill
Do the same with Webpack:
npm install --save-dev webpack
We're using --save-dev because these dependencies are only required to develop the application. For that reason, they can be listed under the devDependencies section of package.json.
For running the application, we'll need Express, React, Twilio, Fanout, and other dependencies. Let's add them now:
npm install --save express ejs body-parser path react react-dom twilio fanoutpub faye
Next, create a webpack.config.js file with the following content:
      var path = require("path");

module.exports = {
  entry: ["./src/app.js"],

  output: {
    filename: "public/js/bundle.js",
    sourceMapFilename: "public/js/bundle.map"
  },

  devtool: "#source-map",

  module: {
    loaders: [
      {
        loader: "babel",
        exclude: /node_modules/
      }
    ]
  }
};
This way, Webpack will create a public/js/bundle.js file with all of the application's JavaScript code (from the script /src/app.js).
Next, create a config.js file with the following content:
      module.exports = {
  twilio: {
    validate: false
  },

  fanout: {
    realm_id: "<YOUR_FANOUT_REALM_ID>",
    realm_key: "<YOUR_FANOUT_REALM_KEY>"
  },

  channel: "sms",

  port: process.env.APP_PORT || 3000
};
Finally, add the following start script to package.json. This script packs our application and starts the Node.js server:
      {
  ...
  "scripts": {
    "start": "webpack && node server.js"
  },
  ...
}
We'll review the server.js code in the next section.
Setting up Express
Let's start by setting up a simple Express web application.
Create the server.js file and write the following require statements:
      var express = require("express");
var ejs = require("ejs");
var bodyParser = require("body-parser");
var path = require("path");
var config = require("./config");
Now create the Express object:
var app = express();
Add the configuration to capture both the body and URL parameters:
      app.use(bodyParser.json());
app.use(bodyParser.urlencoded({ extended: true }));
Add the configuration of the public directory (to serve CSS files, for example):
app.use(express.static(path.join(__dirname, "public")));
We'll be using EJS as the template library, so let's define views as the directory to store our templates and configure Express to use EJS as the view engine:
      app.set("views", path.join(__dirname, "views"));
app.set("view engine", "ejs");
Next, let's add the following code to respond to the / route with the index template:
      app.get("/", function(req, res) {
  res.render("index", {});
});
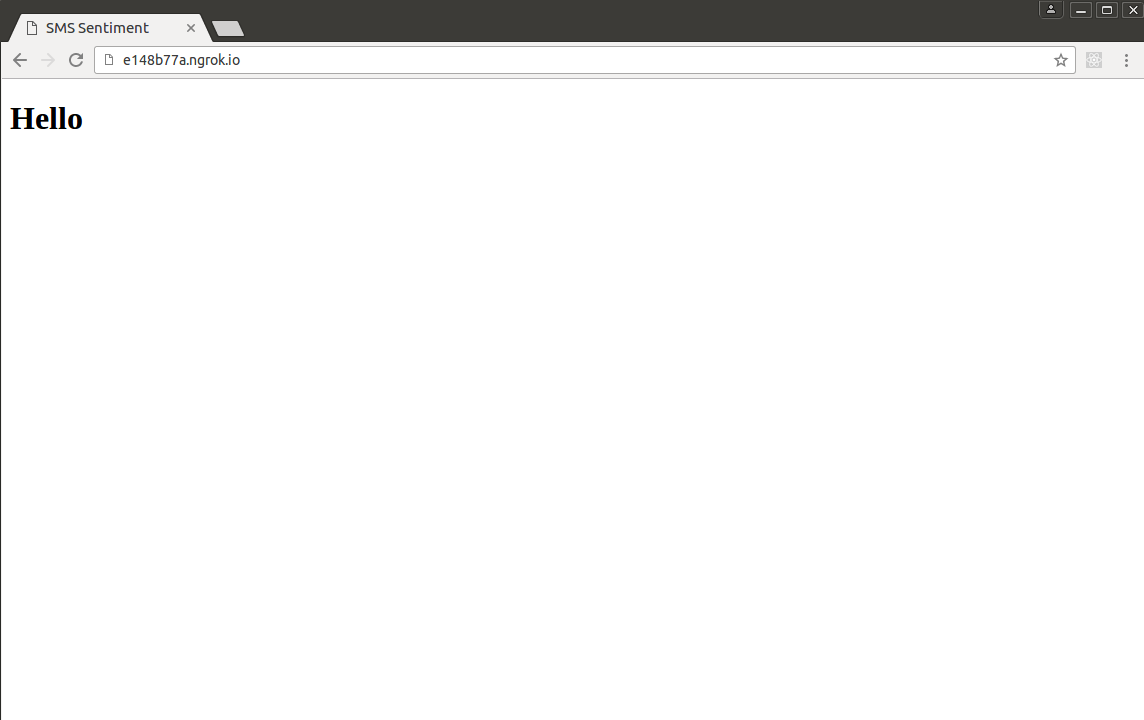
And create the corresponding views/index.ejs file with some content, for example:
      <!DOCTYPE html>
<html>
<head>
    <meta charset="utf-8">
    <meta name="viewport" content="width=device-width, initial-scale=1">
    <title>SMS Sentiment</title>
</head>
<body>
    <h1>Hello</h1>
</body>
</html>
Back to the server.js file, add the code to start the server:
      app.listen(config.port, function() {
  console.log("Server up and listening on port %d", config.port);
});
If you execute the command node server.js and go to https://localhost:3000 (or whatever your host and port are), you should see something like this:

In the next section, we'll expose our server to the Internet with ngrok.
Setting up ngrok
In a new terminal window, navigate to the directory where you unzipped ngrok.
We'll start ngrok by dictating which port we want to expose to the Internet. In this case, we'll tell it to expose port 3000:
./ngrok http 3000
If you're on Windows, the ngrok syntax is slightly simpler:
ngrok http 3000
Now, you should see something like this:
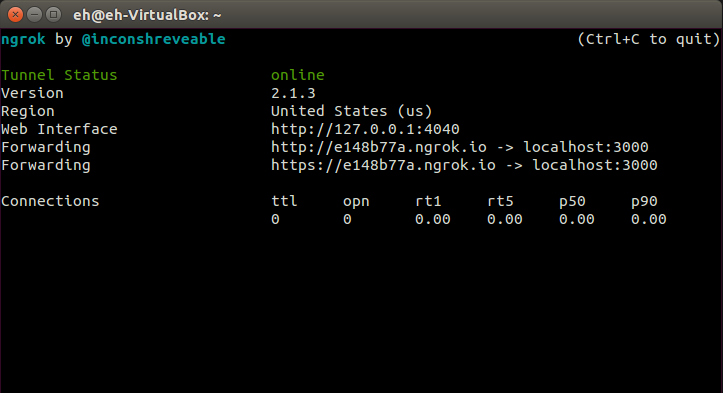
See that URL in the Forwarding row(s) with the ngrok.io domain? That's your public URL. Your's will be different than mine, since ngrok generates a random URL every time you run it.
If you open in a browser https://[YOUR_GENERATED_SUBDOMAIN].ngrok.io, you should see the same page found on https://localhost:3000:
Open this ngrok URL on another computer if you want to test this out. Once again, you should see the same page. Our local server is now available publicly.
The only disadvantage to this architecture is that our URL is not permanent. If you restart ngrok, it will give you another URL, likely a different one.
You can specify a fixed subdomain. For example, to get the URL https://sms.ngrok.io use the command:
ngrok http -subdomain=sms 3000
However, this requires a paid plan. You can get more info about it in this page.
Nevertheless, as long as you don't stop or restart ngrok, the URL won't change, so forget about that terminal window, let's leave it running for now.
In the next section, we'll review the Twilio API for receiving/sending SMS messages.
Receiving SMS messages
Let's configure our Twilio number to communicate to our server when it receives an SMS message.
Go to your Phone Numbers Console and select your phone number. The following screen will be shown:
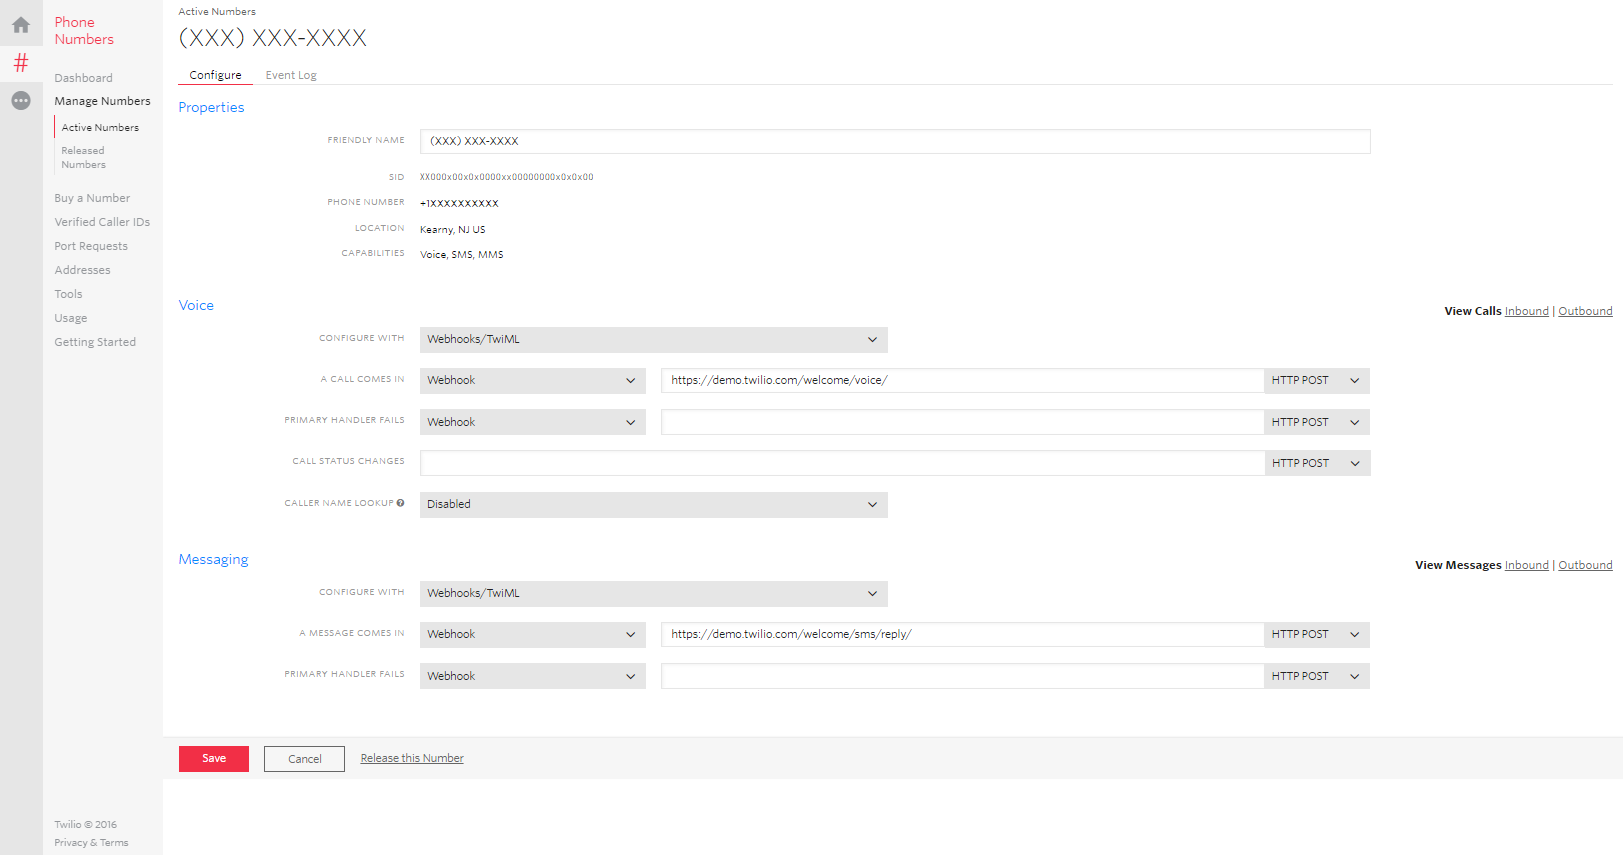
Let's say that Twilio will call the /sms route in our server, so enter your ngrok URL with this route in the corresponding field of the Messaging section:

Make sure the HTTP request type is set to POST. Save your changes.
Now, we'll add the code to receive the message on the /sms route.
We'll be using the Twilio API for Node.js, which is documented on https://twilio.github.io/twilio-node/.
At the beginning of the server.js file, import the Twilio module:
var Twilio = require("twilio");
And before (or after) the definition of the / route, add the following code:
app.post("/sms", Twilio.webhook(config.twilio), function(req, res) {});
This will define the /sms POST route and the Twilio.webhook function, which acts as a Express middleware that determines if the request was sent by Twilio. This webhook also makes the Express response object aware of TwimlResponse objects.
However, the config.twilio object that we specify automatically defines the validate option as false, which disables this validation. If the validation is enabled (you'll need to enable it if you don't want to receive requests from anyone), this function will look to the environment variable TWILIO_AUTH_TOKEN for your Twilio auth token to validate the request.
When Twilio sends an HTTP request to your server, it includes a value in the header that is signed with your auth token. So, if you enable this option, make sure to export this variable before running the server. On Linux, for example, do it this way:
export TWILIO_AUTH_TOKEN=xxx0xxx00xx0xxxxxxx0xxxx0xxxx00xxx0
Moving on, when an SMS is sent to your Twilio number, your server will get an object like the following:
      {
 ToCountry: 'US',
  ToState: 'NJ',
  SmsMessageSid: 'SMc1cc1b8b81b28dceb80b42a925d37777',
  NumMedia: '0',
  ToCity: 'NEWTON',
  FromZip: '',
  SmsSid: 'SMc1cc1b8b81b28dceb80b42a925d37777',
  FromState: 'Df.',
  SmsStatus: 'received',
  FromCity: 'Mexico',
  Body: 'This is a test',
  FromCountry: 'MX',
  To: '+1201555555',
  ToZip: '07860',
  AddOns: '{
				"status":"successful",
				"message":null,
				"code":null,
				"results":{
					"marchex_sentiment":{
						"request_sid":"XR8b665c4741eabb7c3382d814be2d225r",
						"status":"successful",
						"message":null,
						"code":null,
						"result":{
							"result":0.1545030027627945
						}
					}
				}
			}',
  NumSegments: '1',
  MessageSid: 'SMc7cc1b8b81b28dceb80b42a925d37089',
  AccountSid: 'AC1127a09cf75ed2265926304233f3a2e7',
  From: '+52555555555',
  ApiVersion: '2010-04-01'
}
As you can see, there's a lot of information on this object. For this application, we'll only use the text of the message, the number, the country from which it was sent, and the sentiment result.
So let's extract this information with the following code:
      app.post("/sms", Twilio.webhook(config.twilio), function(req, res) {
  var addOn = JSON.parse(req.body.AddOns);

  // Create a data object with the properties you want to send
  var msg = {
    text: req.body.Body,
    from: req.body.From,
    sentiment: addOn.results.marchex_sentiment.result.result,
    country: req.body.FromCountry
  };
});
Additionally, let's respond to this message to acknowledge it was received. To do this, we'll need to send back a TwiML response:
      app.post("/sms", Twilio.webhook(config.twilio), function(req, res) {
  var addOn = JSON.parse(req.body.AddOns);

  // Create a data object with the properties you want to send
  var msg = {
    text: req.body.Body,
    from: req.body.From,
    sentiment: addOn.results.marchex_sentiment.result.result,
    country: req.body.FromCountry
  };

  // Create a TwiML response
  var twiml = new Twilio.TwimlResponse();
  twiml.message("Message received");

  // Send the TwiML response as XML
  res.send(twiml.toString());
});
If we restart the server with these changes and then send an SMS message to our Twilio number, we should receive an SMS with the following text:
      Sent from your Twilio trial account:
Message received
Ngrok keeps a log of all the traffic going through it, and this bookkeeping is essential to our application. Go to https://localhost:4040 and you should see something like this:
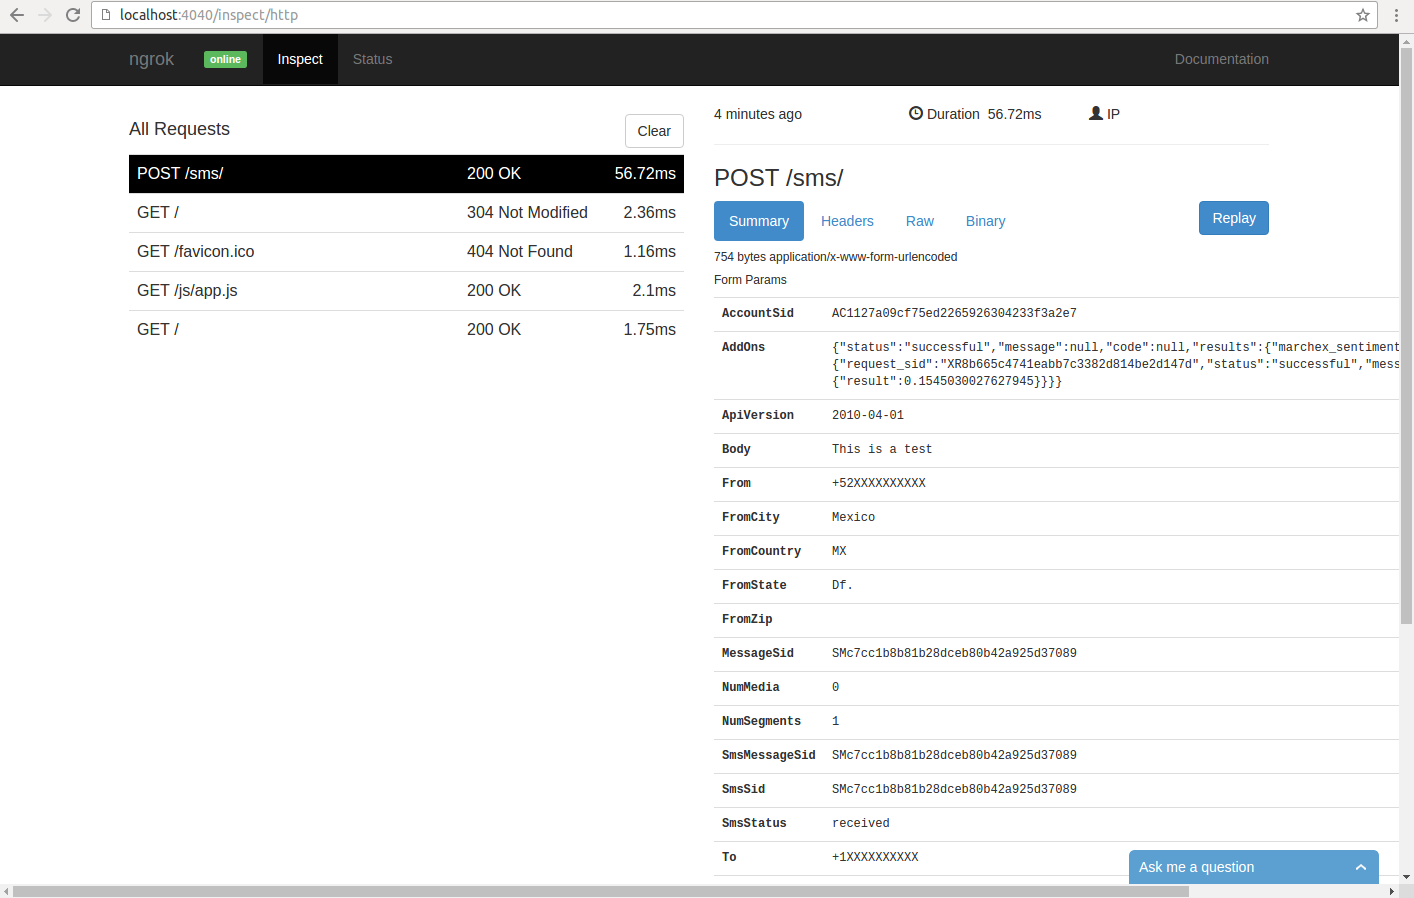
You can even replay a request with the Replay button located in the right top of the window when you select one request from the list on the left.
At the bottom of the same window, you can see the TwiML response:
<?xml version="1.0" encoding="UTF-8"?><Response><Message>Message received</Message></Response>
If you select your Twilio number on your Phone Numbers Console and then select the View Messages Inbound option, you'll see the message you just sent:

The same applies to the response sent by Twilio with the View Messages Outbound option.
Now let's talk about Fanout Cloud.
Publishing messages with Fanout Cloud
Fanout is a publish/subscribe service that makes it easy to build real-time APIs and applications.
It's based on Pushpin, an open source reverse proxy that in turn, makes it easy to create WebSocket, HTTP streaming, and HTTP long-polling services using any web stack as the back-end.
There are two main ways you can use Fanout:
- Publish/Subscribe Messaging. To send data using protocols, such as Bayeux and XMPP (Extensible Messaging and Presence Protocol).
- WebSockets are supported automatically when possible.
- Custom real-time API. To send data using five low-level network transports: HTTP long-polling, HTTP streaming, WebSockets, Webhooks (outbound HTTP), and XMPP.
You can find more information about this on its quickstart guide.
The application will use Fanout's publish/subscribe service to get the SMS information in real-time. This will be done with Faye, a Bayeux-compatible client library.
Why use Fanout Cloud when we can do the same with a simple WebSocket library like Socket.IO? Well, you might not need to use WebSockets. Also, by using Fanout's infrastructure, you don't have to worry about neither scalability nor additional server to manage.
Fanout is organized by realms and channels. A realm can contain any number of channels and different realms may use the same channel names without any problem. Messages are published to channels, and messages are relayed to the subscribers of each channel for that realm.
When you create a Fanout account, one realm will be automatically created for you. In contrast, channels are created on demand at any time.
To send the object with the SMS information, we'll use the Node.js Fanout library.
At the beginning of the server.js file, import the Fanout module:
var Fanout = require("fanoutpub");
Before the definition of the /sms route, initialize the Fanout object passing your Realm ID and Realm Key in this way:
var fanout = new Fanout.Fanout(config.fanout.realm_id, config.fanout.realm_key);
To publish the object with the SMS information, call the publish() function. It takes two parameters: a channel, and the object within the channel that we want to publish:
fanout.publish(config.channel, msg);
Just like that, we're on our way to make a real-time application. In the following section, we'll set up a the view with React.
Creating the view with React
Let's start by defining the HTML that will contain our React application. Modify views/index.ejs so it looks like the following:
      <!DOCTYPE html>
<html>
<head>
    <meta charset="utf-8">
    <meta name="viewport" content="width=device-width, initial-scale=1">
    <title>SMS Sentiment</title>

    <link rel="stylesheet" href="css/simplegrid.css">
    <link rel="stylesheet" href="css/style.css">
    <link rel="stylesheet" href="https://cdn.jsdelivr.net/epoch/0.8.4/epoch.min.css">
</head>
<body class="epoch-my-gauge-theme">

    <div id="root"></div>

    <script src="https://code.jquery.com/jquery-2.2.4.min.js"></script>
    <script src="https://cdnjs.cloudflare.com/ajax/libs/d3/3.5.17/d3.min.js"></script>
    <script src="https://cdn.jsdelivr.net/epoch/0.8.4/epoch.min.js"></script>
    <script src="/js/bundle.js"></script>

</body>
</html>
We'll use Simple Grid to create the layout, so create the public/css directories and download the file https://github.com/ThisIsDallas/Simple-Grid/blob/master/simplegrid.css
Next, create the style.css file:
      html,
body,
#root {
  height: 100%;
  width: 100%;
  margin: 0;
}

#container {
  min-width: 100%;
  min-height: 100%;
  overflow-y: auto;
  overflow-x: hidden;
  color: #fff;
  transition: all 7s ease-in-out;
}

.epoch-my-gauge-theme .epoch .gauge-labels .value {
  fill: #fff;
}

.epoch-my-gauge-theme .epoch .gauge .arc.outer {
  stroke: #fff;
}

.epoch-my-gauge-theme .epoch .gauge .arc.inner {
  stroke: #fff;
}

.epoch-my-gauge-theme .epoch .gauge .tick {
  stroke: #fff;
}

.epoch-my-gauge-theme .epoch .gauge .needle {
  fill: orange;
}

.epoch-my-gauge-theme .epoch .gauge .needle-base {
  fill: #fff;
}

#real-time-gauge {
  margin: 0 auto;
}

.msgs {
  list-style: none;
  max-width: 600px;
  margin: 0 auto;
  padding: 1.5em 2em;
}

.msgs .msg {
  margin-bottom: 1.5em;
  padding-top: 1.5em;
}

.msgs .msg + .msg {
  border-top: 1px solid #fff;
}

.msgs .msg-from {
  margin-bottom: 0.4em;
  font-weight: bold;
}

.msgs .msg-text {
  font-style: italic;
  color: rgba(255, 255, 255, 0.7);
}

.msgs .msg-text:before,
.msg .msg-text:after {
  content: '"';
}

.msgs .msg-info {
  margin-top: 1.5em;
  padding: 0;
  overflow: hidden;
  list-style: none;
}

.msgs .msg-info li {
  float: left;
}

.msgs .msg-info li + li {
  margin-left: 1em;
}

.msgs .msg-info li span {
  font-style: italic;
  color: rgba(255, 255, 255, 0.7);
}

.center-align {
  text-align: center;
}
As said before, we'll be using the Epoch library, so here we're just defining a custom style (epoch-my-gauge-theme) for the gauge along with styles for the SMS messages.
Back to the HTML file, we're also adding:
- The Epoch CSS file (epoch.min.css)
- The element where the React elements will be injected (<div id="root"></div>)
- The required JS files needed by Epoch, jQuery, and the D3 visualization library, required by the first one (although the lastest version of this library at the time of this writing is 4.1.1, Epoch requires version 3.X.X).
- The bundle.js file built by Webpack.
The src directory will store the JavaScript code of our application. Inside it, we're going to structure the application in the following way:
      src
|— components
| | |— gauge.js
| | |— gauge-container.js
| | |— index.js
| | |— message.js
| | |— messages.js
| |— app.js
The starting point will be app.js:
      import React, { Component } from "react";
import ReactDOM from "react-dom";

import Index from "./components/index";

ReactDOM.render(<Index />, document.getElementById("root"));
This file renders the components defined in components/index.js in the element with ID root. Structuring the initial point of our app this way will helps us later to make it isomorphic.
The index component will be the main container for our application. At this level, the app will subscribe to the Fanout channel to listen for SMS messages. Let's first import everything we'll need:
      import React, { Component } from "react";
import ReactDOM from "react-dom";

import GaugeContainer from "./gauge-container";
import Messages from "./messages";

import Faye from "faye";
import config from "../../config";
And then create the Faye client pointing to your Fanout Realm ID:
      var fanout = new Faye.Client(
  `http://${config.fanout.realm_id}.fanoutcdn.com/bayeux`
);
Next, in the constructor of the exported component, define the state properties we're going to use:
      export default class App extends Component {
  constructor(props) {
    super(props);
    this.state = {
      messages: [],
      background: "linear-gradient(135deg, #2979FF 0%, #FF1744 100%)",
      sentiment: 0
    };
  }
}
The state of the component includes:
- messages: the array that will store the objects (with the SMS information) received via Fanout.
- background: the style to show the gradient background that will change depending on the sentiment of the latest message.
- sentiment: the sentiment value of the latest message.
According to the React Component Lifecycle Specification, componentDidMount() is executed once, only on the client, not on the server (remember this point when we make our application isomorphic), and it's the method to use to integrate other JavaScript frameworks, or send AJAX requests.
So let's subscribe to the Fanout channel in the componentDidMount() method (notice the / character to refer to the channel):
      componentDidMount() {
	fanout.subscribe('/' + config.channel, this.updateMessages).then(() => {
		console.log('Subscribed to ' + config.channel);
	});
}

updateMessages = (data) =>{
	var p1 = 0, p2 = 100;
	if(data.sentiment < 0.5) {
		p1 = (0.5 - data.sentiment) * 100;
	} else {
		p2 = (1 - (data.sentiment - 0.5)) * 100;
	}

	this.setState({
			messages: [ data, ...this.state.messages ],
			background: `linear-gradient(135deg, #2979FF ${p1}%, #FF1744 ${p2}%)`,
			sentiment: data.sentiment
	});
}
When a message arrives, the updateMessages function is executed. Notice how the sentiment is used to calculate the percentage of the gradient for each color (I'm sure there are better algorithms to achieve it, but this does the job), and how the new message is prepended to the existing array of messages.
In this case, the spread operator (...) is used to get all the elements of the array and form a new one. React works best with immutable objects, so instead of simply adding the new element to the existing array with a function like splice(), we create a new array.
In the render() method, we use the state properties for the background style and pass the SMS information to the subcomponents:
      render() {
	const style = { background: this.state.background };

	return (
		<div id="container" className={'grid'} style={style}>
			<GaugeContainer sentiment={this.state.sentiment}  />
			<Messages messages={this.state.messages} />
		</div>
	);
}
The GaugeContainer component is a wrapper for the Gauge component:
      import React, { Component } from "react";
import Gauge from "./gauge";

export default class GaugeContainer extends Component {
  constructor(props) {
    super(props);
  }

  render() {
    return (
      <div className={"col-1-1"}>
        <div className={"content center-align"}>
          <h1>SMS Sentiment</h1>
          <Gauge sentiment={this.props.sentiment} />
        </div>
      </div>
    );
  }
}
This Gauge component creates the actual gauge in the componentDidMount() function using the Epoch library:
      import React, { Component } from "react";

export default class Gauge extends Component {
  constructor(props) {
    super(props);
  }

  componentDidMount() {
    // store the object on `this.gauge` so we can access elsewhere
    this.gauge = $(this.refs.gauge).epoch({
      type: "time.gauge",
      value: this.props.sentiment
    });
  }

  componentWillReceiveProps(nextProps) {
    this.gauge.update(nextProps.sentiment);
  }

  render() {
    return (
      <div id="real-time-gauge" className={"epoch gauge-large"} ref="gauge" />
    );
  }
}
Notice how the div element, in which the component is rendered, is referenced with ref and this.refs. You may have seen other tutorials get the DOM element of a component by using either the ReactDOM.getDOMNode() or the ReactDOM.findDOMNode() functions. However, after React 0.14, this.refs is the recommended way to access the DOM. Remember that React works with a Virtual DOM while jQuery works with the real DOM.
We saved a reference to the Epoch gauge component (this.gauge), so when the sentiment property is updated, the gauge can be updated too (in the componentWillReceiveProps function).
To render the messages, the Messages component acts like a container:
      import React, { Component } from "react";
import ReactCSSTransitionGroup from "react-addons-css-transition-group";
import Message from "./message";

export default class Messages extends Component {
  constructor(props) {
    super(props);
  }

  render() {
    const messagesMapped = this.props.messages.map((result, index) => {
      const key = this.props.messages.length - index;
      return <Message message={result} key={key} />;
    });

    return (
      <div className={"col-1-1"}>
        <div className={"content"}>
          <ReactCSSTransitionGroup
            component="ul"
            className="msgs"
            transitionName="msg-transition"
            transitionEnterTimeout={500}
            transitionLeaveTimeout={500}
          >
            {messagesMapped}
          </ReactCSSTransitionGroup>
        </div>
      </div>
    );
  }
}
This code is significant for two main reasons.
First, React requires every message component in a collection to have a unique identifier defined by the key property. This helps React determine when elements are added or removed.
For example, s new elements are prepended instead of appended, we can't give the first element the index 0 as key, since this will only work the first time an element is added. In fact, for the elements added next in line, there will be an element with key 0 already. Therefore, keys are assigned this way:
const key = this.props.messages.length - index;
The second thing is that we use the ReactCSSTransitionGroup add-on component to animate the insertion of a new SMS message on the page. We can do the same thing by using plain CSS only, but let's figure out how to do it the React way.
First install this module with NPM:
npm install --save react-addons-css-transition-group
ReactCSSTransitionGroup wraps the elements that you want to animate. By default, it renders a span to wrap them, but since we're going to work with li elements, we specify the wrapper tag ul with the component property. className becomes a property of the rendered component, as any other property that doesn't belong to ReactCSSTransitionGroup.
transitionName is the prefix used to identify the CSS classes to perform the animation. Based on this, add the following CSS classes to public/css/style.css:
      .msg-transition-enter {
  opacity: 0.01;
}

.msg-transition-enter.msg-transition-enter-active {
  opacity: 1;
  transition: opacity 500ms ease-in;
}

.msg-transition-leave {
  opacity: 1;
}

.msg-transition-leave.msg-transition-leave-active {
  opacity: 0.01;
  transition: opacity 500ms ease-in;
}
Notice that animation duration needs to be specified in both the CSS and the component properties.
You can find more information about animations in React here.
Finally, the Message component renders the SMS information in the following way:
      import React, { Component } from "react";

export default class Message extends Component {
  constructor(props) {
    super(props);
  }

  render() {
    const { from, text, country, sentiment } = this.props.message;
    return (
      <li className={"msg"}>
        <div className={"msg-from"}>+XXXXX - XXX - {from.slice(-4)}</div>
        <div className={"msg-text"}>{text}</div>
        <ul className={"msg-info"}>
          <li>
            Country: <span>{country}</span>
          </li>
          <li>
            Sentiment: <span>{sentiment}</span>
          </li>
        </ul>
      </li>
    );
  }
}
Now if we run the application using npm start, Webpack will bundle all the client files and you should see this page in the browser:

You can play with the application either by sending SMS messages to your Twilio number or by replaying the request with Ngrok. If you're trying the latter option, make sure that you have the webhook validation disabled. If you go to your Fanout Control Panel and then click on the Stats button, you'll see the following information:
Isomorphic React
We now have a fully functional application, but why stop here? Let's turn this application into an isomorphic one.
Isomorphic (or universal) is a term that means that the same JavaScript code can run on the client and server without modification, so the server can generate the page and serve it as plain HTML.
In essence, server-rendering is a simple concept achieved with only one function call on Node.js:
const appHTML = renderToString(<App />);
However, Node.js doesn't know about JSX (the syntax used by React; <App>), so what we can do is to use Webpack to build a server bundle, just like the client bundle.
Create the file webpack.server.config.js with the following content:
      var fs = require("fs");
var path = require("path");

module.exports = {
  entry: path.resolve(__dirname, "server.js"),

  output: {
    filename: "server.bundle.js"
  },

  target: "node",

  externals: fs
    .readdirSync(path.resolve(__dirname, "node_modules"))
    .concat(["react-dom/server", "react/addons"])
    .reduce(function(ext, mod) {
      ext[mod] = "commonjs " + mod;
      return ext;
    }, {}),

  node: {
    __filename: true,
    __dirname: true
  },

  module: {
    loaders: [
      {
        loader: "babel",
        exclude: /node_modules/
      }
    ]
  }
};
This file tells Webpack to take server.js as the entry point to generate the server.bundle.js file with all its dependencies bundled together.
The target: 'node' option tells webpack not to touch any Node.js built-in modules. However, Webpack will load modules from the node_modules directory and bundle them too. To avoid this, we use the externals option. A module listed as an external won't be bundled. For more on externals, see this page.
Unfortunately, using externals assumes a browser environment, so something like require('twilio') will be turned into the global variable twilio. To keep our require statements, we need to create an object with a key/value of each module name and to prefix the value with commonjs.
Next, options are passed to node so __filename and __dirname work as expected.
Open server.js and import the React modules that we'll use (thanks to Webpack and Babel, we can now use import instead of require):
      import React from "react";
import { renderToString } from "react-dom/server";
import App from "./src/components/index";
And replace the / route definition with the following:
      app.get("/", function(req, res) {
  const appHtml = renderToString(<App />);

  res.render("index", {
    appHtml: appHtml
  });
});
Notice that we're using src/components/index.js instead of src/app.js to render the app on the server side. The reason is that src/app.js references the DOM (Document Object Model), which is a browser concept that doesn't exist in the server.
Likewise, since componentDidMount can contain references to the DOM, it won't be executed on the server side. But don't worry, when the React app is loaded in the client (remember that the entry point in the client is still src/app.js), this function will be executed.
Also, modify /views/index.ejs so it can render the generated HTML:
      ...
<div id="root"><%- appHtml %></div>
...
In EJS, the <%- tag outputs the unescaped value of the object into the template (in contrast to the more commonly used <%=).
Make sure that you don't leave any space between the opening and closing div tag, otherwise, React will complain about the blank space.
Finally, we have to modify the start script from package.json to generate the server bundle every time the server is started. Let's organize our scripts in this way:
      ...
"scripts": {
    "start": "npm run build && node server.bundle.js",
    "build:client": "webpack",
    "build:server": "webpack --config webpack.server.config.js",
    "build": "npm run build:client && npm run build:server"
},
...
npm run build will trigger the generation of the server and client bundles and node server.bundle.js will start the server with the generated bundle instead of server.js.
Type npm start and try the app. It should work like before but with the advantages of isomorphic javascript.
Conclusion
We have created a single page application with React that gets SMS information with the help of Twilio and Ngrok and shows it in real-time using Fanout Cloud. We also made it isomorphic with little modifications. Combining the right APIs, you can get simple yet powerful applications.
Remember that the code is on Github. Thanks for reading. Please leave all comments and feedback in the discussion section below. Pleasa favorite this tutorial if you found it informative!
Advance your tech skills today
Access courses on AI, cloud, data, security, and more—all led by industry experts.
