Virtual 3D Shapes in Your Living Room
Sep 6, 2019 • 12 Minute Read
Setting Up
To set up your augmented reality space, check out the first guide in this series: Introduction to Augmented Reality with ARKit.
Detecting Planes
To successfully blend virtual scenes with the real, physical world, we need to be able to identify the geometry of our surroundings. ARKit can detect flat surfaces in the real-world and provides their position and orientation. This information lets us place virtual objects on ceilings, tables, or other horizontal planes in the real-world.
I created a clone of the FirstARKitApp demo we created previously and named it PlaneDetection. We won’t need any scene assets in this demo, so I deleted it. I also removed the 3D-scene initialization code from the ViewController’s viewDidLoad() method, which should only contain the following lines of code:
      override func viewDidLoad() {
  super.viewDidLoad()

  // Set the view's delegate
  sceneView.delegate = self

  // Show statistics such as fps and timing information
  sceneView.showsStatistics = true
}
Next, we need enable plane detection in ARKit. This can be achieved by setting the planeDetection property on the session configuration object to ARWorldTrackingConfiguration.PlaneDetection.horizontal in the viewWillAppear() delegate method:
      override func viewWillAppear(_ animated: Bool) {
  super.viewWillAppear(animated)

  // Create a session configuration
  let configuration = ARWorldTrackingConfiguration()

  // Enable horizontal plane detection
  configuration.planeDetection = .horizontal

  // Run the view's session
  sceneView.session.run(configuration)
}
With this setting in place, the session will detect horizontal, flat surfaces in the real-world geometry captured by the device’s front side camera.
To disable plane detection, set the planeDetection property to an empty array literal.
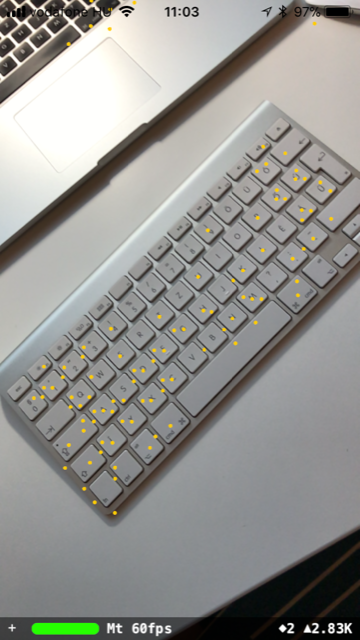
To visualize how plane detection works, we need to add the ARSCNDebugOptions.showFeaturePoints value to the scene view’s debugOptions.
      override func viewDidLoad() {
  super.viewDidLoad()
  …
  sceneView.debugOptions = [ARSCNDebugOptions.showFeaturePoints]
  …
}
Running the app will show visual indicators, the so-called feature points, as ARKit finds surfaces in real-time:

That’s cool, but how about visualizing the detected planes?
Here’s where we need the ARSCNViewDelegate. As you may recall, the ARSCNView’s delegate is set to self in the viewDidLoad() delegate method:
      override func viewDidLoad() {
  super.viewDidLoad()

  // Set the view's delegate
  sceneView.delegate = self
  …
}
The ARSCNViewDelegate protocol provides useful delegate methods. In this demo, we’ll rely on the renderer(_:didAdd node: for anchor:) delegate method. ARKit calls this delegate method whenever a new node corresponding to an anchor has been added to the scene.
Let’s take a closer look at the method:
func renderer(_ renderer: SCNSceneRenderer, didAdd node: SCNNode, for anchor: ARAnchor)
The first parameter is a scene renderer. This is our ARSCNView instance. The second one is a SCNNode object. The third parameter is an AR anchor object corresponding to the node.
So, what is an AR anchor object? AR anchors are used for tracking the real-world positions and orientations of real or simulated objects relative to the camera. When we enable horizontal plane detection, ARKit calls the renderer(_: didAdd node:, for anchor:) delegate method automatically whenever it detects a new horizontal plane and adds a new node for it. We receive the anchor of each detected flat surface, which will be of type ARPlaneAnchor.
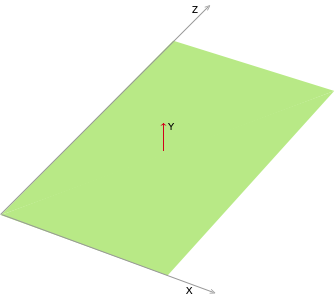
ARPlaneAnchor represents a planar surface in the world, defined using X and Z coordinates, where Y is the plane’s normal.
Let’s implement the renderer(_: didAdd node:, for anchor:) method:
      func renderer(_ renderer: SCNSceneRenderer, didAdd node: SCNNode, for anchor: ARAnchor) {
  if let planeAnchor = anchor as? ARPlaneAnchor {
      let plane = SCNPlane(width: CGFloat(planeAnchor.extent.x), height: CGFloat(planeAnchor.extent.z)) plane.firstMaterial?.diffuse.contents = UIColor(white: 1, alpha: 0.75)

      let planeNode = SCNNode(geometry: plane)

      planeNode.position = SCNVector3Make(planeAnchor.center.x, planeAnchor.center.x, planeAnchor.center.z)
      planeNode.eulerAngles.x = -.pi / 2

      node.addChildNode(planeNode)
  }
}
Detailed Explanation of This Code
      if let planeAnchor = anchor as? ARPlaneAnchor
{
    …
}
We process only anchors of type ARPlaneAnchor, since we’re only interested in detecting planes.
let plane = SCNPlane(width: CGFloat(planeAnchor.extent.x), height: CGFloat(planeAnchor.extent.z))
To visualize the detected planes, I create an SCNPlane object. The SCNPlane is a SceneKit type representing a one-sided plane geometry.
Next, I set the plane’s width and height to the anchor extent’s X and Y values. The ARPlaneAnchor object’s extent property provides the estimated size of the detected plane. So, the SCNPlane object will have the same size as the detected plane in the world.
plane.firstMaterial?.diffuse.contents = UIColor(white: 1, alpha: 0.75)
Next, I set the plane’s diffuse material to white with 75% transparency.
      let planeNode = SCNNode(geometry: plane)
 planeNode.position = SCNVector3Make(planeAnchor.center.x, planeAnchor.center.y, planeAnchor.center.z)
 planeNode.eulerAngles.x = -.pi / 2
A SCNode gets created with the plane geometry. The node’s position will match the anchor’s position to give us an accurate visual clue. I use the anchor center’s coordinates to create a 3D vector. SCNPlane is one-sided and would appear perpendicular to the surface by default. I need to rotate the planeNode 90 degrees counter-clockwise to make it display correctly.
node.addChildNode(planeNode)
Finally we make the planeNode, a child node of the newly created scene node.
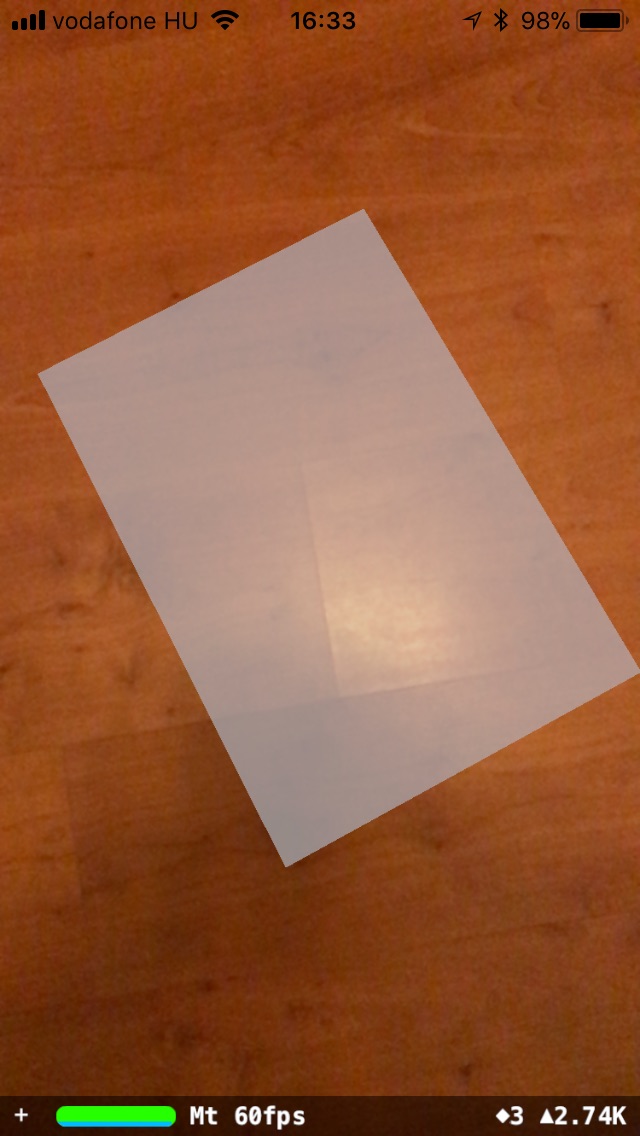
Running the app will produce results like this:
ARKit keeps monitoring the environment and updates the previously detected anchors. We can subscribe to these updates by implementing the renderer(_:, didUpdate node:, for anchor:) ARSCNViewDelegate delegate method.
Let’s implement the delegate so that we can display more accurate results.
      func renderer(_ renderer: SCNSceneRenderer, didUpdate node: SCNNode, for anchor: ARAnchor) {
  if let planeAnchor = anchor as? ARPlaneAnchor,
  let planeNode = node.childNodes.first,
  let plane = planeNode.geometry as? SCNPlane {
      plane.width = CGFloat(planeAnchor.extent.x)
      plane.height = CGFloat(planeAnchor.extent.z)
      planeNode.position = SCNVector3Make(planeAnchor.center.x, 0, planeAnchor.center.z)
  }
}
First, we perform some safety checks to ensure that we’re working with plane information. Then, we set the SCNPlane object’s width and height. Finally, we update the child node’s position.
Now, we are able to detect larger continuous surfaces and display the plane overlays more accurately.
Build and run the app on a device. Allow ARKit to collect enough information about the environment by moving your device around flat surfaces. You’ll see ARKit in action as it updates the size and the position of the detected surfaces.
Virtual 3D Shapes in Your Living Room
How about placing some 3D-objects in our living room? Now that we can detect those flat surfaces, it’s relatively easy to build a scene which blends reality with virtual objects.
We’ll continue enhancing the app from where we left off. First, we need a SceneKit scene. Right click on your project in the project navigator and choose “New File…”, pick “SceneKit Scene File”, and click Next. I saved it as scene3d.scn.
We can use the SceneKit Editor to place various pre-defined 3D-shapes in our scene: boxes, spheres, pyramids, and so on. We could also create these shapes in code, but I used the scene editor to keep it brief.
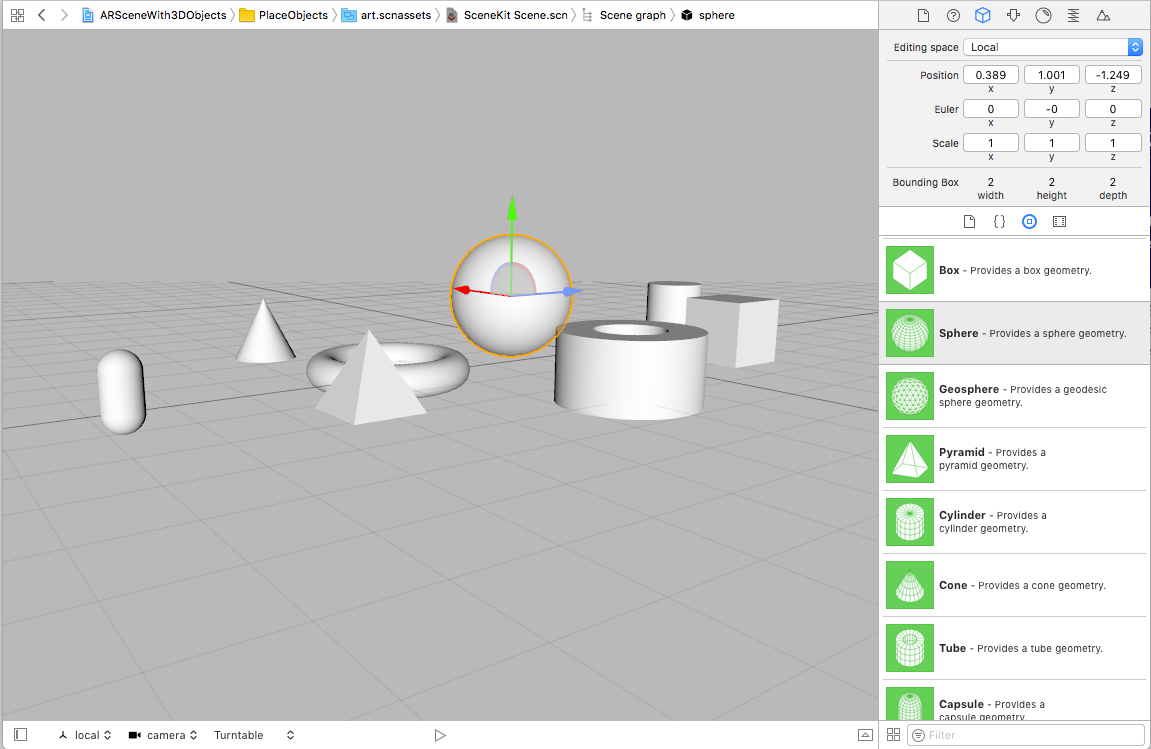
I created a private method to load the scene:
      private func loadScene() {
  guard let scene = SCNScene(named: "art.scnassets/geometry.scn") else {
      print("Could not load scene!")
      return
  }

  let childNodes = scene.rootNode.childNodes
  for childNode in childNodes {
      sceneNode.addChildNode(childNode)
  }
}
I also added a property called sceneNode:
var sceneNode = SCNNode()
This will be the parent node for the nodes in the scene. I call the loadScene() method from viewDidLoad(), but I don’t want to display the scene yet. I aim to place the scene once ARKit detects a horizontal plane.
As you may recall, the renderer(_:, didAdd node:, for anchor:) delegate method gets called whenever a new anchor is detected, and a corresponding node is created. So, all we have to do is add our scene to this node. Here’s our enhanced delegate method:
      func renderer(_ renderer: SCNSceneRenderer, didAdd node: SCNNode, for anchor: ARAnchor) {
  if let planeAnchor = anchor as? ARPlaneAnchor {
      …
      if !isSceneRendered {
          isSceneRendered = true
          sceneNode.scale = SCNVector3(0.01, 0.01, 0.01)
          sceneNode.position = SCNVector3Zero
          node.addChildNode(sceneNode)
      }
  }
}
Note that I created a new boolean property. By checking the isSceneRendered property, we ensure that the scene is only added to the node belonging to the earliest detected horizontal plane.
The other couple of lines of code set the scale and the position of the scene node.
Finally, I add the sceneNode as a child node.
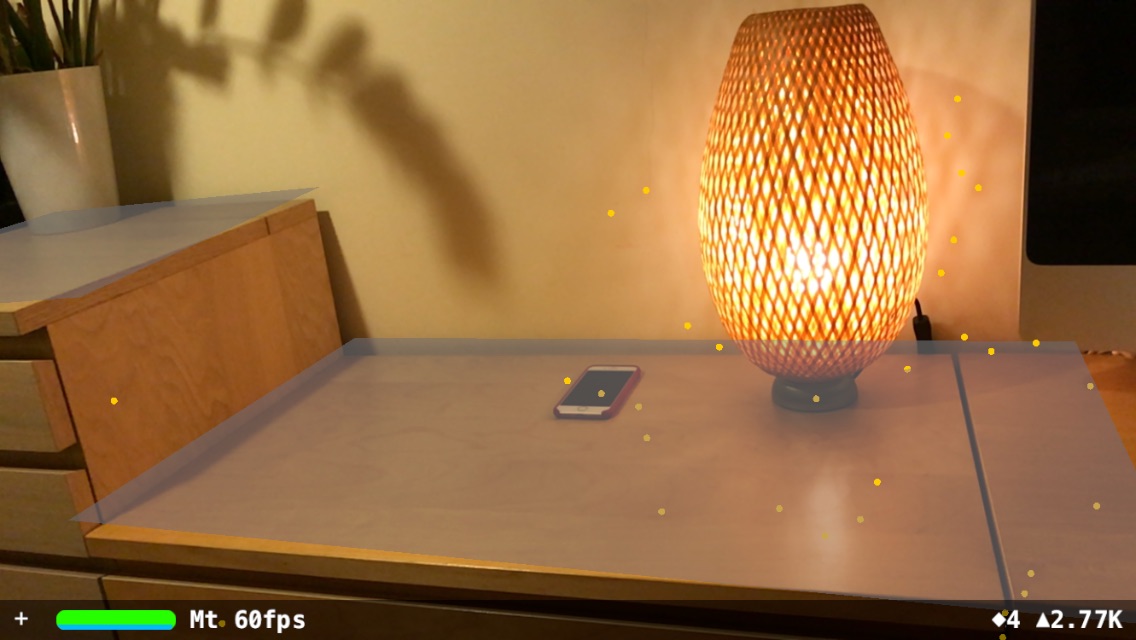
Now, walk around your home with the app running on your iPhone. ARKit will soon detect a flat surface and you should see the scene appearing at random places:
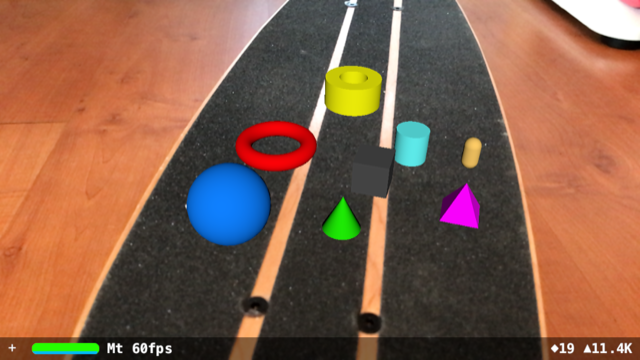
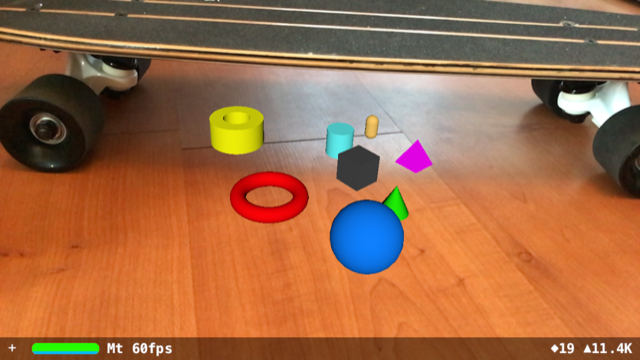
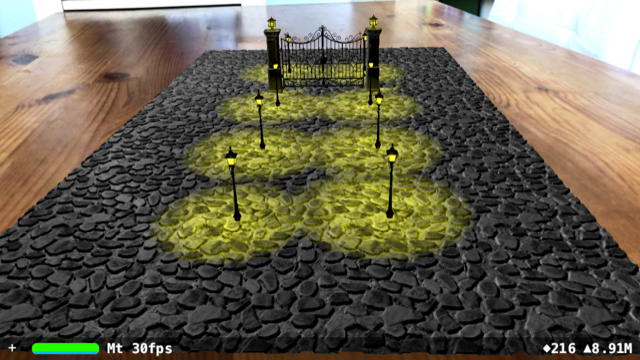
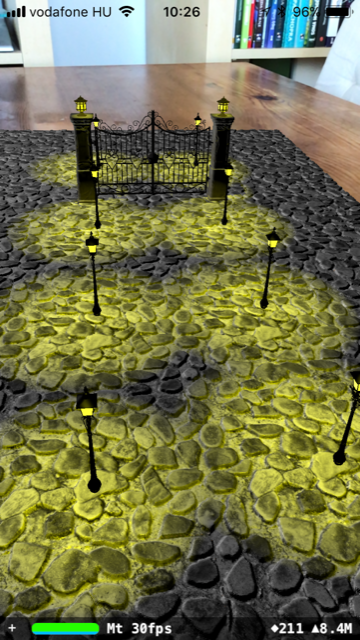
Devices supporting ARKit can render more complex scenes. Here’s a scene I put together using some free 3D models available on free3d.com
Where to Go from Here?
Hopefully, you can see some potential in AR and have seen some of the neat features of ARKit. If you got a little lost in the code, don't fret. Check out the demo projects on Github!
If you enjoyed this quick introduction to ARKit, you'd probably want to find out more. You may want to check out my Swift courses on Pluralsight. I talk about design patterns and Swift best-practices, tips and tricks.
I have also collected a couple of links for you:
- Introducing ARKit (WWDC 2017): https://developer.apple.com/videos/play/wwdc2017/602/
- Official ARKit site: https://developer.apple.com/arkit
- Free and premium 3D models for your ARKit/SceneKit apps: https://free3d.com, https://sketchfab.com, https://www.turbosquid.com
- Blender, free 3D creation tool: https://www.blender.org
I hope you found this guide informative and engaging.
Thanks for reading! Please feel free to show some love by hitting the 'thumbs up' at the top right of the page.
Advance your tech skills today
Access courses on AI, cloud, data, security, and more—all led by industry experts.
