Artistic Neural Style Transfer with TensorFlow 2.0, Part 1: Theory
Jul 29, 2020 • 10 Minute Read
Introduction
Everyone loves art, and yet not everyone has the talent to create it. If you understand deep learning, however, then you don't need to know how to paint a Picasso painting. You can simply use deep learning to convert any image to a Picasso-style image.
This guide series will make that visualization possible! You will learn how CNN automatically maps the style of one image onto another. You will use an image with a particular artistic style to give a Picasso look to the photograph of your choice.
This is the first guide in a two-part series. This guide will cover the pre-processing of the image, along with an explanation of the VGG model, intermediate layers, and the cost function.
The second guide will talk about style loss and content loss. It will also give a brief explanation ofhow variation loss functions and optimization help to generate AI art.
Let's dig into what exactly the VGG model is first.
About VGG
In a deep neural network, where hundreds of layers are involved, you face the serious problem of vanishing gradients in which the accuracy of the model decreases with the increase in the number of layers. Hence, efficient networks like ResNet, DenseNet, VGG-Net, etc. were introduced. It is difficult and very time consuming to build dense neural network from scratch for every problem, and ResNet, DenseNet, and VGG-Net are some of the state-of-the-art networks that have been quite successful.
This guide uses a pre-trained VGG-19 model. Pre-trained models are built using transfer learning techniques, where the model uses knowledge to solve a problem (i.e., recognizing a boat) and applies it to a related but similar problem (recognizing a ship).
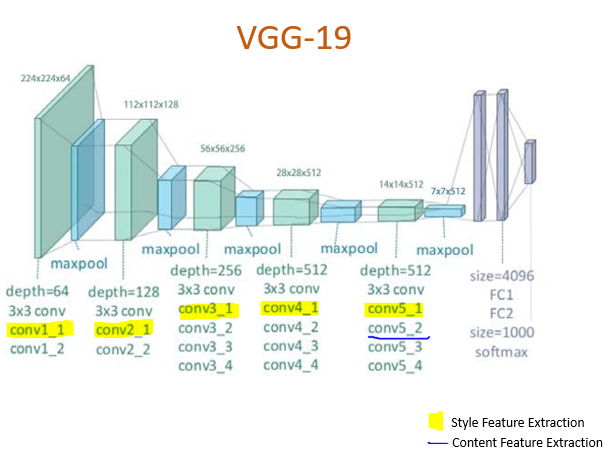
The VGG-Net model can recognize low-level features using shallow (earlier) layers and high-level features using deeper layers. The images below show the layer structure of the VGG-19 Network:
VGG Architecture
Now you know the building blocks of the VGGNet-19 model. The architecture of its variants is described in the image below.
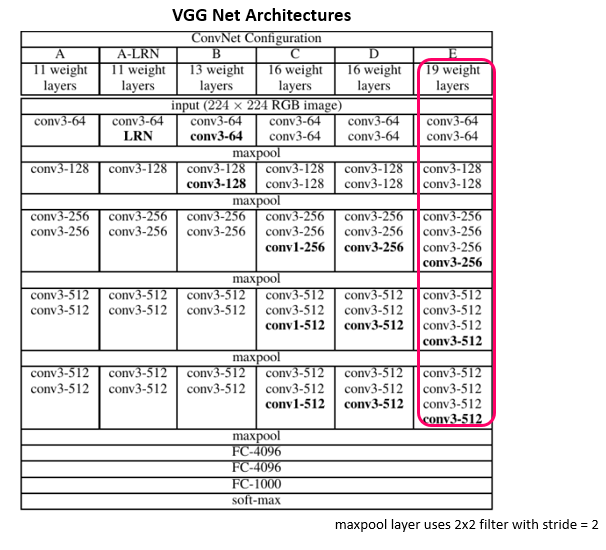
Instead of using large filters with larger strides, this model uses smaller filters. For example, the three 3x3 convolution layers will incorporate three non-linear rectification layers instead of one 7x7 convolution layer. This will help the decision function to learn more features. Also, a stack of 3x3 layers will decrease the size in terms of weights, making the model less prone to overfitting.
Code Implementation
Now, access TensorFlow's 2.0. Before you input the image into the VGG model, it is important to pre-process it. Most images are in a numpy array, and the model accepts the images in the form of the tensor. The PIL library will do the job.
      import tensorflow as tf
import IPython.display as display

import matplotlib.pyplot as plt
import matplotlib as mpl
mpl.rcParams['figure.figsize'] = (12,12)
mpl.rcParams['axes.grid'] = False

import numpy as np
import PIL.Image
import time
import functools

def tensor_to_image(tf_input):
  tf_input = tf_input*255
  tf_input = np.array(tf_input, dtype=np.uint8)
  if np.ndim(tf_input)>3:
    assert tf_input.shape[0] == 1
    tf_input = tf_input[0]
  return PIL.Image.fromarray(tf_input)

#input image of your choice
content_path = 'houses.jpg'

style_path = 'Picasso.png'
In artistic neural style transfer, we use three images:
- Content image (image on which style is applied)
- Style image (image used as a style)
- Generated image (a raw image, which will contain the styled content image)
Feel free to provide the path for your content and style image in the above code snippet.
Visualize the Input
After selecting the images, pre-process them in terms of size, shape, and dimensions.
      def load_img(image_path):
  max_dim = 512
  img = tf.io.read_file(image_path)
  img = tf.image.decode_image(img, channels=3)#Detects the image to perform apropriate opertions
  img = tf.image.convert_image_dtype(img, tf.float32)#converts image to tensor dtype

  shape = tf.cast(tf.shape(img)[:-1], tf.float32)# Casts a tensor to float32.

  long_dim = max(shape)
  scale = max_dim / long_dim

  new_shape = tf.cast(shape * scale, tf.int32)

  img = tf.image.resize(img, new_shape)

  return img[tf.newaxis, :]
      def imshow(image, title=None):
  if len(image.shape) > 3:
    image = tf.squeeze(image, axis=0)

  plt.imshow(image)
  if title:
    plt.title(title)
      content_image = load_img(content_path)
style_image = load_img(style_path)

plt.subplot(1, 2, 1)
imshow(content_image, 'Content-Image')

plt.subplot(1, 2, 2)
imshow(style_image, 'Style-Image')

Now, in this case, the generated image will target the elements of the content image, i.e., it will have houses and a lake but "painted" in the style of the style reference image.
Define Content and Style Representations
Intermediate layers are necessary to define the representation of content and style from the images. For an input image, try to match the corresponding style and content target representations at these intermediate layers.
      x = tf.keras.applications.vgg19.preprocess_input(content_image*255)
x = tf.image.resize(x, (224, 224))
vgg = tf.keras.applications.VGG19(include_top=True, weights='imagenet')
prediction_probabilities = vgg(x)
prediction_probabilities.shape
      vgg = tf.keras.applications.VGG19(include_top=False, weights='imagenet')

print()
for layer in vgg.layers:
  print(layer.name)

Intermediate Layers for Style and Content
The convolution layers in VGG have the responsibility to separate the style and content of an image. You will use different intermediate layers to extract content and style information.
For the content layer, the second convolutional layer in block 5, block5_conv2 is used. Considering the fact that deeper layers in the network capture the objects and their arrangement in the input image, these are complex features to extract. And near the final layers of the CNN, the best features are found.
For the style layers, use the first convolutional layer in each block of layers, that is, block1_conv1 up to block5_conv5. CNN keeps learning features. At multiple layers, different patterns are detected. Starting layers will detect simple diagonal lines, first layer edges, then certain patterns, and so on.
      content_layers = ['block5_conv2']

style_layers = ['block1_conv1',
                'block2_conv1',
                'block3_conv1',
                'block4_conv1',
                'block5_conv1']

num_content_layers = len(content_layers)
num_style_layers = len(style_layers)
Build the Model
Load pre-trained VGG, trained on Imagenet data.
      def vgg_layers(layer_names):
  vgg = tf.keras.applications.VGG19(include_top=False, weights='imagenet')
  vgg.trainable = False

  tf_outs = [vgg.get_layer(layer).output for layer in layer_names]

  model = tf.keras.Model([vgg.input], tf_outs)
  return model
      style_extractor = vgg_layers(style_layers)
style_outputs = style_extractor(style_image*255)

#Look at the statistics of each layer's output
for name, tf_out in zip(style_layers, style_outputs):
  print(name)
  print("  shape: ", tf_out.numpy().shape)
  print("  min: ", tf_out.numpy().min())
  print("  max: ", tf_out.numpy().max())
  print("  mean: ", tf_out.numpy().mean())
  print()

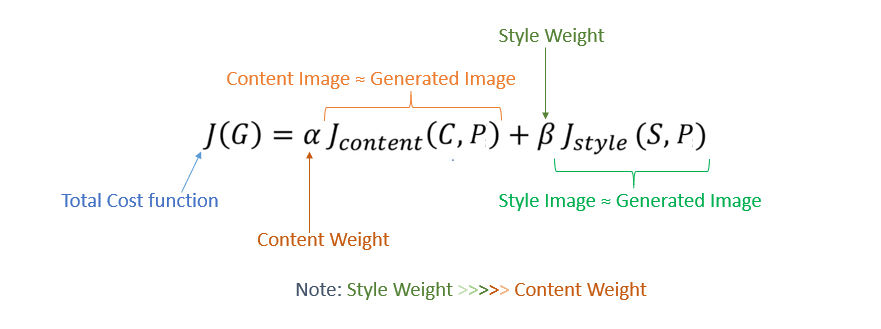
The model is ready to combine the painted brushstroke of an artist (style) on your selected image (content). The model will optimize by calculating the cost function and reducing the losses.
Cost Function
In style transfer, a neural network is not trained. Instead, its weights and biases are kept constant, and an image is updated by changing/modifying the pixel values until the cost function is optimized (reducing the losses). It makes sure that the "content" in the content image and the "style" in the style image are present in the generated image.
Conclusion
This is the end of Part 1. The next guide will discuss the losses (a component of the cost function) in depth and the creation of artistic style image using NN.
You now have an understanding of the VGG-19 network and the cost function used to generate the artistic image. You also know how and why the intermediate layer is used to extract content and style from an image.
Continue with Part 2 of the series here.
For more details, reach out to me here.