Requesting e-signatures in a chat with Pusher, HelloSign, and Spring Boot
Learn how to build a chat in Pusher in this free tutorial! Also learn how to add e-signature requests to the chat with the HelloSign API.
Dec 15, 2018 • 73 Minute Read
Introduction
In this tutorial, we're going to build a chat using Pusher's Presence Channels. Using Pusher, our chat will be able to request e-signed Non-Disclosure Agreements (NDAs) to its members using the HelloSign API.
You will need the following to take on this project:
- Java 7 or higher
- Maven as the build manager
- Spring Boot as the server-side framework
- H2 as in-memory database
- Thymeleaf as the server-side template engine
- jQuery and Handlebars for the client-side interaction
We're going to use Pusher and HelloSign webhooks to receive events from these APIs, and we'll use ngrok to keep everything in a local environment.
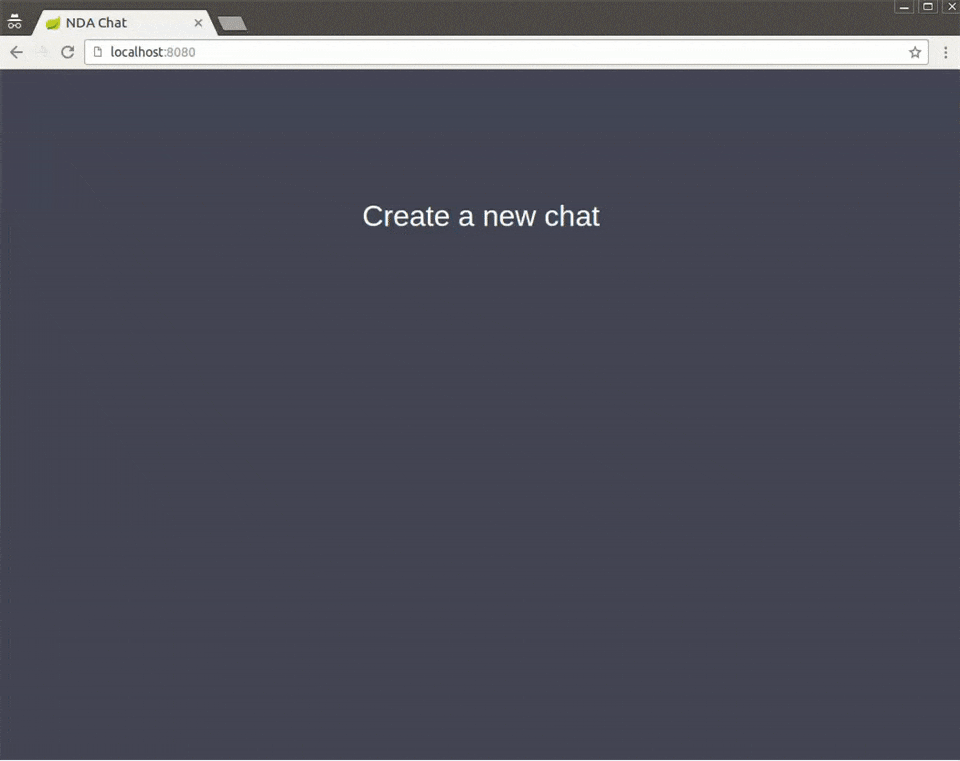
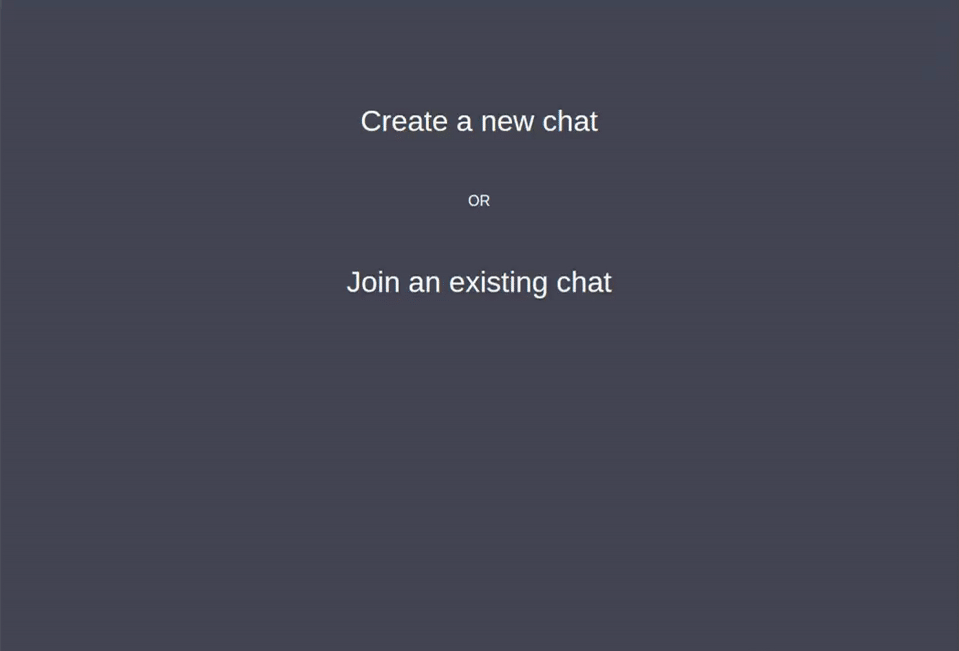
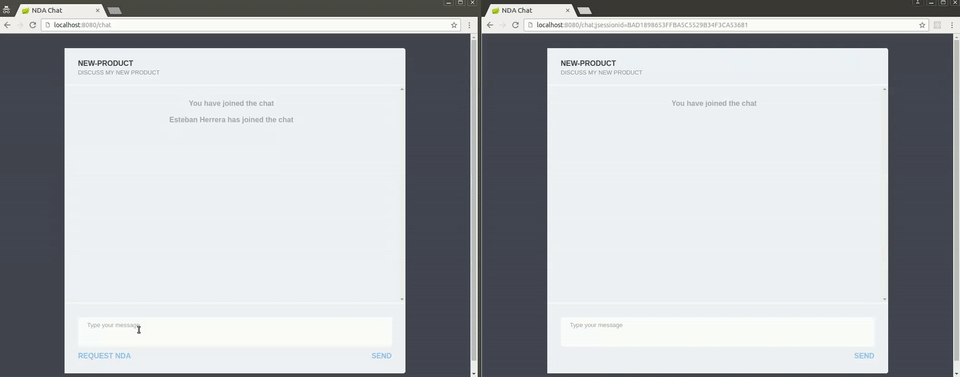
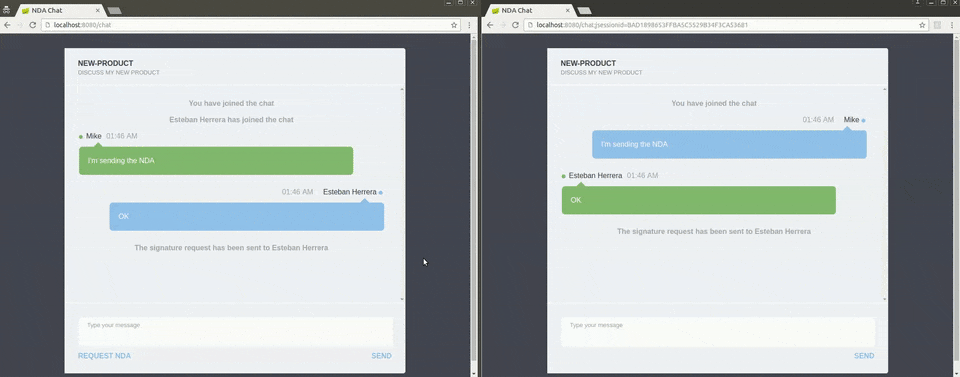
The app's design is based on this pen, and it works in the following way:
First, a user creates a chat:
Then, another user joins the chat:
At any time, the chat owner can send a request to sign an NDA:
When a member of the chat signs the NDA, a notification is sent with a link to view the signed document:
We won't list the complete source code for all the files, only the relevant parts. However, you can find the entire code of the application on Github.
Requirements
Java environment
You'll need JDK 7 or higher (JDK 8 is preferred), as well as Maven 3.0 or higher.
An IDE, like Eclipse, IntelliJ or Netbeans, will make things easier, but it's not required.
Pusher
Create a free account at https://dashboard.pusher.com/accounts/sign_up.
When you first log in, you'll be asked to enter some configuration options:
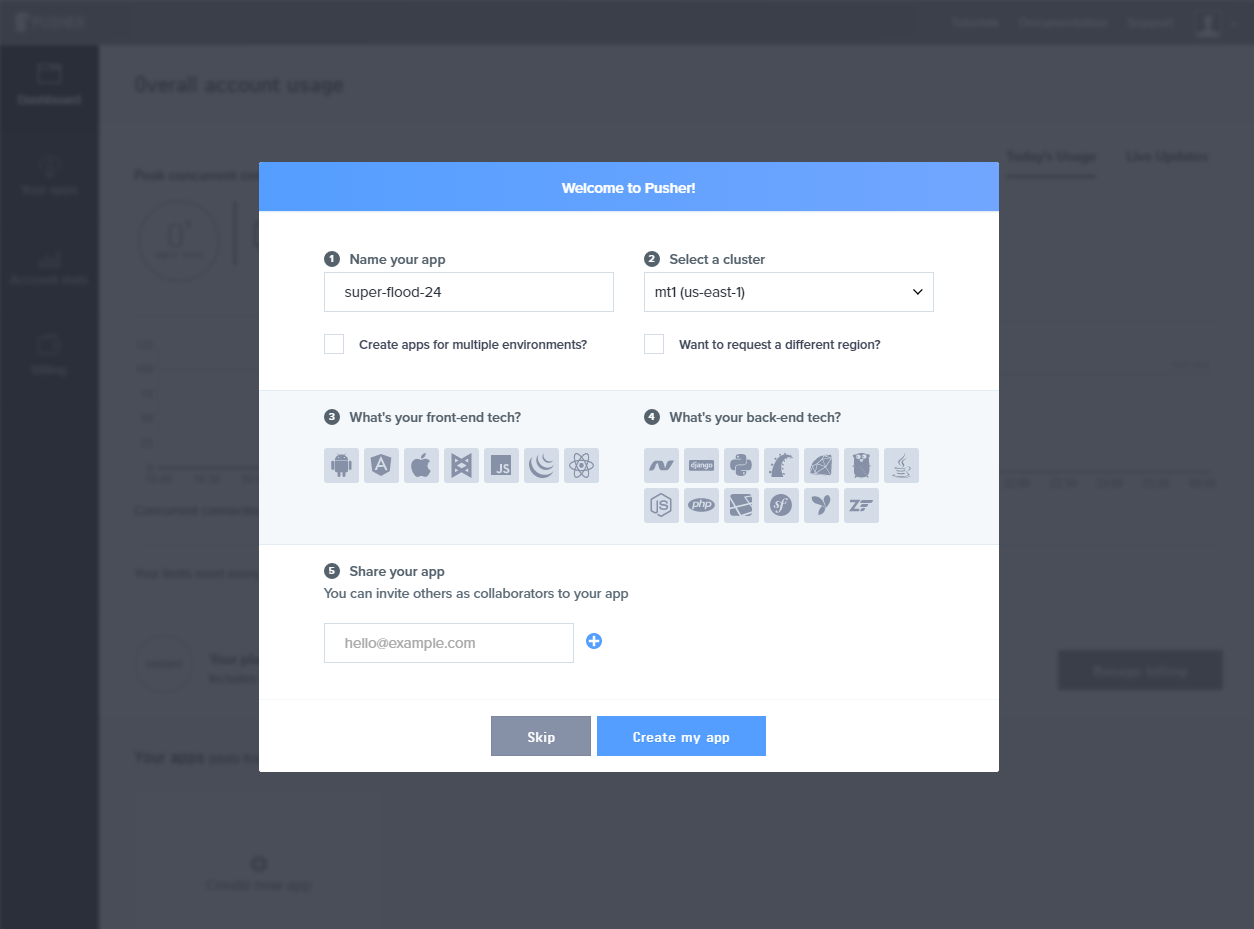
Enter a name, choose Javascript as your front-end tech, and Java as your back-end tech.
Then go to either the Getting Started or App Keys tab to copy your App ID, Key, and Secret credentials; we'll need them later.
HelloSign
Sign up at https://www.hellosign.com/. At the time of this writing, your free account has the following limitations:
- You can send 3 documents every month for free
- There can only be one sender
- You cannot access any templates
But don't worry, these limitations don't apply in test mode, which is the mode we're going to use.
Ngrok
When a member is added to the chat or an NDA is signed, a webhook will be triggered (think of a webhook as a callback). This means an HTTP request will be made to our server, so we'll need to deploy our application on the cloud or keep it locally and use a service like ngrok to make it publicly available.
Ngrok proxies external requests to your local machine by creating a secure tunnel and giving you a public URL.
ngrok is a Go program, distributed as a single executable file (no additional dependencies). For now, just download it from https://ngrok.com/download and unzip the compressed file.
Now that we have all we need, let's create the app.
Setting up the application
Dependencies
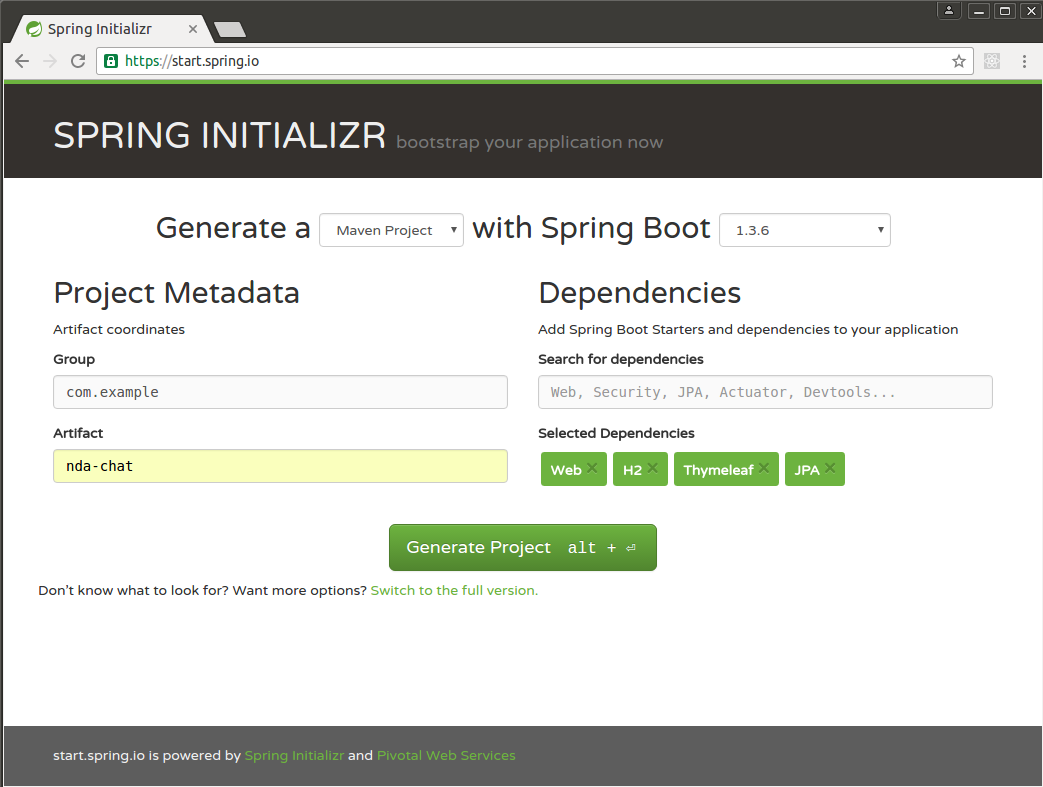
One of the easiest ways to create a Spring Boot app is to use the project generator at https://start.spring.io/.
Go to that page and choose to generate a Maven project with the following dependencies:
- Web
- H2
- Thymeleaf
- JPA
Enter a Group ID, an Artifact ID and generate the project:
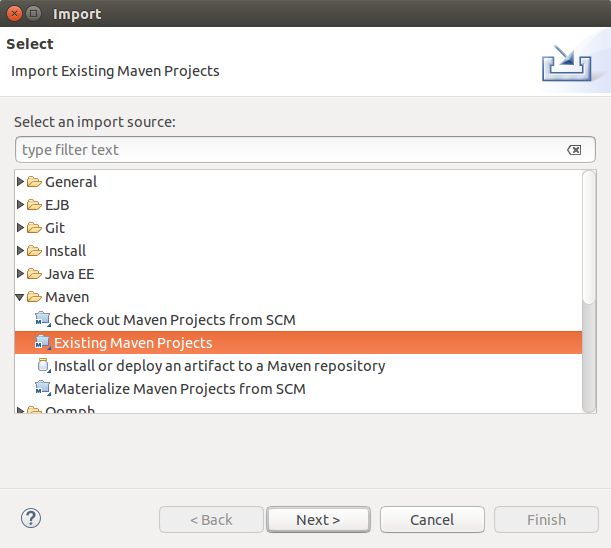
Unzip the content of the downloaded file. At this point, you can import the project to an IDE if you want. For example, in Eclipse, go to File -> Import and choose Existing Maven Projects:
Let's add some configurations to the pom.xml file. In the properties section, change the Java version if you're not using Java 8 and add the following line:
<spring.version>4.3.1.RELEASE</spring.version>
The latest version of the Spring Framework at the time of this writing is 4.3.1.RELEASE. The above line will ensure Spring Boot uses this version.
Also, in dependencies, add the dependencies we'll need for our project:
      <dependency>
	<groupId>org.apache.commons</groupId>
	<artifactId>commons-lang3</artifactId>
	<version>3.4</version>
</dependency>

<dependency>
  <groupId>com.pusher</groupId>
  <artifactId>pusher-http-java</artifactId>
  <version>1.0.0</version>
</dependency>

<dependency>
	<groupId>com.hellosign</groupId>
	<artifactId>hellosign-java-sdk</artifactId>
	<version>3.4.0</version>
</dependency>
Project architecture
Now, onto the project organization. Inside src/main/java, we'll work with the following package structure:
- com.example.config will contain configuration classes
- com.example.constants will contain interfaces with constants values used in the app
- com.example.model will contain the JPA entity models
- com.example.repository will contain the Spring JPA interfaces to work with the model
- com.example.service will contain the business service classes of the app
- com.example.web will contain the Spring MVC controllers of the app
- com.example.web.vo will contain the objects used for communication between the view and the controllers
Inside src/main/resources, we'll put some configuration files in addition to the following directory structure:
- static/css will contain the CSS style files used in the application
- static/img will contain the images used in the application
- static/js will contain the Javascript files used in the application
- templates will contain the Thymeleaf templates used in the application
We'll first create the com/example/web/ChatController class with the following content:
      @Controller
public class ChatController {

	@RequestMapping(method=RequestMethod.GET, value="/")
    public ModelAndView index() {
		ModelAndView modelAndView = new ModelAndView();

		modelAndView.setViewName("index");
		modelAndView.addObject("text", "Hello World!");

        return modelAndView;
    }
}
This controller defines a / route that shows an index template. Next, create the file src/main/resources/templates/index.html with some HTML content like:
      <!DOCTYPE HTML>
<html xmlns:th="http://www.thymeleaf.org">
<head>
    <title>NDA Chat</title>
    <meta http-equiv="Content-Type" content="text/html; charset=UTF-8" />
</head>
<body>
    <p th:text="${text}" />
</body>
</html>
Using Thymeleaf syntax, this will print the text variable defined in the controller. You can learn more about Thymeleaf here.
Run the application either by executing the com.example.NdaChatApplication class on your IDE or on the command line with:
$ mvn spring-boot:run
Additionally, you can create a JAR file and execute it using command line:
      $ mvn package -DskipTests
$ java -jar target/nda-chat-0.0.1-SNAPSHOT.jar
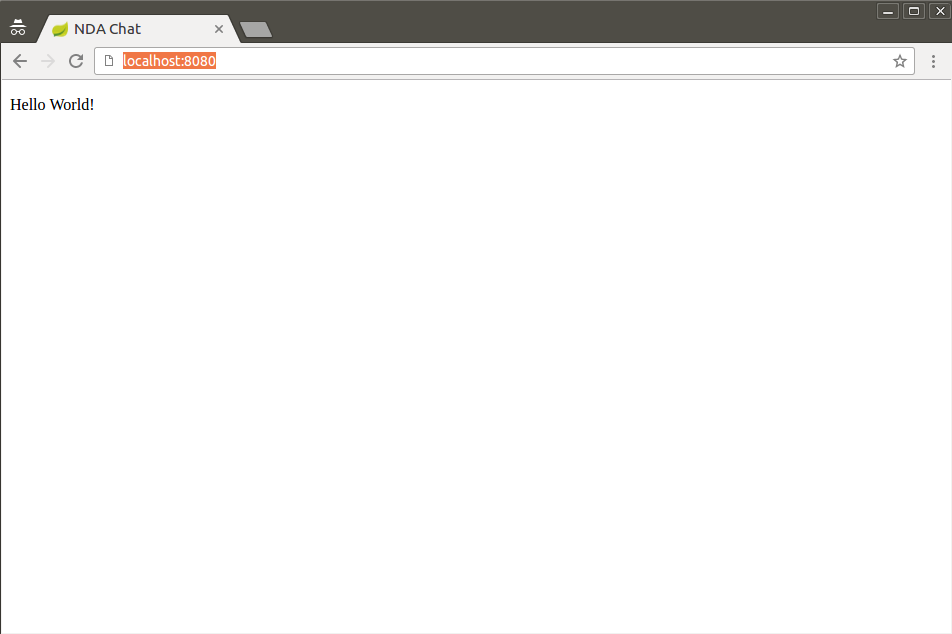
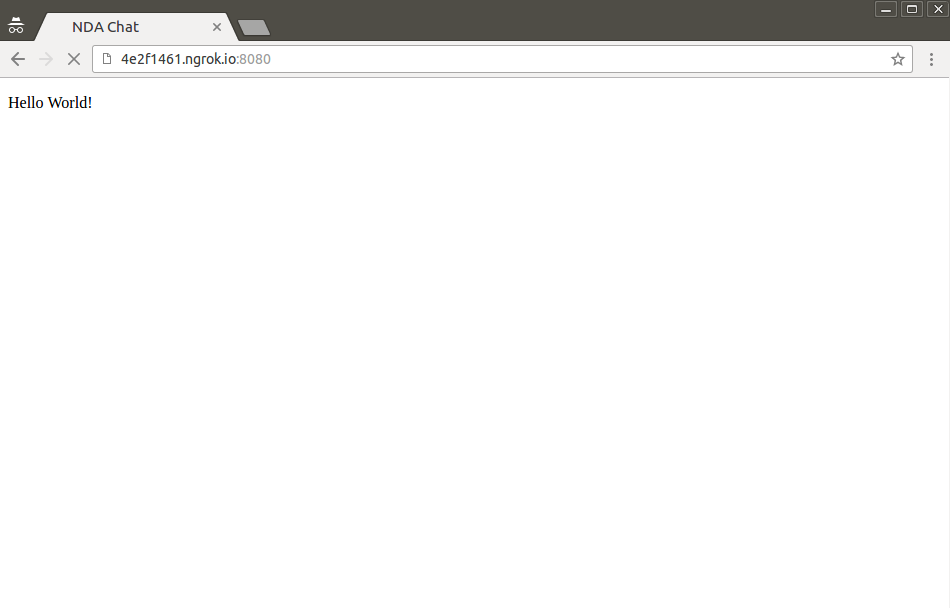
When you open https://localhost:8080/ in a browser, you should see something like the following:
Now, let's take a moment to configure ngrok.
Setting up Ngrok
In a new terminal window, navigate to the directory where you unzipped ngrok.
We'll start ngrok by telling it which port we want to expose to the Internet. For our app, that would be port 8080:
./ngrok http 8080
Alternatively, if you're on Windows:
ngrok http 8080
Now, you should see something like this:
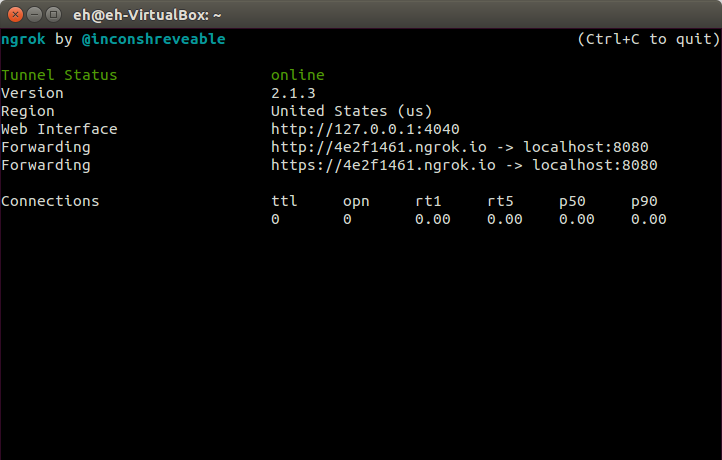
See that URL in the Forwarding row(s) with the ngrok.io domain? That's your public URL. Your public URL will likely be different than the one you see in the example. That's because ngrok generates a random URL every time you run it.
If you open in a browser https://[YOUR_GENERATED_SUBDOMAIN].ngrok.io, you should see the same page found on https://localhost:8080:
Open this ngrok URL in another computer if you want. Once again, you should see the same page. This means that our local server is now available publicly. The only disadvantage to using ngrok for server exposure is that this URL is not permanent. If you restart ngrok, it will give you another URL.
You can specify a subdomain, for example, to get the URL https://chat.ngrok.io use the command:
ngrok http -subdomain=chat 8080
However, this requires a paid plan. You can get more info in this page.
Nevertheless, as long as you don't stop or restart ngrok, the URL won't change, so let's leave it running for now.
In the next section, we'll go deeper into the code of the application starting with the database layer.
Database layer
We'll use H2 as the database for our application. It can work as an embedded in-memory database, which is perfect for our purposes.
Open the src/main/resources/application.properties file and enter the following options:
      spring.datasource.platform=h2

spring.jpa.hibernate.ddl-auto="none"

spring.h2.console.enabled=true

spring.jpa.properties.hibernate.show_sql=true
spring.jpa.properties.hibernate.use_sql_comments=true
spring.jpa.properties.hibernate.format_sql=true
spring.jpa.properties.hibernate.type=trace
In Spring Boot, by default, JPA databases will be created automatically if you use an embedded database (such as H2, HSQL or Derby). If they are in the classpath, Spring Boot will execute the files schema.sql (to define the structure of the database) and data.sql (to insert initial data).
However, we can define profiles to run distinct scripts for different databases. That's the purpose of the line:
spring.datasource.platform=h2
It tells Spring Boot to execute the files schema-h2.sql and data-h2.sql. For this application, create the file src/main/resources/schema-h2.sql with the following content:
      CREATE TABLE chat(
	chat_id             BIGINT IDENTITY PRIMARY KEY,
	chat_name           VARCHAR(50) NOT NULL,
	chat_description    VARCHAR(150) NOT NULL,
	chat_active         BOOLEAN NOT NULL,
	created_at          TIMESTAMP NOT NULL
);

CREATE TABLE user(
	user_id             BIGINT IDENTITY PRIMARY KEY,
	user_email          VARCHAR(50) NOT NULL,
	user_name           VARCHAR(50) NOT NULL,
	user_active         BOOLEAN NOT NULL,
	nda_signed          BOOLEAN NOT NULL,
	owns_chat           BOOLEAN NOT NULL,
	chat_id             BIGINT NOT NULL,
	sign_id             VARCHAR(255),
	created_at          TIMESTAMP NOT NULL,
	CONSTRAINT FK_user_chat FOREIGN KEY (chat_id) REFERENCES chat(chat_id)
);

CREATE TABLE message(
	message_id          BIGINT IDENTITY PRIMARY KEY,
	chat_id             BIGINT NOT NULL,
	user_id             BIGINT NOT NULL,
	message_text        VARCHAR(1000) NOT NULL,
	created_at          TIMESTAMP NOT NULL,
	CONSTRAINT FK_message_chat FOREIGN KEY (chat_id) REFERENCES chat(chat_id),
	CONSTRAINT FK_message_user FOREIGN KEY (user_id) REFERENCES user(user_id)
);
By default, Hibernate (the JPA implementation used by Spring Boot), will try to create the schema. Since Spring Boot will be responsible for that, we have to turn off this feature using:
spring.jpa.hibernate.ddl-auto="none"
H2 provides a browser-based console that Spring Boot can auto-configure for you at the path /h2-console. However for auto-configuration to work, these conditions need to be met:
- You are developing a web application
- com.h2database:h2 is on the classpath
- You are using Spring Boot's developer tools
Since we're not using Spring Boot's developer tools, we have to explicitly configure it with:
spring.h2.console.enabled=true
The rest of the application.properties files tell Hibernate to print in the console the generated SQL statements for debugging purposes.
Now that we have our schema, let's create the JPA entities that will represent the database tables.
Create the src/main/java/com/example/model/Chat.java file with the following content:
      @Entity
public class Chat  implements Serializable {

	/** ID of the chat */
	@Id
	@Column(name="chat_id")
	@GeneratedValue(strategy = GenerationType.IDENTITY)
	private Long id;

	/** Name of the chat */
	@Column(name="chat_name", nullable = false)
	private String name;

	/** Description of the chat */
	@Column(name="chat_description", nullable = false)
	private String description;

	/** Indicates if the chat is active */
	@Column(name="chat_active", nullable = false)
	private Boolean active;

	/** The date and time when the chat was created */
	@Column(name="created_at", nullable = false)
	private Date createdAt;

	/** Members of the chat */
	@OneToMany(fetch = FetchType.LAZY,
            cascade = CascadeType.ALL,
            mappedBy = "chat",
            orphanRemoval = true)
	private Set<User> members = new LinkedHashSet<User>();

	/**
	 * Helper method to add a member
	 * @param user Member to add to the chat
	 */
	public void addMember(User user) {
        this.members.add(user);
        user.setChat(this);
    }

    // Getters and Setters ...

	@Override
	public String toString(){
		return new ToStringBuilder(this).
			       append("id", id).
			       append("name", name).
			       append("description", description).
			       append("active", active).
			       append("createdAt", createdAt).
			       toString();
	}

	@Override
	public boolean equals(Object obj) {
	   if (obj == null) { return false; }
	   if (obj == this) { return true; }
	   if (obj.getClass() != getClass()) {
	     return false;
	   }
	   Chat that = (Chat) obj;
	   return new EqualsBuilder()
	                 .appendSuper(super.equals(obj))
	                 .append(id, that.id)
	                 .isEquals();
	  }

	@Override
	public int hashCode() {
		return new HashCodeBuilder(5, 13).
		   append(id).
		   toHashCode();
	}
}
Notice how the one-to-many relationship with the User entity is set up and the helper method establishes it. In addition, as the good practices dictate, we're also defining the toString(), equals(), and hashCode() methods with classes from the commons-lang library.
The src/main/java/com/example/model/User.java file contains the following code:
      @Entity
public class User implements Serializable {

	/** ID of the user */
	@Id
	@Column(name="user_id")
	@GeneratedValue(strategy = GenerationType.IDENTITY)
	private Long id;

	/** Email of the user */
	@Column(name="user_email", nullable = false)
	private String email;

	/** Name of the user */
	@Column(name="user_name", nullable = false)
	private String name;

	/** Indicates if the user is active */
	@Column(name="user_active", nullable = false)
	private Boolean active;

	/** Indicates if the user has signed the NDA */
	@Column(name="nda_signed", nullable = false)
	private Boolean ndaSigned;

	/** Indicates if the user is the owner of the chat */
	@Column(name="owns_chat", nullable = false)
	private Boolean ownsChat;

	/** ID of the HelloSign request to sign the NDA */
	@Column(name="sign_id", nullable = true)
	private String signId;

	/** Date and time of the creation of the user */
	@Column(name="created_at", nullable = false)
	private Date createdAt;

	/** Object that represents the chat the user belongs to */
	@ManyToOne
    @JoinColumn(name = "chat_id",
                nullable = false, updatable = false)
	private Chat chat;

    // Getters and Setters ...

	@Override
	public String toString(){
		return new ToStringBuilder(this).
			       append("id", id).
			       append("email", email).
			       append("name", name).
			       append("active", active).
			       append("ndaSigned", ndaSigned).
			       append("ownsChat", ownsChat).
			       append("createdAt", createdAt).
			       toString();
	}

	@Override
	public boolean equals(Object obj) {
	   if (obj == null) { return false; }
	   if (obj == this) { return true; }
	   if (obj.getClass() != getClass()) {
	     return false;
	   }
	   User that = (User) obj;
	   return new EqualsBuilder()
	                 .appendSuper(super.equals(obj))
	                 .append(id, that.id)
	                 .isEquals();
	  }

	@Override
	public int hashCode() {
		return new HashCodeBuilder(3, 11).
		   append(id).
		   toHashCode();
	}
}
In turn, src/main/java/com/example/model/Message.java contains:
      @Entity
public class Message implements Serializable {

	/** ID of the message */
	@Id
	@Column(name="message_id")
	@GeneratedValue(strategy = GenerationType.IDENTITY)
	private Long id;

	/** ID of the chat that the message belongs to */
	@Column(name="chat_id", nullable = false)
	private Long idChat;

	/** Text of the message */
	@Column(name="message_text", nullable = false)
	private String message;

	/** Date and time when the message was created */
	@Column(name="created_at", nullable = false)
	private Date createdAt;

	/** Object that represents the user that post the message */
	@ManyToOne(fetch = FetchType.EAGER)
    @JoinColumn(name = "user_id",
                nullable = false, updatable = false)
	private User user;

    // Getters and Setters ...

	public String getCreatedAtString() {
		String time = "";
		if(this.createdAt != null) {
			DateFormat df = new SimpleDateFormat("hh:mm a");
			time = df.format(this.createdAt);
		}

		return time;
	}

	public String getMessageFormatted() {
		String msg = "";

		if(this.message != null) {
			msg = this.message.replaceAll("(\r?\n)", "<br />");
		}

		return msg;
	}

	@Override
	public String toString(){
		return new ToStringBuilder(this).
			       append("id", id).
			       append("idChat", idChat).
			       append("message", message).
			       append("createdAt", createdAt).
			       toString();
	}

	@Override
	public boolean equals(Object obj) {
	   if (obj == null) { return false; }
	   if (obj == this) { return true; }
	   if (obj.getClass() != getClass()) {
	     return false;
	   }
	   Message that = (Message) obj;
	   return new EqualsBuilder()
	                 .appendSuper(super.equals(obj))
	                 .append(id, that.id)
	                 .isEquals();
	  }

	@Override
	public int hashCode() {
		return new HashCodeBuilder(7, 15).
		   append(id).
		   toHashCode();
	}
}
The repository objects will be handled by Spring Data JPA, which reduces the amount of boilerplate code by generating the code to implement the data-access layer code from interfaces you define. You can read about how to work with Spring Data in this page.
By default, Spring Data creates the following methods for basic Create, Read, Update, and Delete (CRUD) functionality:
      <S extends T> S save(S entity);
T findOne(ID primaryKey);
Iterable<T> findAll();
Long count();
void delete(T entity);
boolean exists(ID primaryKey);
This way, we just have to define the business methods used by the application.
For the chat repository, our business methods would be:
      @Repository
public interface ChatRepository extends CrudRepository<Chat, Long> {

	/**
	 * Finds all active chats
	 * @return a List of Chat objects ordered by their ID
	 */
	List<Chat> findByActiveTrueOrderById();

	/**
	 * Finds an active chat by its name
	 * @param chatName Name of the chat
	 * @return List of Chat objects that meet the search criteria
	 */
	List<Chat> findByNameAndActiveTrue(String chatName);
}
For the user repository:
      @Repository
public interface UserRepository extends CrudRepository<User, Long> {

	/**
	 * Finds active members of a chat who haven't sign the NDA and are not the chat owner
	 * @param chat the Chat object that the users belongs to
	 * @return A List of User objects that represent the members of the chat
	 */
	List<User> findByChatAndNdaSignedFalseAndActiveTrueAndOwnsChatFalse(Chat chat);

	/**
	 * Finds users by their sign request ID
	 * @param signId HelloSign sign request ID
	 * @return A List of User objects that meet the search criteria
	 */
	@EntityGraph(attributePaths = { "chat" })
	List<User> findBySignId(String signId);
}
The @EntityGraph annotation indicates that the chat relationship object must be fetched.
For the message repository:
      @Repository
public interface MessageRepository extends CrudRepository<Message, Long> {

	/**
	 * Finds the messages of a chat
	 * @param idChat ID of the chat
	 * @return a List of Message objects that meet the search criteria
	 */
	List<Message> findByIdChatOrderByCreatedAt(Long idChat);
}
In the next section, we're going to review the service layer of our chat application.
Service layer
The service layer is just a thin wrapper of the database layer. Its main purpose is to provide transactional capabilities to the repository methods.
We're going to set up two services: the chat service and the user service.
Chat service
      @Service
@Transactional
public class ChatService {

	@Autowired
	private UserRepository userRepository;

	@Autowired
	private ChatRepository chatRepository;

	@Autowired
	private MessageRepository messageRepository;

	/**
	 * Saves(creates or modify) a chat object
	 * @param chat The object to save
	 */
	public void saveChat(Chat chat) {
		chatRepository.save(chat);
	}

	/**
	 * Add a new user to a chat
	 * @param id ID of the chat
	 * @param user Object that represents the user to add
	 * @return the Chat object with the new user added
	 */
	public Chat addNewUserToChat(Long id, User user) {
		Chat chat = getChat(id);
		chat.addMember(user);

		userRepository.save(user);

		return chat;
	}

	/**
	 * Saves a message and its relation to a user
	 * @param msg The message to save
	 * @param idUser The ID of the user that post the message
	 */
	public void saveMessage(Message msg, Long idUser) {
		User user = userRepository.findOne(idUser);
		msg.setUser(user);

		messageRepository.save(msg);
	}

	/**
	 * Marks an active chat as inactive
	 * @param chatName The name of the chat to mark
	 */
	public void markChatAsInactive(String chatName) {
		List<Chat> chats = chatRepository.findByNameAndActiveTrue(chatName);

		if(chats != null && !chats.isEmpty()) {
			Chat chat = chats.get(0);
			chat.setActive(Boolean.FALSE);
			chatRepository.save(chat);
		}
	}

	/**
	 * Finds a chat by its ID
	 * @param id ID of the chat to find
	 * @return a chat object
	 */
	public Chat getChat(Long id) {
		return chatRepository.findOne(id);
	}

	/**
	 * Get all the active chats
	 * @return a List of chat objects
	 */
	public List<Chat> getAllActiveChats() {
		return chatRepository.findByActiveTrueOrderById();
	}

	/**
	 * Find an active chat by name
	 * @param chatName Name of the chat
	 * @return a chat object
	 */
	public Chat getActiveChatByName(String chatName) {
		List<Chat> chats = chatRepository.findByNameAndActiveTrue(chatName);
		Chat chat = null;

		if(chats != null && !chats.isEmpty()) {
			chat = chats.get(0);
		}

		return chat;
	}

	/**
	 * Gets all the messages of a chat
	 * @param idChat ID of the chat
	 * @return a List of message objects
	 */
	public List<Message> getAllChatMessages(Long idChat) {
		return messageRepository.findByIdChatOrderByCreatedAt(idChat);
	}
}
User service:
      @Service
@Transactional
public class UserService {

	@Autowired
	private UserRepository userRepository;

	@Autowired
	private ChatRepository chatRepository;

	/**
	 * Marks a user as inactive
	 * @param idUser ID of the user
	 */
	public void markUserAsInactive(Long idUser) {
		User user = userRepository.findOne(idUser);

		if(user != null) {
			user.setActive(Boolean.FALSE);
			userRepository.save(user);
		}
	}

	/**
	 * Finds all the active members of a chat that haven't sign the NDA
	 * @param idChat ID of the chat
	 * @return a List of User objects
	 */
	public List<User> getChatMembersToSignNda(Long idChat) {
		Chat chat = chatRepository.findOne(idChat);

		return userRepository.findByChatAndNdaSignedFalseAndActiveTrueAndOwnsChatFalse(chat);
	}

	/**
	 * Gets a user by the HelloSign ID of her signature request
	 * @param signId ID of the signature request
	 * @return a User object
	 */
	public User getUserBySignId(String signId) {
		List<User> users = userRepository.findBySignId(signId);
		User user = null;

		if(users != null && !users.isEmpty()) {
			user = users.get(0);
		}

		return user;
	}

	/**
	 * Saves(creates or modify) a user object
	 * @param user The object to save
	 */
	public void saveUser(User user) {
		userRepository.save(user);
	}
}
Define constants
Finally, in the src/main/java/com/example/constants/GeneralConstants.java and src/main/java/com/example/constants/HelloSignConstants.java files, we'll define the constants we'll use in the next sections:
      public interface GeneralConstants {

	/** Channel prefix required by Pusher for presence chats */
	String CHANNEL_PREFIX = "presence-";

	/** ID used to store the object in the session */
	String ID_SESSION_CHAT_INFO = "chatInfo";
}
      public interface HelloSignConstants {

	/** Subject for the email sent by HelloSign to request a sign */
	String EMAIL_SUBJECT = "The NDA for the chat ";

	/** ID of the signing role */
	String SIGNING_ROLE = "Consultant";

	/** ID of the template custom field */
	String NAME_TEMPLATE_FIELD = "name";

	/** Error message when the file of the signed document doesn't exist */
	String FILE_DOWNLOAD_ERROR_MSG = "Sorry. The file does not exist.";

	/** Content type of the file */
	String FILE_CONTENT_TYPE = "application/pdf";

	/** ID for the request signed event */
	String REQUEST_SIGNED_EVENT = "signature_request_signed";

	/** ID for the request sent event */
	String REQUEST_SENT_EVENT = "signature_request_sent";

	/** Response to the webhook request required by HelloSign */
	String WEBHOOK_RESPONSE = "Hello API Event Received";
}
Now that we've taken care of most of the boilerplate code, we can go to the fun stuff: the controller and the view layers.
Setting up the initial page
Open the ChatController class and modify the index method, so it looks like this:
      public class ChatController {

	private Logger logger = LoggerFactory.getLogger(ChatController.class);

	@Autowired
	private ChatService chatService;

	/**
	 * Route for the main page
	 * @return Object with the view information
	 */
	@RequestMapping(method=RequestMethod.GET, value="/")
    public ModelAndView index() {
		ModelAndView modelAndView = new ModelAndView();

		List<Chat> list = chatService.getAllActiveChats();
		logger.debug("" + list.size());

		modelAndView.setViewName("index");
		modelAndView.addObject("chat", new ChatForm());
		modelAndView.addObject("chats", list);

        return modelAndView;
    }
}
This will fetch all the active chats to present them on the index page. Next, modify the index.html template. The code below will be the layout for our index page.
      <!DOCTYPE HTML>
<html xmlns:th="http://www.thymeleaf.org">
<head>
    <title>NDA Chat</title>
    <meta http-equiv="Content-Type" content="text/html; charset=UTF-8" />
    <link rel="stylesheet" href="https://cdnjs.cloudflare.com/ajax/libs/animate.css/3.2.0/animate.min.css" />
    <link rel="stylesheet" href="/css/style.css" />
</head>
<body>
	<div class="container clearfix">
		<div class="options-container">
		    <a id="createChat" href="#createChatModal">Create a new chat</a>

		    <div th:unless="${#lists.isEmpty(chats)}">
		    OR

		    <a id="joinChat" href="#joinChatModal">Join an existing chat</a>
		    </div>
    	</div>
    </div>

    <div id="createChatModal">
        <div id="close-container" class="close-createChatModal">
            <img class="close-icon" src="img/close.svg" />
        </div>

        <div class="modal-content">
        	<form id="create-chat-form" role="form" th:action="@{/chat/create}" method="post" th:object="${chat}">
			    <div>
			        <label for="chatName">Chat Name</label>
			        <input type="text" id="chatName" name="chatName" maxlength="50" size="35" th:field="${chat.chatName}"/>
			    </div>
			    <div>
			        <label for="chatDescription">Chat Description</label>
			        <input type="text" id="chatDescription" name="chatDescription" maxlength="150" size="60" th:field="${chat.chatDescription}"/>
			    </div>
			    <div>
			        <label for="userEmail">Your E-mail:</label>
			        <input type="text" id="userEmail" name="userEmail" maxlength="50" size="35" th:field="${chat.userEmail}"/>
			    </div>
			    <div>
			        <label for="userName">Your Name:</label>
			        <input type="text" id="userName" name="userName" maxlength="50" size="35" th:field="${chat.userName}"/>
			    </div>
			    <div>
			        <button type="submit">Save</button>
			    </div>
			</form>
        </div>
    </div>

    <div id="joinChatModal" th:unless="${#lists.isEmpty(chats)}">
        <div id="close-container" class="close-joinChatModal">
            <img class="close-icon" src="img/close.svg" />
        </div>

        <div class="modal-content">
        	<form id="join-chat-form" role="form" th:action="@{/chat/join}" method="post" th:object="${chat}">
			    <div>
			        <label for="idChat">Chat</label>
			        <select id="idChat" name="idChat" th:field="${chat.idChat}">
			        	<option value="">---- Select ----</option>
			        	<option	  th:each="chat : ${chats}"
						          th:value="${chat.id}"
						          th:text="${chat.name}"></option>
			        </select>
			    </div>
			    <div>
			        <label for="userEmail">Your E-mail:</label>
			        <input type="text" id="userEmail" name="userEmail" maxlength="50" size="35" th:field="${chat.userEmail}"/>
			    </div>
			    <div>
			        <label for="userName">Your Name:</label>
			        <input type="text" id="userName" name="userName" maxlength="50" size="35" th:field="${chat.userName}"/>
			    </div>
			    <div>
			        <button type="submit">Save</button>
			    </div>
			</form>
        </div>
    </div>

    <script src="https://code.jquery.com/jquery-2.2.4.min.js"></script>
    <script src="http://ajax.aspnetcdn.com/ajax/jquery.validate/1.15.0/jquery.validate.min.js"></script>
	<script src="js/animatedModal.min.js"></script>
	<script src="js/validate.js"></script>

	<script>
		$("#createChat").animatedModal({
			modalTarget:'createChatModal',
			color: '#94C2ED'
		});
	</script>

	<script th:unless="${#lists.isEmpty(chats)}">
		$("#joinChat").animatedModal({
	        modalTarget:'joinChatModal',
			color: '#94C2ED'
		});
	</script>
</body>
</html>
Some remarks on this page:
- You can find the code of the CSS and JS files in the Github repo.
- If the list of chats is empty, the options related to joining an existing chat are not rendered.
- It uses animatedModal.js to present the forms to create or join a chat in a modal window.
- The forms are validated with the jQuery Validation Plugin. The validation rules can be found on the validate.js script.
- When creating a chat, the name must be unique among the active chats. This validation is made with an AJAX call to the following method on the chat controller:
      @RequestMapping(method=RequestMethod.GET, value="/chat/validate/name", produces = "application/json")
@ResponseBody
public String validateChatName(@RequestParam String chatName) {
	Chat chat = chatService.getActiveChatByName(chatName);

	return String.valueOf(chat == null);
}
When a chat is created, the createChat controller method is invoked:
      @RequestMapping(method=RequestMethod.POST, value="/chat/create")
public String createChat(ChatForm form, Model model) {

	User user = new User();
	user.setName(form.getUserName());
	user.setActive(Boolean.TRUE);
	user.setCreatedAt(new Date());
	user.setEmail(form.getUserEmail());
	user.setNdaSigned(Boolean.FALSE);
	user.setOwnsChat(Boolean.TRUE);

	Chat chat = new Chat();
	chat.setActive(Boolean.TRUE);
	chat.setCreatedAt(new Date());
	chat.setDescription(form.getChatDescription());

	form.setChatName(form.getChatName().toLowerCase().replaceAll("\\s+", "-")); // Replace blank spaces with a hyphen
	form.setPresenceChatName(GeneralConstants.CHANNEL_PREFIX + form.getChatName());
	chat.setName(form.getChatName());

	chat.addMember(user);

	chatService.saveChat(chat);

	form.setIsUserChatOwner(Boolean.TRUE);
	form.setIdChat(chat.getId());
	form.setIdUser(user.getId());

	model.addAttribute(GeneralConstants.ID_SESSION_CHAT_INFO, form);

	return "redirect:/chat";
}
Notice how the helper method addMember() is used to set up the relationship between the chat and the user; it allows both chat and user to be saved with a single method call on the Chat object. Also, the channel name is prefixed with presence- (defined as GeneralConstants.CHANNEL_PREFIX). This prefix is required by Pusher Presence Channels (more on this later). Finally, the ChatForm is added to the Model object.
Now, to save this object to the HTTP session, we only have to annotate the controller class with @SessionAttributes and the same identifier used when it was added to the Model object:
      @Controller
@SessionAttributes(GeneralConstants.ID_SESSION_CHAT_INFO)
public class ChatController {
	...
}
This way, the chat information will be available to all pages of our web app.
The method to join an existing chat is similar:
      @RequestMapping(method=RequestMethod.POST, value="/chat/join")
public String joinChat(ChatForm form, Model model) {
	User user = new User();
	user.setName(form.getUserName());
	user.setActive(Boolean.TRUE);
	user.setCreatedAt(new Date());
	user.setEmail(form.getUserEmail());
	user.setNdaSigned(Boolean.FALSE);
	user.setOwnsChat(Boolean.FALSE);

	Chat chat = chatService.addNewUserToChat(form.getIdChat(), user);

	form.setIsUserChatOwner(Boolean.FALSE);
	form.setIdUser(user.getId());
	form.setChatName(chat.getName());
	form.setChatDescription(chat.getDescription());
	form.setPresenceChatName(GeneralConstants.CHANNEL_PREFIX + form.getChatName());

	model.addAttribute(GeneralConstants.ID_SESSION_CHAT_INFO, form);

	return "redirect:/chat";
}
As you can see, both methods redirect to the /chat route, which is defined by this method:
      @RequestMapping(method=RequestMethod.GET, value="/chat")
public ModelAndView chat(
		@SessionAttribute(GeneralConstants.ID_SESSION_CHAT_INFO) ChatForm chatInfo) {
	ModelAndView modelAndView = new ModelAndView();
	List<Message> list = chatService.getAllChatMessages(chatInfo.getIdChat());

	modelAndView.setViewName("chat");
	modelAndView.addObject("messages", list);

	return modelAndView;
}
It gets all the existing chat messages (if any) to present the chat history to the user.
In the next sections, we're going to talk about Pusher presence chats, Pusher webhook setup, and the configurations in HelloSign that allow a user to sign an NDA document.
Pusher's presence chats and Webhooks
Presence channels provide information about who is subscribed to the channel. For this, an HTTP request is made to determine if the current user has permission to access the channel and to provide information about that user.
On the client-side, once a subscription is authenticated, you can access the information about the users with the members property of the channel and the local user with the members.me property.
You can also subscribe to the following events on the channel:
- When a subscription has succeeded (pusher:subscription_succeeded)
- When there's a subscription error (pusher:subscription_error)
- When a member is added (pusher:member_added)
- When a member is removed (pusher:member_removed)
You can learn more about presence channels here.
On the server-side, webhooks allow us to be notified about the following events:
- When a channel is created (channel_vacated)
- When the last subscriber exits the channel (channel_vacated)
- When a member is added in a presence channel (member_added)
- When a member is removed in a presence channel (member_removed)
- When an event is sent to a channel (client_event)
There is a delay of a few seconds between a client disconnecting and the channel_vacated and member_removed events being sent so that momentary drops in connection or page navigations would not be taken into account.
You can know more about Pusher webhooks here.
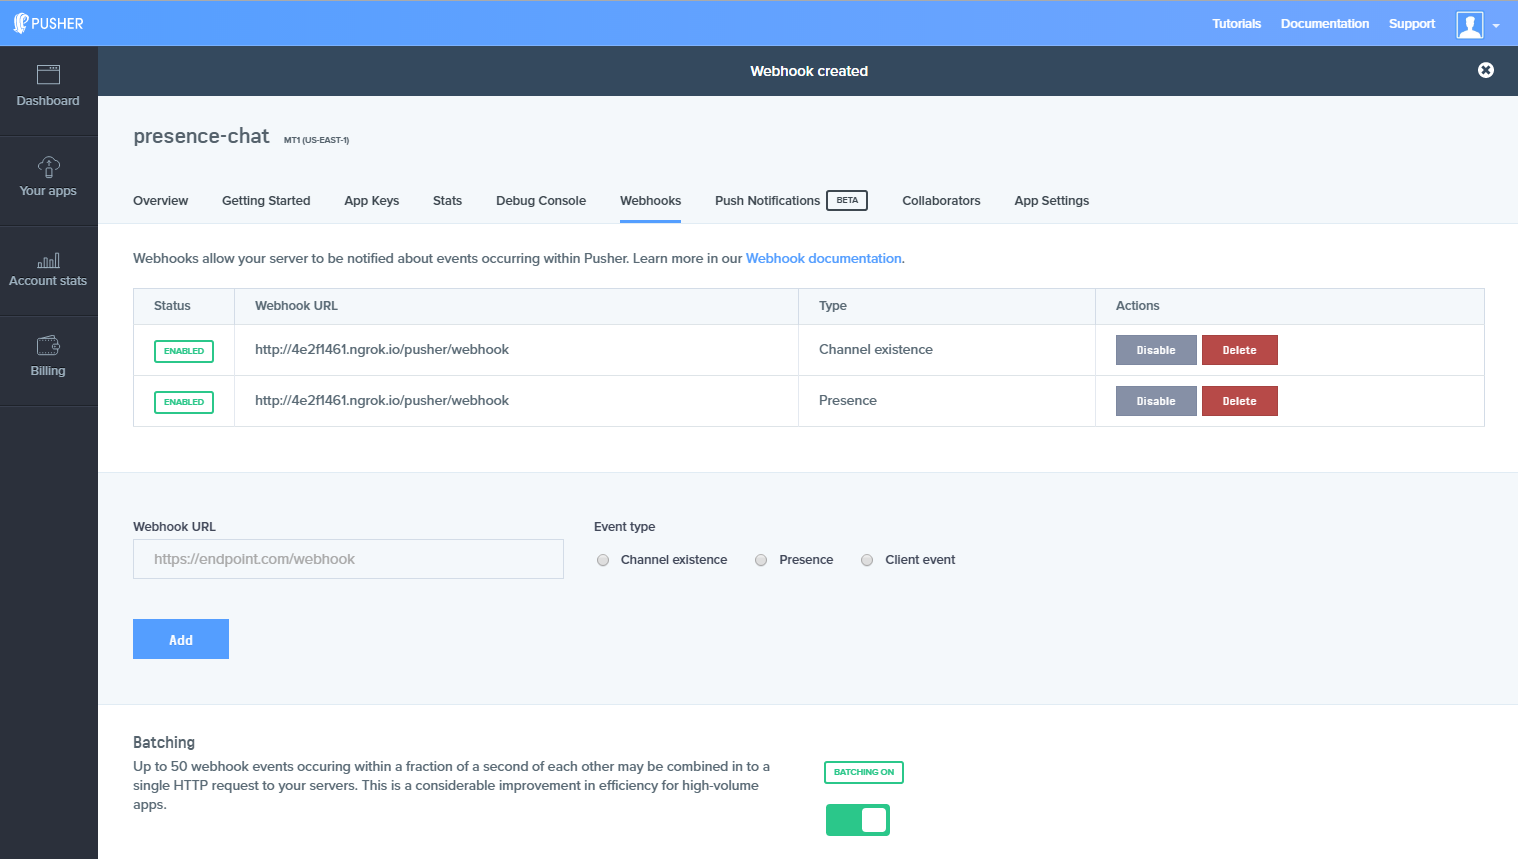
Let's configure the webhooks for channel and presence events. Go to your Pusher dashboard, select your app and then the Webhooks tab. Add two webhooks with your public URL and /pusher/webhook. My URL would be https://4e2f1461.ngrok.io/pusher/webhook. This webhook would be used for the Event types Channel existence and Presence:
The chat page
Create the src/main/resources/templates/chat.html file with the following content:
<!DOCTYPE HTML>
<html xmlns:th="http://www.thymeleaf.org">
<head>
<title>NDA Chat</title>
<meta http-equiv="Content-Type" content="text/html; charset=UTF-8" />
<link rel="stylesheet prefetch" href="https://maxcdn.bootstrapcdn.com/font-awesome/4.4.0/css/font-awesome.min.css" />
<link rel="stylesheet" href="/css/style.css" />
</head>
<body>
<div class="container clearfix">
<div class="chat">
<div class="chat-header clearfix">
      <div class="chat-about">
  <div class="chat-name" th:text="${session.chatInfo.chatName}"></div>
  <div class="chat-desc" th:text="${session.chatInfo.chatDescription}"></div>
</div>
<div class="loader">
<img src="/img/loader.gif" />
</div>
</div> <!-- end chat-header -->
<div class="chat-history">
<ul>
<li class="clearfix" th:each="msg : ${messages}" >
<div th:if="${session.chatInfo.idUser == msg.user.id}">
<div class="message-data">
<span class="message-data-name" th:inline="text"><i class="fa fa-circle online"></i> [[${msg.user.name}]]</span>
<span class="message-data-time" th:text="${msg.createdAtString}"></span>
</div>
<div class="message my-message" th:utext="${msg.messageFormatted}">
</div>
</div>
<div class="clearfix" th:if="${session.chatInfo.idUser != msg.user.id}">
<div class="message-data align-right">
<span class="message-data-time" th:text="${msg.createdAtString}"></span>
<span class="message-data-name" th:text="${msg.user.name}"></span> <i class="fa fa-circle me"></i>
</div>
<div class="message other-message float-right" th:utext="${msg.messageFormatted}">
</div>
</div>
</li>
</ul>
</div> <!-- end chat-history -->
<div class="chat-message clearfix">
<textarea name="message-to-send" id="message-to-send" placeholder ="Type your message" rows="3"></textarea>
<a id="send-btn" class="float-right button">Send</a>
<a id="request-nda-btn" class="float-left button" th:if="${session.chatInfo.isUserChatOwner}">Request NDA</a>
</div> <!-- end chat-message -->
</div> <!-- end chat -->
</div> <!-- end container -->
<script id="message-template" type="text/x-handlebars-template">
<li class="clearfix">
<div class="message-data">
<span class="message-data-name"><i class="fa fa-circle online"></i> {{name}}</span>
<span class="message-data-time">{{time}}</span>
</div>
<div class="message my-message">
{{{msg}}}
</div>
</li>
</script>
<script id="message-response-template" type="text/x-handlebars-template">
<li class="clearfix">
<div class="message-data align-right">
<span class="message-data-time" >{{time}}</span>
<span class="message-data-name" >{{name}}</span> <i class="fa fa-circle me"></i>
</div>
<div class="message other-message float-right">
{{{msg}}}
</div>
</li>
</script>
<script id="message-system-template" type="text/x-handlebars-template">
<li>
<div class="message-data-system">
<span><b>{{{msg}}}</b></span>
</div>
</li>
</script>
<script src="https://js.pusher.com/3.1/pusher.min.js"></script>
<script src="https://code.jquery.com/jquery-2.2.4.min.js"></script>
<script src="https://cdnjs.cloudflare.com/ajax/libs/handlebars.js/4.0.5/handlebars.min.js"></script>
      <script th:inline="javascript">
  var CHANNEL = /*[[${session.chatInfo.presenceChatName}]]*/ 'NA'; var
  PUSHER_KEY = /*[[${key}]]*/ 'NA';
</script>
<script src="js/chat.js"></script>
</body>
</html>
Let's review this code. This part will print the chat information from the session:
<div class="chat-about">
<div class="chat-name" th:text="${session.chatInfo.chatName}"></div>
<div class="chat-desc" th:text="${session.chatInfo.chatDescription}"></div>
</div>
Then, it will print the messages sent before the user subscribed to the chat (differentiating between the messages sent by the local user and the other chat members):
<li class="clearfix" th:each="msg : ${messages}" >
<div th:if="${session.chatInfo.idUser == msg.user.id}">
<div class="message-data">
<span class="message-data-name" th:inline="text"><i class="fa fa-circle online"></i> [[${msg.user.name}]]</span>
<span class="message-data-time" th:text="${msg.createdAtString}"></span>
</div>
<div class="message my-message" th:utext="${msg.messageFormatted}">
</div>
</div>
<div class="clearfix" th:if="${session.chatInfo.idUser != msg.user.id}">
<div class="message-data align-right">
<span class="message-data-time" th:text="${msg.createdAtString}"></span>
<span class="message-data-name" th:text="${msg.user.name}"></span> <i class="fa fa-circle me"></i>
</div>
<div class="message other-message float-right" th:utext="${msg.messageFormatted}">
</div>
</div>
</li>
If the local user is the chat owner, the Request NDA button is rendered:
<a id="request-nda-btn" class="float-left button" th:if="${session.chatInfo.isUserChatOwner}">Request NDA</a>
The Handlebars templates for messages are defined:
<script id="message-template" type="text/x-handlebars-template">
<li class="clearfix">
<div class="message-data">
<span class="message-data-name"><i class="fa fa-circle online"></i> {{name}}</span>
<span class="message-data-time">{{time}}</span>
</div>
<div class="message my-message">
{{{msg}}}
</div>
</li>
</script>
<script id="message-response-template" type="text/x-handlebars-template">
<li class="clearfix">
<div class="message-data align-right">
<span class="message-data-time" >{{time}}</span>
<span class="message-data-name" >{{name}}</span> <i class="fa fa-circle me"></i>
</div>
<div class="message other-message float-right">
{{{msg}}}
</div>
</li>
</script>
<script id="message-system-template" type="text/x-handlebars-template">
<li>
<div class="message-data-system">
<span><b>{{{msg}}}</b></span>
</div>
</li>
</script>
And variables from the server are printed using Thymeleaf's syntax for inline Javascript:
<script th:inline="javascript">
var CHANNEL = /*[[${session.chatInfo.presenceChatName}]]*/ 'NA'; var
PUSHER_KEY = /*[[${key}]]*/ 'NA';
</script>
To get the Pusher key, let's modify our controller code. But first, let's define a configuration object that will take the values of Pusher's API from environment (or command line) variables:
      @Component
public class PusherSettings {
	/** Pusher App ID */
	@Value("${pusher.appId}")
    private String appId;

	/** Pusher Key */
	@Value("${pusher.key}")
    private String key;

	/** Pusher Secret */
	@Value("${pusher.secret}")
    private String secret;

	/**
	 * Creates a new instance of the Pusher object to use its API
	 *
	 * @return An instance of the Pusher object
	 */
	public Pusher newInstance() {
		return new Pusher(appId, key, secret);
	}

	public String getPusherKey() {
		return key;
	}
}
Property values can be injected directly into your beans using the @Value annotation and are accessible after a bean has been constructed.
Now, in ChatController, inject an instance of this object:
      @Autowired
private PusherSettings pusherSettings;
Modify the chat method to add the key to the modelAndView object:
      @RequestMapping(method=RequestMethod.GET, value="/chat")
public ModelAndView chat(
		@SessionAttribute(GeneralConstants.ID_SESSION_CHAT_INFO) ChatForm chatInfo) {

	...

	modelAndView.addObject("key", pusherSettings.getPusherKey());

	return modelAndView;
}
The Javascript code that gives the chat functionality to this page is on the js/chat.js file:
      $(document).ready(function() {
  var chatHistory = $(".chat-history");
  var chatHistoryList = chatHistory.find("ul");
  var sendBtn = $("#send-btn");
  var ndaBtn = $("#request-nda-btn");
  var textarea = $("#message-to-send");

  function addMessage() {
    var messageToSend = textarea.val().trim();
    if (messageToSend !== "") {
      $.ajax({
        method: "POST",
        url: "/chat/message",
        contentType: "application/json; charset=UTF-8",
        data: JSON.stringify({ message: messageToSend })
      }).done(function(msg) {
        console.log(msg);
        textarea.val("");
      });
    }
  }

  function scrollToBottom() {
    chatHistory.scrollTop(chatHistory[0].scrollHeight);
  }

  function addSystemMessage(message) {
    var template = Handlebars.compile($("#message-system-template").html());
    var params = {
      msg: message
    };

    chatHistoryList.append(template(params));
    scrollToBottom();
  }

  scrollToBottom();

  var pusher = new Pusher(PUSHER_KEY, {
    encrypted: true,
    authEndpoint: "/chat/auth"
  });
  var presenceChannel = pusher.subscribe(CHANNEL);

  presenceChannel.bind("pusher:subscription_succeeded", function() {
    console.log(presenceChannel.members.me);
    addSystemMessage("You have joined the chat");
  });

  presenceChannel.bind("pusher:subscription_error", function(status) {
    alert("Subscription to the channel failed with status " + status);
  });

  presenceChannel.bind("pusher:member_added", function(member) {
    console.log("pusher:member_added");
    addSystemMessage(member.info.name + " has joined the chat");
  });

  presenceChannel.bind("pusher:member_removed", function(member) {
    console.log("pusher:member_removed");
    addSystemMessage(member.info.name + " has left the chat");
  });

  presenceChannel.bind("new_message", function(data) {
    if (data.message !== "") {
      var templateEl =
        presenceChannel.members.me.id === data.userId
          ? $("#message-template")
          : $("#message-response-template");
      var template = Handlebars.compile(templateEl.html());
      var params = {
        msg: data.message.replace(/(\r?\n)/g, "<br />"),
        name: data.userName,
        time: data.time
      };

      chatHistoryList.append(template(params));
      scrollToBottom();
    }
  });

  presenceChannel.bind("system_message", function(data) {
    if (data.message !== "") {
      addSystemMessage(data.message);
    }
  });

  sendBtn.on("click", function() {
    addMessage();
  });

  ndaBtn.on("click", function() {
    $.ajax({
      method: "POST",
      url: "/chat/request/nda"
    }).done(function(msg) {
      console.log(msg);
    });
  });

  $(document)
    .ajaxStart(function() {
      $(".loader").show();
    })
    .ajaxStop(function() {
      $(".loader").hide();
    });
});
After defining the functions to add messages, we can create the pusher object.
      var pusher = new Pusher(PUSHER_KEY, {
  encrypted: true,
  authEndpoint: "/chat/auth"
});
Then, the subscription to the channel is made and the presence events are bound.
The API endpoints of the application for the chat functionality are defined in the com.example.web.PusherController.
This class is annotated with the @RestController annotation:
      @RestController
public class PusherController {
	...
}
In Spring MVC 4, if your controller is annotated with @RestController instead of @Controller, you don't need the @ResponseBody annotation to specify responses formatted as JSON.
Let's wire the services we'll need (notice the@PostConstruct annotation in the method that creates the pusher instance):
      @RestController
public class PusherController {
	private Logger logger = LoggerFactory.getLogger(PusherController.class);

	@Autowired
	private ChatService chatService;

	@Autowired
	private UserService userService;

	@Autowired
	private PusherSettings pusherSettings;

	private Pusher pusher;

	/**
	 * Method executed after the object is created
	 * that creates an instance of the Pusher object
	 */
	@PostConstruct
	public void createPusherObject() {
		pusher = pusherSettings.newInstance();
	}
}
After that, let's define the authentication endpoint for the presence chat:
      @RestController
public class PusherController {
	...

	@RequestMapping(method = RequestMethod.POST, value= "/chat/auth")
	public String auth(
			@RequestParam(value="socket_id") String socketId,
	        @RequestParam(value="channel_name") String channel,
	        @SessionAttribute(GeneralConstants.ID_SESSION_CHAT_INFO) ChatForm chatInfo){

		Long userId = chatInfo.getIdUser();
		Map<String, String> userInfo = new HashMap<>();
		userInfo.put("name", chatInfo.getUserName());
		userInfo.put("email", chatInfo.getUserEmail());

		String res = pusher.authenticate(socketId, channel, new PresenceUser(userId, userInfo));

	    return res;
	}
}
In the method, we just get the information about the chat and the user from the session to make the actual authentication and return the information.
To register a message, we insert it in the database and publish an event into the presence channel afterwards:
      @RestController
public class PusherController {
	...

	@RequestMapping(value = "/chat/message",
					method = RequestMethod.POST,
					consumes = "application/json",
					produces = "application/json")
	public ChatMessageResponse messsage(
			@RequestBody ChatMessageRequest request,
			@SessionAttribute(GeneralConstants.ID_SESSION_CHAT_INFO) ChatForm chatInfo) {

		Message msg = new Message();
		msg.setCreatedAt(new Date());
		msg.setIdChat(chatInfo.getIdChat());
		msg.setMessage(request.getMessage());

		chatService.saveMessage(msg, chatInfo.getIdUser());

		ChatMessageResponse response = new ChatMessageResponse();
		response.setMessage(msg.getMessage());
		response.setTime(msg.getCreatedAtString());
		response.setUserId(msg.getUser().getId());
		response.setUserName(msg.getUser().getName());

		pusher.trigger(chatInfo.getPresenceChatName(), "new_message", response);

		return response;
	}
}
Finally, we need to define the method that will handle Pusher's webhook requests:
      @RestController
public class PusherController {
	...

	@RequestMapping(value = "/pusher/webhook",
			method = RequestMethod.POST,
			consumes = "application/json")
	public String webhook(
			@RequestHeader(value="X-Pusher-Key") String key,
			@RequestHeader(value="X-Pusher-Signature") String signature,
			@RequestBody String json) throws JsonParseException, JsonMappingException, IOException {
		Validity valid = pusher.validateWebhookSignature(key, signature, json);

		if(Validity.VALID.equals(valid)) {
			ObjectMapper mapper = new ObjectMapper();
			PusherWebhookRequest request = mapper.readValue(json, PusherWebhookRequest.class);

			if(request.getEvents() != null) {
				for(PusherWebhookRequest.Event event : request.getEvents()) {
					switch(event.getName()) {
						case "channel_occupied":
							logger.info("channel_occupied: " + event.getChannel());
							break;
						case "channel_vacated":
							logger.info("channel_vacated: " + event.getChannel());
							chatService.markChatAsInactive(event.getChannel().replace(GeneralConstants.CHANNEL_PREFIX, ""));
							break;
						case "member_added":
							logger.info("member_added: " + event.getUserId());
							break;
						case "member_removed":
							logger.info("member_removed: " + event.getUserId());
							userService.markUserAsInactive(event.getUserId());
							break;
					}
				}
			}
		}

		return "OK";
	}
}
In the code above, we verify that the request comes from Pusher. Valid WebHooks will contain these headers:
- X-Pusher-Key: The currently active Pusher's API key.
- X-Pusher-Signature: An HMAC SHA256 hex digest formed by signing the POST payload (body) with Pusher's APIS token's secret
To perform the authentication, Pusher's library requires these headers and the request body as arguments to the validateWebhookSignature method:
Validity valid = pusher.validateWebhookSignature(key, signature, json);
If the request is valid, the JSON object is converted to an object of type PusherWebhookRequest. These are sample requests in JSON format:
      {
	"time_ms":1469203501957,
	"events":[
		{
			"channel":"presence-test",
			"name":"channel_occupied"
		}
	]
}


{
	"time_ms":1469203501957,
	"events":[
		{
			"channel":"presence-test",
			"user_id":"1",
			"name":"member_added"
		}
	]
}
Finally, the event is handled accordingly (for channel_vacated events the chat is marked as inactive and for member_removed events, the user is marked as inactive too).
The chat functionality is completed, now the only thing missing is the signing of the NDA document.
Setting up HelloSign
We're going to work with a document with some Lorem ipsum text that will represent our NDA agreement:
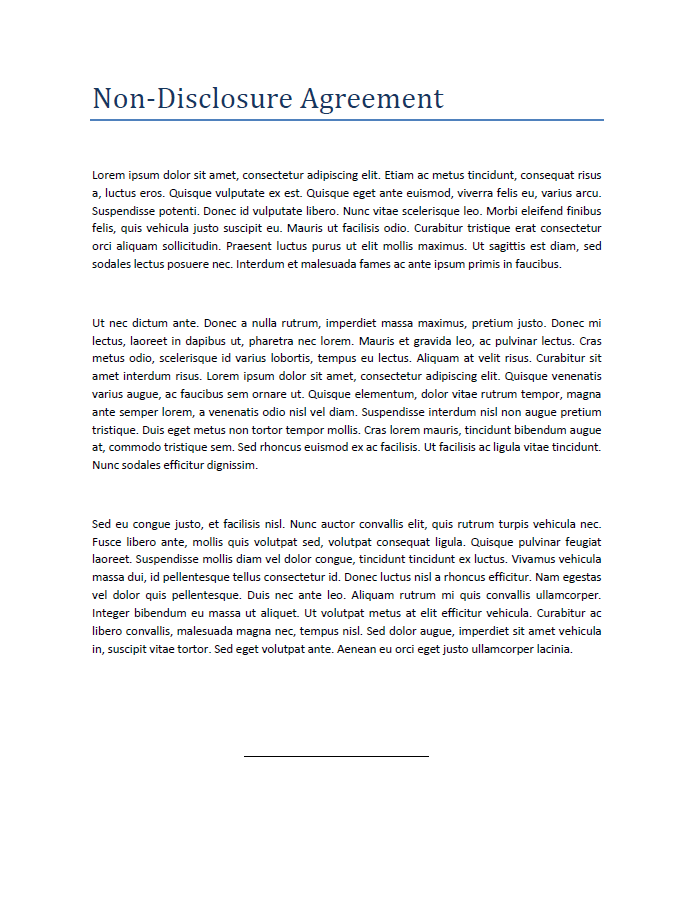
You can get the sample PDF document here.
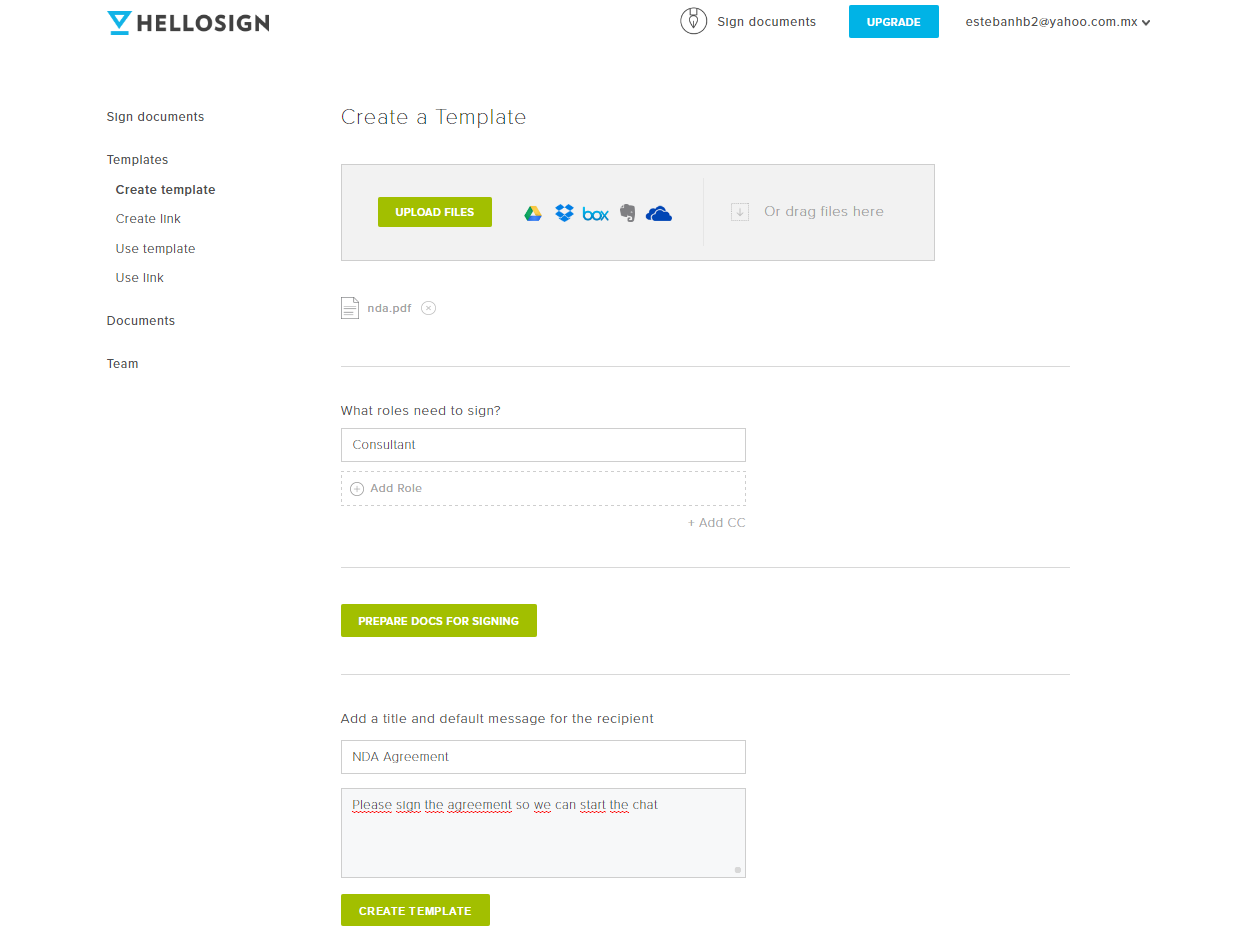
Go to your HelloSign dashboard and choose the Templates option in the menu on the left. The following screen will be shown:
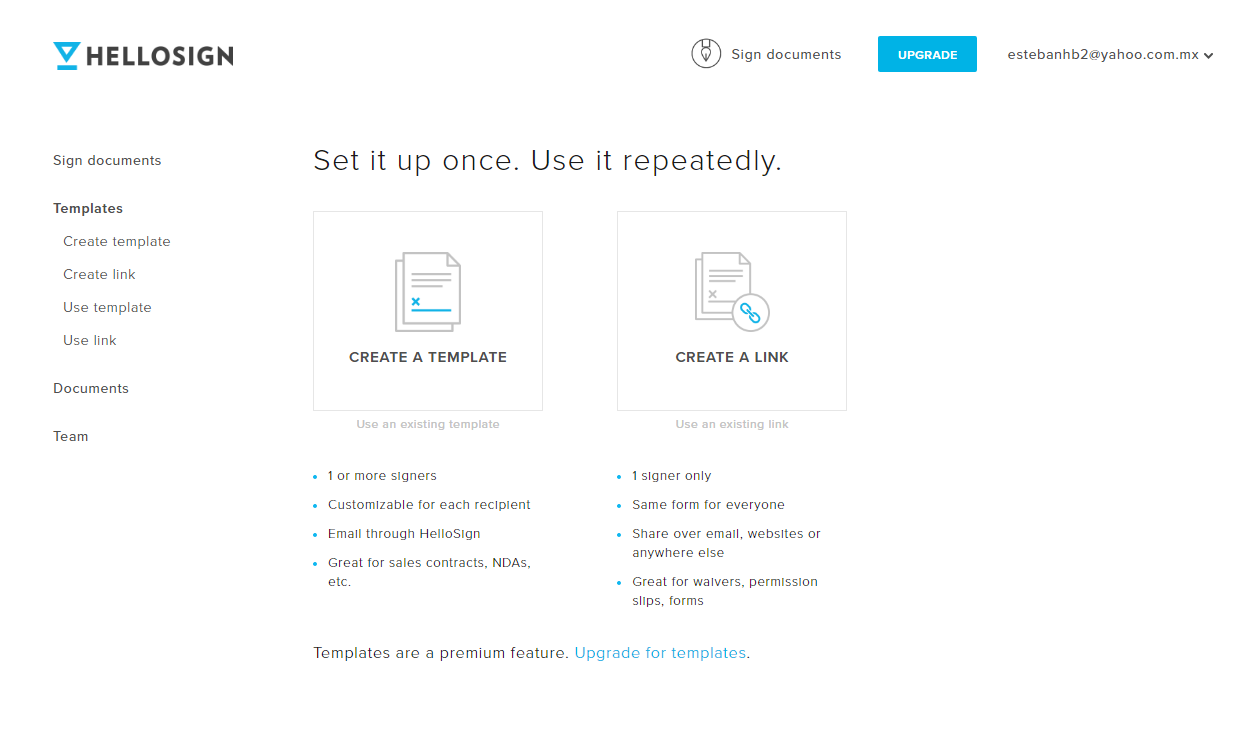
Choose Create a Template and press Continue if a warning pop-up appears. You'll reach the following screen:
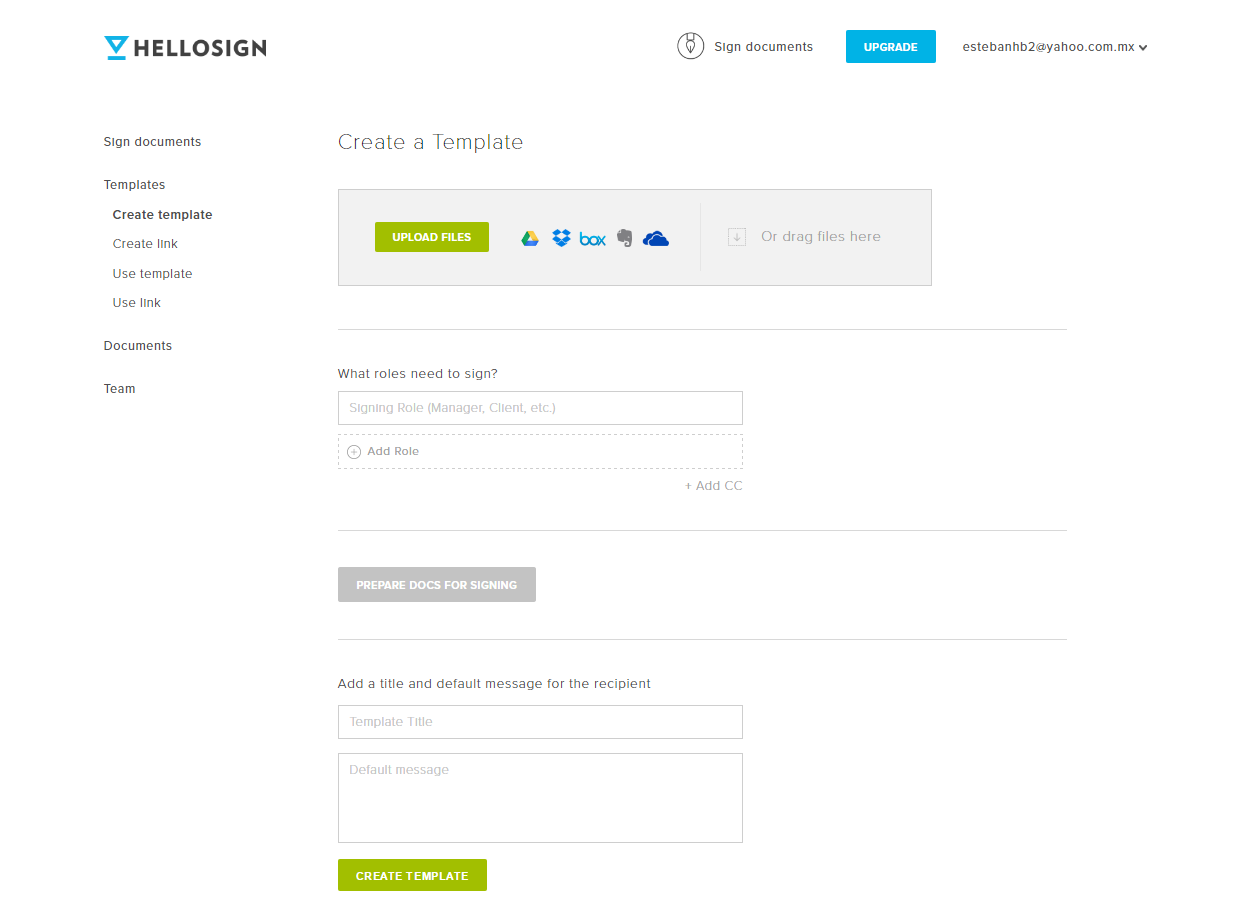
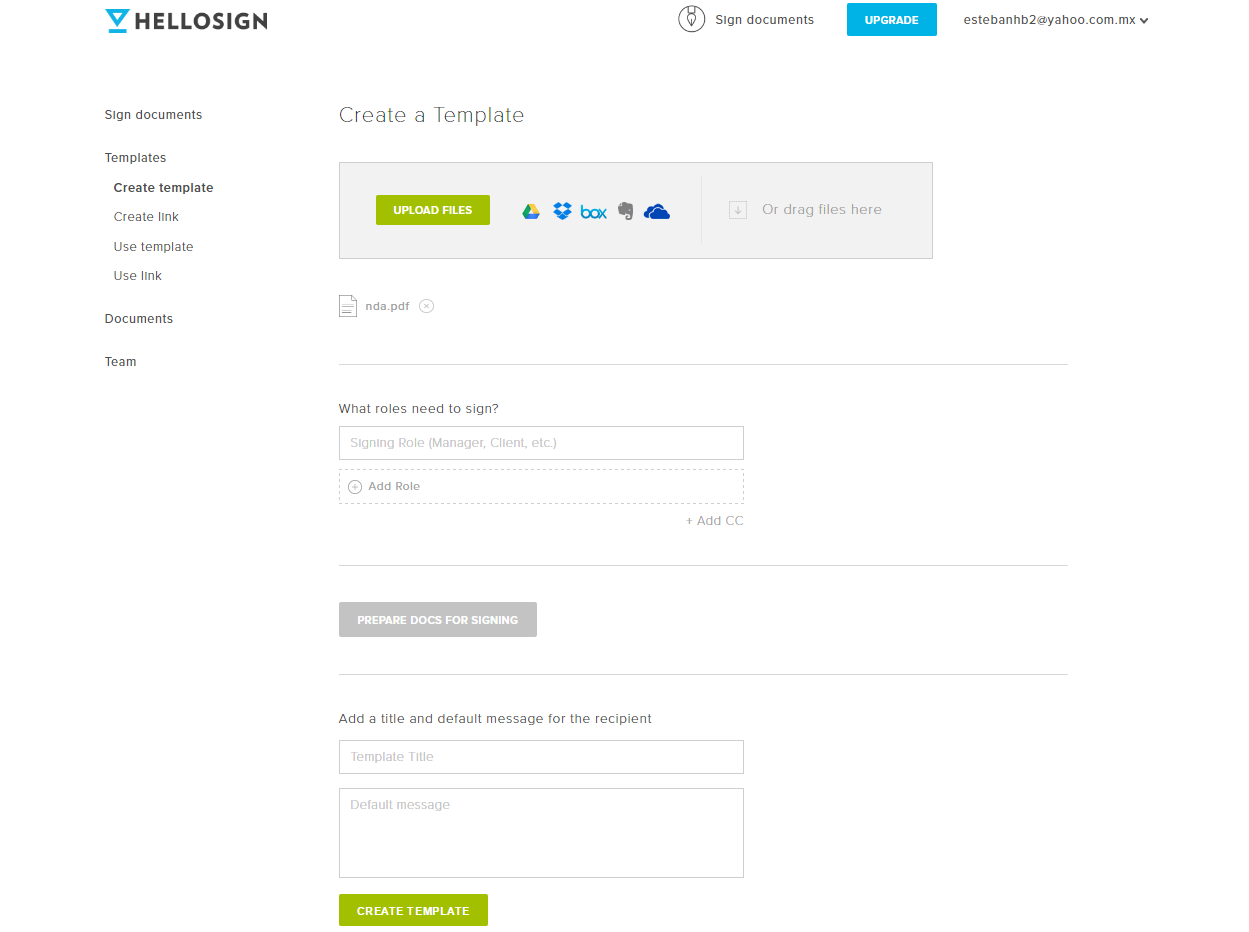
Next, upload the sample document:
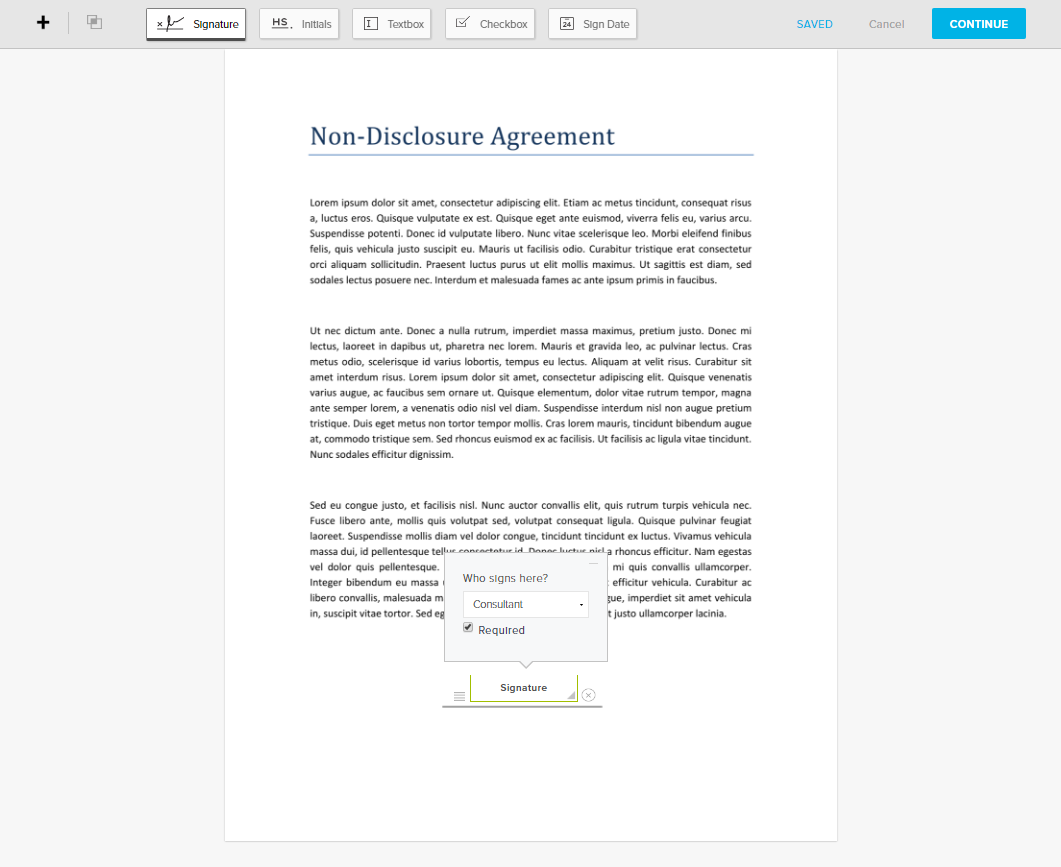
We'll only require the signature of one person, so let's enter a role -- Consultant:
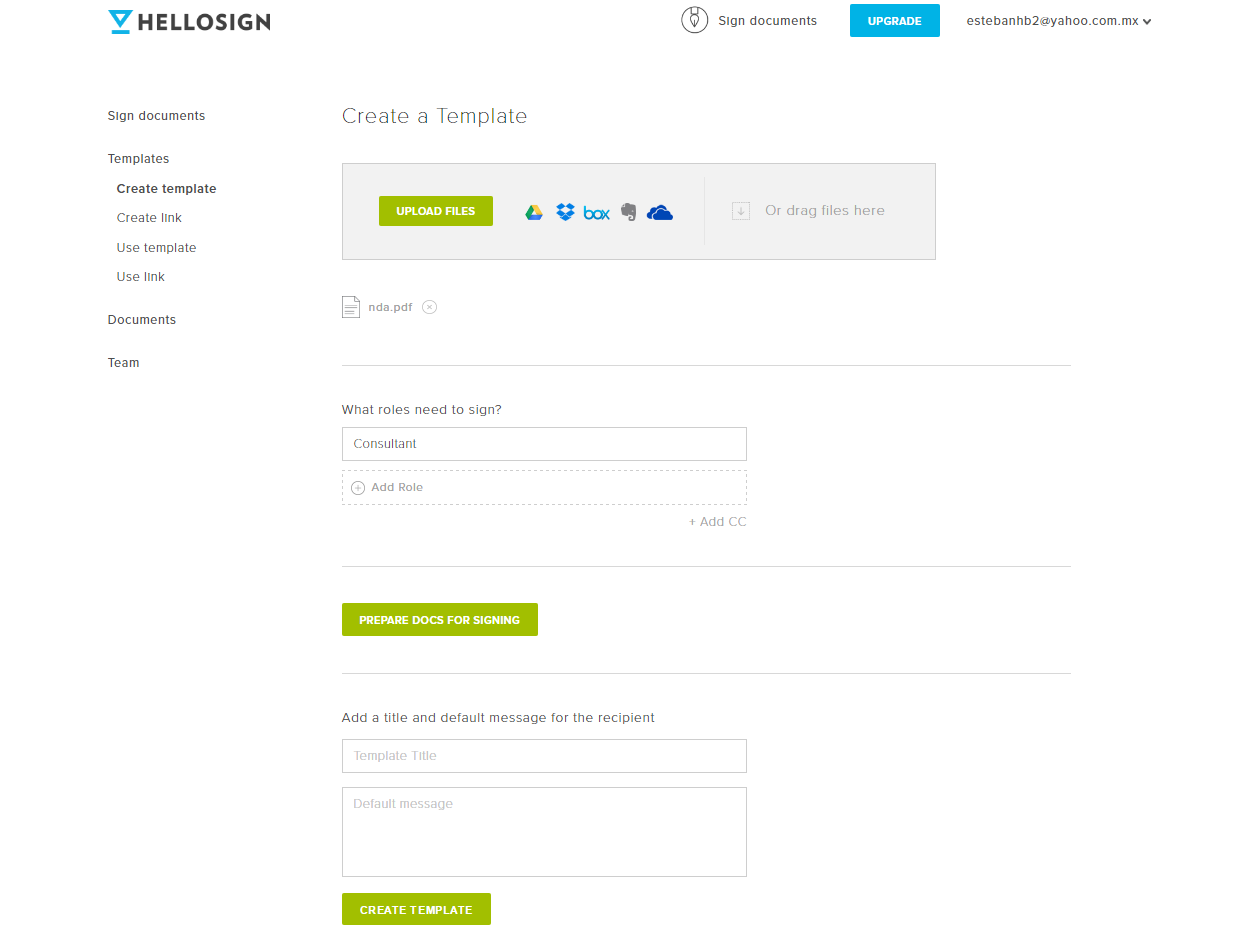
Click the Prepare Docs for Signing button. The following window will be shown:
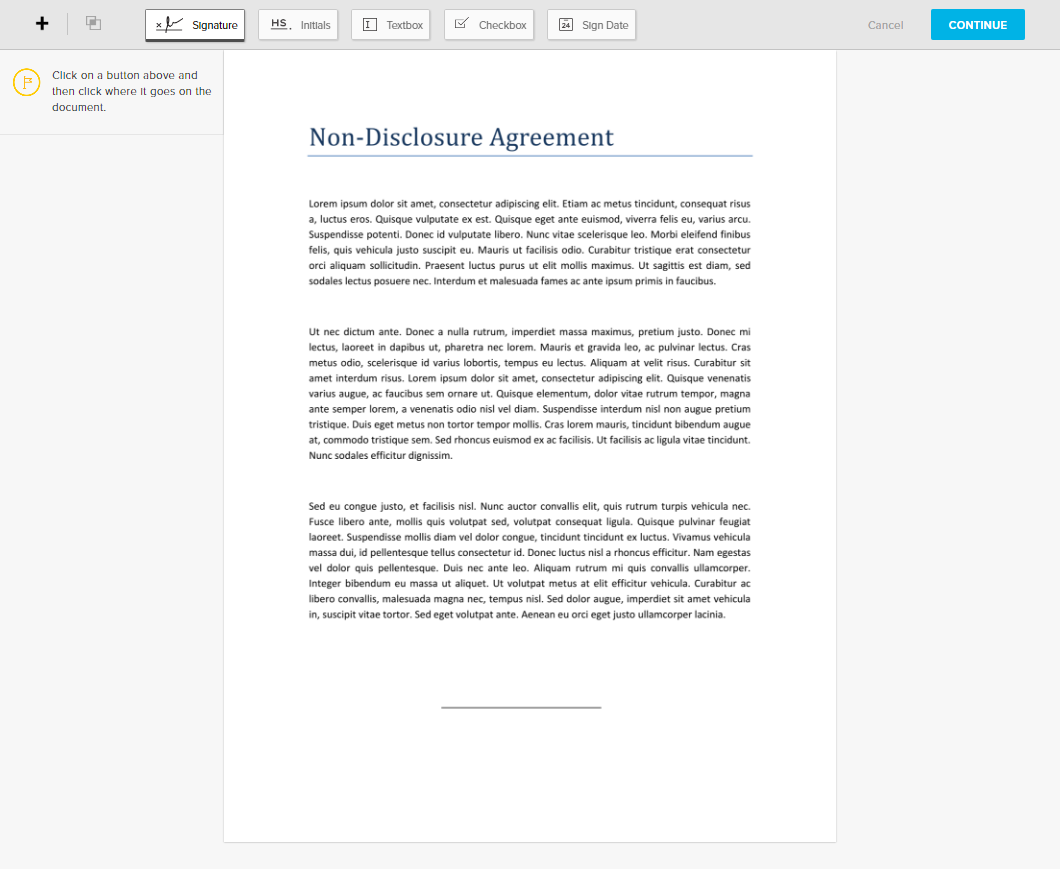
Click the Signature button and then click on the place where you want the signature on the document:
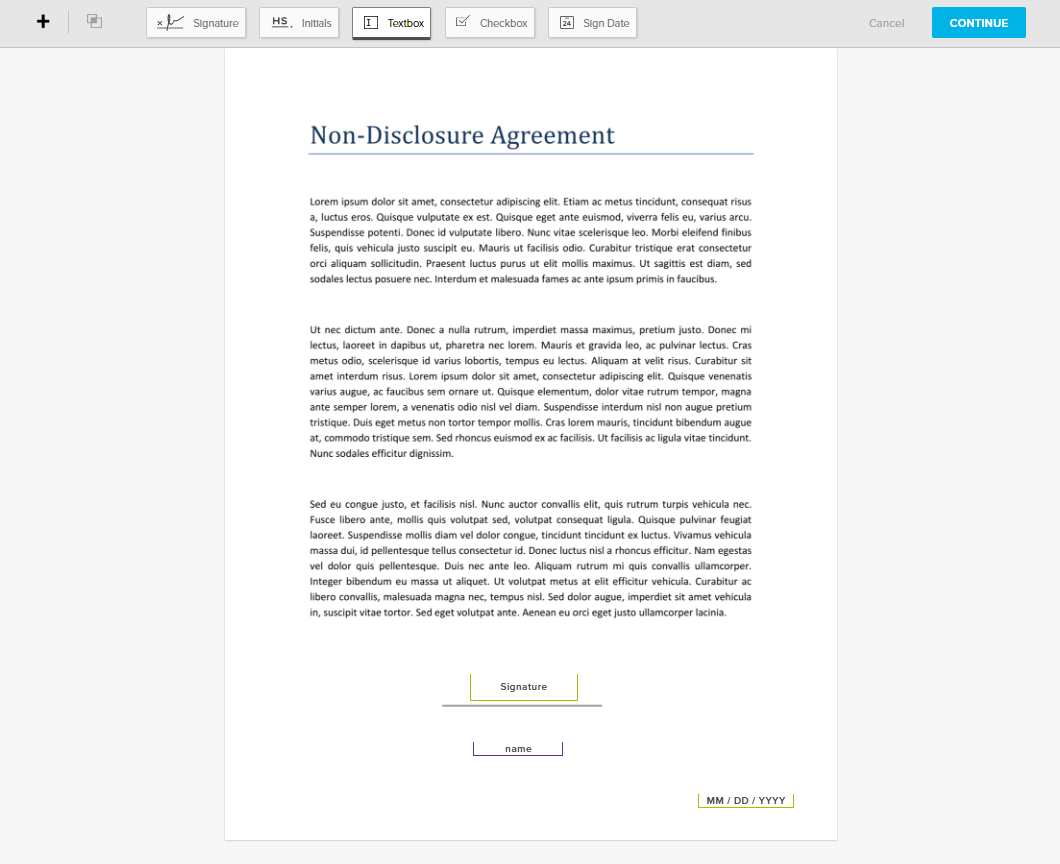
Add a Textbox selecting Me (when sending). under Who fills this out? and with the value name in Field Label (this will be used to reference the field when requesting the signature via the API), and a Sign Date field:
Then, click Continue and add a title and a message for the recipient:
Finally, click the Create Template button. The template ID will be shown:
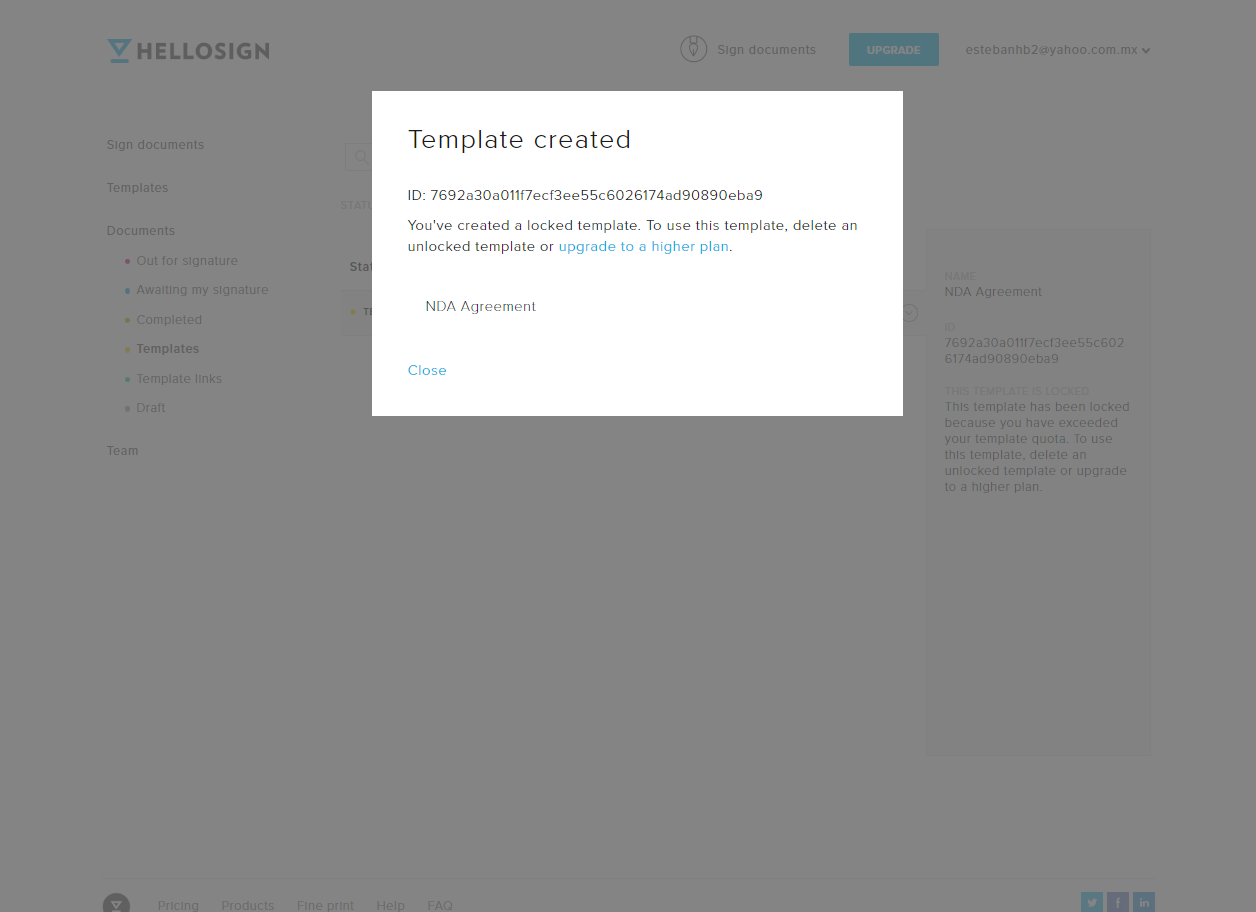
Store the template ID, we'll need it later.
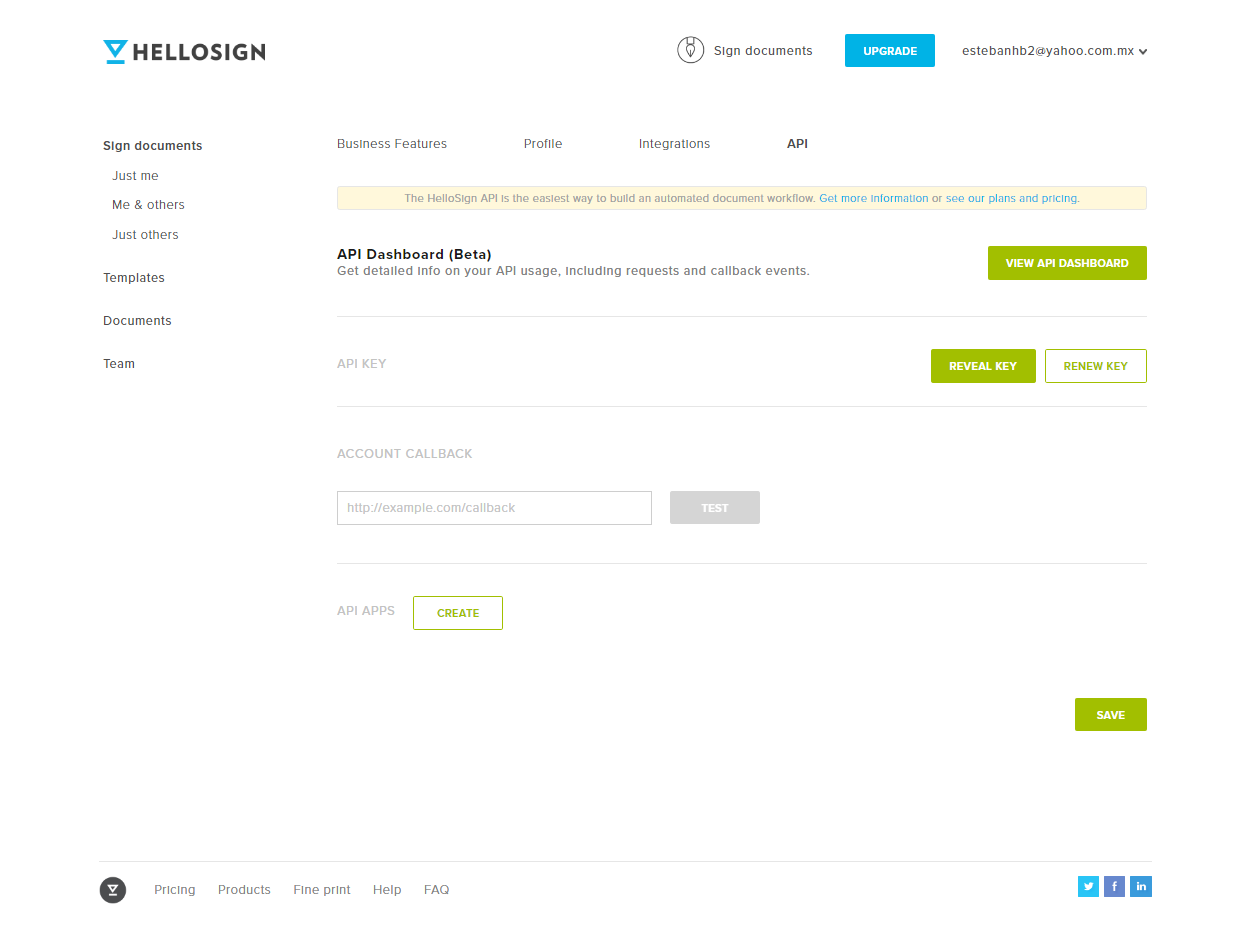
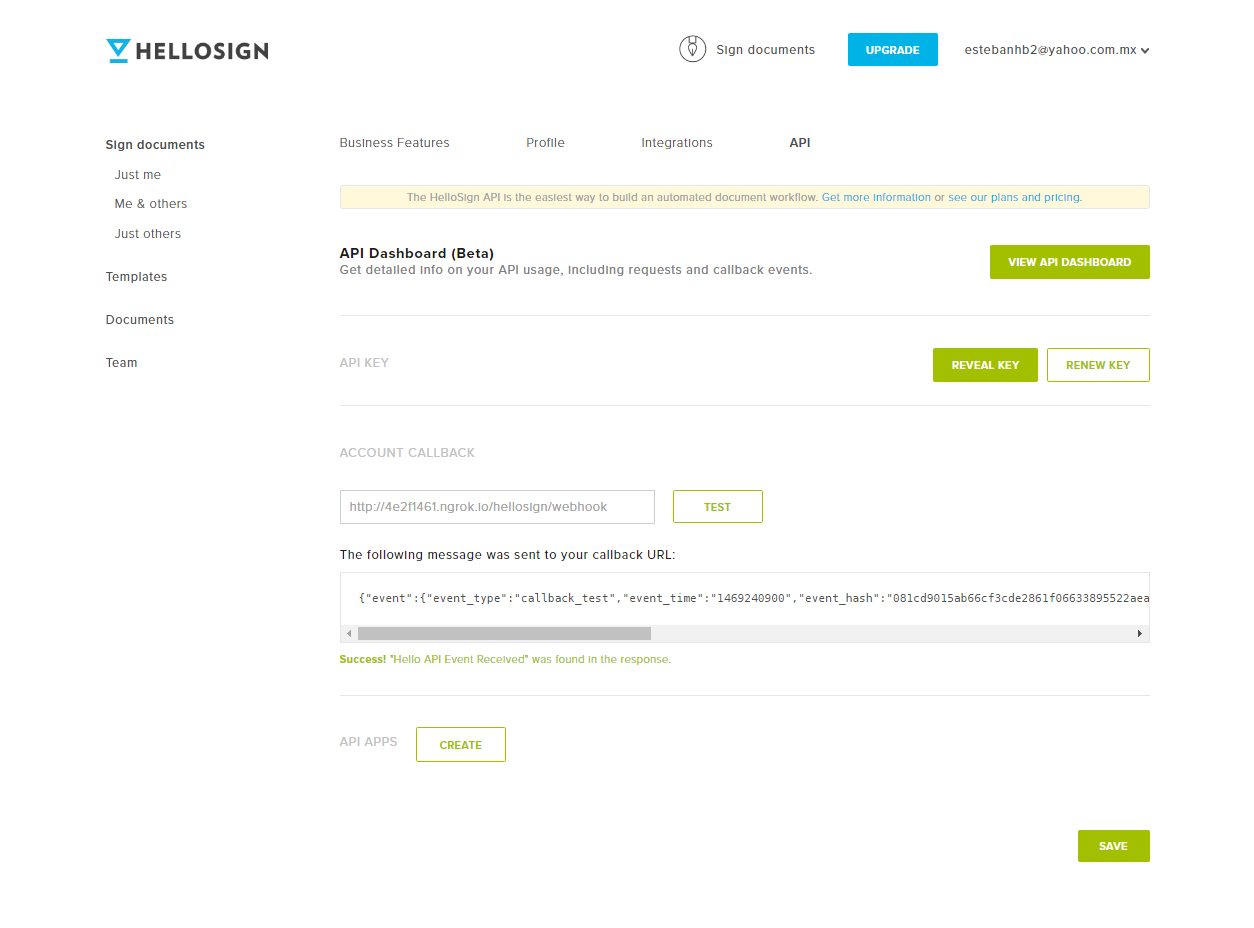
Now let's set up the API. On the menu under your email:
Go to Settings and then to the API tab:
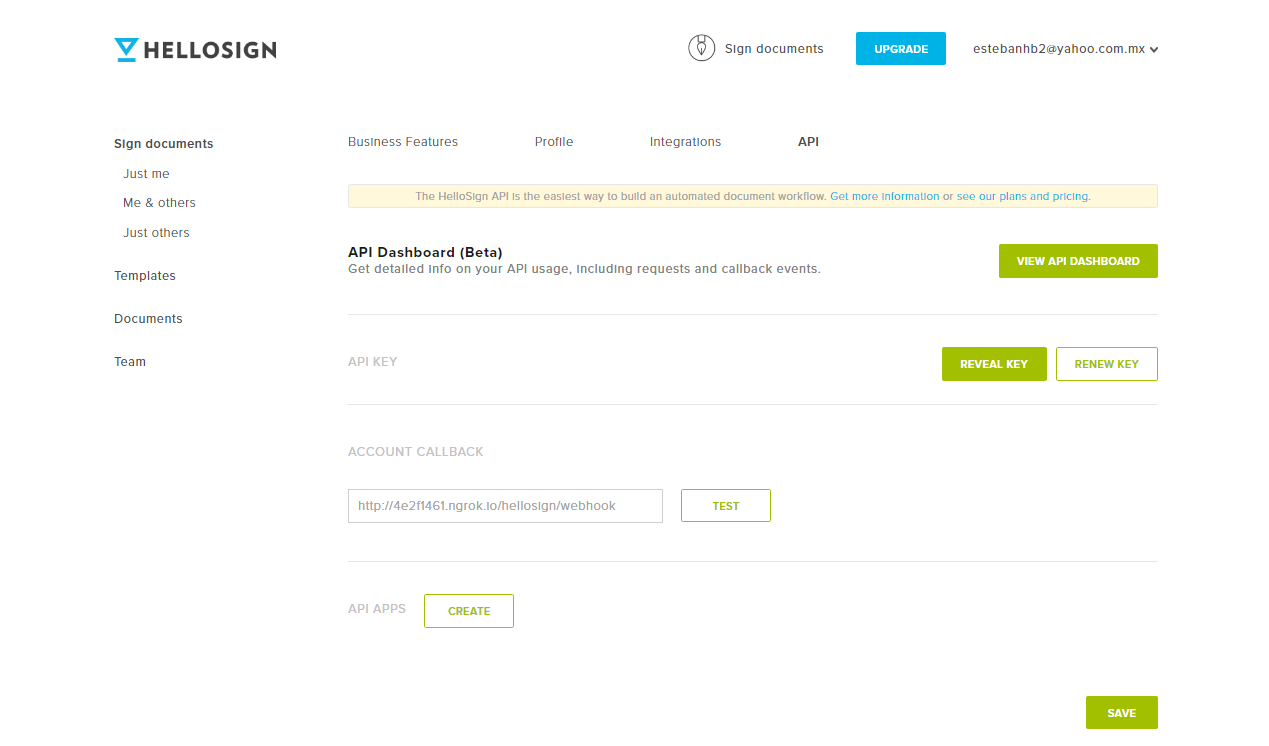
Under Account Callback, enter the URL https://4e2f1461.ngrok.io/hellosign/webhook (or whatever your domain is, just keep the /hellosign/webhook):
If you test the webhook (assuming you have it already configured), HelloSign will send a message to the URL, for example:
      {
	"event":{
		"event_type":"callback_test",
		"event_time":"1469227065",
		"event_hash":"8db73f2e2749aa0b79ff4a461a12922a575a9a436cc5e195962f594a17d4060c",
		"event_metadata":{
			"related_signature_id":null,
			"reported_for_account_id":"74d9aec621265624c4d3b5f14fe71735fcf8bf87",
			"reported_for_app_id":null,
			"event_message":null
		}
	}
}
You can find more information about HelloSign webhooks here.
Now click the Reveal Key button and copy your API key, we'll need it for the following section.
Integrating HelloSign
We'll create a class similar to PusherController for the HelloSign functionality. Create the class com.example.web.HelloSignController and inject the following dependencies:
      @RestController
public class HelloSignController {
	private Logger logger = LoggerFactory.getLogger(HelloSignController.class);

	@Autowired
	private UserService userService;

	@Autowired
	private PusherSettings pusherSettings;

	@Value("${hellosign.apikey}")
	private String helloSignApiKey;

	@Value("${hellosign.templateId}")
	private String helloSignTemplateId;

	@Value("${hellosign.testMode}")
	private Boolean testMode;

	private Pusher pusher;

	/**
	 * Method executed after the object is created
	 * that creates an instance of the Pusher object
	 */
	@PostConstruct
	public void createPusherObject() {
		pusher = pusherSettings.newInstance();
	}
}
Notice how the values of the HelloSign API will be injected from system variables. Next, we'll add the method to request a signature from a chat member:
      @RequestMapping(value = "/chat/request/nda",
		method = RequestMethod.POST,
		produces = "application/json")
public String requestNda(
	@SessionAttribute(GeneralConstants.ID_SESSION_CHAT_INFO) ChatForm chatInfo)
			throws HelloSignException {

	List<User> users = userService.getChatMembersToSignNda(chatInfo.getIdChat());

	if(users != null && !users.isEmpty()) {
		HelloSignClient client = new HelloSignClient(helloSignApiKey);

		for(User user : users) {
			TemplateSignatureRequest request = new TemplateSignatureRequest();
			request.setSubject(HelloSignConstants.EMAIL_SUBJECT + chatInfo.getChatName());
			request.setSigner(HelloSignConstants.SIGNING_ROLE, user.getEmail(), user.getName());
			request.setCustomFieldValue(HelloSignConstants.NAME_TEMPLATE_FIELD, user.getName());
			request.setTemplateId(helloSignTemplateId);
			request.setTestMode(testMode);

			SignatureRequest newRequest = client.sendTemplateSignatureRequest(request);

			user.setSignId(newRequest.getId());
			userService.saveUser(user);
		}

	}

	return "OK";
}
In this method, we get the list of chat members who haven't signed the agreement yet. Then, we make a signature request for each of them. There's a lot of options to set (here's the signature request documentation). However, since we've done most of the work when we set the template, this method only sets:
- The subject of the email that will be sent to the signer
- The email and name of the signer
- The value of our custom field, which is the name of the signer
- The template ID of the document to sign
- The flag that indicates that we're using the test mode
Finally, the returned sign ID is saved in the User table. We'll use this value to get the user information later.
Next, set up a method to respond to the HelloSign webhook:
      @RequestMapping(value = "/hellosign/webhook",
		method = RequestMethod.POST)
public String webhook(@RequestParam String json) throws HelloSignException {
	JSONObject jsonObject = new JSONObject(json);
	Event event = new Event(jsonObject);

	boolean validRequest = event.isValid(helloSignApiKey);

	if(validRequest) {
		SignatureRequest signatureRequest = event.getSignatureRequest();
		User user = null;
		ChatMessageResponse response = new ChatMessageResponse();

		logger.info(event.getTypeString());
		switch(event.getTypeString()) {
			case HelloSignConstants.REQUEST_SIGNED_EVENT:
				user = userService.getUserBySignId(signatureRequest.getId());
				if(user != null) {
					response.setMessage(user.getName() + " has signed the NDA agreement. Download the file <a href=\"/download/" + signatureRequest.getId() + "\" target=\"_blank\">here</a>");
					pusher.trigger(GeneralConstants.CHANNEL_PREFIX + user.getChat().getName(), "system_message", response);
				}
				break;
			case HelloSignConstants.REQUEST_SENT_EVENT:
				user = userService.getUserBySignId(signatureRequest.getId());
				if(user != null) {
					response.setMessage("The signature request has been sent to " + user.getName());
					pusher.trigger(GeneralConstants.CHANNEL_PREFIX + user.getChat().getName(), "system_message", response);
				}
				break;
		}
	}

	return HelloSignConstants.WEBHOOK_RESPONSE;
}
There are many events we can listen for, but for this application, we're only interested in the event that a sign request is sent and the event that an NDA document is signed. Once we determine that these events have taken place, we can send the appropriate notifications to the chat.
As with all webhooks requests, we need to validate that the request really came from HelloSign. Fortunately, the HelloSign Java library provides an object of type com.hellosign.sdk.resource.Event, which takes the JSON object from the request and validates it with a method call:
      JSONObject jsonObject = new JSONObject(json);
Event event = new Event(jsonObject);

boolean validRequest = event.isValid(helloSignApiKey);
For example, here's the JSON sent when a user signs the document:
      {
  "metadata": {},
  "response_data": [
    {
      "api_id": "9d295b_9",
      "signature_id": "a267902280c190df81677fc7733c5e4c",
      "name": null,
      "type": "signature",
      "value": null,
      "required": true
    },
    {
      "api_id": "9d295b_11",
      "signature_id": "a267902280c190df81677fc7733c5e4c",
      "name": null,
      "type": "date_signed",
      "value": "07/22/2016",
      "required": false
    }
  ],
  "signature_request_id": "ce00f316b22e4bb9eb1978d1072681726b621037",
  "original_title": "The NDA for the chat test",
  "subject": "The NDA for the chat test",
  "custom_fields": [{
    "api_id": "0652b9_9",
    "editor": null,
    "name": "name",
    "type": "text",
    "value": "Esteban Herrera",
    "required": null
  }],
  "signing_redirect_url": null,
  "title": "The NDA for the chat test",
  "message": "Please sign the agreement so we can start the chat",
  "details_url": "https://www.hellosign.com/home/manage?guid=ce00f316b22e4bb9eb1978d1072681726b621037",
  "signatures": [{
    "signer_name": "Esteban Herrera",
    "signature_id": "a267902280c190df81677fc7733c5e4c",
    "status_code": "signed",
    "last_viewed_at": 1469241388,
    "signed_at": 1469241960,
    "signer_email_address": "[email protected]",
    "last_reminded_at": null,
    "error": null,
    "has_pin": false,
    "order": null
  }],
  "has_error": false,
  "requester_email_address": "[email protected]",
  "signing_url": "https://www.hellosign.com/sign/ce00f316b22e4bb9eb1978d1072681726b621037",
  "test_mode": true,
  "is_complete": true,
  "cc_email_addresses": [],
  "files_url": "https://api.hellosign.com/v3/signature_request/files/ce00f316b22e4bb9eb1978d1072681726b621037",
  "final_copy_uri": "/v3/signature_request/final_copy/ce00f316b22e4bb9eb1978d1072681726b621037"
}
If there are no errors, we have to return a response body with the text Hello API Event Received. If an error occurs, the webhook request will be considered a failure, and it will be retried later. Notice the simmilarity between webhooks and callbacks here.
Once the document is signed, we can view it (or download it) as a PDF file. From the application, we can request it by clicking a link, which is handled by this method:
      @RequestMapping(value="/download/{id}", method = RequestMethod.GET)
public void downloadFile(HttpServletResponse response, @PathVariable("id") String id) throws IOException, HelloSignException {
	HelloSignClient client = new HelloSignClient(helloSignApiKey);
	File file = client.getFiles(id);

	if(!file.exists()){
		String errorMessage = HelloSignConstants.FILE_DOWNLOAD_ERROR_MSG;
		System.out.println(errorMessage);
		OutputStream outputStream = response.getOutputStream();
		outputStream.write(errorMessage.getBytes(Charset.forName("UTF-8")));
		outputStream.close();

		return;
	}

	response.setContentType(HelloSignConstants.FILE_CONTENT_TYPE);
	response.setHeader("Content-Disposition", String.format("inline; filename=\"" + file.getName() +"\""));
	response.setContentLength((int)file.length());

	InputStream inputStream = new BufferedInputStream(new FileInputStream(file));
	FileCopyUtils.copy(inputStream, response.getOutputStream());
}
The application is now complete.
Running the application
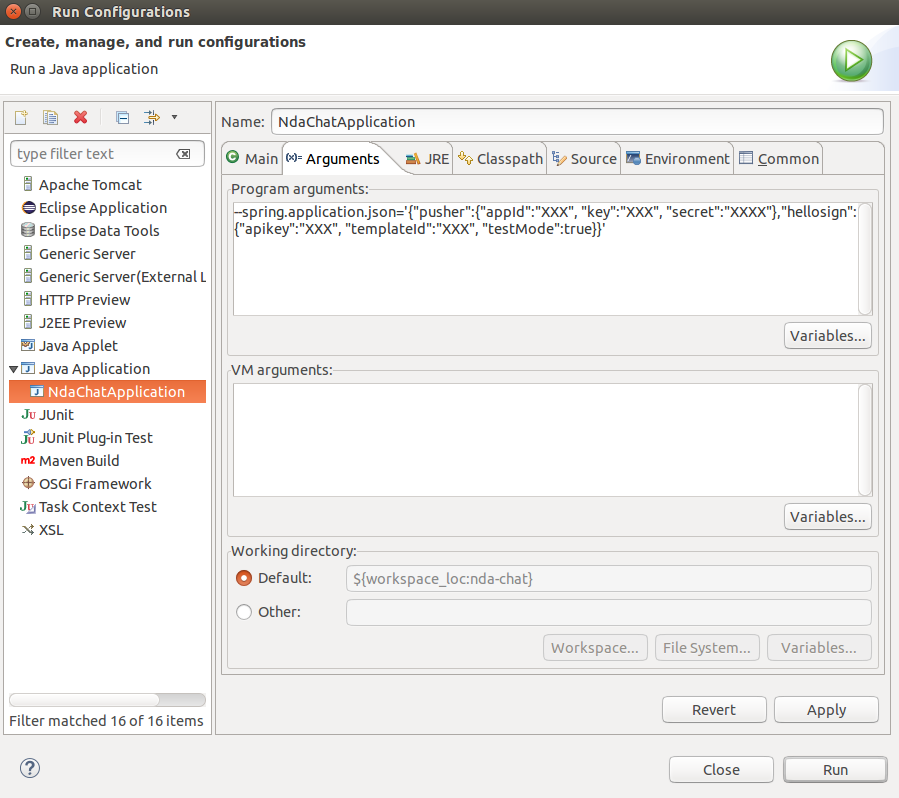
To run the application, we have to pass all the values we injected with the @Value annotation either as environment variables or as command-line options using inline JSON (more info here).
If we're using Eclipse, for example, we can configure the values in the Arguments section of the Run Configuration dialog:
If we're using mvn spring-boot:run, we can do it this way:
mvn spring-boot:run -Dspring.application.json='{"pusher":{"appId":"XXX", "key":"XXX", "secret":"XXX"},"hellosign":{"apikey":"XXX", "templateId":"XXX", "testMode":true}}'
Or if we're using the JAR file built by Maven:
java -jar target/nda-chat-0.0.1-SNAPSHOT.jar --spring.application.json='{"pusher":{"appId":"XXX", "key":"XXX", "secret":"XXX"},"hellosign":{"apikey":"XXX", "templateId":"XXX", "testMode":true}}'
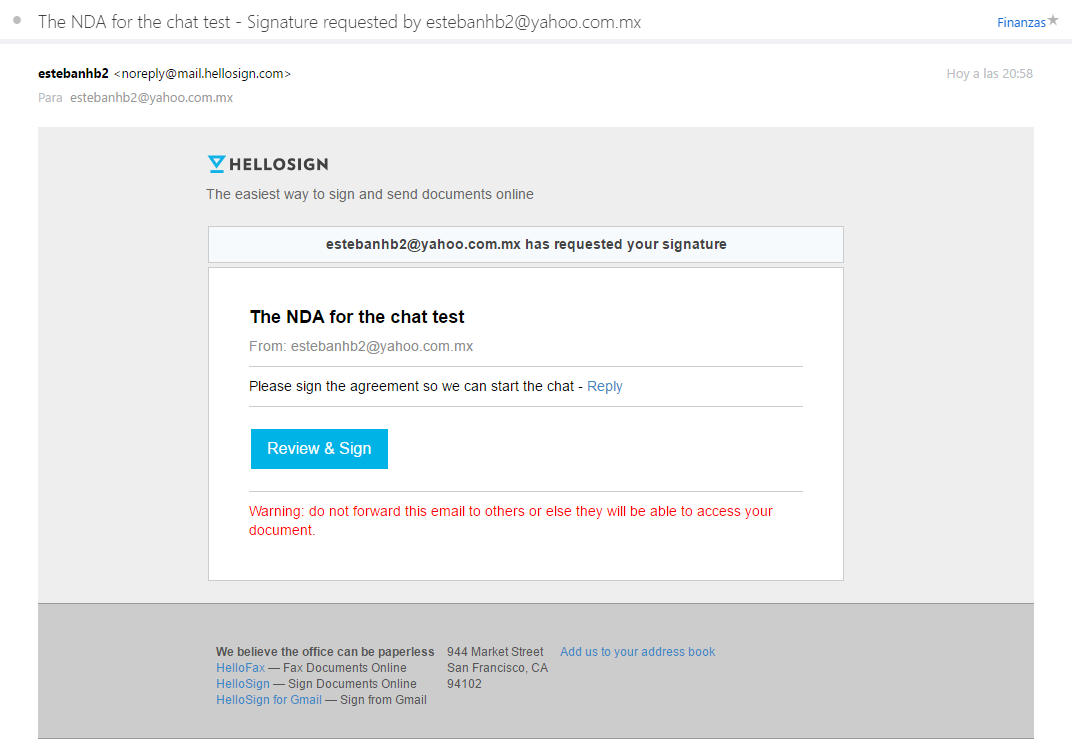
Either way, once the application is running, create a chat, join the chat in another browser (or in incognito mode so the sessions can be different) and request users to sign the NDA.
The signer will receive an email from HelloSign:
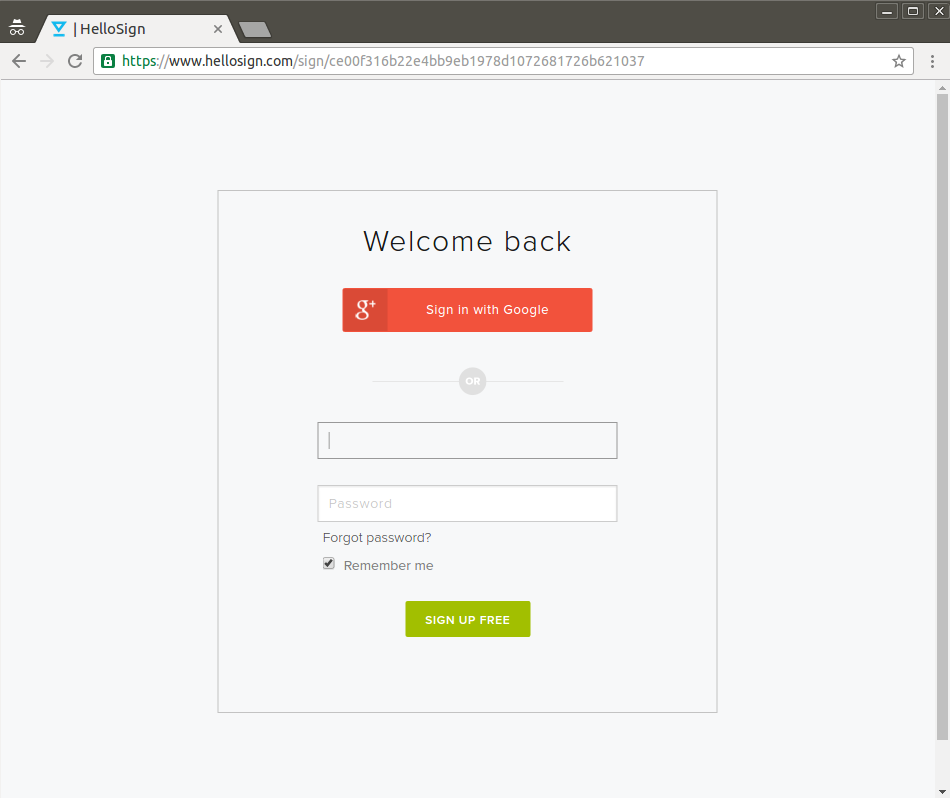
To sign the document, the user will have to create a HelloSign account:
After signing in, since we're using test mode, we'll see a warning:

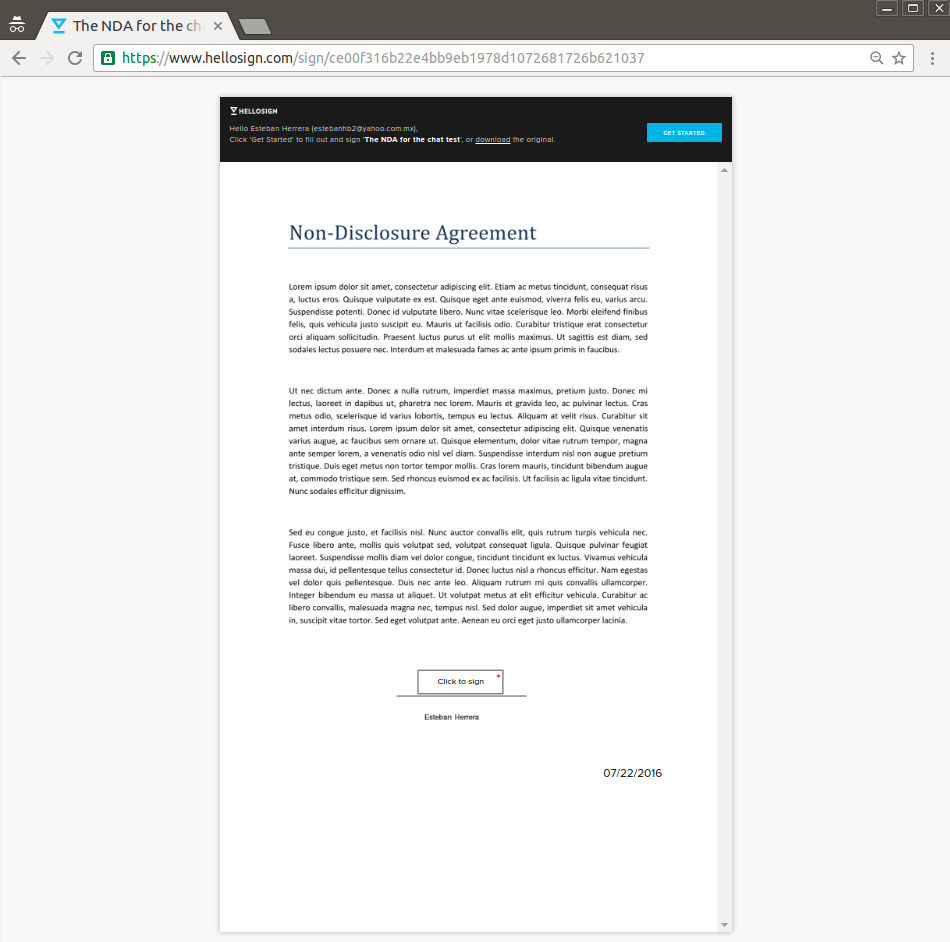
Then, the document will be presented:
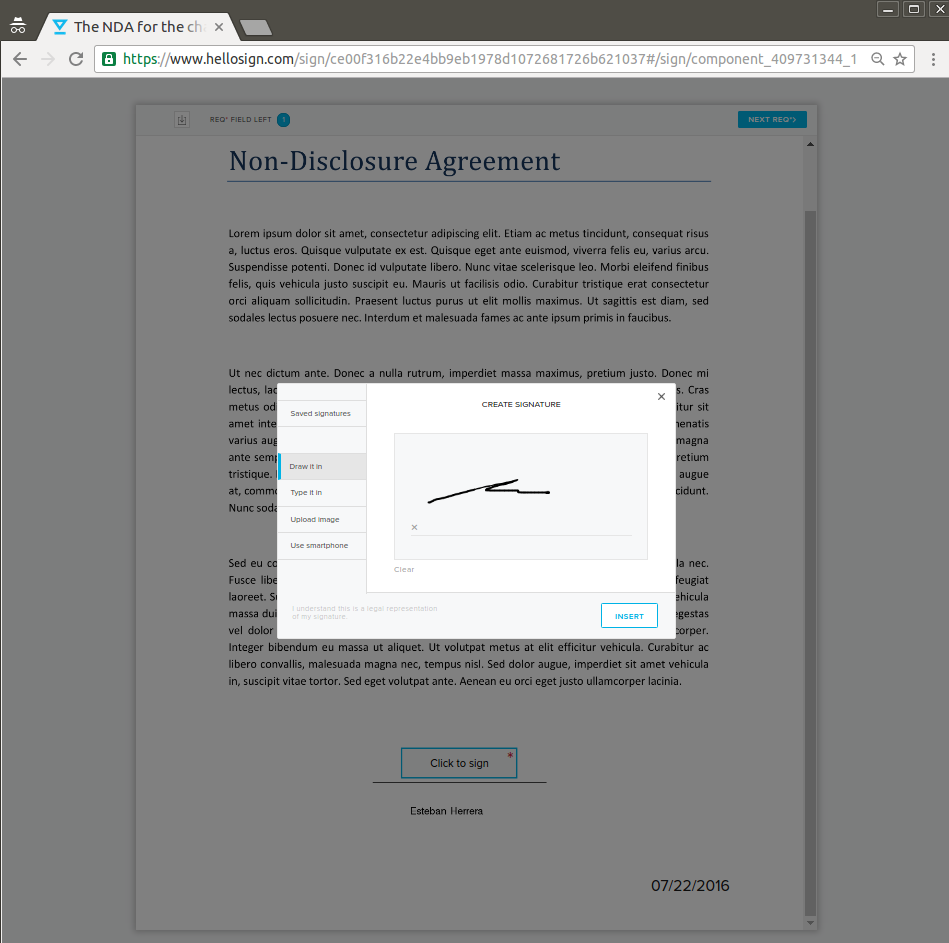
Click on the signature field and you will see a signature window. You can enter your signature in various ways (by drawing, typing, uploading an image, or using a smartphone):
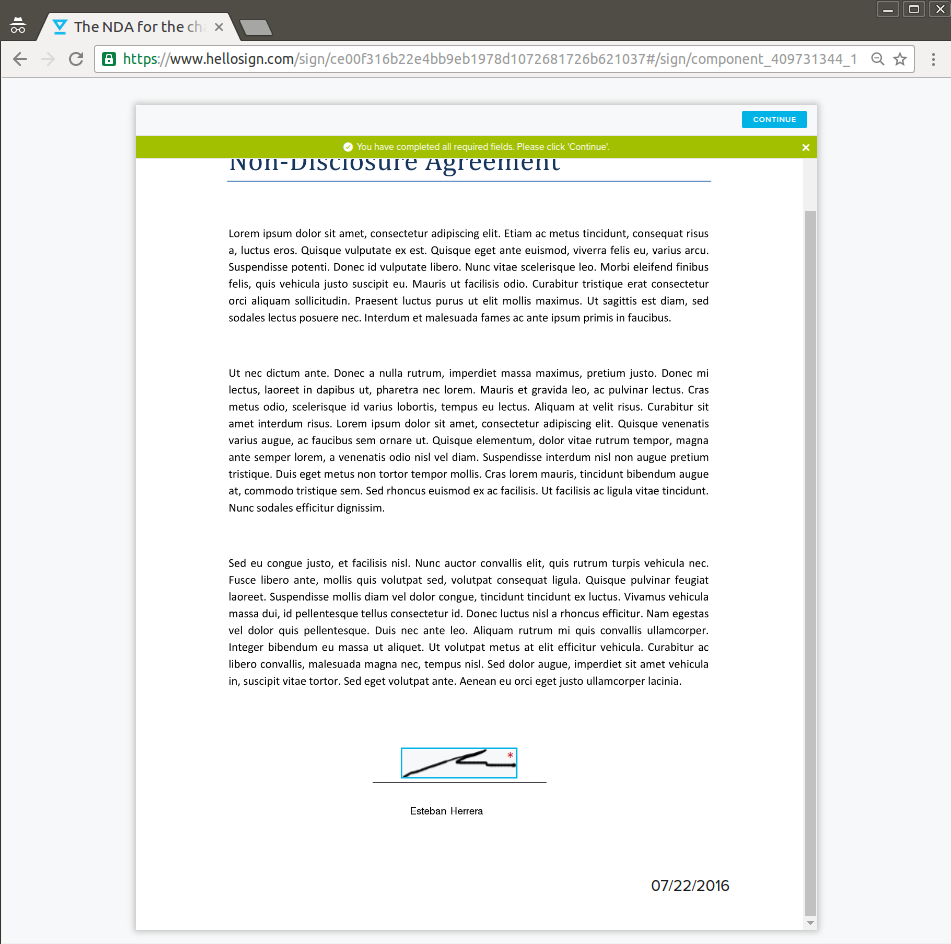
Once you're done, the signature will be added to the document:
When you press the Continue button at the right top, you'll have to agree to the terms of service:
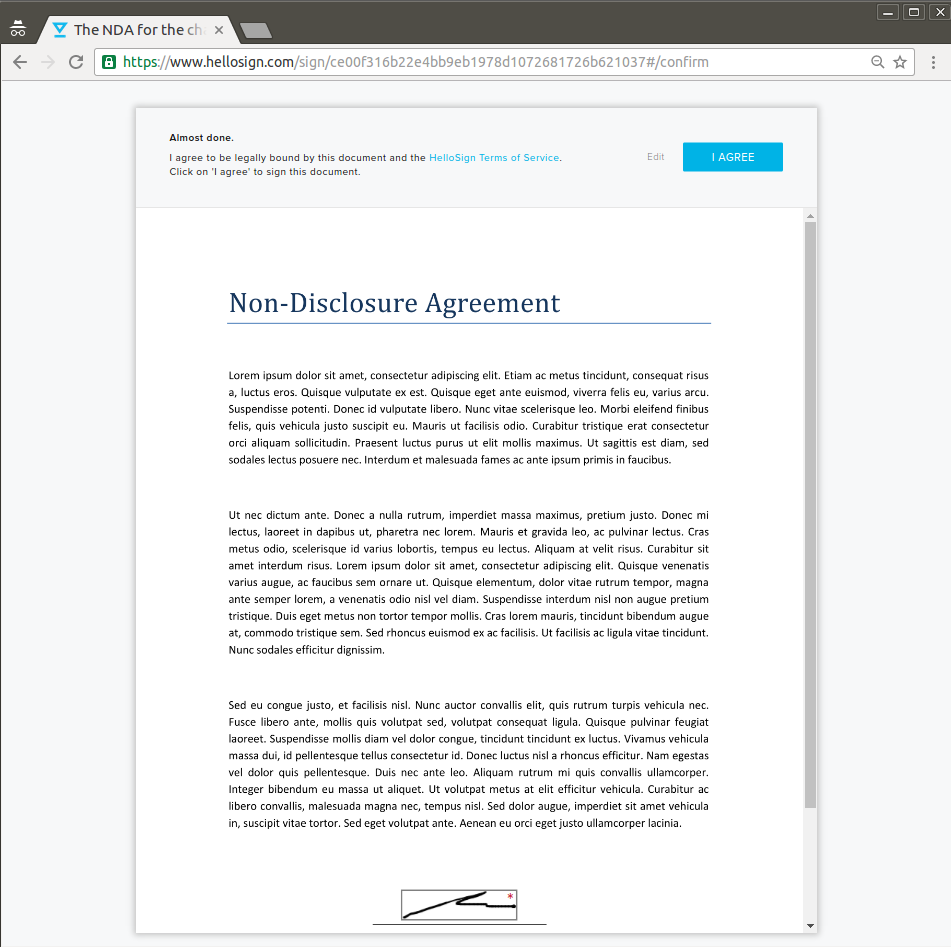
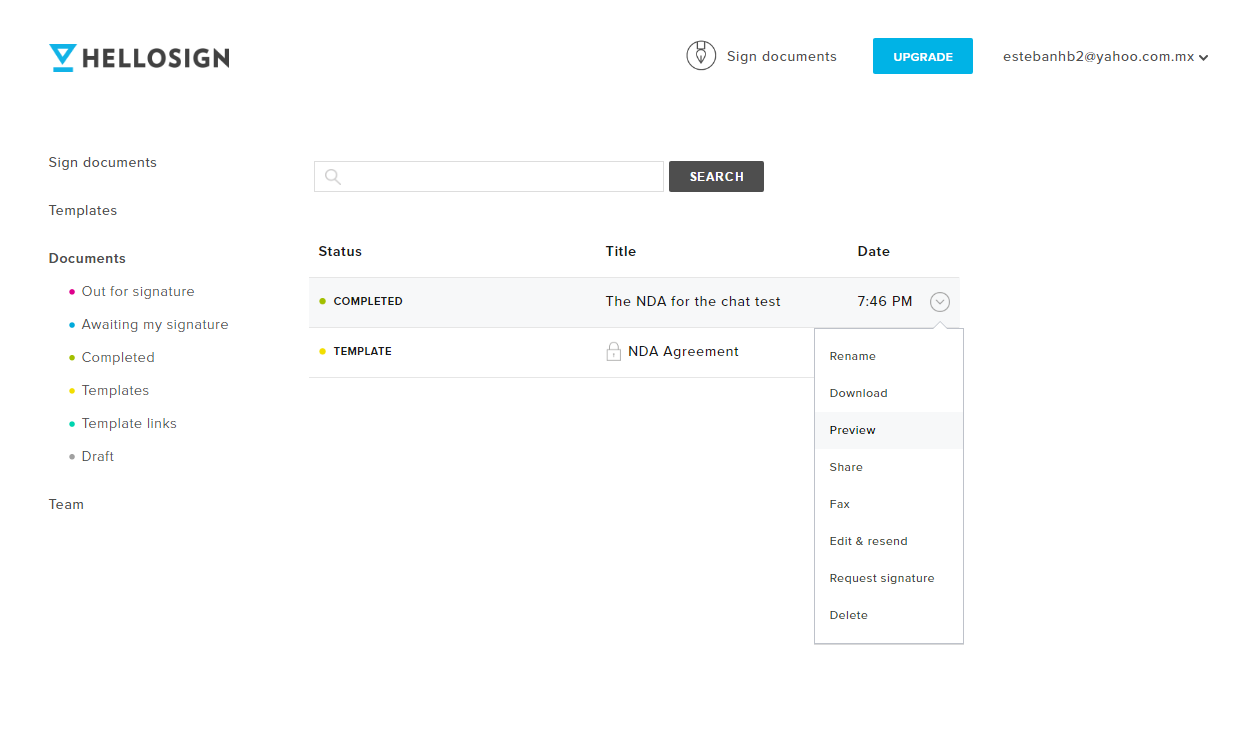
Once you've read, agreed to the terms, and signed, you've successfully signed the Non-Disclosure Agreement. In your HelloSign dashboard, you'll be able to see the signed NDA document under the Documents option in the menu on the left:
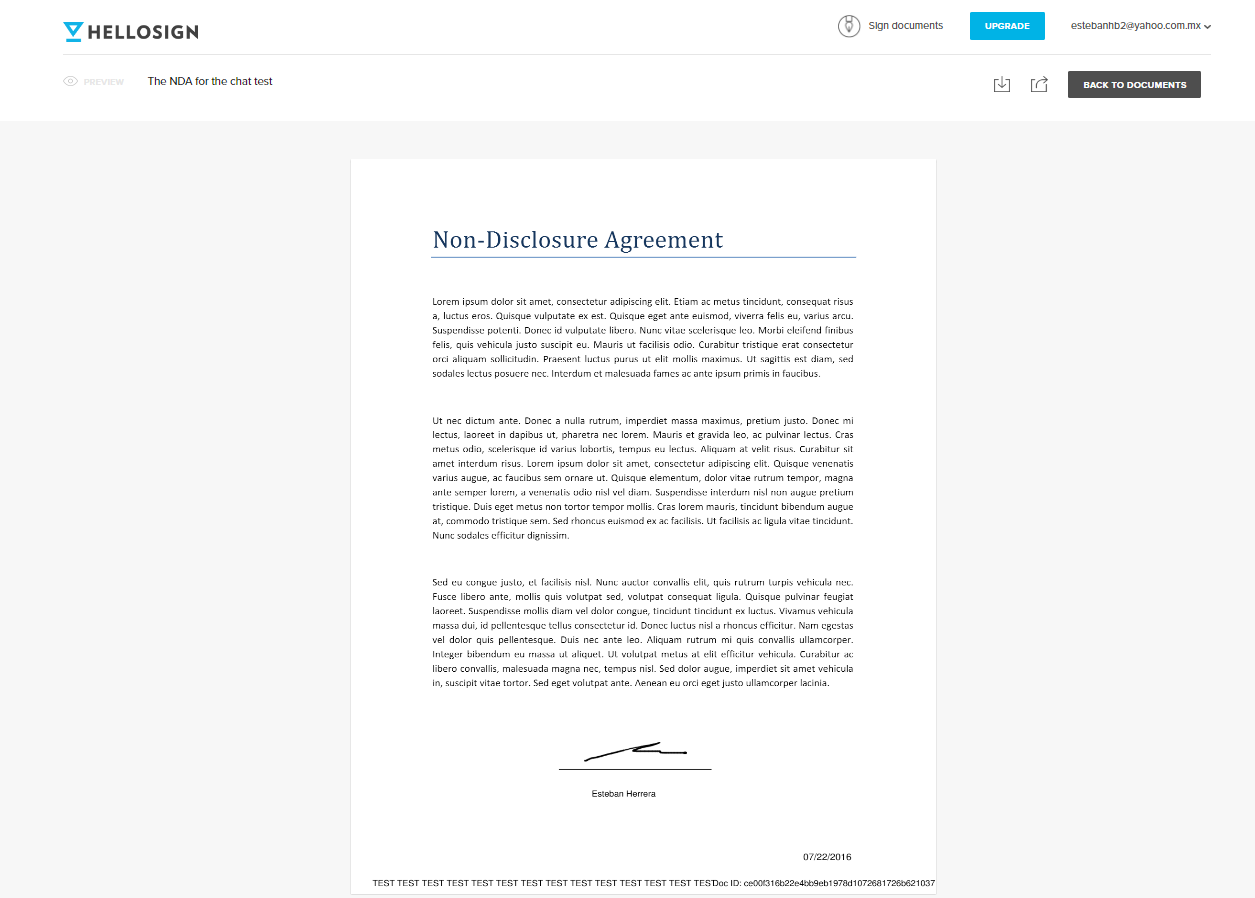
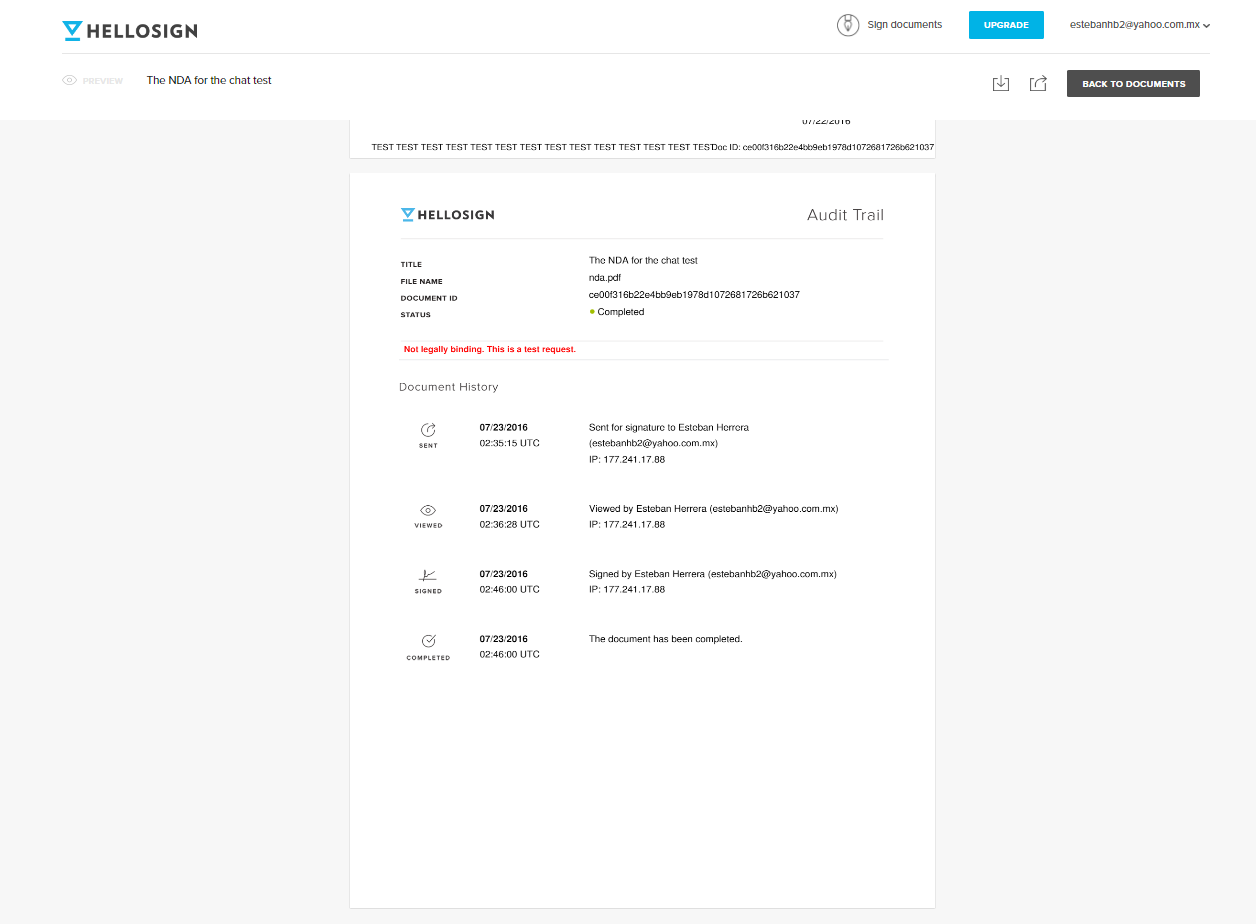
If you choose the Preview option on the document menu, you'll see the signed document and related information:
Remember that you can view the state of the database at any time with the H2 web console:
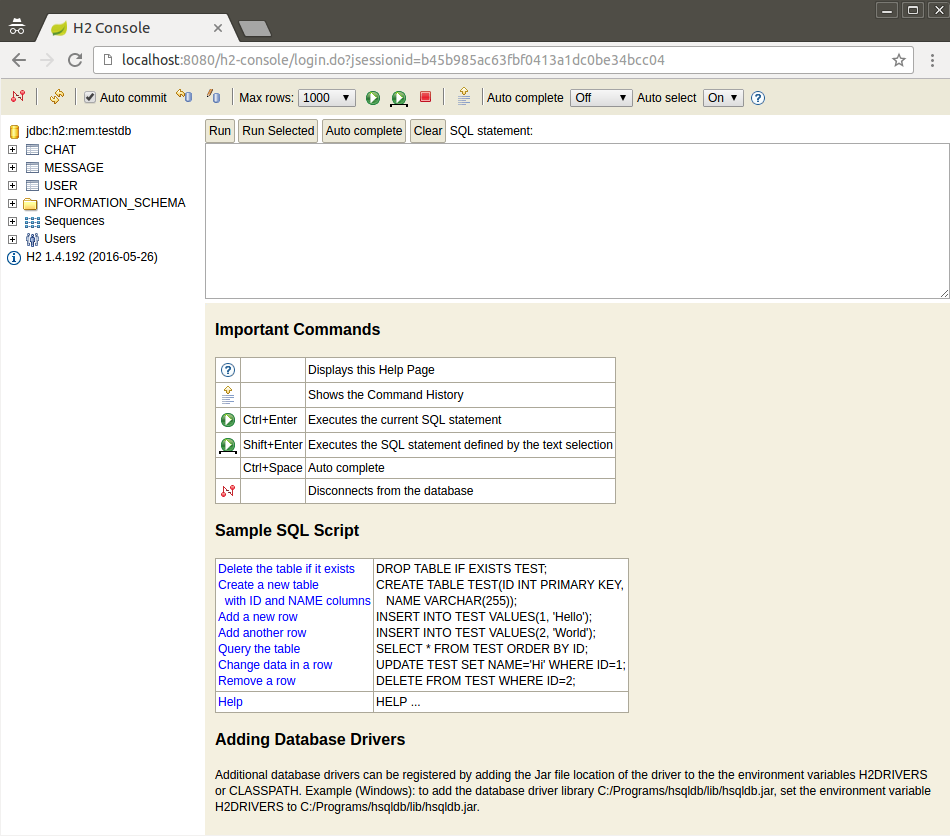
You just have to connect to the database with the default URL jdbc:h2:mem:testdb, and the user sa with no password:

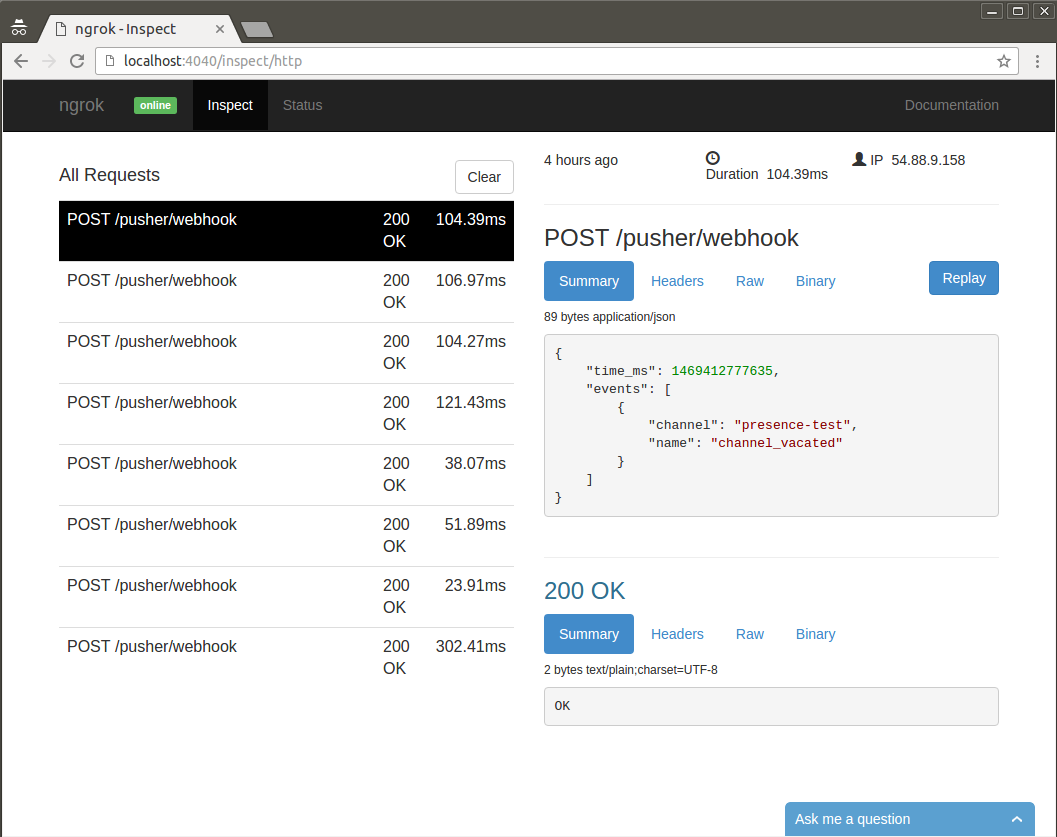
And to view or replay the webhook requests, ngrok provides a console on https://localhost:4040:
Conclusion
We have come a long way with this application, learning how to set up presence chats with Pusher, signing documents with the HelloSign API, using ngrok to work locally with webhooks and expose our database publicly, and building a complete application using Spring MVC and Spring Data under Spring Boot.
I hope this tutorial guided you in the areas above and perhaps helped you find new ways to use Java and HTML.
Thank you for reading. Contact me via email or through the comments section below if you need anything. Remember that the code of the app is on Github.
Advance your tech skills today
Access courses on AI, cloud, data, security, and more—all led by industry experts.
