Scale ASP.NET Core Apps with Docker Swarm Mode
Learn how to scale an application with Docker Swarm mode in this free ASP.net Docker tutorial. Learn more about the exciting Docker Swarm mode today!
Jan 10, 2019 • 14 Minute Read
Docker Swarm Mode
Starting with Docker 1.12, the Docker Engine comes with a built-in container orchestration module called Docker Swarm mode. The newest Docker Swarm mode is exciting because you no longer need to deal with complex network configurations, load balancers, service registries or certificate generation and management. The new Docker Engine makes multi-host and multi-container orchestration easy, with just a few commands you can setup a production environment for your applications that can surviving hardware failure and handle software updates with zero downtime.
With ASP.NET Core's release, .NET developers will switch to containers as the default deployment model, this article will show you how easily you can build, deploy and scale an ASP.NET Core app using Docker.
Prerequisites
I'm using a Windows 10 machine for development but you can follow this tutorial on a Mac or Linux device using Visual Studio Code and Docker.
Windows 10 prerequisites:
Build the app
We start by creating a very simple ASP.NET Core Web API project. In Visual Studio, go to "File > New Project > .NET Core > ASP.NET Core Web Application". Select Web API from the ASP.NET Core templates. Let's name this app TokenGen.
After the projects is created, go to the Controllers folder and add a new controller named TokenController with the following content:
      namespace TokenGen.Controllers
{
    [Route("api/[controller]")]
    public class TokenController : Controller
    {
        [HttpGet]
        public dynamic Get()
        {
            return new
            {
                Guid = Guid.NewGuid().ToString(),
                Expires = DateTime.UtcNow.AddHours(1),
                Issuer = Environment.MachineName
            };
        }
    }
}
This code generates a new GUID (Globally Unique Identifier) on every GET call stating the expiration date and the issuer. We use the machine name to identify the issuer. When you run an ASP.NET Core app inside a container, the machine name gets populated with the container-unique identifier. As a result, our code will help us determine in which container our app is running.
Container-ize the app
The next step is to create a docker file, so we can build our app into a container image. Inside the root directory, next to the .sln file, create a file named TokenGen.dockerfile with the following content:
      FROM microsoft/dotnet:latest

# Set environment variables
ENV ASPNETCORE_URLS="http://*:5000"
ENV ASPNETCORE_ENVIRONMENT="Development"

# Copy files to app directory
COPY /src/TokenGen /app

# Set working directory
WORKDIR /app

# Restore NuGet packages
RUN ["dotnet", "restore"]

# Build the app
RUN ["dotnet", "build"]

# Open port
EXPOSE 5000/tcp

# Run the app
ENTRYPOINT ["dotnet", "run"]
Now we are ready to build our tokengen-img docker image. Open PowerShell, navigate to your project root directory and execute the build command:
docker build -t tokengen-img -f TokenGen.dockerfile .
At this point the Docker engine will pull the dotnet:latest image from Docker Hub, copy /src/TokenGen files and run the dotnet CLI commands, you will see in the PS output the build log.
If everything worked out, we are ready to run our app from a container for the first time. Start the TokenGen container using the following bash command:
docker run --name tokengen -d -p 5000:5000 -t tokengen-img
Let's test the deployment by calling the api/token endpoint from Powershell:
Invoke-RestMethod http://localhost:5000/api/token
You should get a response like this:
      guid                                 expires                     issuer
----                                 -------                     ------
90c629af-3d78-4b53-81b0-4be563985887 2016-08-09T14:21:11.326422Z 5d0a1f82371c
If you also run docker ps you will notice that the tokengen container ID is the same with the issuer value from the api/token response.
We can now stop and delete the container by using the following commands:
      docker stop tokengen
docker rm tokengen
Scale the app
In order to scale our app we first need to enable Docker Swarm mode; do this by running docker swarm init in PowerShell.
Now that Docker Swarm mode is enabled, we will create a task for the swarm and start our app as a service. The service command is similar to the docker run command. You should name your service the same way we named our container earlier, so it's easy to target the service using scale.
Create and start our new tokengen service on Docker Swarm:
docker service create --publish 5000:5000 --name tokengen tokengen-img
Now if we run docker service ls, we can check if our service is running:
      ID            NAME      REPLICAS  IMAGE         COMMAND
96lqd9bdvwhs  tokengen  1/1       tokengen-img
And if we call the api/token endpoint from PowerShell with Invoke-RestMethod https://localhost:5000/api/token we get the same result:
      guid                                 expires                  issuer
----                                 -------                  ------
40afe497-ce14-4f65-936e-910c1490165a 2016-08-09T14:46:15.506Z df5197d48d32
It's time to scale our app. The scale command lets us run replicas of our application.
docker service scale tokengen=3
Running docker ps will show 3 tokengen containers:
      CONTAINER ID        IMAGE                 COMMAND                  CREATED             STATUS              PORTS                    NAMES
a87acd74a274        tokengen-img:latest   "dotnet run"             41 seconds ago      Up 35 seconds       5000/tcp                 tokengen.1.ayuux8p9ztip5uyappics17i7
debcdb4c7e9d        tokengen-img:latest   "dotnet run"             41 seconds ago      Up 35 seconds       5000/tcp                 tokengen.2.7gh3immv1tu5as0w4ps4709ib
df5197d48d32        tokengen-img:latest   "dotnet run"             8 minutes ago       Up 8 minutes        5000/tcp                 tokengen.3.2g61t441iyuyehoafoelvkbik
Now we can see the Docker Swarm built-in load balancer at work. Open 3 PowerShell windows and run Invoke-RestMethod https://localhost:5000/api/token:
      guid                                 expires                     issuer
----                                 -------                     ------
0b36bb43-20f0-4183-a364-0c83894e79ac 2016-08-09T14:55:02.673038Z a87acd74a274
b74b4808-237e-406a-8a8b-f580dcc78225 2016-08-09T14:55:02.68909Z  debcdb4c7e9d
92dd2f7b-e47d-4b1d-8192-141d307d276d 2016-08-09T14:55:02.691565Z df5197d48d32
As you can see the load balancer distributes our calls to all 3 replicas. Docker Swarm uses a round-robin system to load balance between the containers.
We can also scale down our service or even stop it by scaling to 0:
docker service scale tokengen=0
We can remove the service in the same way we deleted the container (using rm):
docker service rm tokengen
Update the app
With Docker Swarm you can apply rolling updates to a service without disruption. In order to publish updates we first need to version our app.
Open project.json and add the version element "version": "1.0.0-*". Now we need to use the version number to tag the Docker image.
In the project root, next the .sln file, create a PowerShell script swarm-ver-deploy.ps1 with the following content:
      $serviceName = "tokengen"

# parse project.json and extract app version
$rootPath = Split-Path -Path $MyInvocation.MyCommand.Definition -Parent
$projectPath = "$rootPath\src\TokenGen\project.json"
$json = Get-Content -Raw -Path $projectPath | ConvertFrom-Json
$version = $json.version.Split("-")[0]

# tag docker image with app version
$imageName = "$serviceName-img:$version"

# build image
if(docker images -q $imageName){
    "Image $imageName exists!"
    return
}else{
    docker build -t $imageName -f "$rootPath\TokenGen.dockerfile" $rootPath
}

# create service
docker service create --publish 5000:5000 --name $serviceName --replicas 3 --update-delay 5s $imageName
This script reads the version from project.json, builds the docker image tokengen-img:version, and creates the tokengen service.
Note that we are using update-delay parameter to configure the swarm with a 5 second update delay, so the new service instances have time to start up.
If we run swarm-ver-deploy.ps1 then docker ps we get the following:
      CONTAINER ID        IMAGE                COMMAND                  CREATED              STATUS              PORTS                    NAMES
223a898ee96b        tokengen-img:1.0.0   "dotnet run"             About a minute ago   Up About a minute   5000/tcp                 tokengen.3.8ugt7nogpqczkorm7ehdvw2nb
0b2d5e3b7288        tokengen-img:1.0.0   "dotnet run"             About a minute ago   Up About a minute   5000/tcp                 tokengen.2.creqhebrccauxmiwm2iaz6fxt
9edb15886b9a        tokengen-img:1.0.0   "dotnet run"             About a minute ago   Up About a minute   5000/tcp                 tokengen.1.a3ufm7s7iul5nouidrjt38tkg
We can now create another script that will publish new versions. Name this script swarm-ver-update.ps1:
      $serviceName = "tokengen"

# parse project.json and extract app version
$rootPath = Split-Path -Path $MyInvocation.MyCommand.Definition -Parent
$projectPath = $rootPath + "\src\TokenGen\project.json"
$json = Get-Content -Raw -Path $projectPath | ConvertFrom-Json
$version = $json.version.Split("-")[0]

# tag docker image with app version
$imageName = "$serviceName-img:$version"

# build image
if(docker images -q $imageName){
    "Image $imageName exists!"
    return
}else{
    docker build -t $imageName -f "$rootPath\TokenGen.dockerfile" $rootPath
}

# apply update
docker service update --image $imageName $serviceName
Like the deploy script, swarm-ver-update.psl reads the version from project.json and builds the new image. But instead of creating a service, we use service update command to specify the new image.
If you change the project version to 1.0.1-* and run swarm-ver-update.ps1 then docker ps output will be:
      CONTAINER ID        IMAGE                COMMAND                  CREATED             STATUS              PORTS                    NAMES
728cb9538f16        tokengen-img:1.0.1   "dotnet run"             8 seconds ago       Up 3 seconds        5000/tcp                 tokengen.2.e9cyto0nuwmtdfo02tij3z0m9
31dfc6b8d626        tokengen-img:1.0.1   "dotnet run"             17 seconds ago      Up 13 seconds       5000/tcp                 tokengen.3.e1qxbp7c2496pmuefjq4dhrok
e88d06710e20        tokengen-img:1.0.1   "dotnet run"             27 seconds ago      Up 22 seconds       5000/tcp                 tokengen.1.7p4gsxocbfa141uwuwedpfvut
As you can see all service replicas have been updated to v1.0.1. If you would run docker ps while the update was running you would see that the v1.0.1 was gradually applied.
Set up a reverse proxy
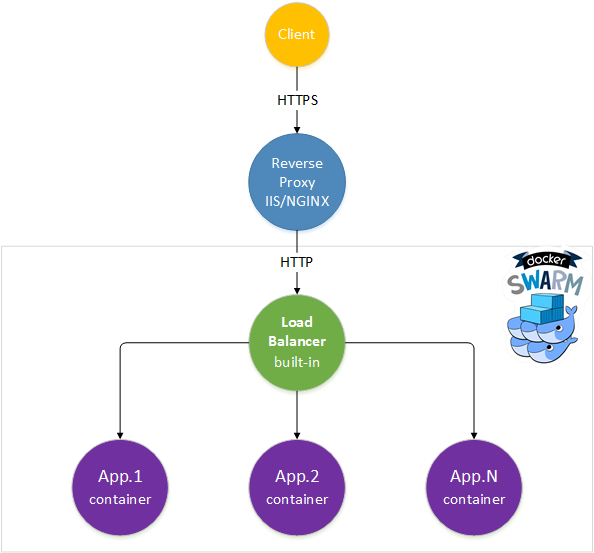
The Kestrel web server is not meant to be an internet-facing server. For this task, we can use IIS on Windows or NGNIX/HAProxy on Linux.
Using a reverse proxy in front of the Docker Swarm load balancer offers a lot of advantages. I will enumerate those I find most useful:
Let's assume you want to test on your local machine the TokenGen app with SSL.
In IIS, create a new website named tokengen-rp and bind port 80 and 443 to tokengen.local. You can use the IIS Express Development certificate or generate a new one from IIS. Edit the windows hosts file and map tokengen.local to ::1.
Download and install IIS application request routing module.
In order to configure reverse proxy for TokenGen app, execute the following steps:
- In the tokengen-rp site settings click on "URL Rewrite" icon
- Right-click on the "inbound rules list"
- Select "Add Rule(s)"
- Choose "Reverse proxy" from the rule templates
- Enter 10.0.75.2:5000 as the server name where HTTP requests will be forwarded
- Check "Enable SSL Offloading"
Note that 10.0.75.2 is the default IP for the Docker MobyLinuxVM that's running on your local machine.
Now we can test our TokenGen app from PowerShell over SSL:
      System.Net.ServicePointManager]::ServerCertificateValidationCallback = {$true}
Invoke-RestMethod https://tokengen.local/api/token
Conclusion
I hope I've proven how easy and straightforward scaling an application can be with Docker Swarm mode. You can find the TokenGen project and all PowerShell script on GitHub in this public repository.
In the articles to come, I plan to use a NoSQL database to store and retrieve tokens, thereby showcasing Docker networks and container linking.
You can also follow me on twitter @stefanprodan
Advance your tech skills today
Access courses on AI, cloud, data, security, and more—all led by industry experts.
