AngularJS Models
In this next installment of the AngularJS guide series you'll learn all about Angular models, specificlaly Angular scopes and databinding and how to use them in the MVC architecture. Find the info you need on scopes and how to properly use them in your Angular code.
Jan 10, 2019 • 15 Minute Read
AngularJS Models
In my previous article, I discussed aspects of AngularJS controllers and their role in the MVC (Model View Controller) architecture. In this article, I will talk more about the $scope object and the different ways to create and manage models in AngularJS applications.
The model in an MVC-based application is generally responsible for modeling the data used in the view and handling user interactions such as clicking on buttons, scrolling, or causing other changes in the view.
In basic examples, AngularJS uses the $scope object as the model. However, in the previous article I showed how using the controllerAs method allowed the controller itself to be added to the scope with a given name and essentially be used as the model. In this latter case, the controller was the object with the data and methods considered to make up the model. But the controller was still attached to the $scope, making it easier to set up binding to the controller object.
Clearly $scope is important when we are working with models.
Understanding $scope
It is easy to consider the $scope as simply a well-known name for a model object but that would be a mistake. The $scope is more than an object injected into the system to represent the data and methods we need. It is the key to data binding and to connecting the model to the view, and it has additional methods to support the communication between the two.
As the name implies, a scope is a representation of some portion of the application. In fact, a scope represents some portion of the DOM (Document Object Model) for the page. Generally, each new angular directive ( e.g. controller) will have a scope associated with it. Just as the document is represented as a tree by the DOM, the scopes in a given page are also nested into a tree structure. There is a root scope for the page and other scopes are added as children to that root scope.
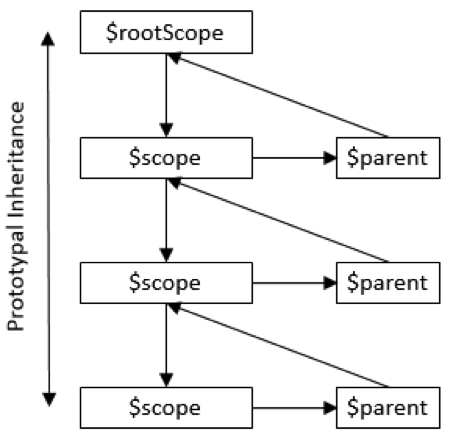
Each scope has access to its own properties and functions as well as those of its parent. AngularJS creates the tree of scopes and creates a reference to the parent scope in a $parent field. While the parent can be accessed from the current scope, generally it is a bad idea to couple the code in a controller or other directive to the scope in a container. However, because the scopes are in a hierarchy, the parent relationship can be leveraged for data binding in the view where the hierarchy is more well-known and coupling can be avoided. Let's look at an example of leveraging the scope hierarchy.
Scopes and Databinding
One of the primary uses of the model in an MVC application is to provide the data displayed in the view and implement the functions invoked from the view. In an AngularJS application the data binding statements are evaluated against the current scope. With a controller that looks like this, the $scope object being created and managed is the current scope for the controller and will be available for binding in the view.
      angular.module("hackApp").controller(
    "todoController", function($scope){
        $scope.description = "A list of things to do.";
        $scope.todos = [];
        $scope.newTodo = {"title":"", "completed":false};

        $scope.addTodo = function(){
            var toAdd = {"title":$scope.newTodo.title, "completed":$scope.newTodo.completed};
            $scope.todos.push(toAdd);
        };

    });
When we use syntax like the following in the corresponding AngularJS view, the expressions in the binding statement are evaluated against the scope object that was manipulated in the controller.
      <div ng-controller="todoController">
    <span>{{description}}</span>
    <form>
        <label for="newTodo">Task:</label>
        <input type="text" id="newTodo" placeholder="New Task" ng-model="newTodo.title" />
        <button ng-click="addTodo()" value="Add">Add</button>
    </form>

    <ul>
        <li ng-repeat="todo in todos"><input type="checkbox" ng-model="todo.complete" />{{todo.title}}</li>
    </ul>
</div>
Notice that the "description" field that was set on the $scope object can be referenced in the template using the simple expression containing its name. For the input to create a new To Do item, the ng-model attribute is used. It indicates that the input should be bound to the "title" field on the "newTodo" that was applied to the $scope. Likewise, the ng-click attribute is used to hook the button click event to the addTodo function that was defined on the scope.
In this view there are actually several scopes, even though there is only one controller. The application has the $rootScope which is available for the page. The controller creates a child scope and the ng-repeat, which will create an LI element for each item in the list of To Do items. It also creates a new scope for each element. Each child scope for the list items has the controller scope set as the parent scope and has the "todo" field populated with the value currently being iterated.
In the repeat, it may be necessary to access data from the parent scope, the controller's scope. One way to do that would be to use the special $parent property on the current scope to reach up a level and access data from the parent scope. In this example the "todos" array is accessed by using $parent.todos.
      <ul>
    <li ng-repeat="todo in todos">
        <input type="checkbox" ng-model="todo.complete" />
        {{todo.title}} ({{$index + 1}} of {{$parent.todos.length}})
    </li>
</ul>
It turns out that using the $parent property is not necessary in this case. AngularJS data binding looks first at the current scope for the field being referenced in the expression. If the field isn't found on the current scope, AngularJS will look to the parent scope for the field. So the previous example could be modified to the following and still work.
{{todo.title}} ({{$index + 1}} of {{todos.length}})
This feature makes databinding to state on the parent scope much easier and even more intuitive in the case of the repeat scenario. One case where the explicit use of the $parent field is important is if the current scope and the parent both have a field with the same name. If you wish to display the value from the parent, then the $parent reference becomes necessary.
Event Emitting and Broadcasting
The model not only has fields to be bound to inputs and display elements, it also has functions that act as event handlers as well. Just like the data binding can use the hierarchy of scopes to bind to data outside the immediate scope, so too can events fired in a scope broadcasted to child scopes or emitted to parent scopes. This is especially useful when using nested controllers as discussed in the previous article.
The $emit and $broadcast functions can be used in place of traditional traditional binding statements. For example, the following template markup will cause a click event to emit a named event and arguments. This event will "bubble" up to any listening scopes.
<li ng-repeat="todo in todos" ng-click="$emit('todoSelect', todo.title)"></li>
On the parent scope, the event needs to be subscribed and needs a handler defined (as shown here).
      $scope.$on("todoSelect", function(event, args){
    $scope.message = "Selected:" + args + " from scope: " + event.targetScope.$id + " handling scope: " + event.currentScope.$id;
});
Using $broadcast works similarly, but the scope tree is traversed down instead of up to find handlers. One big difference is that for an emitted event, the event propagation can be stopped by any listener on the way up the scope hierarchy. A broadcast event cannot be cancelled and gets delivered to all the child scopes. In both cases the event can be marked to prevent default handling so that the browser does not perform the default action based on the event.
Apply and Watch
One of the great features of databinding in AngularJS applications is that changes made to the model are reflected directly in the view and changes in the view are applied to the $scope. AngularJS handles this for you so there is no special code that needs to be written to hook up listeners for changes. AngularJS uses two methods on the $scope object to achieve this: $watch and $apply.
As the names imply, each of these functions allow for half of the update behavior. The $watch function is used to monitor some aspect of model and get notified when it changes. The $apply function is used to apply changes to the model. As mentioned, in most situations it is unnecessary to work with these functions directly as AngularJS invokes them as needed to manage the databinding.
If you do not need to know about these functions, why mention them? It turns out that they come in handy in certain cases. The most common reason for applying changes because you have modified the model in a promise or callback. If you are using the $http service, AngularJS handles this pretty cleanly for you, but if you are using another library and find yourself modifying the model in a promise or callback, you may need $watch. After making changes to the $scope (model) call the apply method which will trigger a digest. This then will alert any watchers to the changes.
      asynchronousCall(function(data)){
  $scope.myproperty = data.someValue;
  $scope.$apply();
};
Similarly, the $watch method is not required for standard data binding, but scenarios may arise in which an application needs to know that an object has changed. In those cases, the $watch method allows for monitoring certain values and executing a listener function to compare the old and new values and act on any changes. The following example shows how to hook a listener up to a change event for a field on the scope.
      $scope.$watch(
    function(scp) { return scp.newTodo.title; },
    function(newValue, oldValue) {
        if(newValue !== oldValue){
            console.log("Value of title changed to:" + newValue);
        }
    }
);
The first parameter in the function is a function that returns the value from the scope to be watched. The scope is passed into the function making it easier to return the value to watch.
The second parameter is the listener function which receives the old and new values and can then take actions. Keep in mind that the watch functions are going to be called for every digest cycle executed by AngularJS, so the listener functions used should execute quickly.
For other scenarios there is watchCollection and watchGroup. WatchCollection allows you to monitor an array and get notified when items are added or removed. The watchGroup method allows for assigning a single listener for a group of monitored items.
Avoiding Direct Use of $scope
In the previous article on controllers the concept of "controllerAs" was covered. This is the idea of setting the controller as a property on the scope with a given name and using the controller as the model. A small change to our markup to give the controller a name on the scope and reference the model properties through the controller.
      <div ng-controller="todoAsController as todoC">
        <span>{{todoC.message}}</span>
        <span>{{todoC.description}}</span>
        <form>
            <label for="newTodo2">Task:</label>
            <input type="text" id="newTodo2" placeholder="New Task" ng-model="todoC.newTodo.title" />
            <button ng-click="todoC.addTodo()" value="Add">Add</button>
        </form>

        <ul>
            <li ng-repeat="todo in todoC.todos"><input type="checkbox" ng-model="todo.complete" /> {{todo.title}} ({{$index + 1}} of {{todoC.todos.length}})</li>
        </ul>
    </div>
Notice the "as todoC" in the ng-controller directive. This instructs AngularJS to create a field on the scope named "todoC" and set its value to the controller. Now, instead of directly setting fields and functions on the scope, the controller itself becomes the model as shown here.
      angular.module("hackApp").controller(
    "todoAsController", function(){
        var vm = this;

        vm.description = "A list of things to do.";
        vm.todos = [];
        vm.newTodo = {"title":"", "completed":false};

        vm.addTodo = function(){
            var toAdd = {"title":vm.newTodo.title, "completed":vm.newTodo.completed};
            vm.todos.push(toAdd);
        };
    });
The first step is to get a local reference to the controller to avoid issues with this referencing and then set the fields and functions on the variable. The controller is now the model and this simplifies and clarifies the code. In addition, it removes the temptation to write code to reach up to parent scopes or other actions that would couple this controller to objects outside its scope of responsibility.
When using this model, it will still be necessary to use the $scope for working with emitted or broadcast events. In that case, try to limit yourself to using $emit, $broadcast, and $on when using the scope.
In addition to using the controllerAs pattern, it is important to note that the controller does not have to represent the whole of the model. You can use the controller as a conduit to a model class or even mix the two. For example, the ToDo item in the previous examples could be encapsulated in a class function in its own JavaScript file.
      function ToDo(text, completed){
    this.title = text;
    this.complete = completed;
};
Now, in the controller code, this ToDo item can be used instead of working with anonymous objects or setting properties on the controller itself.
      var vm = this;

vm.description = "A list of things to do.";
vm.todos = [];
vm.newTodo = new ToDo("", false);

vm.addTodo = function(){
    var toAdd = new ToDo(vm.newTodo.title, vm.newTodo.completed);
    vm.todos.push(toAdd);
Now the newTodo variable is created using the constructor function. This same pattern is used when cloning the item before putting it in the array. You could further compose this by creating a view model class that represents the entire view and leverages the ToDo class as needed. All of this depends on your team and the design patterns you choose to model your data in the application.
Conclusion
In this article, we covered the model aspect of MVC. Now that we understand much about the code aspects of the MVC pattern, our next article will dive into the views and the details of data binding, using filters, and directives.
Thank you. I hope you enjoyed this article.
Advance your tech skills today
Access courses on AI, cloud, data, security, and more—all led by industry experts.
