Beginner Linux Navigation Manual
Learn how to navigate Linux using the command line in this free Linux tutorial! Great for beginners, this guide will show you how to navigate your UNIX based server.
Sep 6, 2019 • 16 Minute Read
Introduction
Welcome to the Linux world! Whether you’re just starting on an intro to CS course or wandering through your very first UNIX-based home server, learning how to navigate around in Linux (more specifically, using the command line) is going to make your life much easier and much much more powerful.
Getting Started
Linux
There are many distributions of Linux out there. Each of them has its own variation of commands to work with. Specifically for this tutorial, I’m going to be using Ubuntu 14.04.2 LTS on Cloud9. Keep in mind that all commands demonstrated here will probably be usable on earlier and future versions of Ubuntu, as well as Debian and Debian-based distros.
To check for the distribution and version number, simply type this into the terminal.
cat /etc/issue
Bash
Not only do different distros have different commands, they also have different default shell (scripting environment). What this means is that this window — often called the terminal — works differently.

In this case, I’m going to be using Bash (short for Bourne-Again Shell), which is the default shell for Ubuntu and Debian.
Structure
In Bash, you’ll typically be presented with this kind of prompt:

where brillydev is my username, and ~/workspace is the directory I’m currently in, followed by a dollar sign ($), or depending on some user, a hash (#).
Because I’m lazy, I’m going to omit that brillydev:~/workspace, and leave only $ when I show you my terminal window. You don’t need to type all of these brillydev:~/workspace $ when you type the command.
Oh, and keep in mind that Linux is case-sensitive. A is different from a!
pwd
pwd (print working directory) shows the current directory (basically, the folder) you’re in.
      $ pwd
/home/brillydev/workspace
In case you’re wondering:
-
~ (tilde) means the user’s home directory, usually /home/username
-
. (dot) means the current directory you’re in
-
.. (dot dot) means the parent directory of the current directory you’re in.
For example, if you’re in foo/bar/, . will represent bar/, .. will represent foo/.
cd
The most basic command of all time, cd (change directory) means... Err, change directory.
      $ pwd
/home/brillydev/workspace/foo/bar

$ cd ..
$ pwd
/home/brillydev/workspace/foo
You can see that the directory changes according to what you type after cd. Typing cd alone without any argument (without anything that follows it) will bring you to the home directory of the user.
cd followed by a dash (-)will bring you to the recent directory you were in.
      $ cd
$ pwd
/home/brillydev

$ cd workspace/foo
$ pwd
/home/brillydev/workspace/foo

$ cd -
$ pwd
/home/brillydev
ls
ls (list) list down all the content inside the directory.
      $ pwd
/home/brillydev/workspace

$ ls
apple.txt bar/ foo/ somefiles.txt
A slash (/) post-fixed after a name indicates that it is a directory. In this case, bar and foo are directories. Anything not with a slash are all files.
Flags
In addition to performing a general task, a command may also contain flags to specify a specific task you want the command to do. A flag is anything prefixed with a dash (-) that follows the command name.
For example, you can type ls -l. In this case, l being the flag, to display the content of the directory in a nice list view.
      $ ls -l
total 8
-rw-r--r-- 1 brillydev brillydev 0 Oct 22 13:18 apple.txt
drwxr-xr-x 2 brillydev brillydev 4096 Jan 31 03:55 bar/
drwxr-xr-x 2 brillydev brillydev 4096 Oct 22 13:18 foo/
-rw-r--r-- 1 brillydev brillydev 0 Feb 6 14:08 somefiles.txt
Flags can also be combined. ls -a display all content, including hidden files (files that are prefixed with a dot). When used with ls -l, we can combine them like this:
      $ ls -la
total 16
drwxr-xr-x 4 brillydev brillydev 4096 Feb 21 08:04 ./
drwxr-xr-x 10 brillydev brillydev 4096 Feb 21 07:55 ../
-rw-r--r-- 1 brillydev brillydev 0 Oct 22 13:18 .hiddenfile.txt
-rw-r--r-- 1 brillydev brillydev 0 Oct 22 13:18 apple.txt
drwxr-xr-x 2 brillydev brillydev 4096 Jan 31 03:55 bar/
drwxr-xr-x 2 brillydev brillydev 4096 Oct 22 13:18 foo/
-rw-r--r-- 1 brillydev brillydev 0 Feb 6 14:08 somefiles.txt
Some flags can also be more than one-letter long. Those that are multiple letters long can be written with double dashes in front. For instance, ls -a can also be written as:
      $ ls --all
./ ../ .hiddenfile.txt apple.txt bar/ foo/ somefiles.txt
tree
For those who want more fancy visualization, tree is for you.
      $ tree
.
├── apple.txt
├── bar
├── foo
└── somefiles.txt
2 directories, 2 files
clear / reset / Ctrl + L / ⌘ + K
You’re having fun playing around with all these commands when you realize you screen is really cluttered and you need some clean up. Typing clear or reset or input any of the key combinations mentioned will get your terminal wiped up.
File Execution
Surprisingly not many beginners know how to run a standalone binary/executable file. To execute a local file, simply type
$ ./filename
If you ever find yourself stuck in the program, simply press Ctrl + C to get out.
Some Addition
If shutting down the system is frustrating to you, here is the way to do it.
$ shutdown -h now
To restart the computer:
$ reboot
To log out:
$ exit
or simply press Ctrl + D.
If any of these don’t work, adding a sudo in front will probably help.
$ sudo reboot
File Manipulation
mkdir
mkdir (make directory) is used to create a directory.
      $ ls
apple.txt foo/ somefiles.txt

$ mkdir bar
$ ls
apple.txt bar/ foo/ somefiles.txt
mv
To move files, the command mv (move) is used.
      $ ls
apple.txt bar/ foo/ somefiles.txt

$ mv apple.txt foo

$ ls
bar/ foo/ somefiles.txt

$ ls foo
apple.txt
Interestingly, it can also be used to rename things as well!
      $ cd foo
$ ls
apple.txt

$ mv apple.txt hello.txt
$ ls
hello.txt
And if you’re tired of typing ls everytime after the command, a semicolon can condense your code into one line. This produces the same effect:
      $ mv apple.txt hello.txt; ls
hello.txt
rm
rm (remove) removes files. Take note that this action cannot be undone.
      $ cd ..
$ ls
bar/ foo/ somefiles.txt

$ rm somefiles.txt
rm: remove regular file ‘somefiles.txt’? (y/n) y

$ ls
bar/ foo/
rm cannot be used with directories, unless accompanied by -r flag (short for recursive). What this means is that rm will go into every directory in the specified path and delete files one by one, recursively up each directory inside. If you don’t understand this, it’s fine, unless you do programming. Just remember that it deletes all the files and directories in the specified path.
      $ ls
bar/ foo/

$ rm -r foo
rm: remove regular file ‘apple.txt’? (y/n) y
rm: remove ‘foo’? (y/n) y

$ ls
bar/
If you’re tired of typing ys for all the files, rm -rf can help you. Be extremely careful, however, as this command-flag combination is incredibly dangerous. If you accidentally type the wrong path — boy, there’s no going back!
rmdir
If you try to use rm alone for directories, you’ll be faced with this:
      $ ls
bar/

$ rm bar
rm: cannot remove ‘bar’: Is a directory
In this case, rmdir (remove directory) can be used instead. Note also that this command can only be used with empty directories.
      $ ls
bar/

$ rmdir bar
$ ls
$
touch
When you wish to create new (empty) files, use touch.
      $ ls
$
$ touch file1 file2.txt file3
$ ls
file1 file2.txt file3
cp
Copying is undeniably one of the greatest inventions of all time. To do that, use cp (copy).
      $ ls
file1 file2.txt file3

$ cp file2.txt file2copy.txt

$ ls
file1 file2.txt file2copy.txt file3
To copy a directory recursively, use cp -r.
ln -s
You’ll encounter this quite often in the future. So it’s probably good to know it now. To create a symbolic link (Google for explanations), use ln -s.
$ ln -s ~/apache ~/Desktop/apache
Working with Content
echo
echo prints out whatever you say to it.
      $ echo "hello world"
hello world
cat / more / less / head / tail
To display the content of a file, use any of the commands above.
      $ cat hello.txt
hello, world! I am a little puppy.
Lorem ipsum blah blah blah.
Three lines are enough for a sample, aren't they?
These commands don’t do exactly the same thing. Do some little experiments to find out how they differ :)
grep
grep is an extremely powerful tool to search the content of a file. It prints out the line containing the word(s) specified, if it is present in the file. For example.
      $ grep "blah blah blah" hello.txt
Lorem ipsum blah blah blah.
(actual result will have blah blah blah highlighted)
There are a lot more powerful tools out there, such as sed and awk, that will unleash your potential in Linux. We can’t cover all of them here, so be sure to do some research to find out more about them!
User Manual
man
If you happen to forget, or see a new command you’ve never heard of, apart from Google, your user manual will also be incredibly helpful. To use it, simply type man.
      $ man mkdir
[LONG INSTRUCTIONS ON HOW TO USE mkdir]
Piping and Redirection
Pipe
| (that vertical bar right above the Enter key) is called a pipe. It redirects the output of the left command to the input of the right. For example:
      $ echo “hello world

You’re really cute.” | grep “cute”
You’re really cute.
Redirection
Redirections are similar to pipe; but instead of passing the output as an input, they save the output to a file, or read the content of a file.
- > saves the output to a file
- < reads the content of a file
      $ ls foo > abc.txt
$ cat abc.txt
bar/
somefiles.txt

$ wc < abc.txt
21
Redirection overwrites the files each time it is used. Use appends (>> and <<) should you decide to not overwrite them, and append instead.
      $ ls foo >> abc.txt | grep "bar"
bar/
bar/
Working with Packages
apt-get
Working with computers nowadays usually requires external software from the Internet. You can choose to download these external software files manually or use a package manager to manage all the stuff for you. apt-get (advance packaging tool) is the default package manager for Ubuntu and Debian.
      $ apt-get install vim
$ apt-get remove vim
$ apt-get update
If you ever get stuck, sudo can help you.
wget
wget is a tool to download files from the Internet.
      $ apt-get install wget
$ wget https://www.google.com/thefilethatIwant.zip
tar / unzip
Sometimes you’ll get files in archived form. To extract them, use unzip or tar.
      $ apt-get install unzip
$ apt-get install tar

$ unzip thatfile.zip
$ tar -xzvf anotherfile.tar.gz
Text Editing
vi/vim
vi or vim (vi improved) is an awesome tool to do all things text. It’s incredibly difficult to use at first, but through time, you’ll realize that it’s one of the best out there.
      $ apt-get install vim
$ vim sometext.txt
For instructions, I recommend this awesome interactive guide:
nano
If you’re kinda lazy to learn vim, nano is a simple intuitive alternative.
      $ apt-get install nano
$ nano sometext.txt
emacs
All-time rival of vim, here comes emacs.
      $ apt-get install emacs
$ emacs sometext.txt
Permissions
Overview
Remember this?
      $ ls -l
total 8
-rw-r--r-- 1 brillydev brillydev 0 Oct 22 13:18 apple.txt
drwxr-xr-x 2 brillydev brillydev 4096 Jan 31 03:55 bar/
drwxr-xr-x 2 brillydev brillydev 4096 Oct 22 13:18 foo/
-rw-r--r-- 1 brillydev brillydev 0 Feb 6 14:08 somefiles.txt
Those arcane characters on the leftmost column are where your permission settings lie. To characterize, there are three main permissions you can set for a file or a directory: read, write and execute, represented by r, w and x respectively.
The permissions are arranged in the following order: user, group and others.
For example,
-rw-r--r-- 1 brillydev brillydev 0 Oct 22 13:18 apple.txt
This means that the user (owner of apple.txt) can read and write to apple.txt, the user group which the owner of apple.txt is in, as well as other people from somewhere else can only read apple.txt.
Execute, in the context of a directory, also means access. Hence if you deny permission to execute a directory, you can’t access it.
chmod
To change permissions, chmod (change mode) can be used. I leave it to you to interpret what this means :P
      $ sudo chmod 777 apple.txt
$ sudo chmod a-r apple.txt
chown
Similar to chmod, chown (change owner) changes the owner of the file.
$ chown root apple.txt
Fancy Little Features
history
$ history
cal
      $ cal
    February 2016
Su Mo Tu We Th Fr Sa
    1  2  3  4  5  6
    7  8  9 10 11 12 13
14 15 16 17 18 19 20
21 22 23 24 25 26 27
28 29
ssh
You can find out more about ssh (secure shell) from the Internet.
$ ssh http://prakrit.d/
cowsay
      $ sudo apt-get install cowsay
$ cowsay -f ghostbusters "Hi, How are you"
figlet
      $ sudo apt-get install figlet
$ figlet "Welcome"
fortune
      $ sudo apt-get install fortune
$ fortune
Star Wars
      $ sudo apt-get install telnet
$ telnet towel.blinkenlights.nl
FHS
Not a command, but helpful to know. If you notice, all the commands here are really just compiled binary files underneath the hood. To know where they stay, check out:
Differences between /bin, /sbin, /usr/bin, /usr/sbin, /usr/local/bin, /usr/local/sbin
Cheat Sheet
Phew! That was an awful lot of stuff! Use it often, and you’ll remember all the commands by heart. For now, this cheat sheet may be of help.
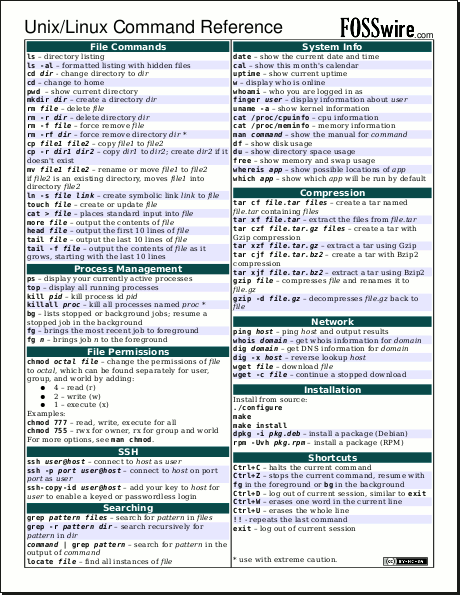
Keep in mind that there are still tons of things which I did not cover in this tutorial. In fact, I didn’t even go into details about how these commands work. Because this tutorial is only designed to be a broad overview (for absolute beginners), I encourage you to dive in further and actually do stuff with it.
But if you’re still not very confident, or maybe you got lost in this tutorial, that’s okay too! There are many alternatives out there on the Internet, but be warned that not a lot of them are beginner-friendly. I also recommend checking out Ryan's Linux Tutorial for more explanations and use cases.
Good luck :)
Advance your tech skills today
Access courses on AI, cloud, data, security, and more—all led by industry experts.
