Configuring ASP.NET Identity
Learn how to use this code-first approach when configuring identity in ASP.NET using Entity Framework to have full control over your user identity options.
Jan 10, 2019 • 25 Minute Read
Introduction
Identity configuration in ASP.NET can be quite confusing, especially if you want to customize setup properties.
When you use a code-first approach using Entity Framework, you have full control over your user identity options. However when developers deal with bigger projects, they typically prefer to use a table-first approach in which they create the database, then consume the information in the API, and lastly shape it in a way that it makes sense on the front end.
So, configuring identity might work best with a mixed approach.
Example problem
Imagine that the client of our fictional software company is a huge car manufacturer. They have a lot of shops all around the world. The first and most important feature of their system should be user-management. It should have different types of users: Admin, Shop Manager, and Seller.
Code
See my working version of the project as a reference if you're ever stuck on any of the code.
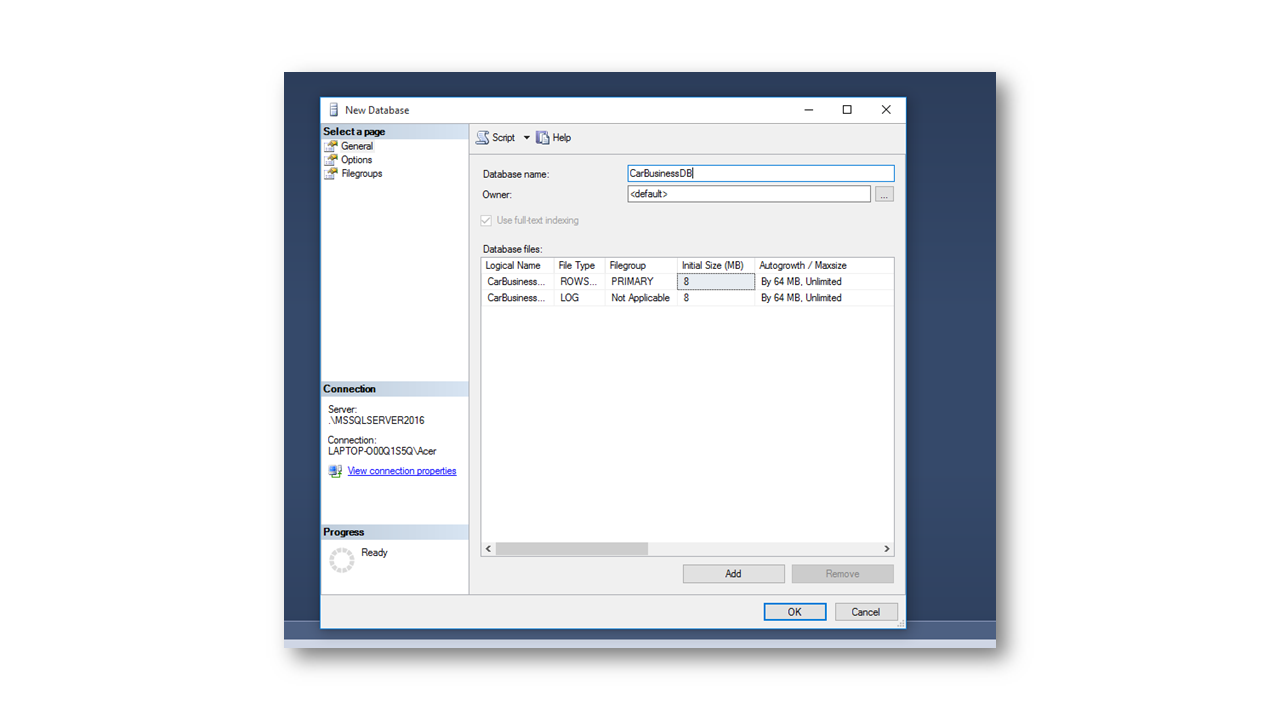
Setting up the database
After we have defined the main properties that a user in our application should have, it is time to start developing the architecture of our system. Since it can scale fast and the database design is important, we will use table-first approach. The first step is to create our database. For this article, I will use SQL Server 2016 in combination with SQL Management Studio.
Below is a SQL Management Studio picture to help you get started with a blank database.
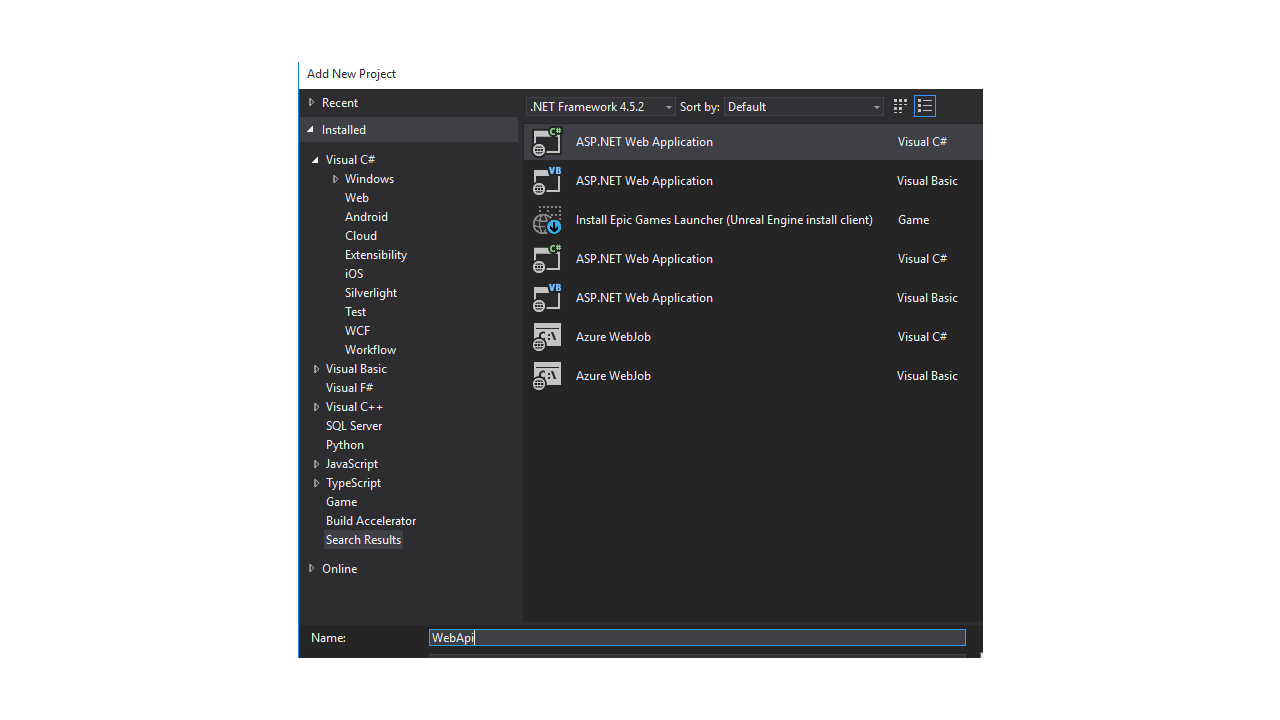
Creating a new project
Now, after we have the blank database, we can set up the ASP.NET web API project, which is going to consume the information. Execute the following steps to do it:
- Create a new project in Visual Studio and choose Blank Solution. Name it CarBusinessSystem.

2 Add a new web api project to this solution. Name it WebApi. In this way, we can use the template to scaffold our user accounts system.
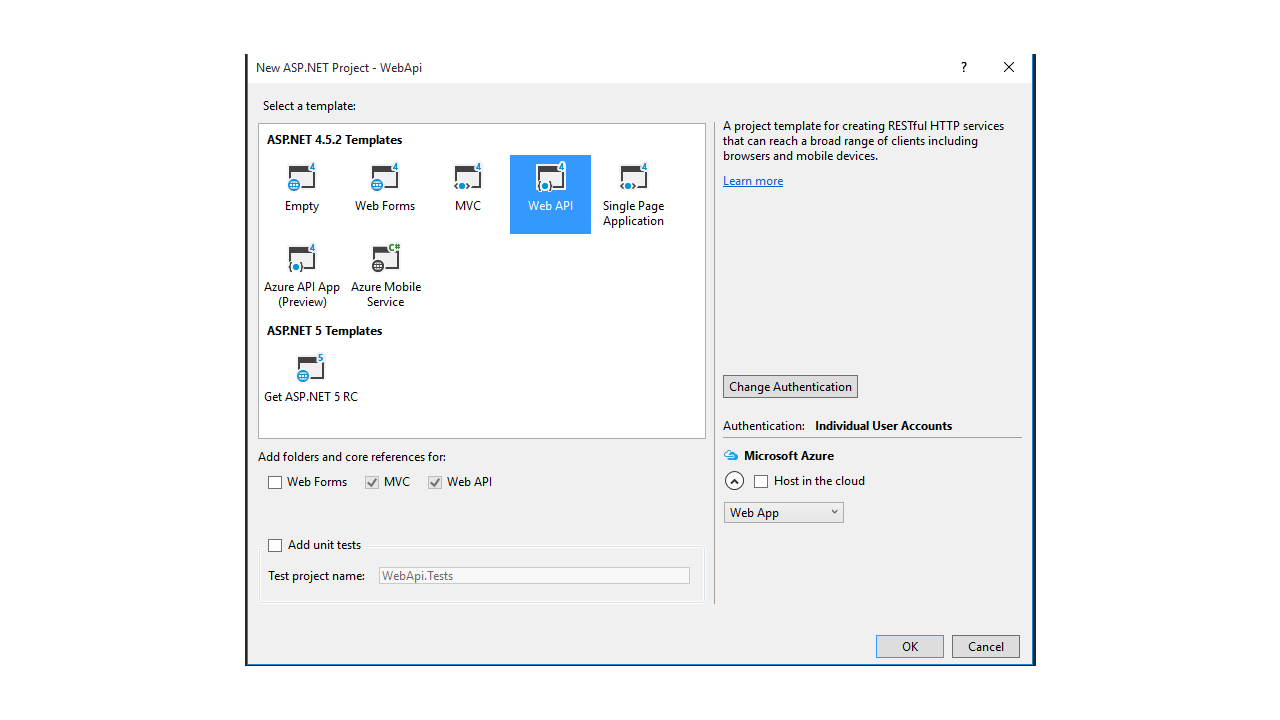
Be careful and choose Individual User Accounts as the Authentication option. In this way, we will have our app's functionalities scaffolded by the project template.
Upon completion, the following set-up should appear in your Solution Explorer:
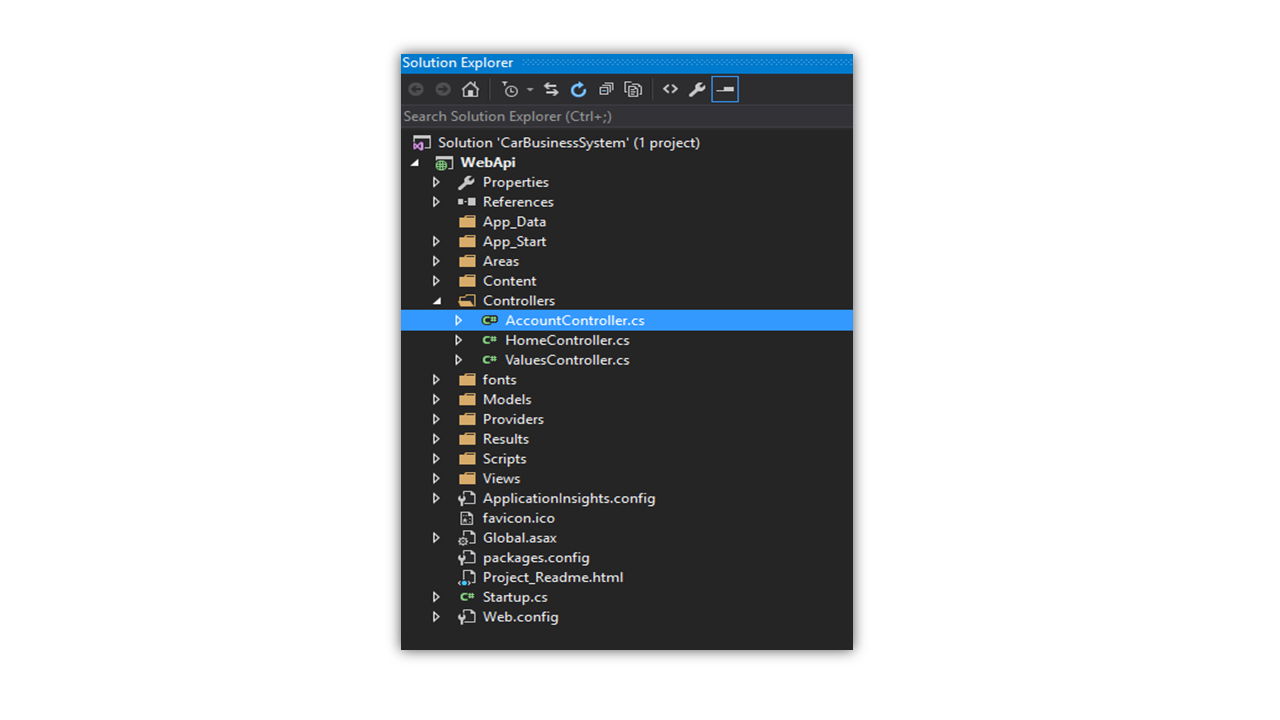
We will have several important files for the purpose of this article.
• AppStart\IdentityConfig.cs
• AppStart\Startup.Auth.cs
• Models\IdentityModels.cs
• Controllers\AccountController.cs
Linking
Now, after we have our database and our asp project created, we should find a way to link them. In order to achieve this, we will create a DbContext by basing it on a connection string, pointing to our database. Open the Web.config file and see what happens between the <connectionStrings> tags. For now we have only the default connection, which points to an instance of LocalDb. We can also notice that the default ApplicationDbContext class in Models\IdentityModels.cs is based on this connection. Our idea here is to create a new context and then base our ApplicationUserManager on it. Replace the default string with the string below:
<add name="SystemUsers" connectionString="Data Source=.;Initial Catalog=CarBusinessDB;Integrated Security = True" providerName="System.Data.SqlClient" />
Be careful when you determine your Data Source. If you're using a local instance of SQL Server, stick with the default data source, or .. If you're using an Azure database or other type of service, look at sample connection strings before proceeding further.
The next step is to create our own database context, which we can use for storing our users and their properties. In the Models\IdentityModels.cs, we are going to delete the ApplicationDbContext and paste the following code on its place.
      public class AppUsersDbContext : IdentityDbContext<ApplicationUser>
{
    public AppUsersDbContext()
        : base("SystemUsers", throwIfV1Schema: false)
    {
    }

    public static AppUsersDbContext Create()
    {
        return new AppUsersDbContext();
    }
}
As you can see, we use the new connection from the Web.config file for the new context by passing its name as a string.
Configuring the ApplicationUserManager
Once we have the connection between the database and the ASP.NET project, we should configure the built in ApplicationUserManager, so it uses this context instead of the default one, which we have already deleted.
A quick look at both the UserStore and the ApplicationUserManager classes:
      namespace Microsoft.AspNet.Identity.EntityFramework
{
   //
   // Summary:
   //     EntityFramework based user store implementation that supports IUserStore, IUserLoginStore,
   //     IUserClaimStore and IUserRoleStore
   //
   // Type parameters:
   //   TUser:
   public class UserStore<TUser> : UserStore<TUser, IdentityRole, string, IdentityUserLogin, IdentityUserRole, IdentityUserClaim>, IUserStore<TUser>, IUserStore<TUser, string>, IDisposable where TUser : IdentityUser
   {
       //
       // Summary:
       //     Default constuctor which uses a new instance of a default EntityyDbContext
       public UserStore();
       //
       // Summary:
       //     Constructor
       //
       // Parameters:
       //   context:
       public UserStore(DbContext context);
   }
}
      namespace WebApi
{
   // Configure the application user manager used in this application. UserManager is defined in ASP.NET Identity and is used by the application.

   public class ApplicationUserManager : UserManager<ApplicationUser>
   {
       public ApplicationUserManager(IUserStore<ApplicationUser> store)
           : base(store)
       {
       }

       public static ApplicationUserManager Create(IdentityFactoryOptions<ApplicationUserManager> options, IOwinContext context)
       {
           ///Calling the non-default constructor of the UserStore class
           var manager = new ApplicationUserManager(new UserStore<ApplicationUser>(context.Get<ApplicationDbContext>()));

           /// Rest of the class ...
       }
   }
}
The ApplicationUserManager calls the constructor of the UserStore, which accepts a DbContext. Then it uses this connection to store the user's data. So, here it is enough just to pass our custom context as a parameter, when the ApplicationUserManager calls the UserStore constructor.
Substitute the manager variable with the following code:
var manager = new ApplicationUserManager(new UserStore<ApplicationUser>(context.Get<AppUsersDbContext>()));
The next step is to initialize our context each time our application starts, so that the user manager and the context use the same instance.
Go to the AppStart\Startup.Auth.cs file, where we can see that currently, only the deleted ApplicationDbContext is initialized.
      public void ConfigureAuth(IAppBuilder app)
{
    // Configure the db context and user manager to use a single instance per request
    app.CreatePerOwinContext(ApplicationDbContext.Create);
    app.CreatePerOwinContext<ApplicationUserManager>(ApplicationUserManager.Create);

    // Enable the application to use a cookie to store information for the signed in user
    // and to use a cookie to temporarily store information about a user logging in with a third party login provider
    app.UseCookieAuthentication(new CookieAuthenticationOptions());
    app.UseExternalSignInCookie(DefaultAuthenticationTypes.ExternalCookie);

    /// Rest of the class ...
}
Change the app.CreatePerOwinContext(ApplicationDbContext.Create); line with the following code:
app.CreatePerOwinContext(AppUsersDbContext.Create);
Now the user manager and the context use the same instance.
Configuring Roles
The next part of setting up our API layer will be to include different roles in our application. Again, we will use the Identity package with the custom DB Context that we have created. While users are managed by the ApplicationUserManager, roles are managed by the ApplicationRoleManager.
This time the class and its references are not scaffolded by the template and we should include them by writing a little bit of code. But before going to this step, let us register a the first user in our system.
Registering Users
Run the project. In the documentation of our API, we already have all endpoints of the scaffolded Account Controller
Open Postman or whichever tool you use for making requests.
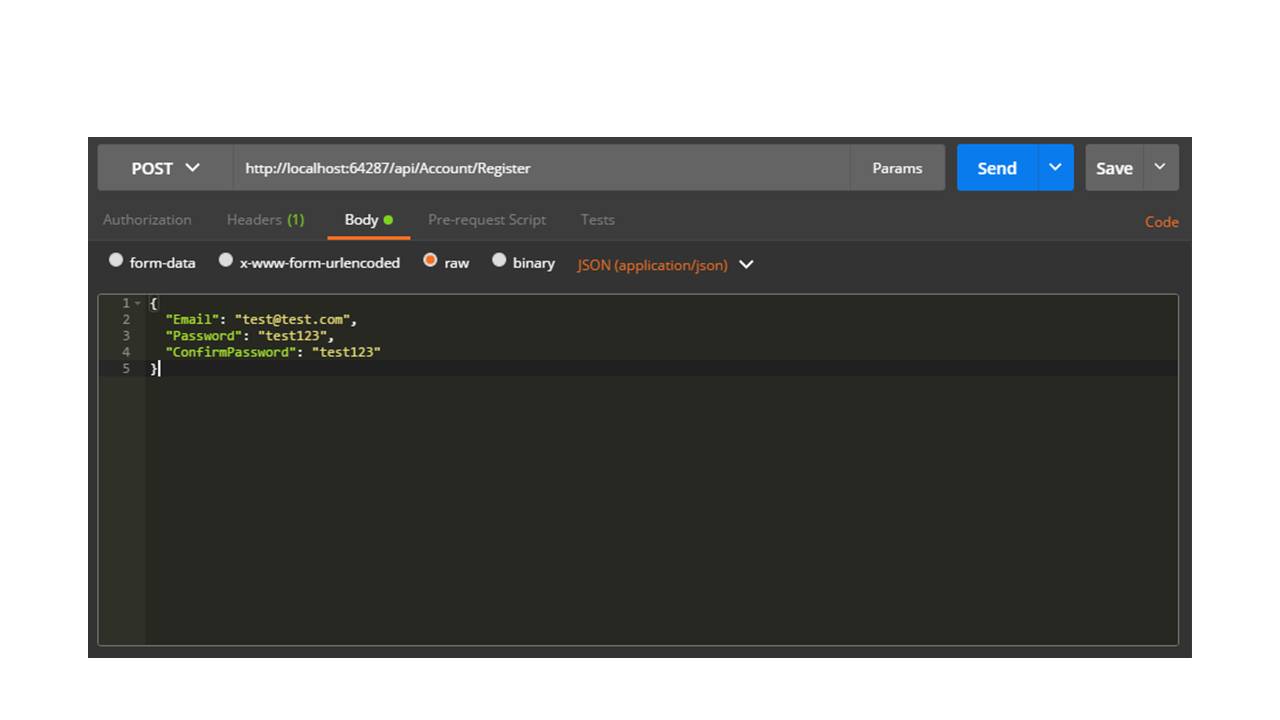
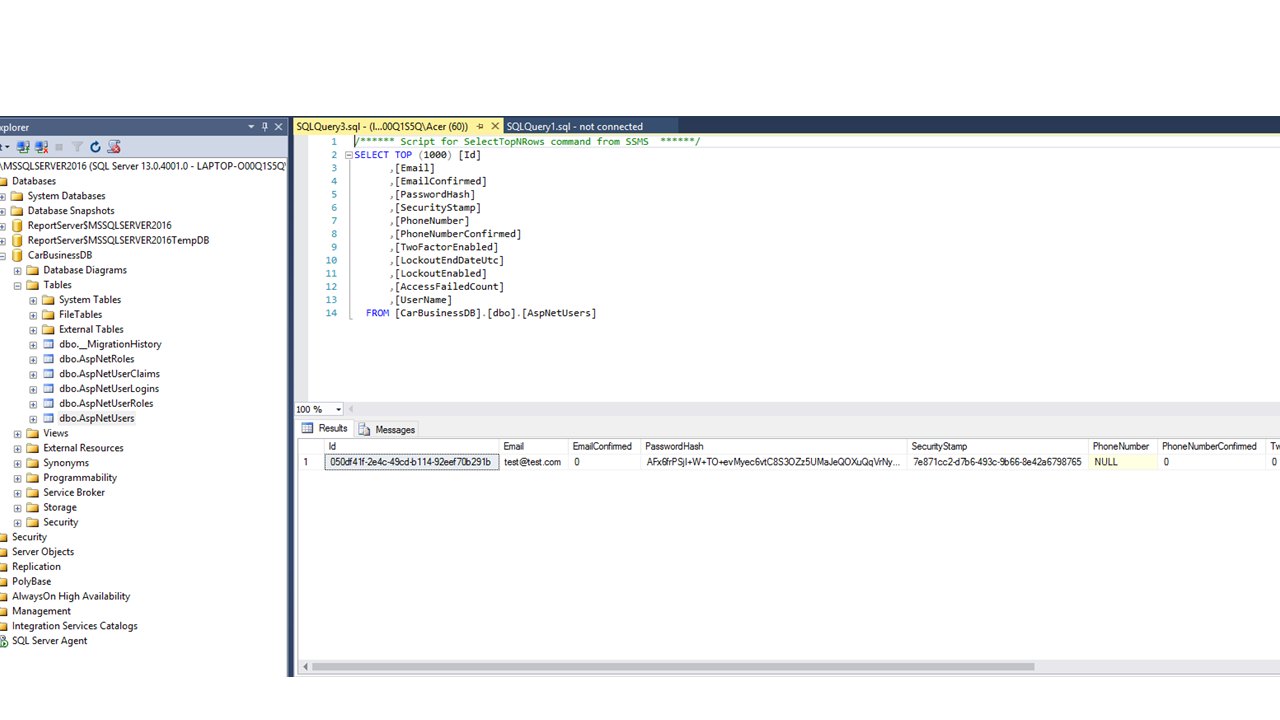
We are ready to open the database and continue.
We notice that a few tables were created because when we made the request first a migration was executed and then our user data was stored in the dbo.AspNetUsers table. As I already mentioned, this table has only the default columns of the IdentityUser class. The other two tables that we are interested in are dbo.AspNetRoles and dbo.AspNetUserRoles. As you already deduce, the first table will serve as a place to store all role types in our application. The second one will be the junction table that defines the many-to-many relationship between users and roles. If you do not understand the terms related to SQL don't worry; the Microsoft.AspNet.Identity package we use deals with the proper usage of our database. Our job is to configure the ASP.NET app, so it sends the right data to our DB.
To proceed, we will open our API project again and write some code in order to make use of the already created tables.
Open AppStart\IdentityConfig.cs and place the following snippet after the end of the ApplicationUserManager class.
      /// <summary>
/// The role manager used by the application to store roles and their connections to users
/// </summary>
public class ApplicationRoleManager : RoleManager<IdentityRole>
{
    public ApplicationRoleManager(IRoleStore<IdentityRole, string> roleStore)
        : base(roleStore)
    {
    }

    public static ApplicationRoleManager Create(IdentityFactoryOptions<ApplicationRoleManager> options, IOwinContext context)
    {
        ///It is based on the same context as the ApplicationUserManager
        var appRoleManager = new ApplicationRoleManager(new RoleStore<IdentityRole>(context.Get<AppUsersDbContext>()));

        return appRoleManager;
    }
}
This code will create the ApplicationRoleManager class that we are going to use in our Account Controller when we write the endpoints, that will asssign roles to different users. But before diving into our controller, let us initialize the ApplicationRoleManager in the same way we did for our ApplicationUserManager. So, open AppStart\Startup.Auth.cs file and put the following code into the ConfigureAuth method:
      public void ConfigureAuth(IAppBuilder app)
{
    // Configure the db context and user manager to use a single instance per request
    app.CreatePerOwinContext(AppUsersDbContext.Create);
    ///Initializing User Manager
    app.CreatePerOwinContext<ApplicationUserManager>(ApplicationUserManager.Create);
    ///Initializing Role Manager
    app.CreatePerOwinContext<ApplicationRoleManager>(ApplicationRoleManager.Create);
    ///Rest of the method... Make sure you do not delete anything, since it is related to the token based authorization that we are going to use.
}
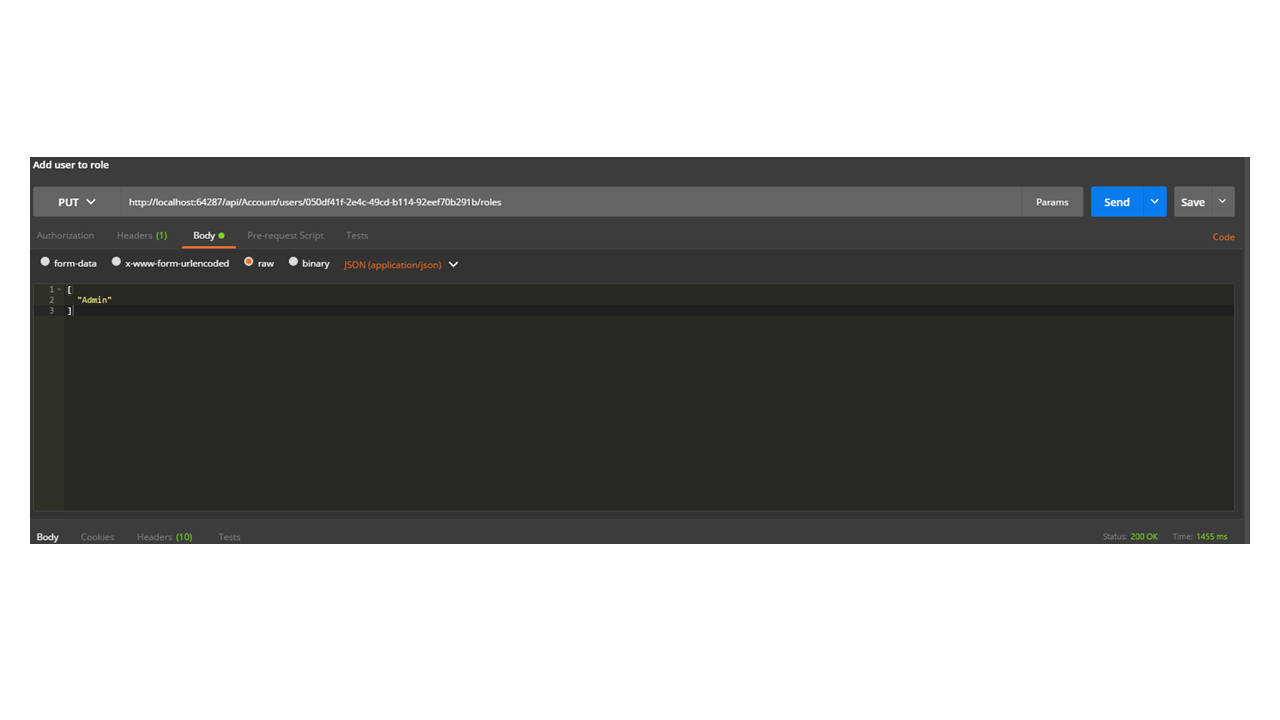
After we do this, we can open some endpoints which are going to take care of assigning roles to users. Go to Controllers\AccountController.cs file and put the following snippet in it:
      AllowAnonymous]
[Route("users/{id:guid}/roles")]
[HttpPut]
public async Task<IHttpActionResult> AssignRolesToUser(string id
The route for our new endpoint will be users/{id:guid}/roles. An ID and an array of roles should be the request parameters.
Finally, make an instance of our ApplicationRoleManager. To do this, add this code snippet in the AccountController
      public class AccountController : ApiController
{
    ///...
    private ApplicationRoleManager _roleManager;
    ///...
    public AccountController(ApplicationUserManager userManager,
        ISecureDataFormat<AuthenticationTicket> accessTokenFormat, ApplicationRoleManager roleManager)
    {
    ///Make an instance of the user manager in the controller to avoid null reference exception
        UserManager = userManager;
        AccessTokenFormat = accessTokenFormat;
        ///Make an instance of the role manager in the constructor to avoid null reference exception
        RoleManager = roleManager;
    }
///...
    public ApplicationRoleManager RoleManager
    {
        get
        {
            return _roleManager ?? Request.GetOwinContext().GetUserManager<ApplicationRoleManager>();
        }
        private set
        {
            _roleManager = value;
        }
    }
/// Rest of the class...
}
Now, we are ready to test our new endpoint by using the ID property of the user that we just added.
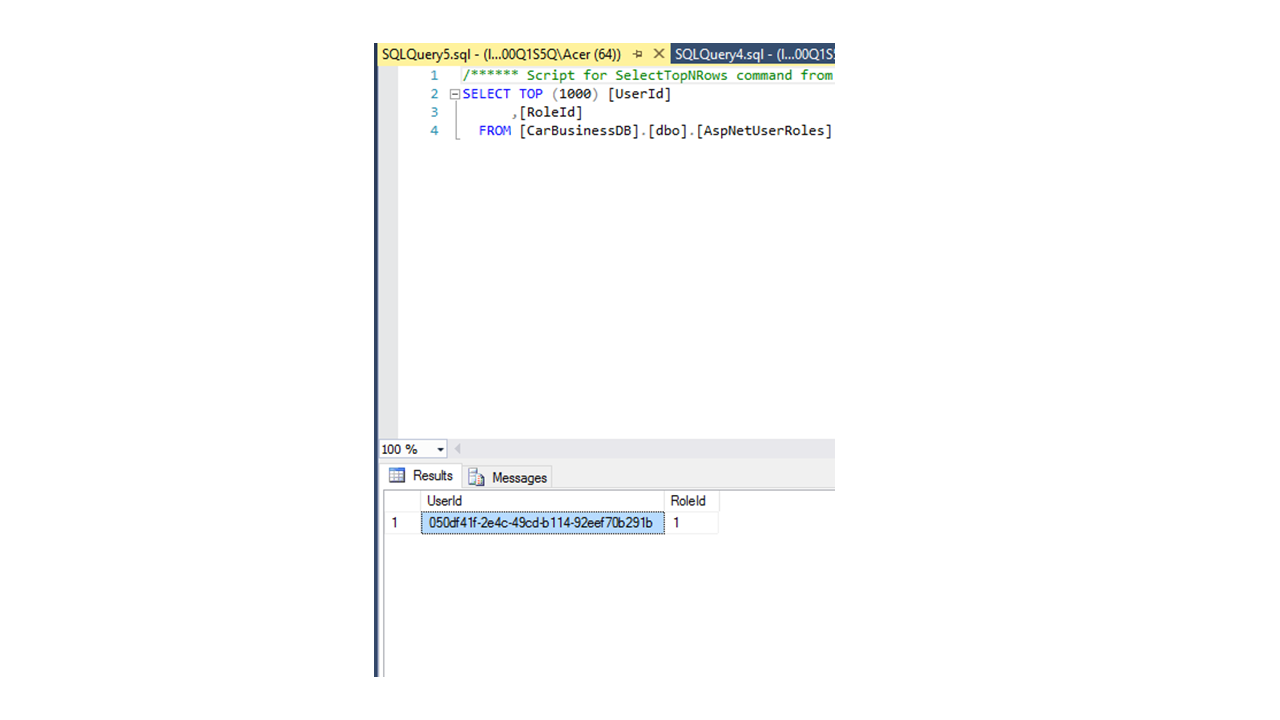
First, add an entry in your dbo.AspNetRoles, which contains the name of the new role. In our case, we will add three of them: Admin, ShopManager, and Seller. Open your MSMS, and execute the following query:
      INSERT INTO dbo.AspNetRoles
(Id, Name)
VALUES
(1, 'Admin')

INSERT INTO dbo.AspNetRoles
(Id, Name)
VALUES
(2, 'ShopManager')

INSERT INTO dbo.AspNetRoles
(Id, Name)
VALUES
(3, 'Seller')
This should be enough for us to make the request.
Now we have the connection in our database.
By now, we have developed a fully-functional User Accounts system that is able to maintain user registration and different roles.
Adding non-default properties to users
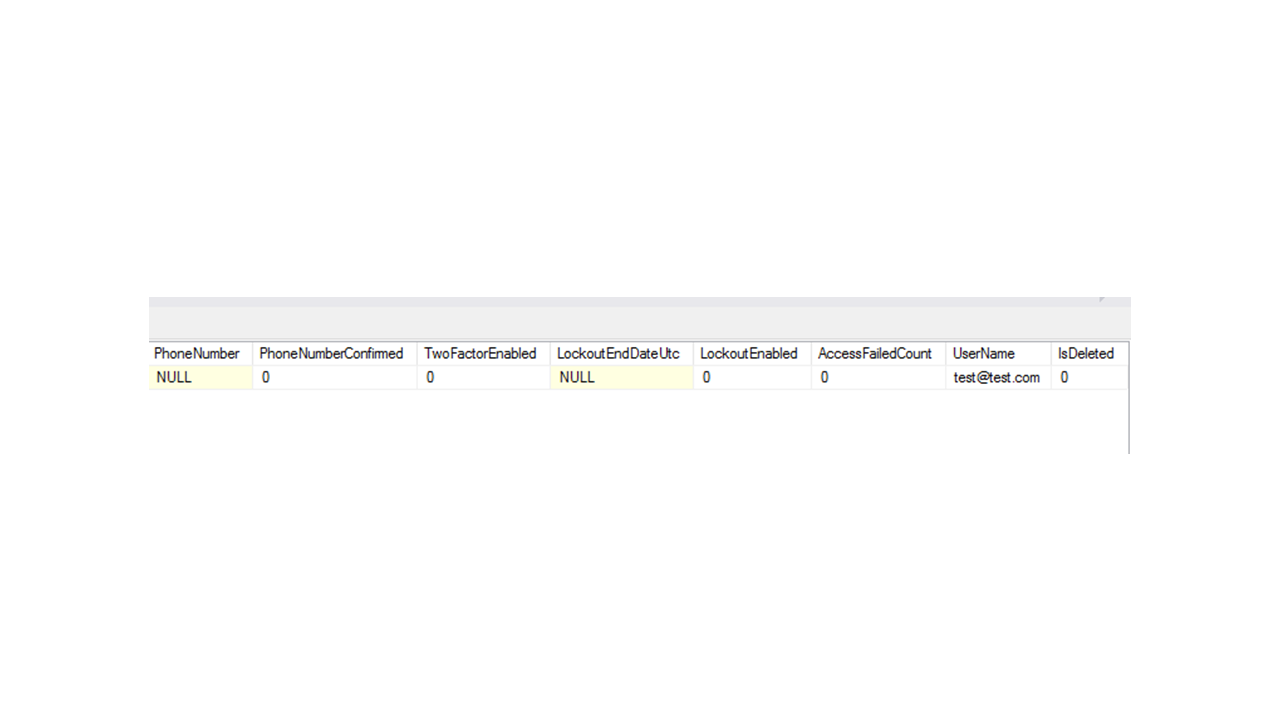
Now, let's add some additional fields to our accounts system. To keep things simple, I will create just two additional columns in the AspNetUsers table. The first one will be IsDeleted, a BIT column that will serve as a marker used for soft deletion.
The second column will be CompanySecretCode, an encrypted column that keeps a code that each user can use to access different documents (there is no particular reason for putting such a column in our table, it is just an example of how to encrypt columns when it comes to accounts system).
Soft deletion
In soft deletion, we mark an entity as "deleted" but don't actually remove it from the database until we decide that it is extraneous.
Since the package that we are using implements code-first migrations, it is enough just to add the IsDeleted column to our ApplicationUser class and then clearly define its default value and further usage. First, open AppStart\IdentityConfig.cs file and add the property:
      public class ApplicationUser : IdentityUser
{
    // Property used for soft deleting users
    public bool IsDeleted { get; set; }
    public async Task<ClaimsIdentity> GenerateUserIdentityAsync(UserManager<ApplicationUser> manager, string authenticationType)
    {
        // Note the authenticationType must match the one defined in CookieAuthenticationOptions.AuthenticationType
        var userIdentity = await manager.CreateIdentityAsync(this, authenticationType);
        // Add custom user claims here
        return userIdentity;
    }
}
After this, we can start using our new column immediately. The first and most obvious thing to do is to assign a value to this property when we create the user. For this purpose, replace the Register method in the AccountController with the following code:
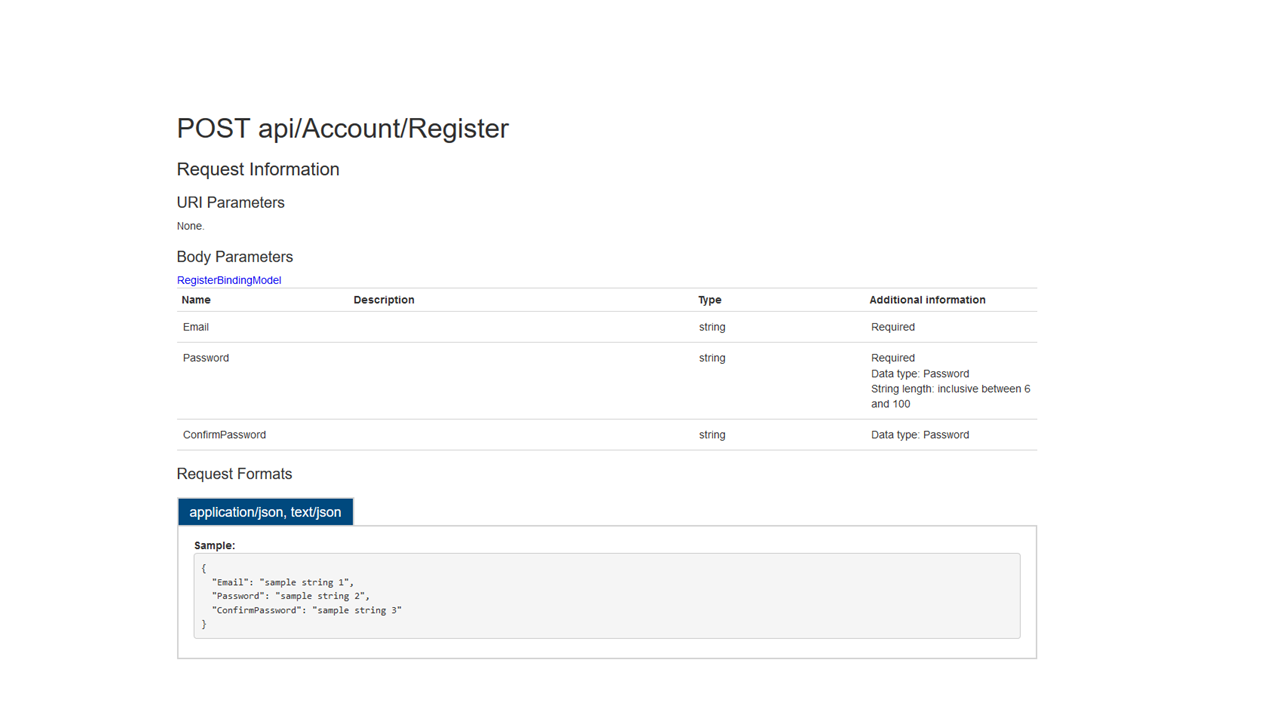
      // POST api/Account/Register
[AllowAnonymous]
[Route("Register")]
public async Task<IHttpActionResult> Register(RegisterBindingModel model)
{
    if (!ModelState.IsValid)
    {
        return BadRequest(ModelState);
    }

    var user = new ApplicationUser() { UserName = model.Email, Email = model.Email };

    //set the IsDeleted property to false
    user.IsDeleted = false;

    IdentityResult result = await UserManager.CreateAsync(user, model.Password);

    if (!result.Succeeded)
    {
        return GetErrorResult(result);
    }

    return Ok();
}
Since we have changed our default ApplicationUser class and our database still does not know about it, we should see an exception when we try to add a new user. The exception reads: 'Consider using Code First Migrations to update the database.'
We should execute a migration that will create the IsDeleted column in our database. Before doing this, delete the user we have created because it does not have the IsDeleted column and this is going to be an obstacle when we try to make it non-nullable. Next:
- Open the Package Manager Console.
- Set the Default Project property to WebApi.
- Enable migrations by targeting our custom context: Enable-Migrations -contexttypename AppUsersDbContext
- Add a migration: Add-Migration Initial
- Update-Database
These commands should execute a migration that creates the needed column in the database. Moreover, you should have a new folder called Migrations in your WebApi project. There you can see all migrations that you have executed and you can write new ones, in case you need them.
This is the migration code we used above:
      public partial class Initial : DbMigration
{
    public override void Up()
    {
        AddColumn("dbo.AspNetUsers", "IsDeleted", c => c.Boolean(nullable: false));
    }

    public override void Down()
    {
    }
}
Now, we are ready to create our new user (follow the same steps that we have used to create the previous one).
Voila! We have our IsDeleted column as a part of our Application User entity.
Deleting users
We can proceed to writing code that is going to deal with deleting user. I prefer to work with Stored Procedures for everything which is not related to default Identity properties. For this purpose, I will include a procedure that is going to deal with deletion. Open SQL Management Studio and execute the following query on our CarBusinessDB.
      CREATE PROCEDURE DeleteUser
@UserId nvarchar(128)
AS
BEGIN
	-- SET NOCOUNT ON added to prevent extra result sets from
	-- interfering with SELECT statements.
	SET NOCOUNT ON;

	UPDATE dbo.AspNetUsers
	SET IsDeleted = 1
	WHERE Id = @UserId
END
GO
Configuring Authorization
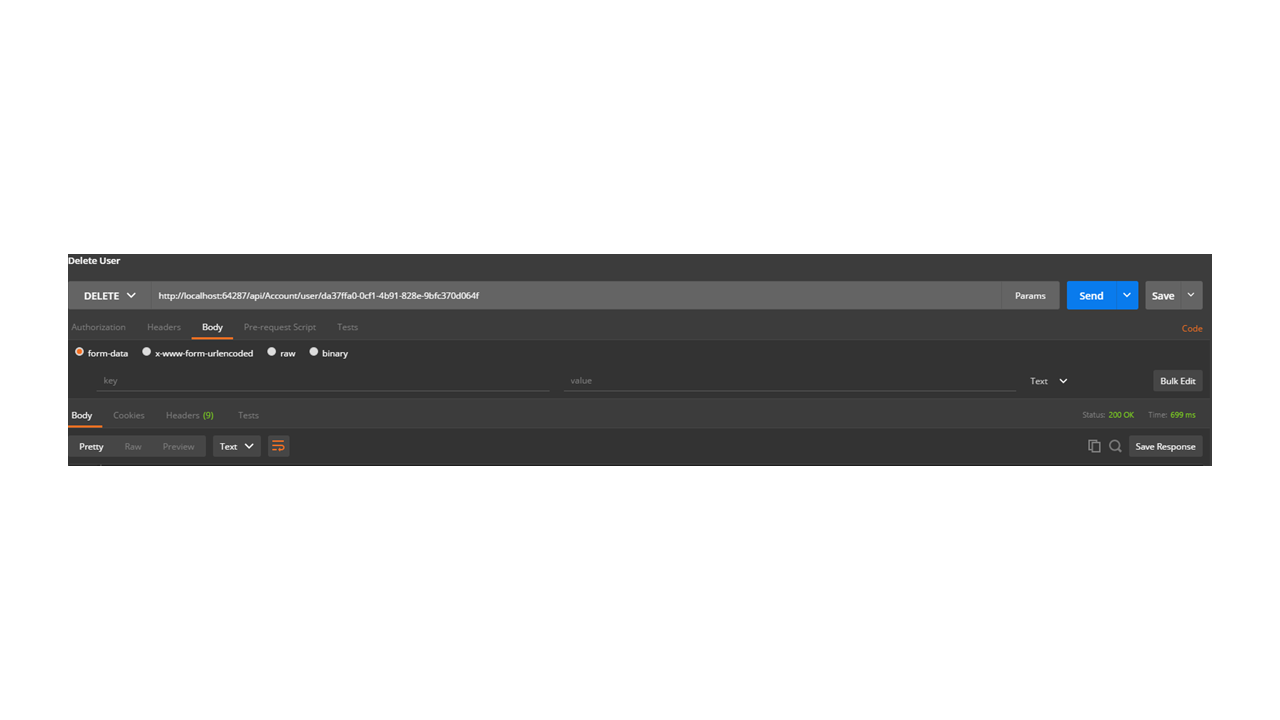
The last thing that we have to implement is an endpoint in AccountController that will come in handy when we delete users:
      AllowAnonymous]
[HttpDelete]
[Route("user/{id:guid}")]
public IHttpActionResult DeleteUser(string id)
{
    //check if such a user exists in the database
    var userToDelete = this.UserManager.FindById(id);
    if (userToDelete == null)
    {
        return this.NotFound();
    }
    else if (userToDelete.IsDeleted)
    {
        return this.BadRequest("User already deleted");
    }
    else
    {
        var con = ConfigurationManager.ConnectionStrings["SystemUsers"].ConnectionString;
        using (SqlConnection connection = new SqlConnection(con))
        {
            using (SqlCommand command = new SqlCommand("dbo.DeleteUser"
We will call the created procedure by using its name and passing its input parameters. In the ideal case for a bigger project, you can use a DAL(Data Access Layer) architecture and create a DeleteUser method in one of your services. However, this is a slight tangent from the Identity logic that we are discussing. Now, with one simple request to the new endpoint, we are able to change the state of each user by its Id.
Selective access
Since developers usually use User Accounts and Roles when they want to secure the access to different parts of their applications, ASP.NET is not an exception and you can allow different types of ApplicationUsers (or different Roles in our case) to be allowed access to some endpoints and denied access to others.
Example
We will configure our AccountController in a way that by default only the Admin role has access to all endpoints. Then we will include some exceptional cases, when other roles can perform operations. We do this by adding the Authorize attribute on the top of our AccountController and then pass the Roles that will be authorized by default.
      Authorize(Roles = "Admin")]
[RoutePrefix("api/Account")]
public class AccountController : ApiController
{
///Rest of the class ...
}
So, we authorized only the Admin role to access our Account endpoints. But it makes sense for the Seller to delete users, as well. For this purpose, we override the default authorization for the DeleteUser endpoint:
      OverrideAuthorization]
[Authorize(Roles = "Admin
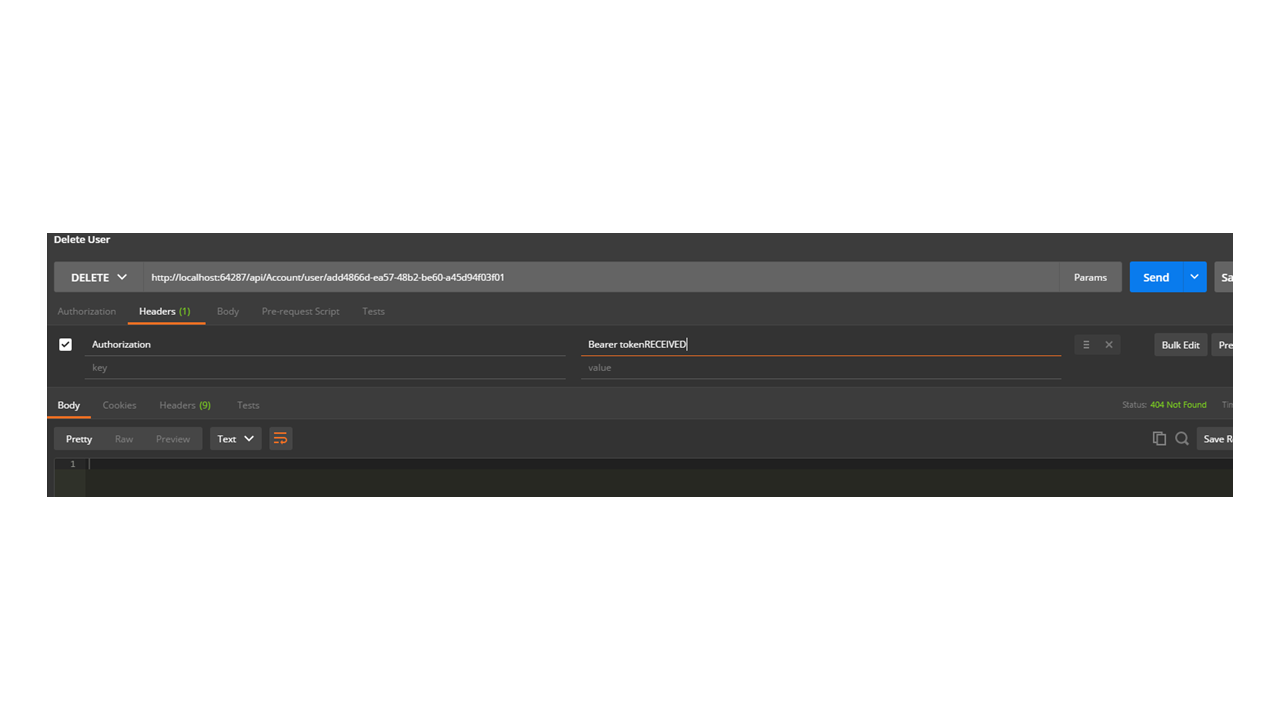
Now, both Admin and Seller roles are authorized to make requests to this endpoint. We can add a user to role Seller and then get a token:
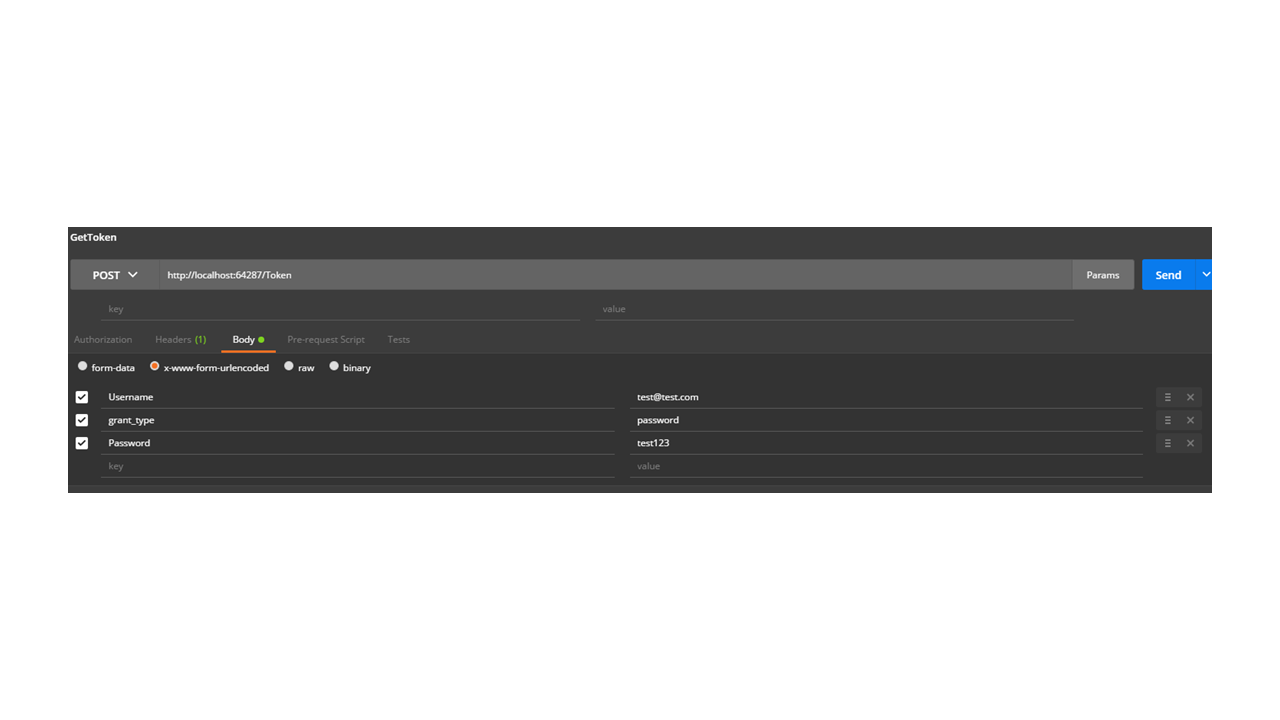
And make a request to the endpoint by passing the token, we have received:
In this way, we are able to use all features of our application the small identity system that we have developed. Fast, simple, and scalable!
Conclusion
ASP.NET Identity gives you the opportunity to implement various types of membership systems. Depending on the needs of your application, you can use its default properties or add custom ones. Hopefully this tutorial showed you how to handle both scenarios and helps you as you tackle issues dealing with database architecture and design.
Once again, a working version of the project is available.
If you have any questions, feel free to contact me on slazov@centroida.co.
Advance your tech skills today
Access courses on AI, cloud, data, security, and more—all led by industry experts.
