Creating iOS Rich Push Notifications
Attract more customer engagement to your iOS app by learning how to create iOS rich push notifications in this guide along with some server-side requirements.
Jan 10, 2019 • 10 Minute Read
Introduction
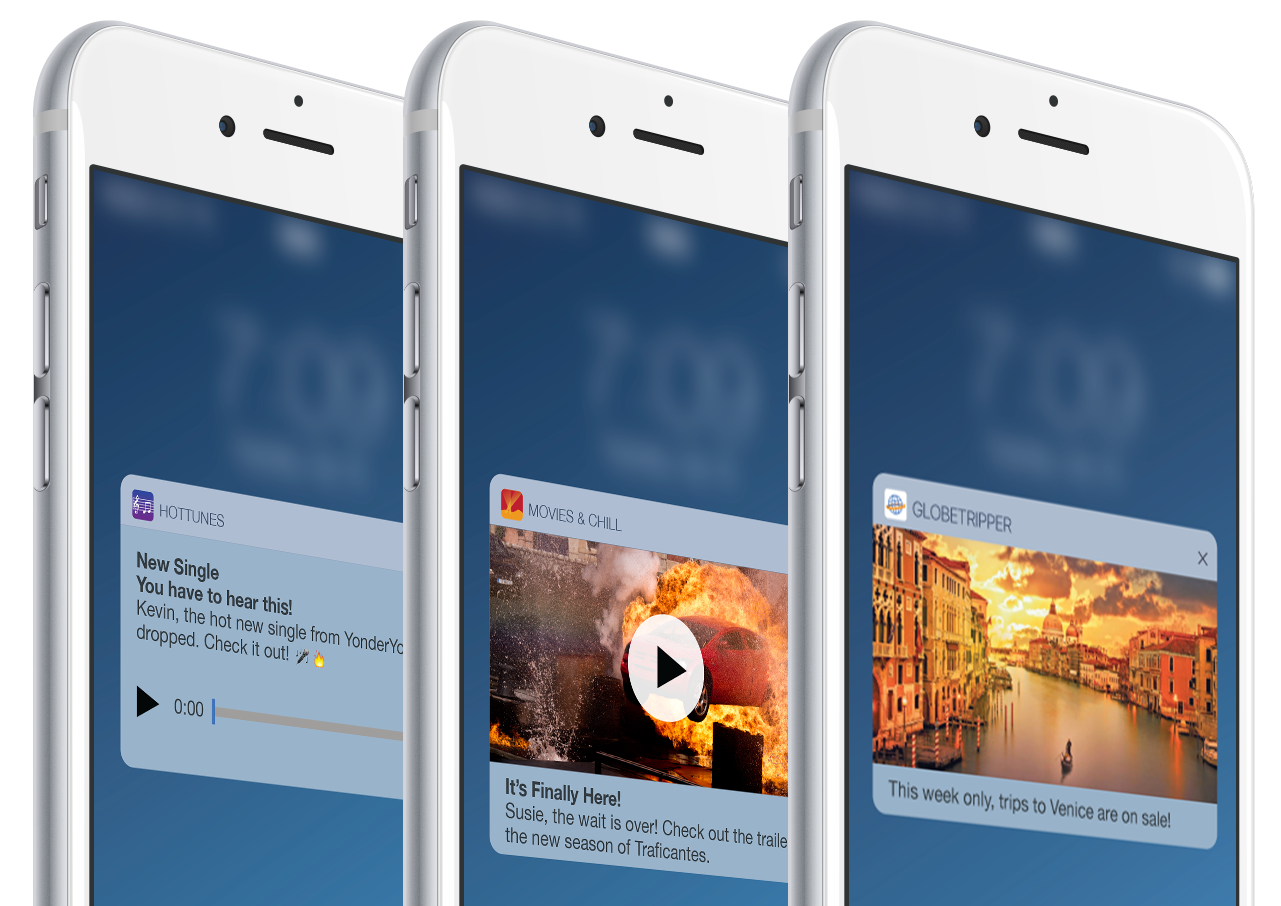
These days, having a visually stunning mobile app isn’t good enough. For your mobile app to see success, it must be designed with user experience (UX) in mind. Push Notifications are a great means of interacting with consumers even when they are not using the application.
This guide will walk you through setting up your project for rich push notifications, you will learn some server-side requirements and we will peek into the infinite possibilities!
Setup
In order to get started with push notifications, you need to follow these steps:
- Open an existing Xcode project or create a new project. Select your project target and go to Capabilities to enable Push Notifications as shown here.
- Open Keychain Access > Certificate Assistant > Request a Certificate From a Certificate Authority... Fill the required fields and choose either to email CA the request or save it to disk. Go to your Apple member center and locate your App ID. You will see that "Push Notifications" service is now Configurable. Select the Edit button. Under Push Notifications section there are two options for certificates as shown here. Select the Create Certificate button to create your Certificate.
Development Certificate - App built from Xcode will receive notifications.
Production Certificate -App installed from Apple Store or Test Flight will receive notifications.
- Upload your .certSigningRequest file that you prevously saved on disk or emailed the Certificate Authority, download your generated Certificate, and double-click the .cer file to install it in your Keychain Access.
- Locate your Certificate in Keychain Access under "Certificates" section and export it as shown here Your Certificate is now saved as .p12 file. If you need your Certificate as .pem/.p8 file you can easy convert it
$ openssl pkcs12 -in CertName.p12 -out CertName.pem -nodes -clcerts
Registering for push notifications
Simply as that in your AppDelegate file:
      import UIKit
import UserNotifications

@UIApplicationMain
class AppDelegate: UIResponder, UIApplicationDelegate, UNUserNotificationCenterDelegate {

    var window: UIWindow?

func application(_ application: UIApplication, didFinishLaunchingWithOptions launchOptions: [UIApplicationLaunchOptionsKey: Any]?) -> Bool {

    UNUserNotificationCenter.current().delegate = self

    if #available(iOS 10, *) {
        UNUserNotificationCenter.current().requestAuthorization(options:[.badge, .alert, .sound]) { granted, error in }
    } else {
       application.registerUserNotificationSettings(UIUserNotificationSettings(types: [.badge, .sound, .alert], categories: nil))
    }
    application.registerForRemoteNotifications()
    return true
 }
...
Add the didRegisterForRemoteNotificationsWithDeviceToken function in your AppDelegate.swift file to get the deviceToken, which will receive notifications.
      ...
func application(_ application: UIApplication, didRegisterForRemoteNotificationsWithDeviceToken deviceToken: Data) {
   let deviceTokenString = deviceToken.reduce("") { $0 + String(format: "%02X", $1) }
   print("APNs device token: \(deviceTokenString)")
}
...
Awesome! Now it's time to make them super duper nice-looking. 🙀
Displaying push notifications
Your notifications interface should feel like natural extension of your containing app!
A very important step for sending media attachment is the mutable-content key in the push payload from the server. So let's take a look at this example payload.
      {
   "aps": {
       "alert": "Hello!",
       "sound": "default",
       "mutable-content": 1,
       "badge": 1
   },
   "data": {
       "attachment-url": "https://example.com/attachment.jpg"
   }
}
From Xcode > File > New > Target..., select Notification Service Extension and activate suggested scheme. Notice that there are two autogenerated files now - NotificationService.swift and Info.plist.
In the NotificationService.swift file, we need to handle the media URL from the payload. For example, we can use FileManager:
      ...
override func didReceive(_ request: UNNotificationRequest, withContentHandler contentHandler: @escaping (UNNotificationContent) -> Void) {
        self.contentHandler = contentHandler
        bestAttemptContent = (request.content.mutableCopy() as? UNMutableNotificationContent)

        func failEarly() {
            contentHandler(request.content)
        }

        guard let content = (request.content.mutableCopy() as? UNMutableNotificationContent) else {
            return failEarly()
        }

        guard let apnsData = content.userInfo["data"] as? [String: Any] else {
            return failEarly()
        }

        guard let attachmentURL = apnsData["attachment-url"] as? String else {
            return failEarly()
        }

        guard let imageData = NSData(contentsOf:NSURL(string: attachmentURL)! as URL) else { return failEarly() }
        guard let attachment = UNNotificationAttachment.create(imageFileIdentifier: "image.gif", data: imageData, options: nil) else { return failEarly() }

        content.attachments = [attachment]
        contentHandler(content.copy() as! UNNotificationContent)
    }
...
... and this UNNotificationAttachmentextension function to save the media to disk:
      extension UNNotificationAttachment {
    static func create(imageFileIdentifier: String, data: NSData, options: [NSObject : AnyObject]?) -> UNNotificationAttachment? {

            let fileManager = FileManager.default
            let tmpSubFolderName = ProcessInfo.processInfo.globallyUniqueString
            let fileURLPath      = NSURL(fileURLWithPath: NSTemporaryDirectory())
            let tmpSubFolderURL  = fileURLPath.appendingPathComponent(tmpSubFolderName, isDirectory: true)

            do {
                try fileManager.createDirectory(at: tmpSubFolderURL!, withIntermediateDirectories: true, attributes: nil)
                let fileURL = tmpSubFolderURL?.appendingPathComponent(imageFileIdentifier)
                try data.write(to: fileURL!, options: [])
                let imageAttachment = try UNNotificationAttachment.init(identifier: imageFileIdentifier, url: fileURL!, options: options)
                return imageAttachment
            } catch let error {
                print("error \(error)")
            }

        return nil
    }
}
Voila!
Adding actions to push notifications
Let's add some actions to our Rich Push Notifications. Modify the payload by adding the "category" key to notify that we want to display actions.
      {
   "aps": {
       "alert": "Hello!",
       "sound": "default",
       "mutable-content": 1,
       "badge": 1,
       "category": "myCategoryName"
   },
   "data": {
       "attachment-url": "https://example.com/attachment.jpg"
   }
}
In the autogenerated Notification Service Info.plist, add an UNNotificationExtensionCategory array with up to 4 action identifiers. These can be seen as "Item 0" and "Item 1" in the picture below:

Adjust the notification category in your didReceiveRequest function in the NotificationService.swift file:
      ...
let meowAction = UNNotificationAction(identifier: "meow", title: "Meow", options: [])
let pizzaAction = UNNotificationAction(identifier: "pizza", title: "Pizza?", options: [])

let category = UNNotificationCategory(identifier: "myCategoryName", actions: [meowAction, pizzaAction], intentIdentifiers: [], options: [])
UNUserNotificationCenter.current().setNotificationCategories([category])
...
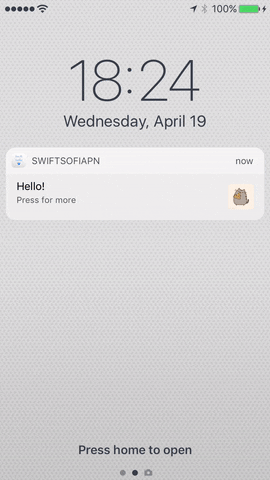
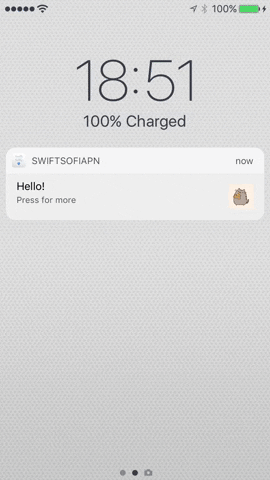
Simple as that! 🎉 Time for a preview:
Finally, add the logic for the notifications buttons in the AppDelegate.swift file, using the identifiers that we specified in the Info.plist file earlier. The method we call is didReceive response from the UNUserNotificationCenterDelegate
      ...
func userNotificationCenter(_ center: UNUserNotificationCenter, didReceive response: UNNotificationResponse, withCompletionHandler completionHandler: @escaping () -> Void) {

        if response.actionIdentifier == "meow" {
            ...
        }
        if response.actionIdentifier == "pizza" {
            ...
        }
        completionHandler()
    }
...
Warning! Don't forget to update the badge icon number when needed!
application.applicationIconBadgeNumber = 0
Custom preview
Last, but not least, let's add a custom preview for notifications from Xcode > File > New > Target... select Notification Content and activate suggested scheme. Now we have NotificationViewController.swift, MainInterface.storyboard and Info.plist files.
Conclusion
The sky is the limit
Let your imagination run wild as you use your newfound abilities to build richer and richer push notifications for IOS apps. or take a look at the sample project included below to continue practicing with some cool ideas!
If you found this guide informative, engaging, or just plain awesome. Thanks for reading!
Advance your tech skills today
Access courses on AI, cloud, data, security, and more—all led by industry experts.
