Exposing Your Local Node.js App to the World
Learn how to expose your Node.js app in Localtunnel.me, ngrok, Zeit's now using a Hello World Express app. See which service may better suit your Node.js app needs!
Jan 10, 2019 • 12 Minute Read
Introduction
In this guide, we're going to review three services to expose your local Node.js app to the world:
This can be useful in the following cases:
- When a remote service needs to call your application and you don't want (or can) deploy your application to a public server.
- For debugging purposes, it's better to keep everything local.
- When you're testing mobile apps and you want to expose your local server as the back-end.
- When you want to make a quick demo of your app to a client/user in another part of the world.
- When you want to publicly expose something, like an email server or a file repository from your private network.
Having said that, we'll take a quick look at each option using a Hello World Express app.
The index.js file:
      const express = require("express");
const app = express();

app.get("/", (req, res) => res.send("Hello World!"));

app.listen(3000, () => console.log("Server listening on port 3000!"));
The package.json file:
      {
  "name": "hello",
  "version": "1.0.0",
  "description": "",
  "main": "index.js",
  "scripts": {
    "start": "node index.js",
    "test": "echo \"Error: no test specified\" && exit 1"
  },
  "keywords": [],
  "author": "",
  "license": "ISC",
  "dependencies": {
    "express": "4.14.0"
  }
}
If you want to skip this and go directly to the comparison table, click here.
localtunnel.me
This is the easiest service you can use to expose your local app to the world. In the words of the author, it was written to easily create a tunnel with no setup, as a library first, and a CLI tool second.
Don't confuse it with the original localtunnel that apparently, was discontinued in favor of ngrok.
localtunnel is available as an npm package, so you can install it with:
npm install -g localtunnel
From any directory, execute the lt command:
lt --port 3000
This will setup a tunnel to you local server on port 3000, and give you a public URL that will remain active even if you restart or stop your server:

By default, the URL will have the domain localtunnel.me with a subdomain composed of random characters. This URL will change every time you rerun the process.
However, you can request a subdomain (assuming it's available) with the option --subdomain. For example:
lt --port 3000 --subdomain hello

In the browser:

As said before, localtunnel can be used as a library also. For example:
      const localtunnel = require('localtunnel');

const tunnel = localtunnel(port, { subdomain: 'hello'} (err, tunnel) => {
    ...
});

tunnel.on('close', function() {
    // When the tunnel is closed
});

...

tunnel.close();
ngrok
Ngrok is the most popular service of all these. Like localtunnel, ngrok creates a secure tunnel to a local server on your machine.
Ngrok is built in Go so it has binary packages for each major platform. You just have to download a ZIP file, unzip it, and then run it from the command line.
That's the recommended way to install it, however, there's also a Node.js wrapper for ngrok that downloads the ngrok binaries for your platform.
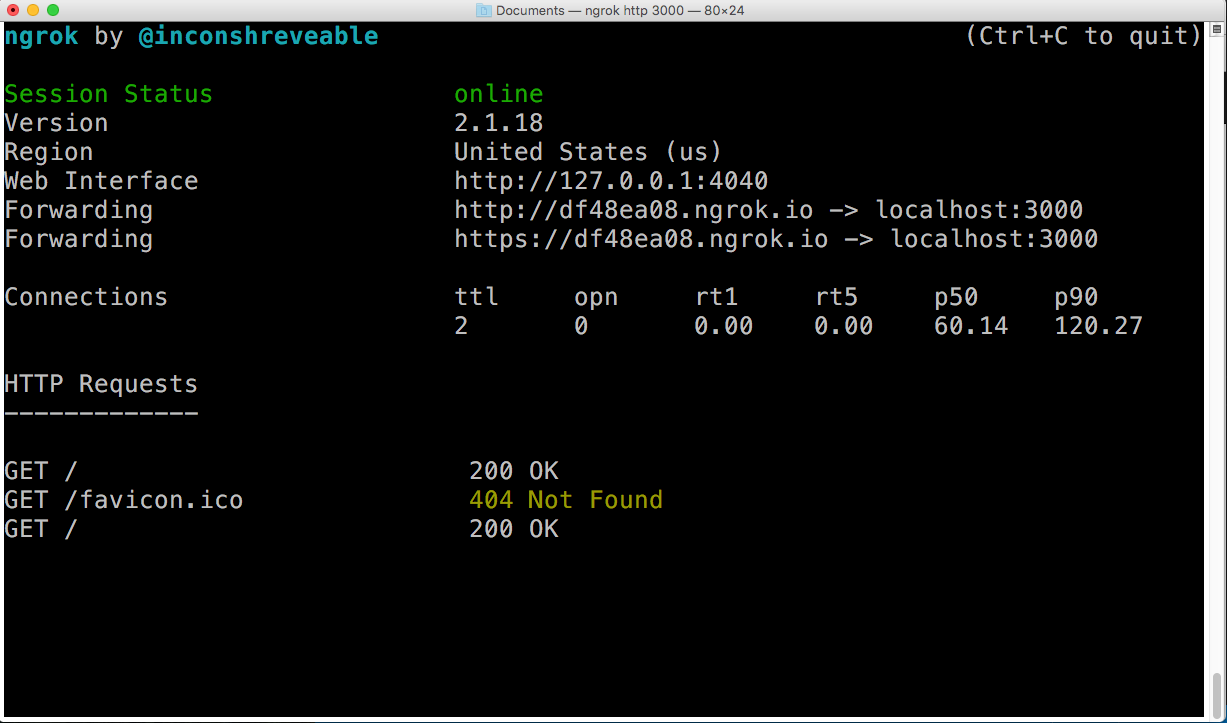
To execute ngrok from the directory you unzipped it, run the command:
./ngrok http 3000
It will start a secure tunnel to your local machine on port 3000 and display a UI in your terminal with the public URL and other information:
In the browser:

Ngrok also provides a UI for inspecting all the HTTP traffic of your tunnel. Just open a browser and go to https://localhost:4040:
This UI also allows you to replay any request, which is very helpful for testing webhooks:
Just like localtunnel, you get a random subdomain every time you execute ngrok. You can specify a custom subdomain with the -subdomain option. For example this command will give you the URL(s) http(s)://hello.ngrok.io:
./ngrok http -subdomain=hello 3000
However, this is only available as a paying customer. It also supports custom domains.
Among other things, you can configure all the ngrok options of the command line with a YAML file, and it also has a REST API to manage tunnels, collect metrics, and replay requests. You can know more about this features at the documentation page, which is very complete.
now
According to its website, Now allows you to deploy your Node.js or Docker-powered app to the cloud with ease, speed, and reliability.
This can give us a hint at the fact that Now uses a different approach than the previous services. Instead of creating a secure tunnel to your localhost, Now deploys you application to the cloud.
You might think this belongs to another category, but the way you can make your application available online without using something like Git, and some features that are helpful for development, make Now enter this comparison.
To install it, we have three options:
- Using pre-built binaries for 64-bit systems.
- Using NPM, you can install Now (globally) with npm install -g now
- Using the Now Desktop app (only available for Mac), which also installs the Now CLI.
Once installed, go to your app directory and type now.
The first time you run this command, it will prompt for an email address to create an account and confirm it. Next, it will start deploying your app, creating a URL, and putting it on your clipboard.
It may take a while to deploy your app, but meanwhile, you can go to a browser and paste the URL on your clipboard to see the progress. When it finishes, it will execute the npm start script and show your app:
If we add /_src to the URL, we'll see the source code of the deployed application:
If we make a change to the application, for example:
      ...

app.get('/', (req, res) => res.send('Hello World! v2') );

...
And then deploy it with the command now, we'll get a new URL where we can see the change. The cool thing is that the previous version will still be available:
The Now CLI provides some other helpful commands. You can see everything that is available with:
now -help
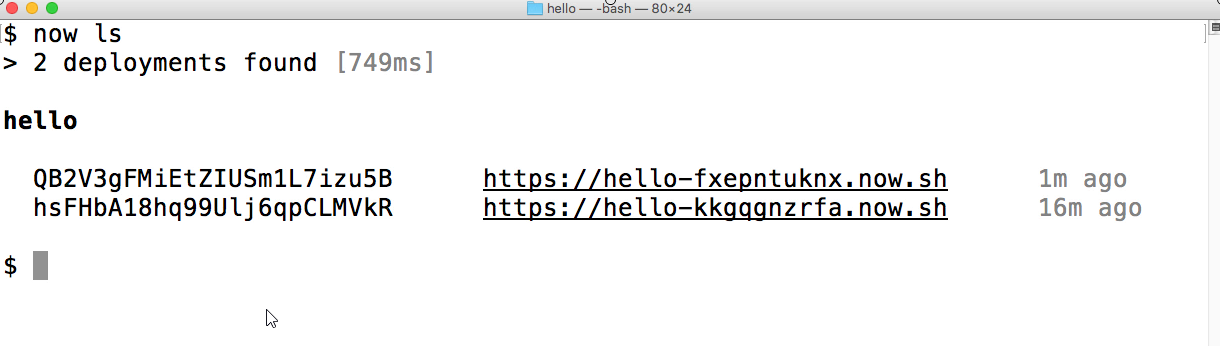
For instance, there's a ls command, to list all the deployed versions of your app:
You can delete a version with rm:
Now also supports custom domains and subdomains and it has a REST API to manage all the deployments under the account, domains, certs, aliases, and secrets for the authenticating user.
Comparison Table
For a quick comparison, here's a summary of the features of each service:
| Feature | localtunnel.me | ngrok | now |
|---|---|---|---|
| Free option | Yes | Yes (with some limitations) | Yes (with some limitations) |
| Custom Subdomains | Yes (free) | Yes (paid) | Yes (paid) |
| Custom Domains | No | Yes (paid) | Yes (paid) |
| Wildcard domains | No | Yes (paid) | No |
| Multiple hosting regions | No | Yes (paid) | Yes (paid) |
| Supports HTTPS | Yes | Yes | Yes |
| API | Yes | Yes | Yes |
| Inspect requests | No | Yes | No |
| Replay requests | No | Yes | No |
| Support non-Node.js apps | Yes (Golang) | Yes (anything) | Yes (with Docker) |
| **View Source in the Cloud ** | No | No | Yes |
| Dynamic Scaling | No | No | Yes |
Conclusion
Great, but which one should you use?
Well, all of them are great services, but here are some suggestions to help you make a choice:
- If you are just doing a demo or some quick tests, go with localtunnel. You can install it with NPM and ask for the same subdomain every time. This helpful if you are setting the URL of your app in an external service. Without paying, you don't have to change it every time.
- If you are testing a webhook, the inspect and replay features of ngrok will be a big help. Also, some frameworks, such as the Microsoft Bot Framework, integrate very nicely with ngrok.
- If you are more interested in the hosting aspect, more than any development-related features, use Now.
I hope you found this guide interesting. Thanks for reading.
Advance your tech skills today
Access courses on AI, cloud, data, security, and more—all led by industry experts.
