Getting Started with React VR
Create virtual reality applications and experiences in a fast and easy way with React VR including VR apps around 360 panos, 3D models, and simple animations.
Sep 6, 2019 • 35 Minute Read
Introduction
React VR aims to allow web developers to author virtual reality (VR) applications using the declarative approach of React and, in particular, React Native.
React VR uses Three.js to support the lower-level WebVR and WebGL APIs. WebVR is an API used to access VR devices on the Web. WebGL (Web Graphics Library) is an API for rendering 3D graphics within any compatible web browser without the use of plug-ins.
React VR is similar to React Native in that it uses View, Image, and Text as core components and supports Flexbox layouts. In addition, React VR adds VR components like Pano, Mesh, and PointLight into the mix.
In this guide, we'll create a simple VR app to learn how to create a scene with a panorama image, 3d objects, buttons, and a flexbox layout. Our mock app is based on two of the official samples of React VR and the Mesh and Layout samples.
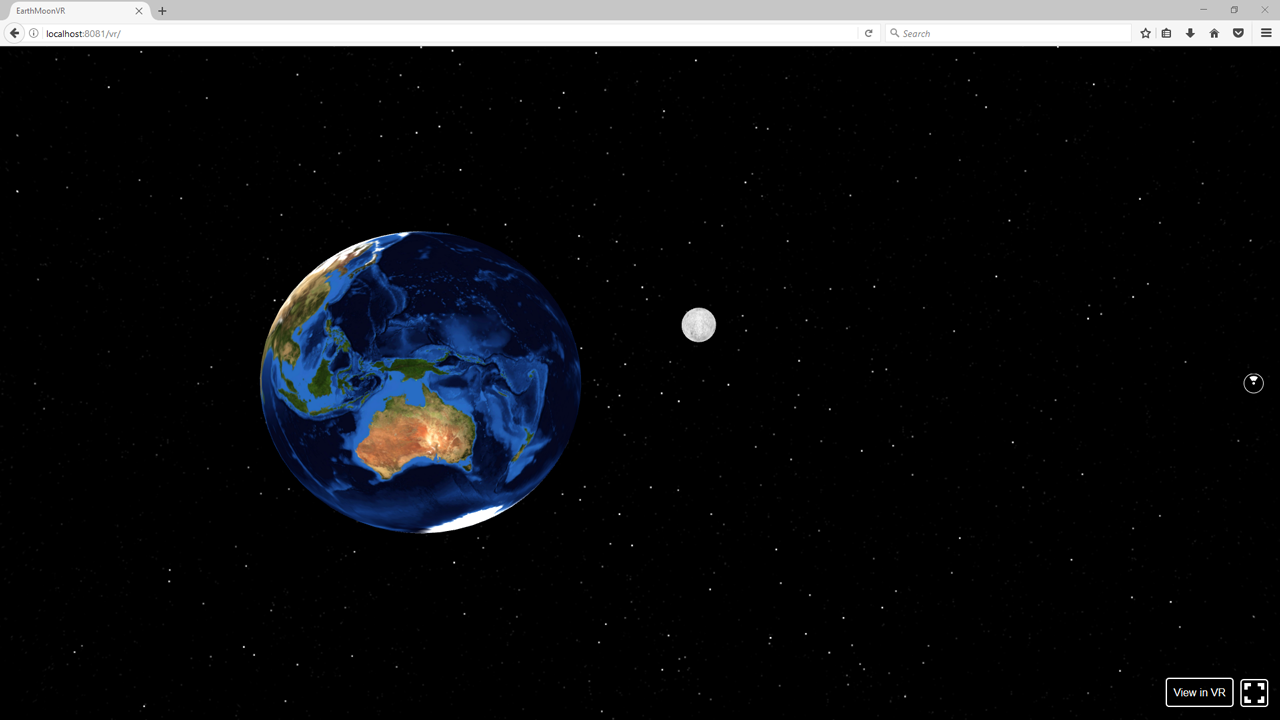
The app will render 3D models of the Earth and the Moon in a cubemap of space along with some buttons to zoom in and zoom out. This is how the finished app looks like:
The models, their scale, and their rotation are not true replicas of the Earth-Moon system. This relationship is just to demonstrate how React VR works. Along the way, we'll explain some key 3D modeling concepts. Once you've achieved mastery with ReactVR, feel free to create more pieces; make it to scale, add in the Sun, and create more planets!
You can find the source code of the final app on GitHub.
Requirements
At the time of writing, Virtual Reality is a rather new technology, and there are few ways to develop or test our VR apps.
WebVR and Is WebVR Ready? can help you know what browser and devices support the latest VR specs.
But don't worry, you don't need any special device, such as Oculus Rift, HTC Vive, or Samsung Gear VR to try a WebVR app right now.
Here's what you do need:
- A Windows machine (a virtual one is fine)
- Firefox Nightly (here are some instructions)
- The latest version of Node.js
There are some builds of Chrome that support the WebVR API, and even an extension that emulates it, but you'll get the best support with Firefox Nightly and Windows.
If you happen to also have an Android device and a Gear VR headset, you can install the Carmel Developer Preview browser to explore your React VR app through your headset.
Creating the project
First, we need to install the React VR CLI tool. Use the NPM:
npm install -g react-vr-cli
Using the React VR CLI, we can create a new application, let's say EarthMoonVR:
react-vr init EarthMoonVR
This will create an EarthMoonVR directory with a sample application inside, also installing the required dependencies so it can take a while. Installing Yarn will speed things up.
(See this guide for more on Yarn.)
Once the install is ready, cd into that directory:
cd EarthMoonVR
To test the sample app, you can execute a local development server with:
npm start
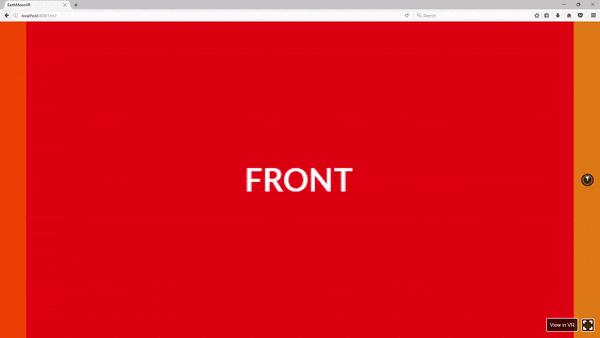
Open your browser at https://localhost:8081/vr. It can take some time to build and initialize the app, but at the end, you should see the following:

React VR
The directory of this sample app has the following structure:
      +-__tests__
+-node_modules
+-static_assets
+-vr
\-.babelrc
\-.flowconfig
\-.gitignore
\-.watchmanconfig
\-index.vr.js
\-package.json
\-rn-cli-config.js
\-yarn.lock
I want to highlight the index.vr.js file, which contains your application code, and the static_assets directory, which contains external resource files, like images and 3D models.
You can know more about the project structure here.
The following is the content of the index.vr.js file:
      import React from "react";
import { AppRegistry, asset, StyleSheet, Pano, Text, View } from "react-vr";

class EarthMoonVR extends React.Component {
  render() {
    return (
      <View>
        <Pano source={asset("chess-world.jpg")} />
        <Text
          style={{
            backgroundColor: "blue",
            padding: 0.02,
            textAlign: "center",
            textAlignVertical: "center",
            fontSize: 0.8,
            layoutOrigin: [0.5, 0.5],
            transform: [{ translate: [0, 0, -3] }]
          }}
        >
          hello
        </Text>
      </View>
    );
  }
}

AppRegistry.registerComponent("EarthMoonVR", () => EarthMoonVR);
We can see that React VR uses ES2015 and JSX.
The code is pre-processed by the React Native packager, which provides compilation (ES2015, JSX), bundling, and asset loading among other things.
In the return statement of the render function, there's a:
- View component, which is typically used as a container for other components.
- Pano component, which renders a 360 photo (chess-world.jpg) that forms our world environment.
- Text component, which renders strings in a 3D space.
Notice how the Text component is styled with a style object. Every component in React VR has a style attribute that can be used to control its look and layout.
Aside from the addition of some special components like Pano or VrButton, React VR works with the same concepts of React and React Native, such as components, props, state, lifecycle methods, events, and flexbox layouts.
Finally, the root component should register itself with AppRegistry.registerComponent, so the app can be bundled and run.
Now that we know what our code does, we can dive into panorama images.
Pano images
Generally, the world inside our VR app is composed by a panorama (pano) image, which creates a sphere of 1000 meters (in React VR distance and dimensional units are in meters) and places the user at its center.
A pano image allows you to see the image from every angle including above, below, behind and next to you, that's the reason they are also called 360 images or spherical panoramas.
There are two main formats of 360 panoramas: equirectangular and cubic. React VR supports both.
Equirectangular panos
An equirectangular pano consists of a single image with an aspect ratio of 2:1, meaning that the width must be twice the height.
These images are created with a special 360 camera. An excellent source of equirectangular images is Flickr, you just need to search for the equirectangular tag. For example, by trying this search, I found this photo:
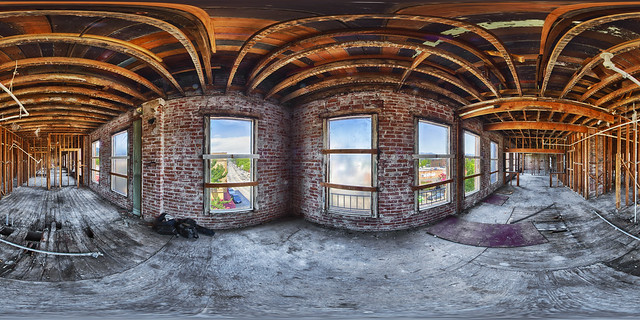
Looks weird, doesn't it?
Anyway, download the photo (at the highest resolution available) to the static_assets directory of our project and change the render function to show it:
      render() {
    return (
      <View>
        <Pano source={asset('sample_pano.jpg')}/>
      </View>
    );
  }
The source attribute of the Pano component takes an object with an uri property with the location of the image. Here we are using the asset function that will look for the sample_pano.jpg file in the static_assets directory and return and object with the correct path in the uri property. In other words, the above code is equivalent to:
      render() {
  return (
    <View>
      <Pano source={ {uri:'../static_assets/sample_pano.jpg'} }/>
    </View>
  );
}
When we refresh the page in the browser (and assuming the local server is still running), we should see something like this:
By the way, if we want to avoid refreshing the page at every change, we can enable hot reloading by appending ?hotreload to the URL (https://localhost:8081/vr/?hotreload).
Cubic panos
Cubemaps are the other format of 360 panoramas. This format uses six images for the six faces of a cube that will fill the sphere around us. It's also known as a skybox.
The basic idea is to render a cube and place the viewers at the center, following them as they move.
For example, consider this image that represents the sides of a cube:
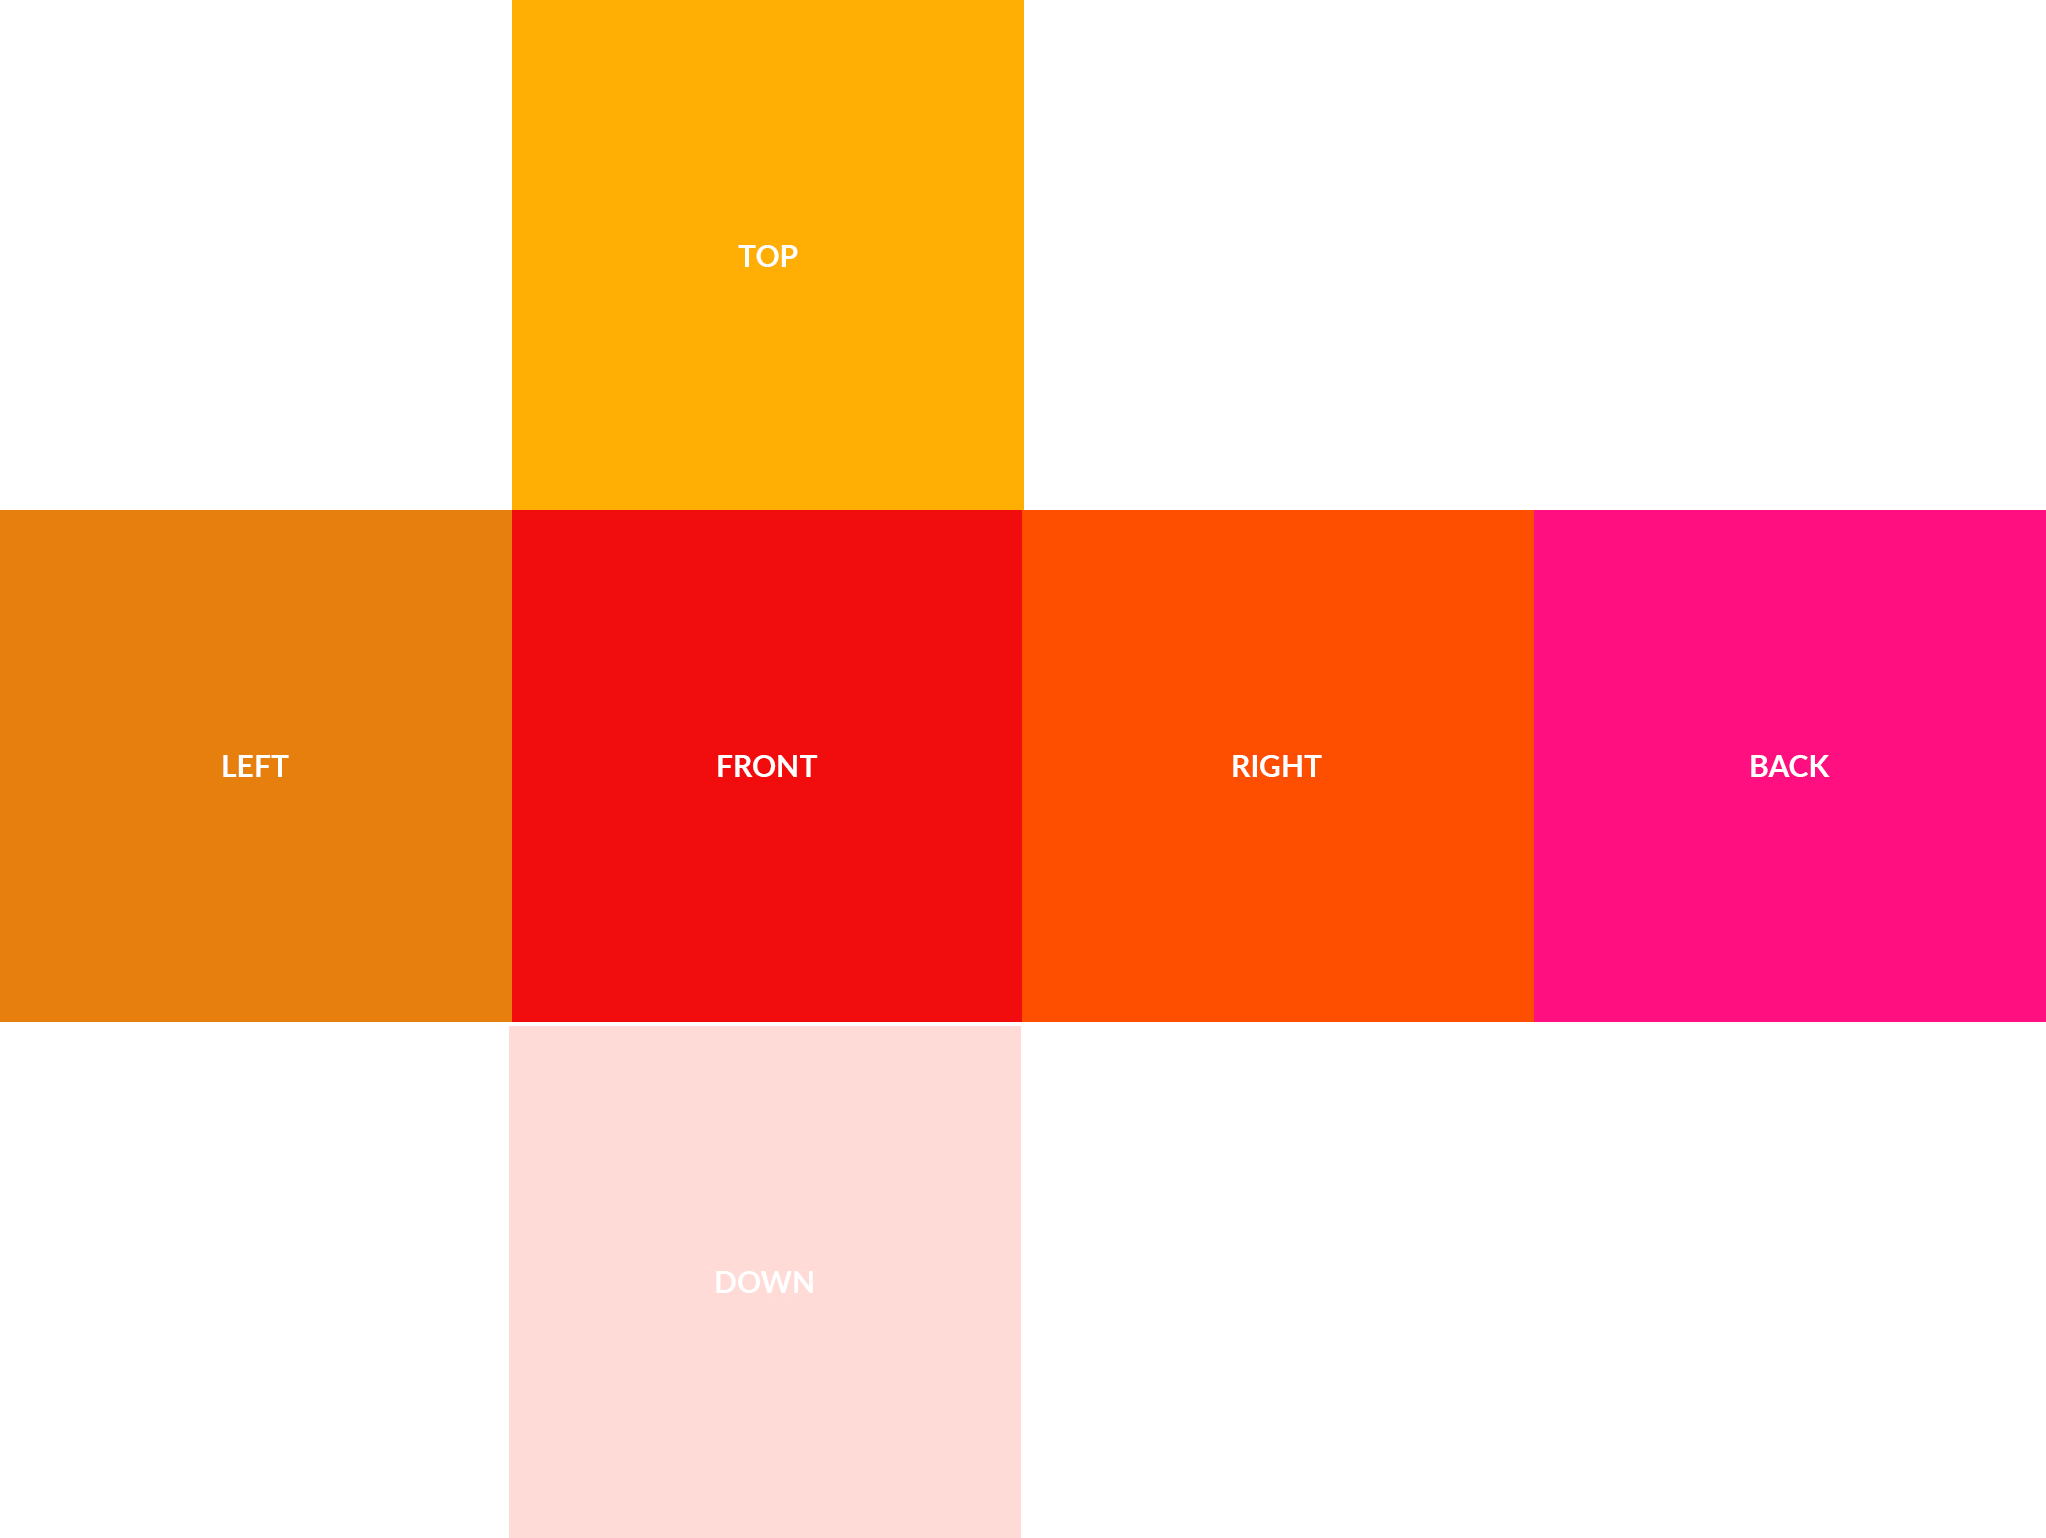
To use this cubemap in React VR, the source attribute of the Pano component must be specified as an array of six individual images presented in the order [+x, -x, +y, -y, +z, -z]. Something like this:
      render() {
  return (
    <View>
      <Pano source={
        {
          uri: [
            '../static_assets/sample_right.jpg',
            '../static_assets/sample_left.jpg',
            '../static_assets/sample_top.jpg',
            '../static_assets/sample_bottom.jpg',
            '../static_assets/sample_back.jpg',
            '../static_assets/sample_front.jpg'
          ]
        }
      } />
    </View>
  );
}
In 2D layouts, the X-axis points to the right and the Y-axis points down, which means that the top left is (0, 0) and the bottom right will be the width and the height of the element at (width, height).
However, in a 3D space, React VR uses the same right-handed coordinate system that OpenGL uses, with positive X pointing to the right, positive Y pointing up, and positive Z pointing forwards towards the user. Because the default view of the user starts out at the origin, this means they'll start out looking in the negative Z direction:
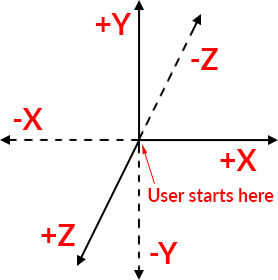
You can read more about the React VR coordinate system here.
This way, our cubicmap (or skybox) will look like this:
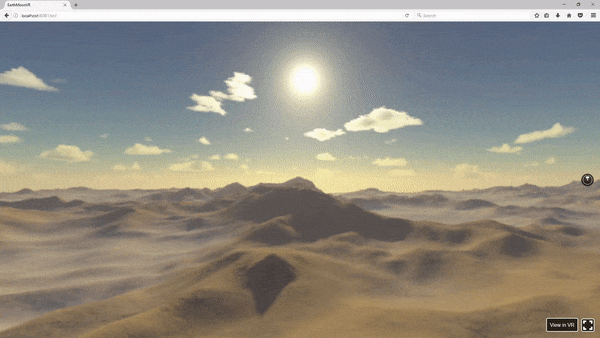
Skyboxes are used a lot with Unity, so there are a lot of places where you can find them for download. For example, I downloaded one of the Sahara desert from this page. When I extract the images and change the code to:
      render() {
  return (
    <View>
      <Pano source={
        {
          uri: [
            '../static_assets/sahara_rt.jpg',
            '../static_assets/sahara_lf.jpg',
            '../static_assets/sahara_up.jpg',
            '../static_assets/sahara_dn.jpg',
            '../static_assets/sahara_bk.jpg',
            '../static_assets/sahara_ft.jpg'
          ]
        }
      } />
    </View>
  );
}
This is the result:
Can you notice that the top and the bottom images don't fit quite right? We can correct them by rotating the top image 90 degrees clockwise and the bottom one 90 degrees counterclockwise:

Now let's create a space skybox for our app.
The best program to this is Spacescape, a free tool for creating space skyboxes (including stars and nebulas) that is available for Windows and Mac.
Using this configuration:
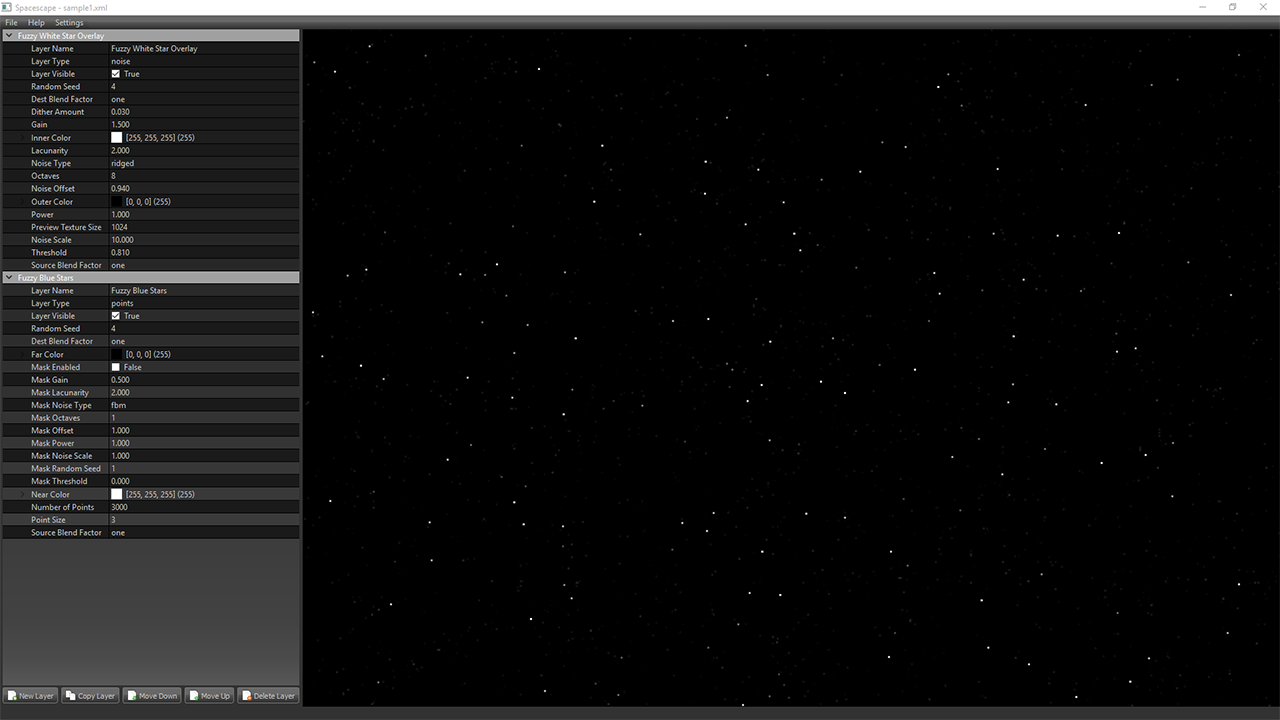
We can export the six images for the skybox:
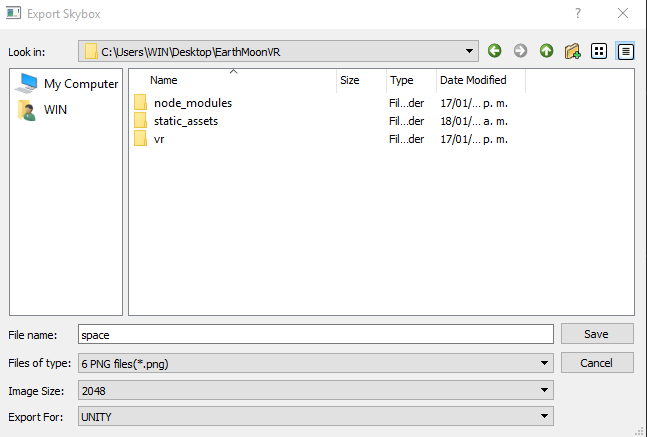
The Export For option in the Export Skybox dialog just applies a particular naming convention, it doesn't produce different images.
If we change the code:
      <Pano
  source={{
    uri: [
      "../static_assets/space_right.png",
      "../static_assets/space_left.png",
      "../static_assets/space_up.png",
      "../static_assets/space_down.png",
      "../static_assets/space_back.png",
      "../static_assets/space_front.png"
    ]
  }}
/>
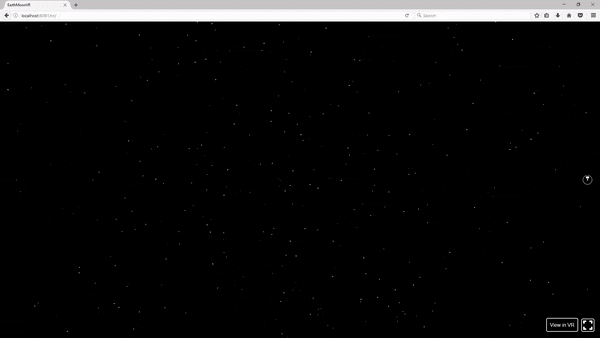
This will be the result:
Now let's talk about 3D models.
3D models
React VR has a Model component that supports the Wavefront .obj file format to represent 3D models.
A mesh is a collection of vertices, edges, and faces that define the shape of a 3D object.
A .obj file is a plain text file that contains coordinates of geometric vertices, texture coordinates, vertex normals and polygonal face elements, among other things.
Typically, a .obj file references an external .mtl file where the materials (or textures) that describe the visual aspect of the polygons are stored.
You can use programs like Blender, 3DS Max, or Maya to create a 3D model and export it to these formats.
There's also a lot of sites where you can download 3D models either for free or at a cost. The following are three of the best ones:
For our app, we're going to use this 3D Earth model and this 3D Moon model from TF3DM.
When we extract the files of the Earth model to the static_assets directory of our app, we can see there's a bunch of images (the textures) along with the .obj and .mtl files. If we open the latter in a text editor, we'll see the material definitions:
      # 3ds Max Wavefront OBJ Exporter v0.97b - (c)2007 guruware
# File Created: 25.01.2016 02:22:51

newmtl 01___Default
    Ns 10.0000
    Ni 1.5000
    d 1.0000
    Tr 0.0000
    Tf 1.0000 1.0000 1.0000
    illum 2
    Ka 0.0000 0.0000 0.0000
    Kd 0.0000 0.0000 0.0000
    Ks 0.0000 0.0000 0.0000
    Ke 0.0000 0.0000 0.0000
    map_Ka C:\Documents and Settings\glenn\Desktop\erth\02\4096\4096_earth.jpg
    map_Kd C:\Documents and Settings\glenn\Desktop\erth\02\4096\4096_earth.jpg
    map_Ke C:\Documents and Settings\glenn\Desktop\erth\02\4096\4096_night_lights.jpg
    map_bump C:\Documents and Settings\glenn\Desktop\erth\02\4096\4096_bump.jpg
    bump C:\Documents and Settings\glenn\Desktop\erth\02\4096\4096_bump.jpg

newmtl 02___Default
    Ns 10.0000
    Ni 1.5000
    d 1.0000
    Tr 0.0000
    Tf 1.0000 1.0000 1.0000
    illum 2
    Ka 0.5882 0.5882 0.5882
    Kd 0.5882 0.5882 0.5882
    Ks 0.0000 0.0000 0.0000
    Ke 0.0000 0.0000 0.0000
    map_Ka C:\Documents and Settings\glenn\Desktop\erth\02\4096\4096_clouds.jpg
    map_Kd C:\Documents and Settings\glenn\Desktop\erth\02\4096\4096_clouds.jpg
    map_d C:\Documents and Settings\glenn\Desktop\erth\02\4096\4096_clouds.jpg
We need to remove the absolute paths to the images so our .obj file can find them. Since we are going to place both files in the same directory, the .mtl file should look like this:
      # 3ds Max Wavefront OBJ Exporter v0.97b - (c)2007 guruware
# File Created: 25.01.2016 02:22:51

newmtl 01___Default
    Ns 10.0000
    Ni 1.5000
    d 1.0000
    Tr 0.0000
    Tf 1.0000 1.0000 1.0000
    illum 2
    Ka 0.0000 0.0000 0.0000
    Kd 0.0000 0.0000 0.0000
    Ks 0.0000 0.0000 0.0000
    Ke 0.0000 0.0000 0.0000
    map_Ka 4096_earth.jpg
    map_Kd 4096_earth.jpg
    map_Ke 4096_night_lights.jpg
    map_bump 4096_bump.jpg
    bump 4096_bump.jpg

newmtl 02___Default
    Ns 10.0000
    Ni 1.5000
    d 1.0000
    Tr 0.0000
    Tf 1.0000 1.0000 1.0000
    illum 2
    Ka 0.5882 0.5882 0.5882
    Kd 0.5882 0.5882 0.5882
    Ks 0.0000 0.0000 0.0000
    Ke 0.0000 0.0000 0.0000
    map_Ka 4096_clouds.jpg
    map_Kd 4096_clouds.jpg
    map_d 4096_clouds.jpg
Now we can add the Model component with the following code:
      <Model
  source={{ obj: asset("earth.obj"), mtl: asset("earth.mtl") }}
  lit={true}
/>
The lit attribute specifies that the materials used in the mesh should work with lights using Phong shading.
Also, don't forget to export the Model component from react-vr:
      import {
  ...
  Model,
} from 'react-vr';
However, if we only add this component to our app, nothing will be shown. What we need, first, is to add a light source.
React VR has four types of light:
- AmbientLight that represents an omni-directional, fixed-intensity and fixed-color light source that affects all objects in the scene equally.
- DirectionalLight that represents a light source which illuminates all objects equally from a given direction.
- PointLight that represents a light originates from a single point, and spreads outward in all directions.
- SpotLight that represents a light originates from a single point, and spreads outward in a cone.
You can try all types of lights to see which one yields the best result for you. In this case, we are going to use an AmbientLight with an intensity value of 2.6:
      import React from "react";
import {
  AppRegistry,
  asset,
  StyleSheet,
  Pano,
  Text,
  View,
  Model,
  AmbientLight
} from "react-vr";

class EarthMoonVR extends React.Component {
  render() {
    return (
      <View>
        ...
        <AmbientLight intensity={2.6} />
        <Model
          source={{ obj: asset("earth.obj"), mtl: asset("earth.mtl") }}
          lit={true}
        />
      </View>
    );
  }
}

AppRegistry.registerComponent("EarthMoonVR", () => EarthMoonVR);
Next, we need to give our model some style properties for placement, size, and rotation. By trying with different values, I came up with the following configuration:
      class EarthMoonVR extends React.Component {
  render() {
    return (
      <View>
        ...
        <Model
          style={{
            transform: [
              { translate: [-25, 0, -70] },
              { scale: 0.05 },
              { rotateY: -130 },
              { rotateX: 20 },
              { rotateZ: -10 }
            ]
          }}
          source={{ obj: asset("earth.obj"), mtl: asset("earth.mtl") }}
          lit={true}
        />
      </View>
    );
  }
}

AppRegistry.registerComponent("EarthMoonVR", () => EarthMoonVR);
Transforms are represented as an array of objects within a style object, and they are applied last to first (remember that the units are meters).
translate positions your model in the x, y, z space, scale gives your model a size, and rotate turns your model around the axes based on the degree measurement provided.
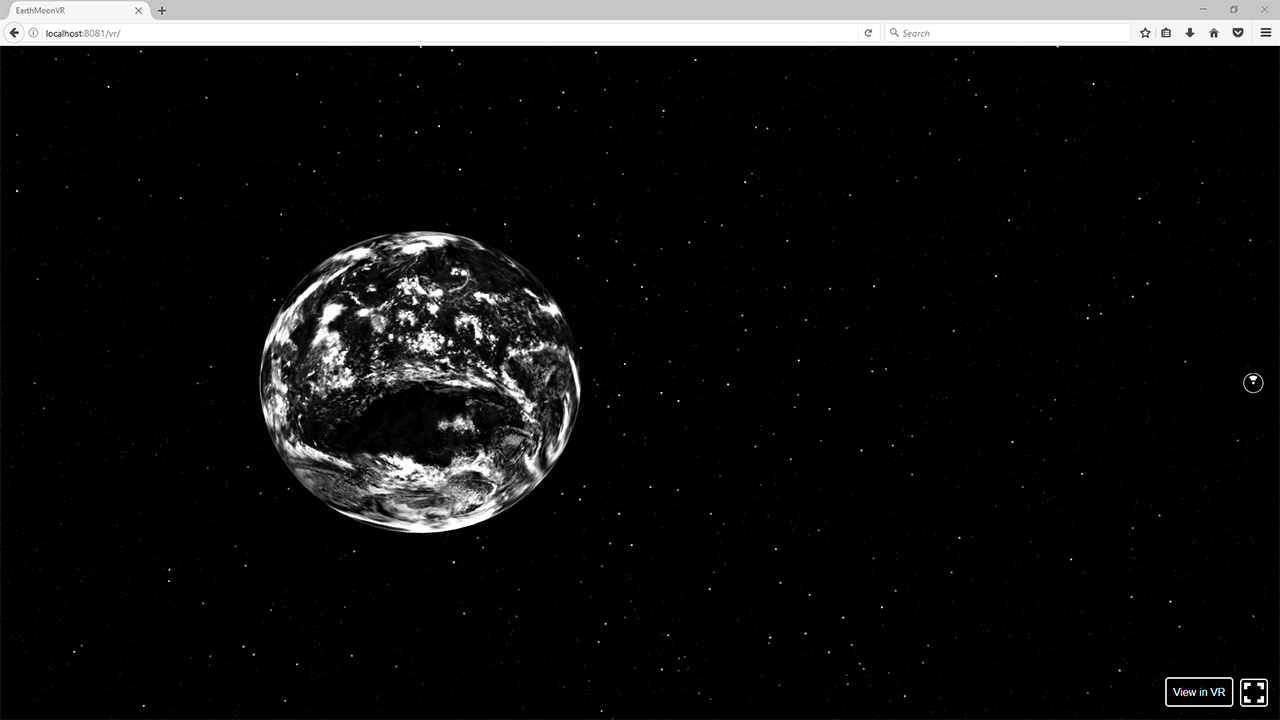
This is the result:
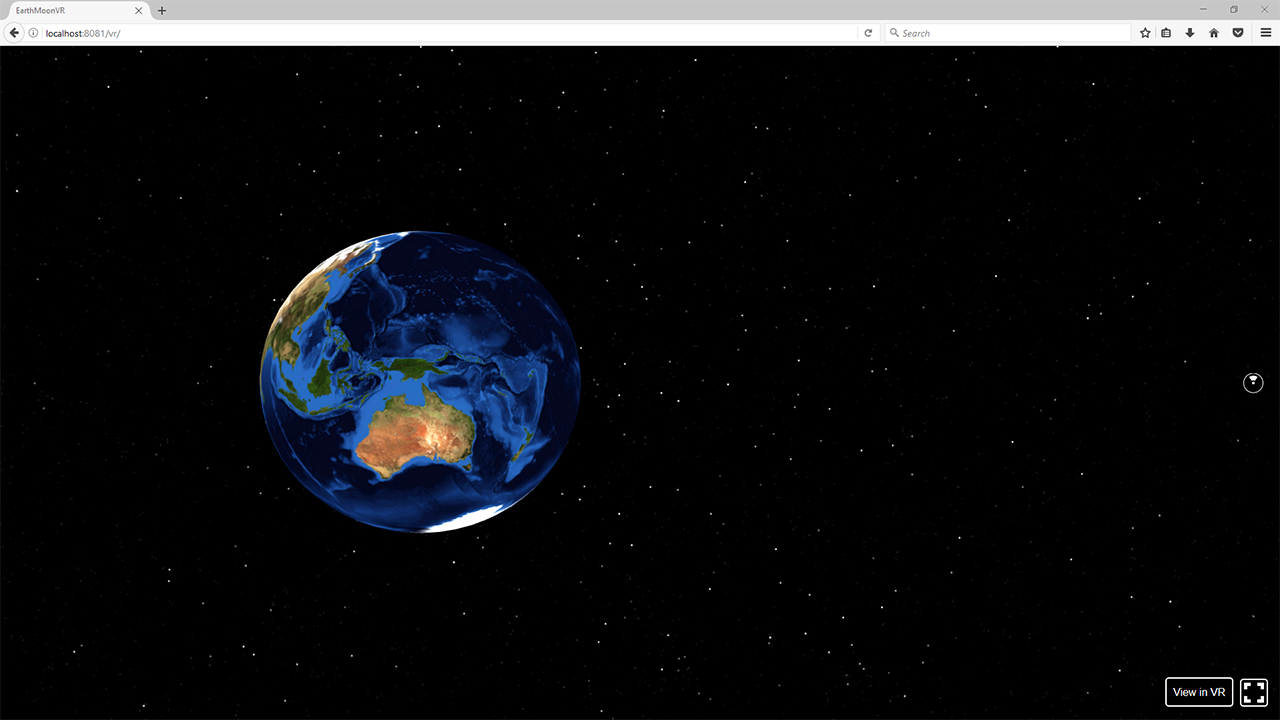
This Earth model has more than one texture we can apply. It comes with the clouds texture by default, but we can change it in the .mtl file by replacing 4096_clouds.jpg in the last three lines with 4096_earth.jpg:
      # 3ds Max Wavefront OBJ Exporter v0.97b - (c)2007 guruware
# File Created: 25.01.2016 02:22:51

newmtl 01___Default
    ...

newmtl 02___Default
    ...
    map_Ka 4096_earth.jpg
    map_Kd 4096_earth.jpg
    map_d 4096_earth.jpg
This is the result:
By the way, if your model doesn't come with a .mtl file, React VR allows you to specify a texture with:
      <Model
  source={{ obj: asset("model.obj"), texture: asset("model.jpg") }}
  lit={true}
/>
We do the same with the Moon model, fixing the texture's path in the .mtl file and trying different values for the scale and placement. You don't need to add another source of light, AmbientLight will work fine for both models.
Here's the code for the Moon model I came up with:
      render() {
    return (
      <View>

        ...

        <Model
          style={{
            transform: [
              {translate: [10, 10, -100]},
              {scale: 0.05},
            ],
          }}
          source={{obj:asset('moon.obj'), mtl:asset('moon.mtl')}}
          lit={true}
        />
      </View>
    );
  }
The result:
If you want to know a little more about 360 panoramas in the context of WebVR, check out the developer documentation at Oculus.
Now let's animate our models.
Animating the models
React VR has an Animated library to compose some types of animation in a simple way.
At this time, only a few components can be animated natively (View with Animated.View, Text with Animated.Text, and Image with Animated.Image). The documentation mentions that you can create custom ones with createAnimatedComponent, but I couldn't find more about it.
Another option is to use requestAnimationFrame, an essential part of JavaScript-based animation APIs.
So what we can do is to have a state property to represent the rotation value on the Y-axis of both models (on the Moon model, let's make the rotation a third of the Earth's rotation to make it slower):
      class EarthMoonVR extends React.Component {
  constructor() {
    super();
    this.state = {
      rotation: 130
    };
  }

  render() {
    return (
      <View>
        ...
        <Model
          style={{
            transform: [
              { translate: [-25, 0, -70] },
              { scale: 0.05 },
              { rotateY: this.state.rotation },
              { rotateX: 20 },
              { rotateZ: -10 }
            ]
          }}
          source={{ obj: asset("earth.obj"), mtl: asset("earth.mtl") }}
          lit={true}
        />
        <Model
          style={{
            transform: [
              { translate: [10, 10, -100] },
              { scale: 0.05 },
              { rotateY: this.state.rotation / 3 }
            ]
          }}
          source={{ obj: asset("moon.obj"), mtl: asset("moon.mtl") }}
          lit={true}
        />
      </View>
    );
  }
}
Now let's code a rotate function that will be called every frame through the requestAnimationFrame function, updating the rotation on a time measurement basis:
      class EarthMoonVR extends React.Component {
  constructor() {
    super();
    this.state = {
      rotation: 130,
    };
    this.lastUpdate = Date.now();

    this.rotate = this.rotate.bind(this);
  }

  rotate() {
    const now = Date.now();
    const delta = now - this.lastUpdate;
    this.lastUpdate = now;

    this.setState({
        rotation: this.state.rotation + delta / 150
    });
    this.frameHandle = requestAnimationFrame(this.rotate);
  }

  ...
}
The magic number 150 just controls the rotation speed (the greater this number, the slower the rotation speed). We save the handler returned by requestAnimationFrame so we can cancel the animation when the component unmounts and start the rotation animation on componentDidMount:
      class EarthMoonVR extends React.Component {
  constructor() {
    super();
    this.state = {
      rotation: 130,
    };
    this.lastUpdate = Date.now();

    this.rotate = this.rotate.bind(this);
  }

  componentDidMount() {
    this.rotate();
  }

  componentWillUnmount() {
    if (this.frameHandle) {
      cancelAnimationFrame(this.frameHandle);
      this.frameHandle = null;
    }
  }

  rotate() {
    const now = Date.now();
    const delta = now - this.lastUpdate;
    this.lastUpdate = now;

    this.setState({
        rotation: this.state.rotation + delta / 150
    });
    this.frameHandle = requestAnimationFrame(this.rotate);
  }

  ...
}
This is the result (you may not notice it, but the moon is rotating very slowly):
Now let's add some buttons to make this a little more interactive.
Styling and Buttons
Create a new component for our buttons. In practice, we can use either a View or a VrButton, as both can be styled as buttons and have useful events (like onEnter) for this purpose.
However, we'll use a VrButton because it has a different state machine and adds the events onClick and onLongClick.
Also, to organize things a little bit, we're going to use a StyleSheet to create a style object so we can reference a style by ID.
This is what the button.js file contains:
      import React from "react";
import { StyleSheet, Text, VrButton } from "react-vr";

export default class Button extends React.Component {
  constructor() {
    super();
    this.styles = StyleSheet.create({
      button: {
        margin: 0.05,
        height: 0.4,
        backgroundColor: "red"
      },
      text: {
        fontSize: 0.3,
        textAlign: "center"
      }
    });
  }

  render() {
    return (
      <VrButton
        style={this.styles.button}
        onClick={() => this.props.callback()}
      >
        <Text style={this.styles.text}>{this.props.text}</Text>
      </VrButton>
    );
  }
}
A VrButton has no appearance, so we have to give it a style. It can also wrap an Image or a Text component. Also, we pass the function to be executed when the button is clicked as a property of the component, as well as its text.
Now, in our root component, we import this Button component and in the render method, we add two buttons wrapped in a View:
      ...
import Button from './button.js';

class EarthMoonVR extends React.Component {
  ...

  render() {
    return (
      <View>
        ...

        <AmbientLight intensity={ 2.6 }  />

        <View>
          <Button text='+'  />
          <Button text='-'  />
        </View>

        ...
      </View>
    );
  }
};
These buttons will represent a zoom control by changing the value of the model's Z-axis, so let's add a state property called zoom with the initial value of -70 (Earth's Z-axis value), the callbacks to increase/decrease it, and modify the models to use it:
      class EarthMoonVR extends React.Component {
  constructor() {
    super();
    this.state = {
      rotation: 130,
      zoom: -70,
    };
    ...
  }

  render() {
    return (
      <View>

       ...

        <View>
          <Button text='+'
            callback={() => this.setState((prevState) => ({ zoom: prevState.zoom + 10 }) ) } />
          <Button text='-'
            callback={() => this.setState((prevState) => ({ zoom: prevState.zoom - 10 }) ) } />
        </View>

        <Model
          style={{
            transform: [
              {translate: [-25, 0, this.state.zoom]},
              {scale: 0.05 },
              {rotateY: this.state.rotation},
              {rotateX: 20},
              {rotateZ: -10}
            ],
          }}
          source={{obj:asset('earth.obj'), mtl:asset('earth.mtl')}}
          lit={true}
        />

        <Model
          style={{
            transform: [
              {translate: [10, 10, this.state.zoom - 30]},
              {scale: 0.05},
              {rotateY: this.state.rotation / 3},
            ],
          }}
          source={{obj:asset('moon.obj'), mtl:asset('moon.mtl')}}
          lit={true}
        />
      </View>
    );
  }
};
Now let's style the View that wraps our buttons using flexbox and StyleSheet.create:
      class EarthMoonVR extends React.Component {
  constructor() {
    super();
    ...
    this.styles = StyleSheet.create({
      menu: {
        flex: 1,
        flexDirection: 'column',
        width: 1,
        alignItems: 'stretch',
        transform: [{translate: [2, 2, -5]}],
      },
    });
    ...
  }

  render() {
    return (
      <View>
        ...

        <View style={ this.styles.menu }>
          <Button text='+'
            callback={() => this.setState((prevState) => ({ zoom: prevState.zoom + 10 }) ) } />
          <Button text='-'
            callback={() => this.setState((prevState) => ({ zoom: prevState.zoom - 10 }) ) } />
        </View>

        ...

      </View>
    );
  }
};
In a flexbox layout, children can be arranged vertically with flexDirection:'column' or horizontally with flexDirection:'row'. The example sets a flexbox of one column, with a width of one meter and a stretch alignment, which means that the elements will take the width of the container.
Check this page on the React Native documentation and this one on the React VR documentation to know more about flexbox layouts.
Finally, we can take the skybox images out of the render method so it doesn't look so crowded:
      import React from "react";
import {
  AppRegistry,
  asset,
  StyleSheet,
  Pano,
  Text,
  View,
  Model,
  AmbientLight
} from "react-vr";
import Button from "./button.js";

class EarthMoonVR extends React.Component {
  constructor() {
    super();
    this.state = {
      rotation: 130,
      zoom: -70
    };
    this.lastUpdate = Date.now();
    this.spaceSkymap = [
      "../static_assets/space_right.png",
      "../static_assets/space_left.png",
      "../static_assets/space_up.png",
      "../static_assets/space_down.png",
      "../static_assets/space_back.png",
      "../static_assets/space_front.png"
    ];
    this.styles = StyleSheet.create({
      menu: {
        flex: 1,
        flexDirection: "column",
        width: 1,
        alignItems: "stretch",
        transform: [{ translate: [2, 2, -5] }]
      }
    });

    this.rotate = this.rotate.bind(this);
  }

  componentDidMount() {
    this.rotate();
  }

  componentWillUnmount() {
    if (this.frameHandle) {
      cancelAnimationFrame(this.frameHandle);
      this.frameHandle = null;
    }
  }

  rotate() {
    const now = Date.now();
    const delta = now - this.lastUpdate;
    this.lastUpdate = now;

    this.setState({
      rotation: this.state.rotation + delta / 150
    });
    this.frameHandle = requestAnimationFrame(this.rotate);
  }

  render() {
    return (
      <View>
        <Pano source={{ uri: this.spaceSkymap }} />

        <AmbientLight intensity={2.6} />

        <View style={this.styles.menu}>
          <Button
            text="+"
            callback={() =>
              this.setState(prevState => ({ zoom: prevState.zoom + 10 }))
            }
          />
          <Button
            text="-"
            callback={() =>
              this.setState(prevState => ({ zoom: prevState.zoom - 10 }))
            }
          />
        </View>

        <Model
          style={{
            transform: [
              { translate: [-25, 0, this.state.zoom] },
              { scale: 0.05 },
              { rotateY: this.state.rotation },
              { rotateX: 20 },
              { rotateZ: -10 }
            ]
          }}
          source={{ obj: asset("earth.obj"), mtl: asset("earth.mtl") }}
          lit={true}
        />

        <Model
          style={{
            transform: [
              { translate: [10, 10, this.state.zoom - 30] },
              { scale: 0.05 },
              { rotateY: this.state.rotation / 3 }
            ]
          }}
          source={{ obj: asset("moon.obj"), mtl: asset("moon.mtl") }}
          lit={true}
        />
      </View>
    );
  }
}

AppRegistry.registerComponent("EarthMoonVR", () => EarthMoonVR);
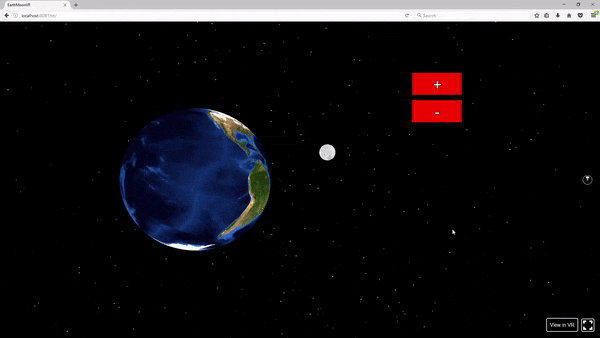
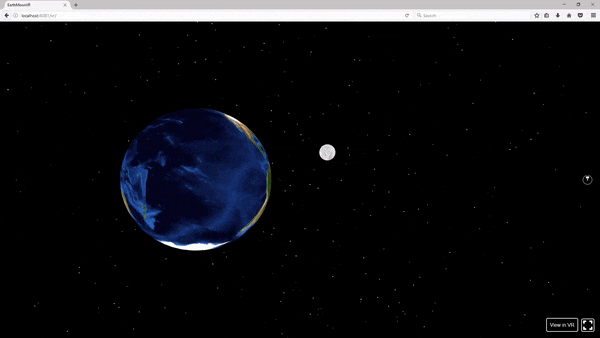
If we test the application, we'll see the buttons in action:

Conclusion
As you saw, React VR is a library that allows you to create VR experiences in a fast and easy way.
There are alternatives with a more complete feature set and bigger community, like A-Frame. However, if you just want to make VR apps around 360 panos, 3D models, and simple animations, and you already know React/React Native, then React VR is an excellent choice. If you found ReactVR to be a good springboard, feel free to experiment with more advanced VR platforms as well.
Remember that you can find the source code of the app on GitHub.
Thanks for reading!
Advance your tech skills today
Access courses on AI, cloud, data, security, and more—all led by industry experts.
