Getting Started with Selenium and Sauce Labs
In this Selenium training, you'll learn the basics of how to create a Selenium test and run it in the cloud with Sauce Labs. Start Learning today!
Jan 10, 2019 • 44 Minute Read
Introduction
As developers, we are used to unit or class tests or other components. Sometimes, however, functionality must be tested at the user interface (UI) level. UI testing is especially necessary when developing web applications. Selenium is a tool that automates this kind of testing.
In this tutorial, you'll learn how to create a Selenium test through the following steps:
- Using the Selenium IDE, a Firefox plugin that records user actions on the browser so that they can be replayed later.
- Exporting our test into Java code and redesigning it using the Page Object pattern.
- Modifying the test so it can run in the cloud using Sauce Labs.
As mentioned, we'll use Java to code the tests, but the tools, such as the Selenium IDE and Sauce Labs, and the concepts we cover, such as the Page Object pattern, apply to all other languages supported by Selenium (Ruby, C#, Python, Node.js, JavaScript, and PHP).
The source code for all the tests is available on Github.
Requirements
Java Environment
You must have JDK 1.6 or higher installed.
We'll use Eclipse and Maven, so you should have these installed too.
Selenium IDE
We'll need the Selenium IDE to record/play tests on the browser. It is available as a Firefox plugin, so make sure you have the Firefox browser installed.
Go to https://docs.seleniumhq.org/download/ and scroll down the page until you find the Selenium IDE section:
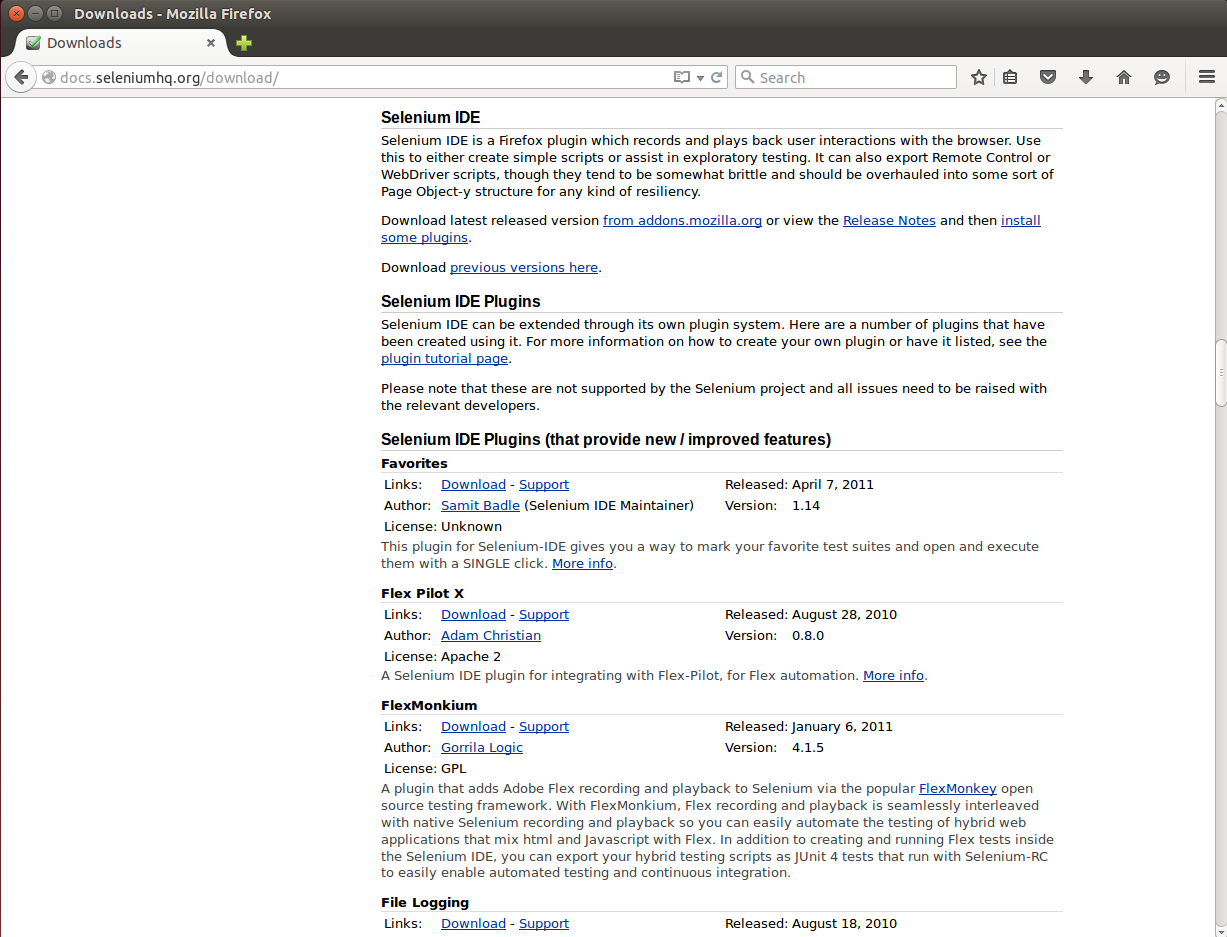
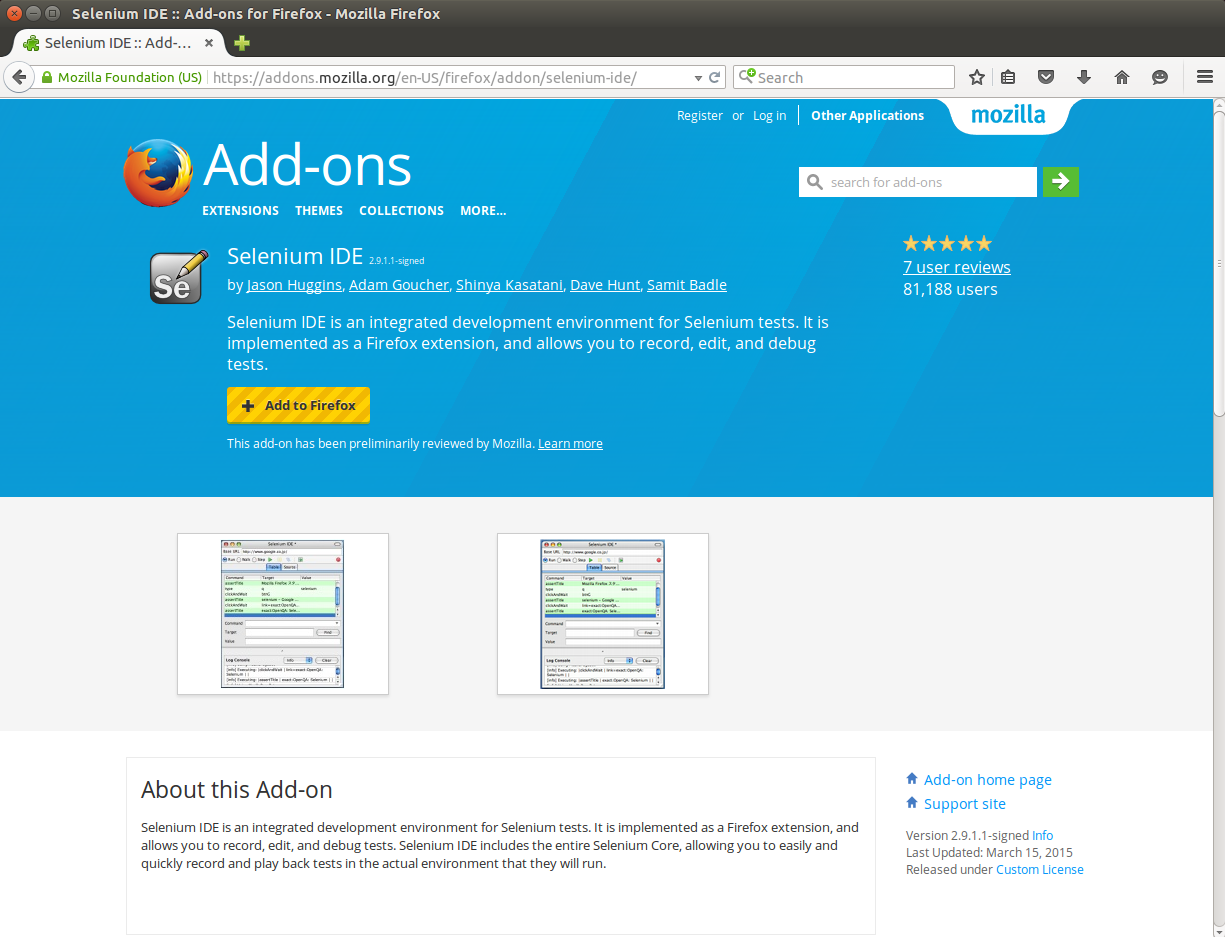
Click the link to download the plugin and install it:
Upon restarting the browser, you can start the Selenium IDE with this toolbar button:

Or from the Tools menu:

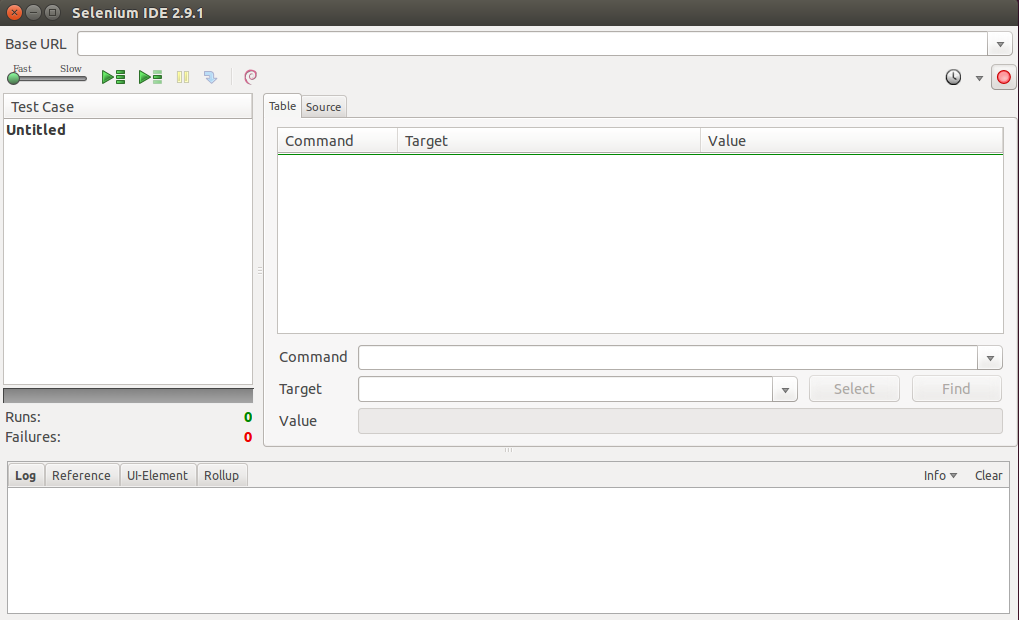
Open the Selenium IDE with either option to check it was installed properly:
Sauce Labs
We'll need Sauce Labs to run the test in the cloud.
You can either sign up for a 14-day free trial or for a free account if you want to test an open-source project. For the latter, you need the repository URL of the project. Go to https://saucelabs.com/opensauce/ to fill the details.
Once you have access to Sauce Labs, go to the My Account option and look for your Access Key:

Save it as we'll need it later.
The Record and Playback pattern
As its name implies, this pattern is about allowing the users to record their interactions with an application and playing them back later.
This provides an easy start to testing since it doesn't require any experience with a programming language, not to mention that it's a fast way to build a test suite.
To show how the Record/Playback style of writing tests works, we're going to use the Selenium IDE and the first lesson of a Markdown tutorial that you can find here. To enter the first lesson of the tutorial, go here:
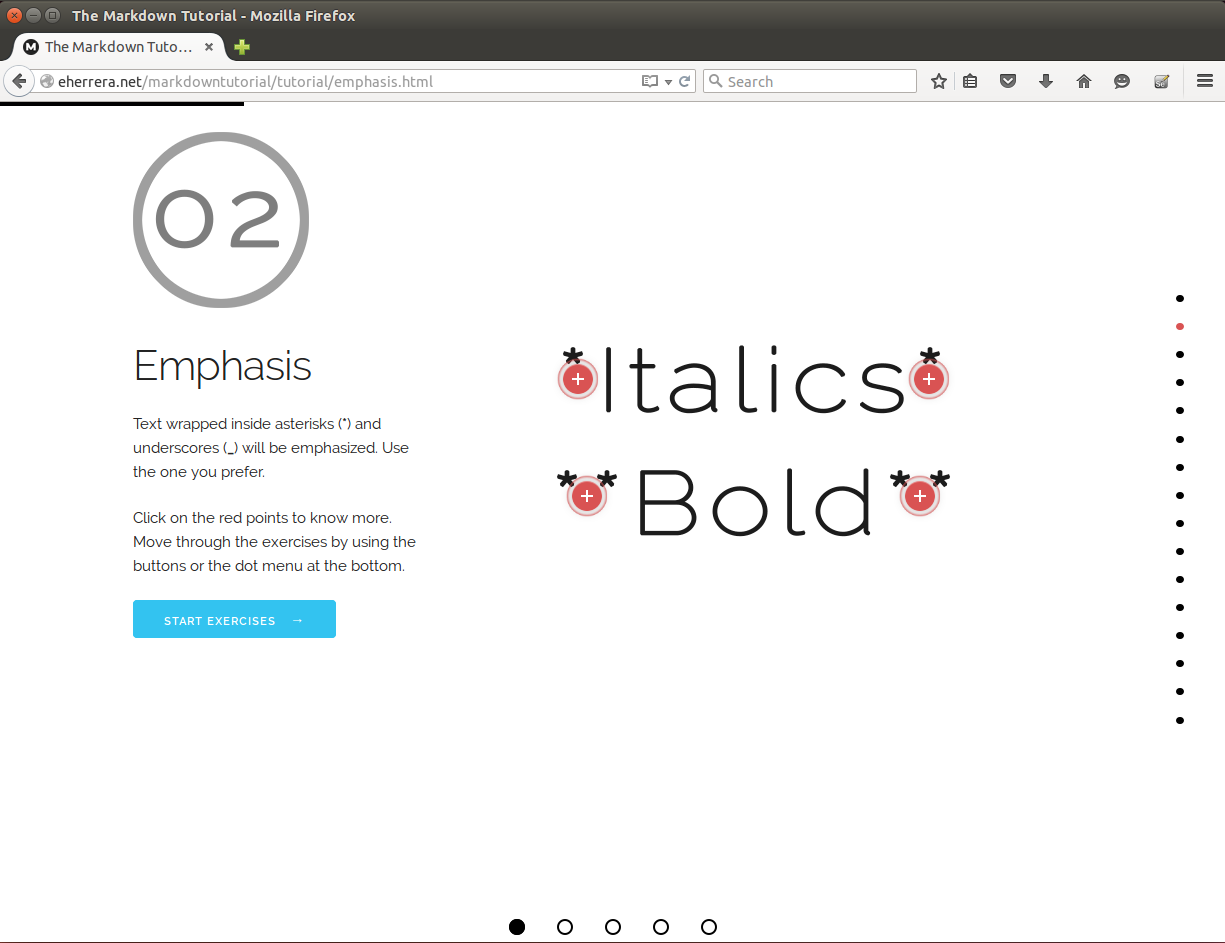
Now open the Selenium IDE. It will start recording all our actions, so click on the Start Exercises button. You'll notice that two commands will be recorded:
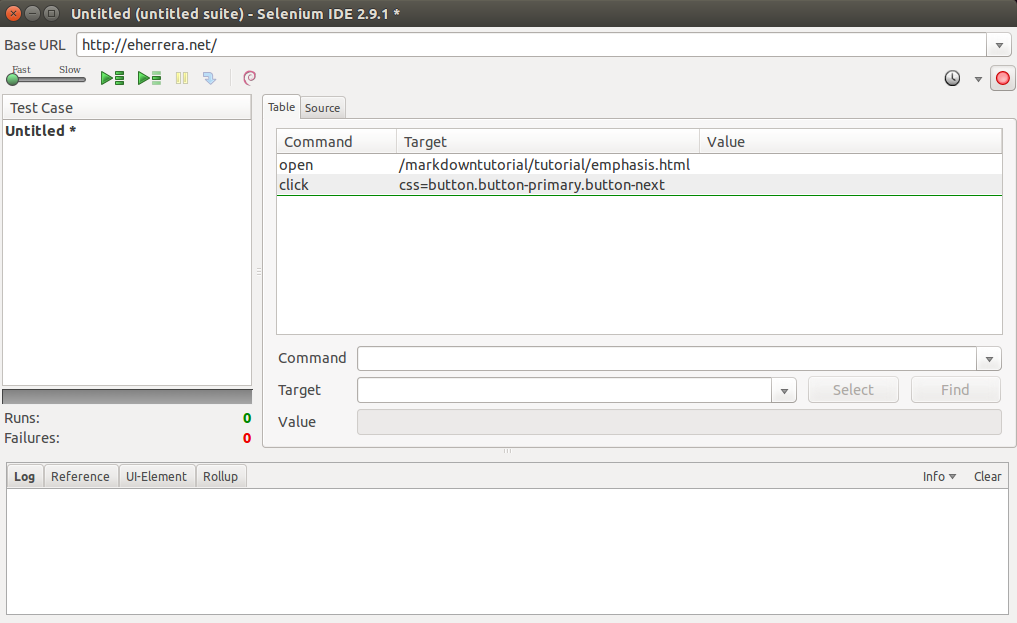
These commands tell Selenium what to do. For now, just notice how everything you do in the browser is recorded.
Back to the page, it now presents the first exercise. Let's verify this. We have some options to do it, for example:
- We can check that the text "In this exercise, make the words "American Oxygen" bold" is shown.
- We can check that the text box where we enter the solution is shown.
- We can check that the button for revealing the answer is shown.
Let's think about what is more convenient. The text can change in future revisions of the page, so maybe is not a good choice. The other two options sound like they should always be present at this point of the flow. Maybe the text box is more permanent than the answer button (which could disappear under some conditions). However, for demonstration purposes, let's choose to verify the existence of the button.
If we right-click the Show me the answer button and choose Show All Available Commands, the following menu will be shown:
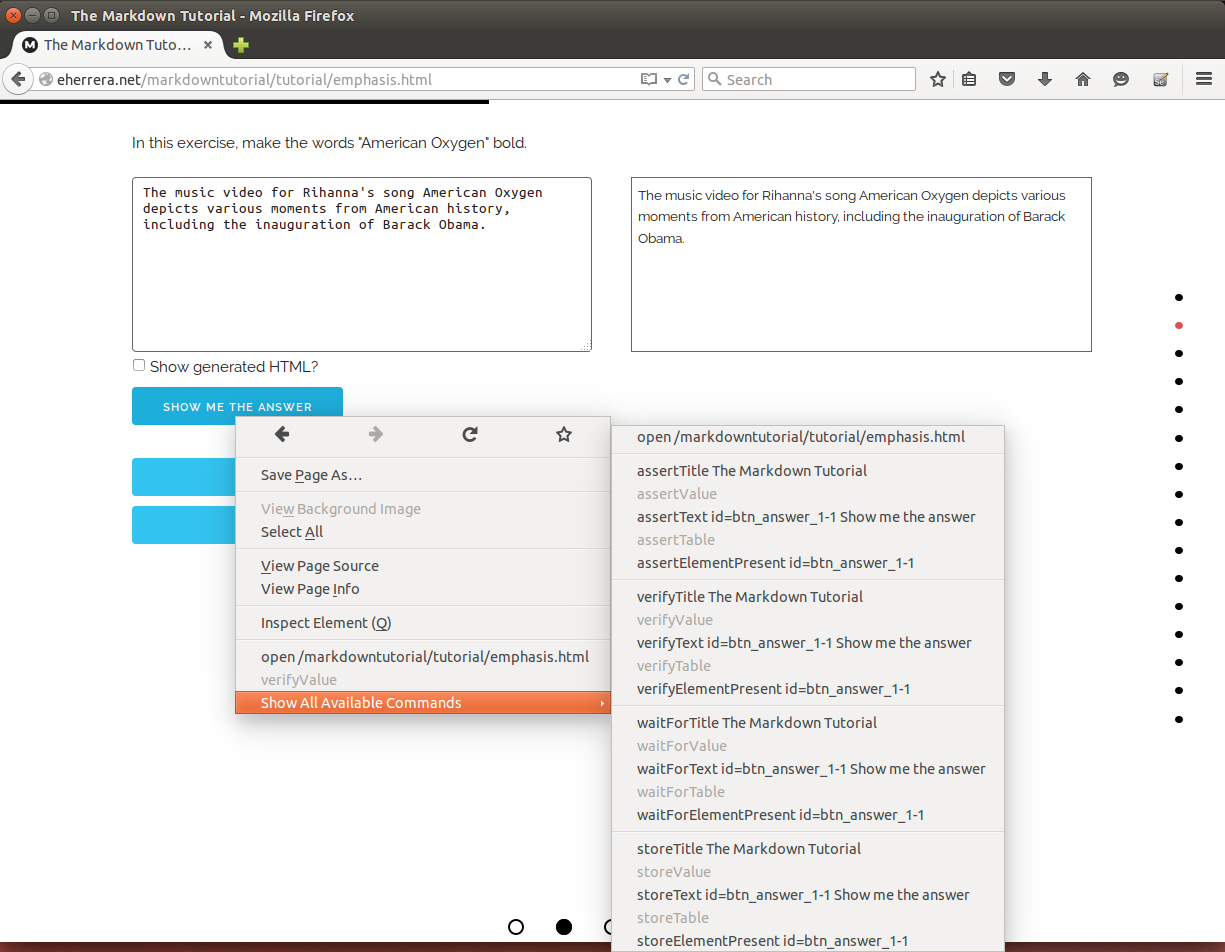
The context menu shows some suggested commands with parameters for testing the current element/page. There are three types of Selenium commands:
- Actions are commands that do things, such as clicking buttons of links. If an Action fails for some reason, the execution of the current test is stopped.
- Accessors examine the state of the application and store the results in variables, such as storeTitle.
- Assertions check that the state of the application is the same as the expected state. There are three types of assertions:
- assert which aborts the test when the assertion fails. - verify which doesn't abort the test when the assertion fails but logs the failure instead. - waitFor which waits for some condition to become true (useful for testing AJAX applications). waitFor assertions will succeed immediately if the condition is already true, but will fail and halt the test if the condition does not become true within the current timeout setting.
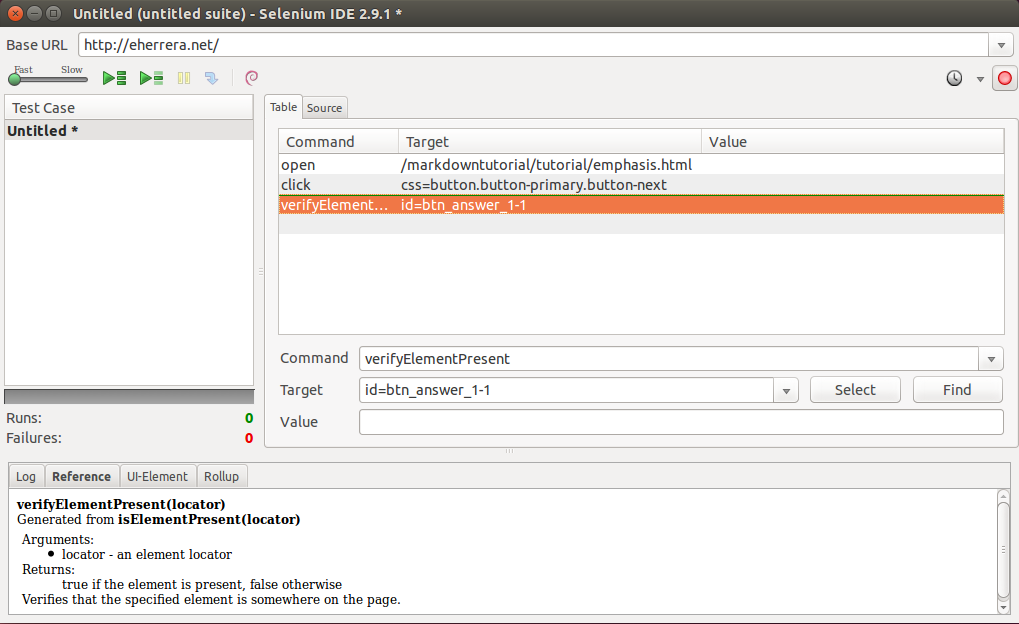
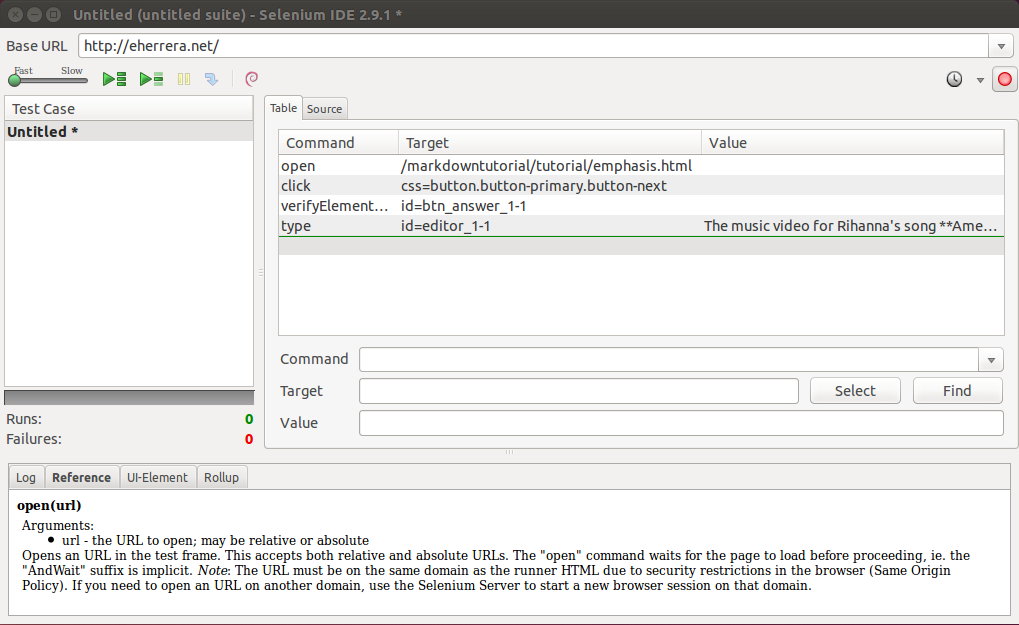
So let's choose verifyElementPresent. The Selenium IDE window will be updated to show this:
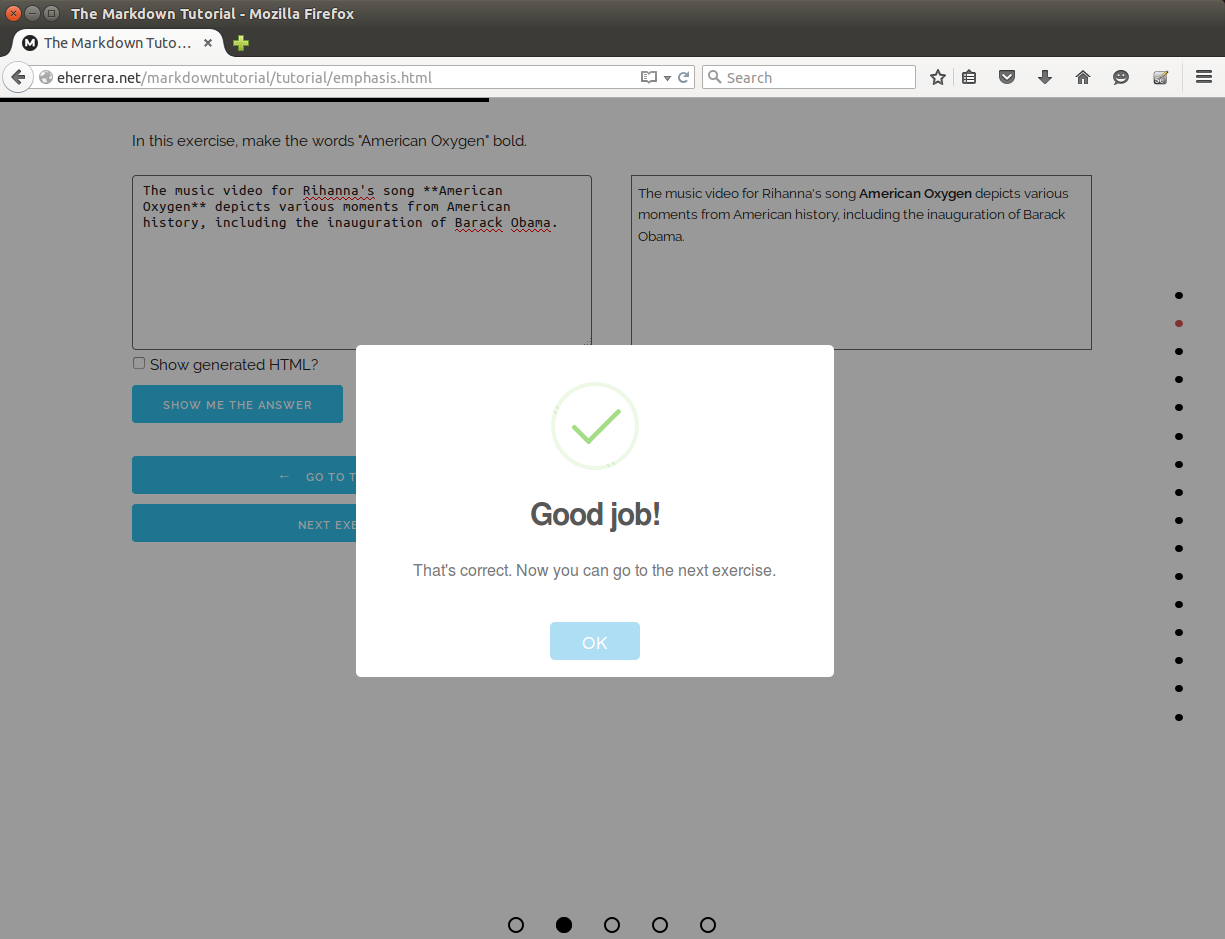
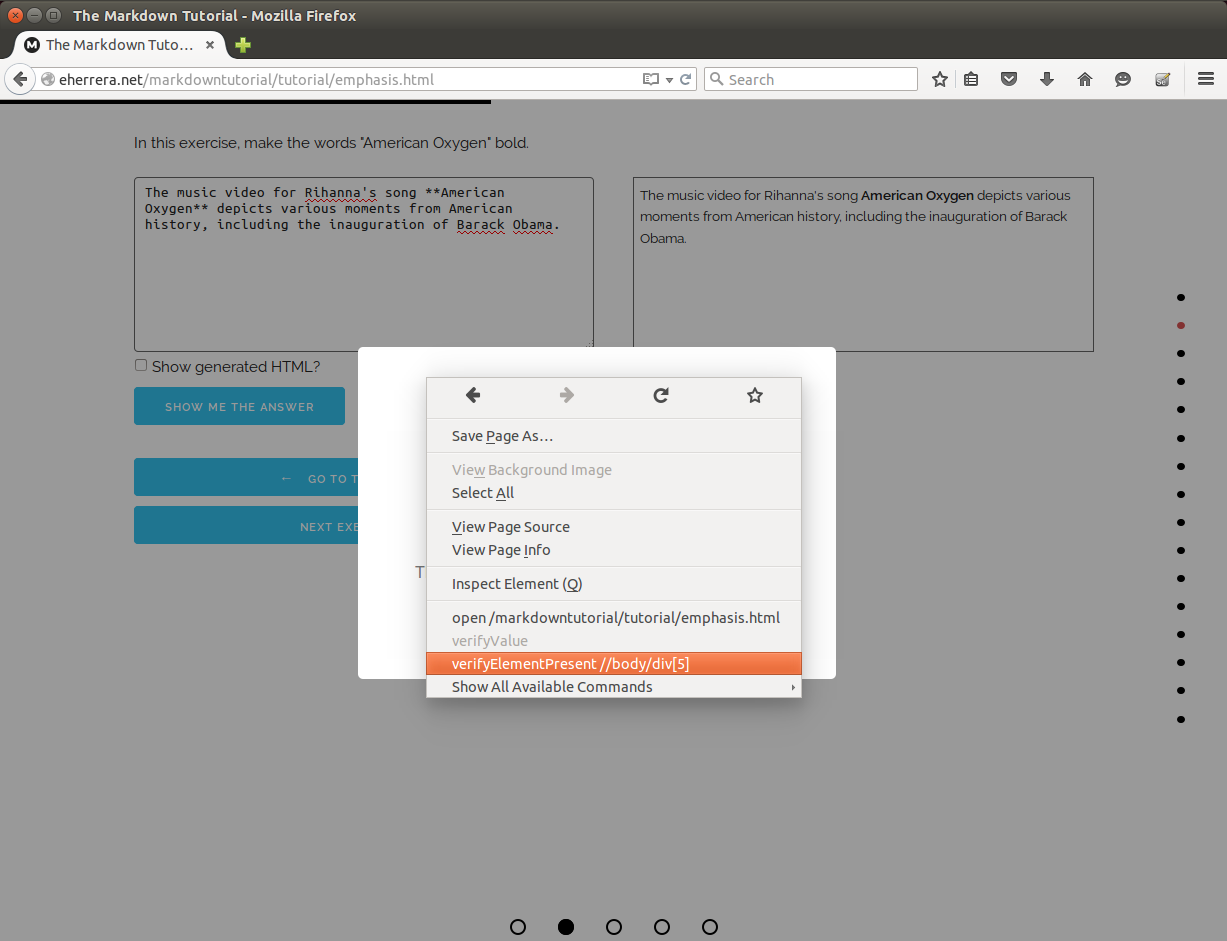
Now let's do the exercise and make the words "American Oxygen" bold by surrounding them with **. Once we do this, the following popup will be shown:
And the Selenium IDE window will be updated to show the command to input the text:
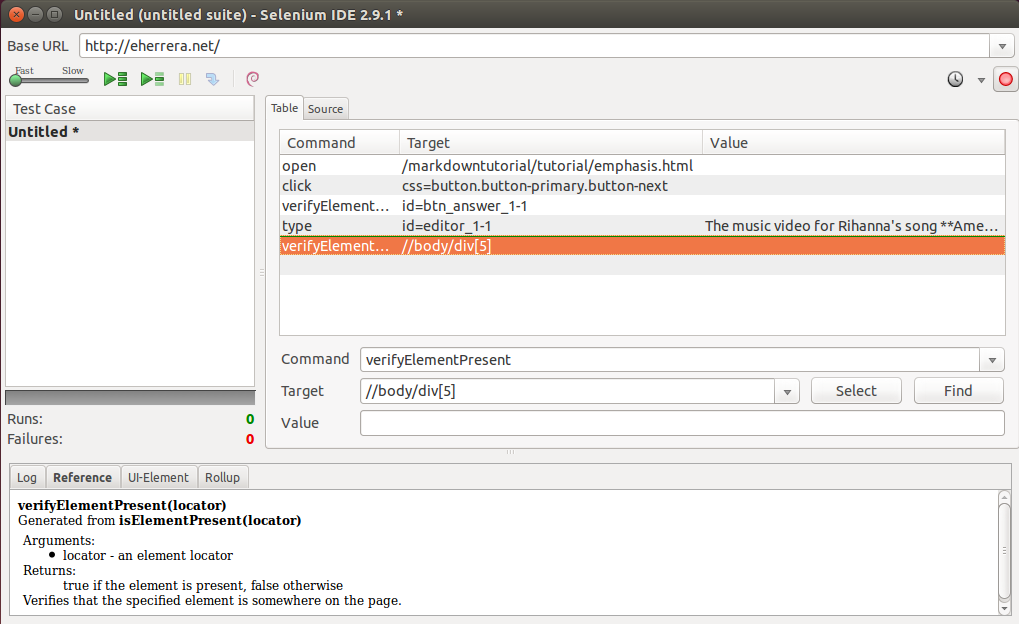
Now let's add another verification. Right-click the popup window and choose verifyElementPresent //body/div[5] (notice that the command was added to the main contextual menu. As you use the IDE, Selenium will try to predict the command you'll want to use):
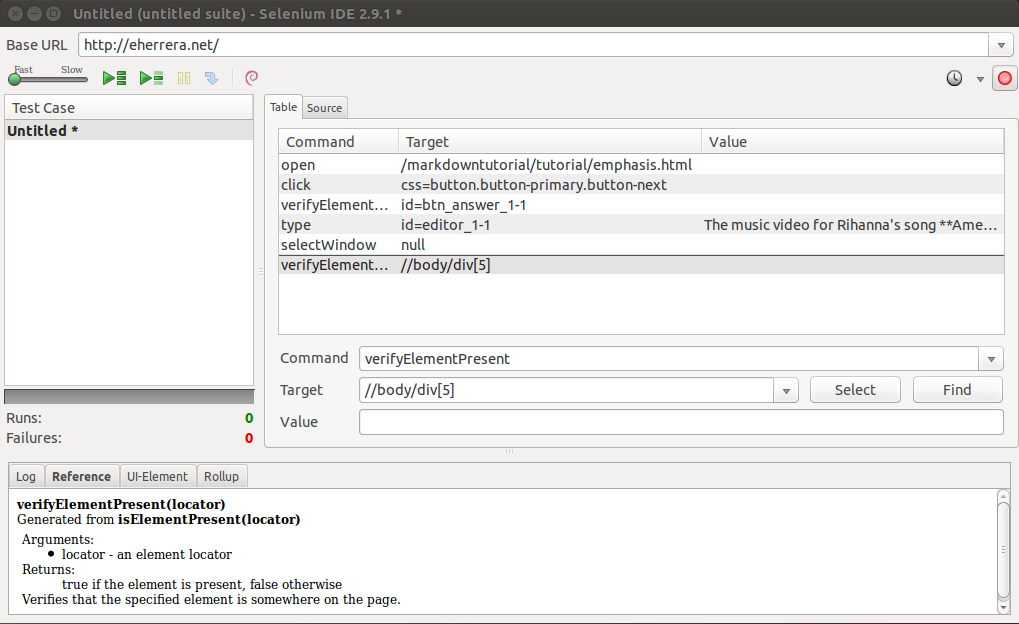
Again, the Selenium IDE window will be updated:
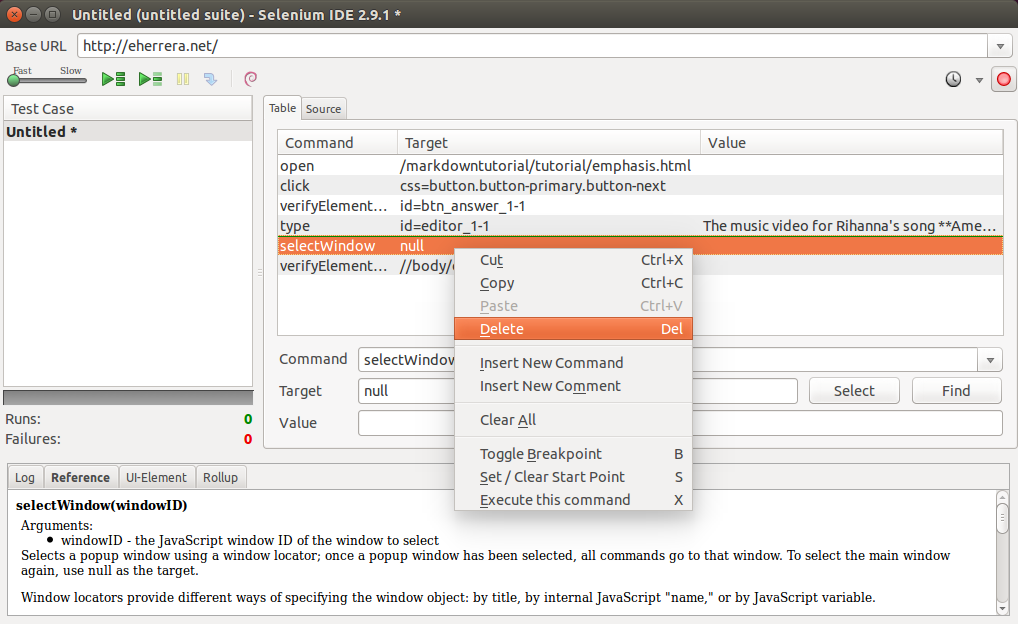
Notice that in this case, a selectWindow command was added. We can delete this command by selecting it with a right-click and choosing the Delete option:
At this point, the Selenium IDE window should look like this:
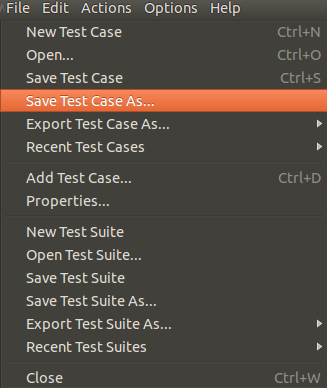
Now stop recording and save the test case by going to the File menu and choosing the Save Test Case As... option:
The test case will be saved as an HTML file. This is how the saved file looks like:
      <?xml version="1.0" encoding="UTF-8"?>
<!DOCTYPE html PUBLIC "-//W3C//DTD XHTML 1.0 Strict//EN" "http://www.w3.org/TR/xhtml1/DTD/xhtml1-strict.dtd">
<html xmlns="http://www.w3.org/1999/xhtml" xml:lang="en" lang="en">
<head profile="http://selenium-ide.openqa.org/profiles/test-case">
<meta http-equiv="Content-Type" content="text/html; charset=UTF-8" />
<link rel="selenium.base" href="http://eherrera.net/" />
<title>sample-test-case-selenium-ide</title>
</head>
<body>
<table cellpadding="1" cellspacing="1" border="1">
<thead>
<tr><td rowspan="1" colspan="3">sample-test-case-selenium-ide</td></tr>
</thead><tbody>
<tr>
	<td>open</td>
	<td>/markdowntutorial/tutorial/emphasis.html</td>
	<td></td>
</tr>
<tr>
	<td>click</td>
	<td>css=button.button-primary.button-next</td>
	<td></td>
</tr>
<tr>
	<td>verifyElementPresent</td>
	<td>id=btn_answer_1-1</td>
	<td></td>
</tr>
<tr>
	<td>type</td>
	<td>id=editor_1-1</td>
	<td>The music video for Rihanna's song **American Oxygen** depicts various moments from American history, including the inauguration of Barack Obama.</td>
</tr>
<tr>
	<td>verifyElementPresent</td>
	<td>//body/div[5]</td>
	<td></td>
</tr>

</tbody></table>
</body>
</html>
To execute the test, choose the first command (open), and click one of the green arrow buttons of the top-left corner of the window. The first green button will play the entire suite of tests, and the second will only play the current test.
When you do it, you'll see that the test fails:
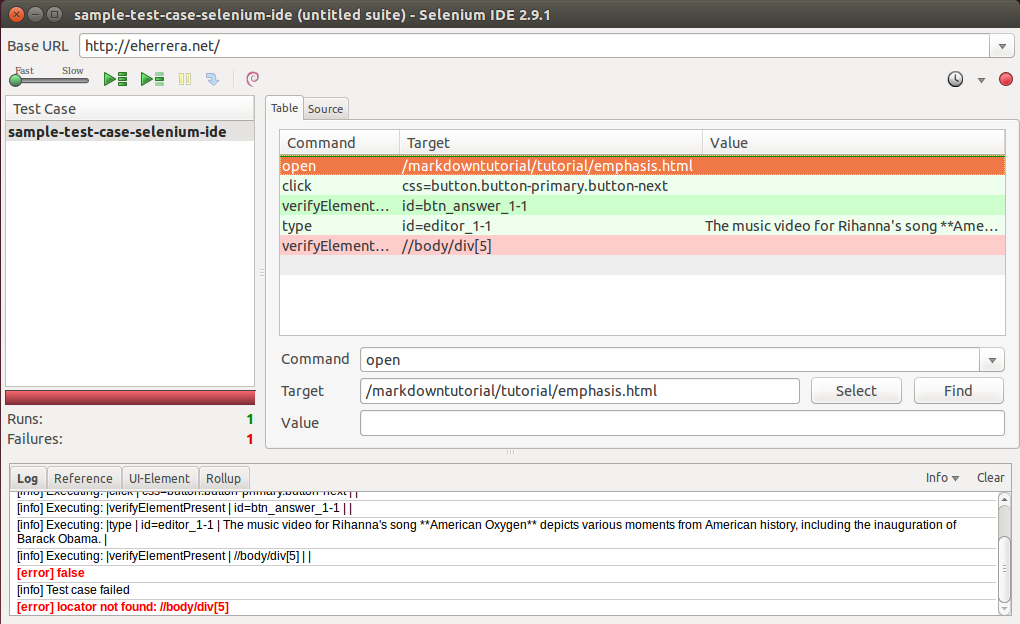
Look at the Log tab at the bottom of the IDE window, and the browser. The problem is that the correct answer's popup didn't show up.
Let's analyze how the page works. When the user writes something in the text box, the markdown is generated and compared to the answer to the exercise, which is stored in an array. If there's a match, the popup is shown. Here's the piece of code that does this:
      // Set up markdown editors
$(".editor").each(function() {
  var elementId = $(this)[0].id;
  var exerciseId = getExerciseId(elementId);

  // Set up event to update markdown/html when the user writes something
  $(this).on("keyup", function(event) {
    var md = generateMd(exerciseId);

    if (
      exercises[exerciseId] != undefined &&
      md.trim() == exercises[exerciseId]["answer"]
    ) {
      if (exerciseId == "15-1") {
        swal({
          title: "Excellent job!",
          text: "You are now a Markdown Master",
          type: "success"
        });
      } else {
        swal({
          title: "Good job!",
          text: "That's correct. Now you can go to the next exercise.",
          type: "success"
        });
      }
    }
  });

  // For the initial text
  generateMd(exerciseId);
});
As you can see, the magic happens in the keyup event, so we need to fire this event in the test before the verification step.
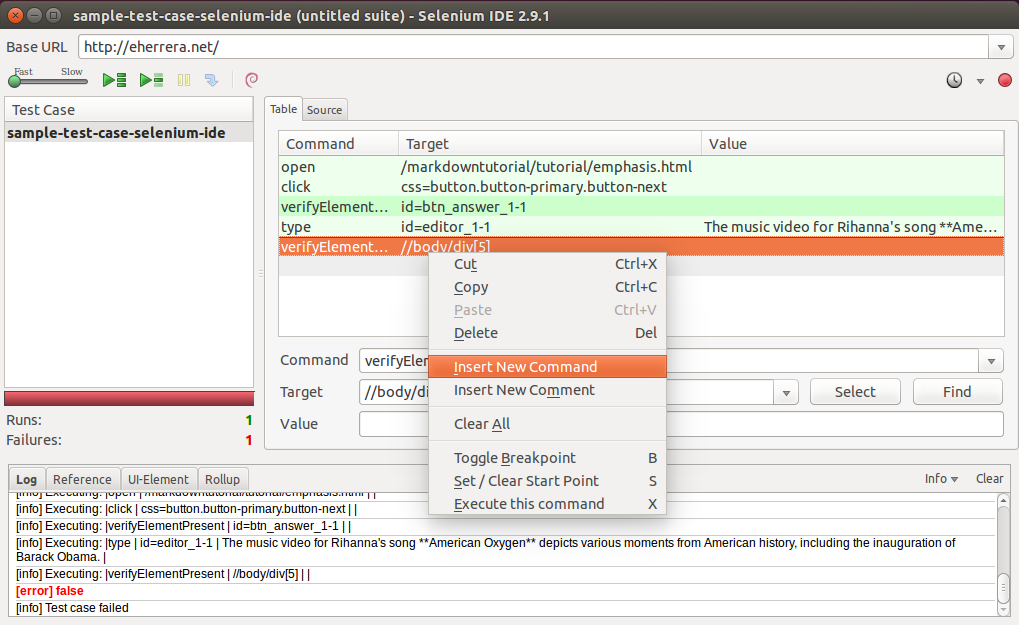
Return to the Selenium IDE window, right-click the last step, and choose Insert New Command:
Below the command table, open the Command menu:
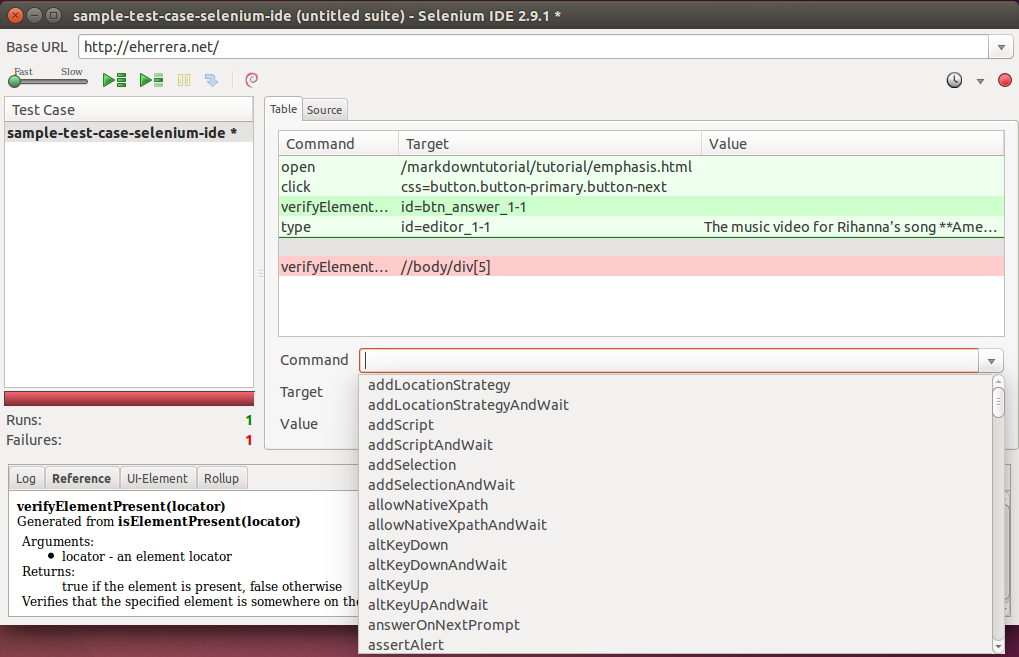
Look at all the stuff you have at your disposal. Among all of this, there's a fireEvent command. Select it:
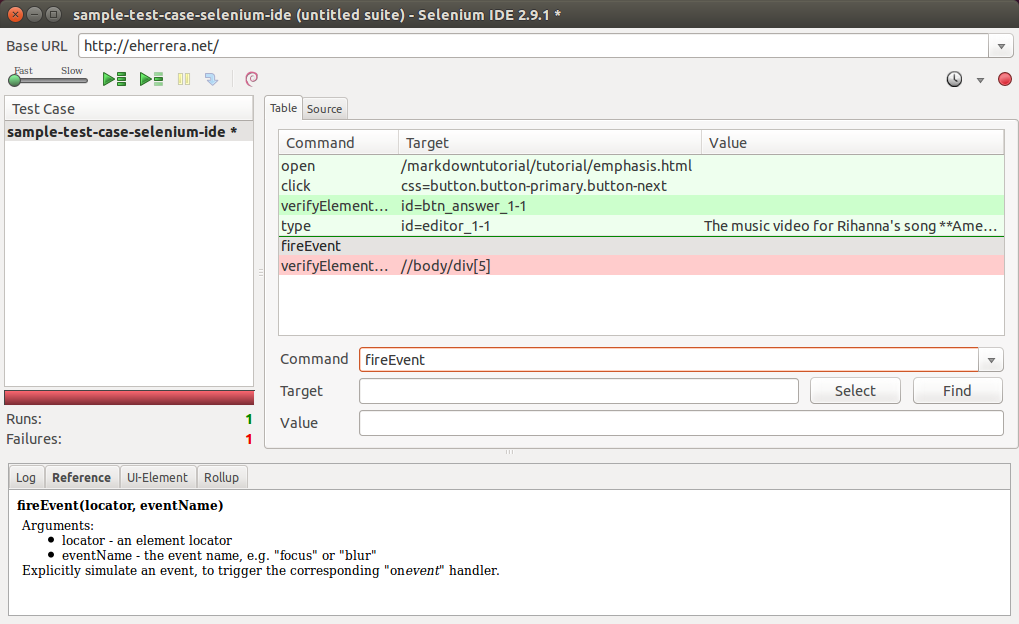
In the Target field, we will input id=editor-1-1 to reference our text box. We know how to reference this element because of the previous type command, but, in case we don't know, we can click on the Select button next to the text box and select and element on the browser to get the value.
In the Value field, we will input keyup, the event to fire.
Once we have made this change, select the first command (open) and run the test again. This time, everything should be fine (also notice how the actions are replayed on the browser):
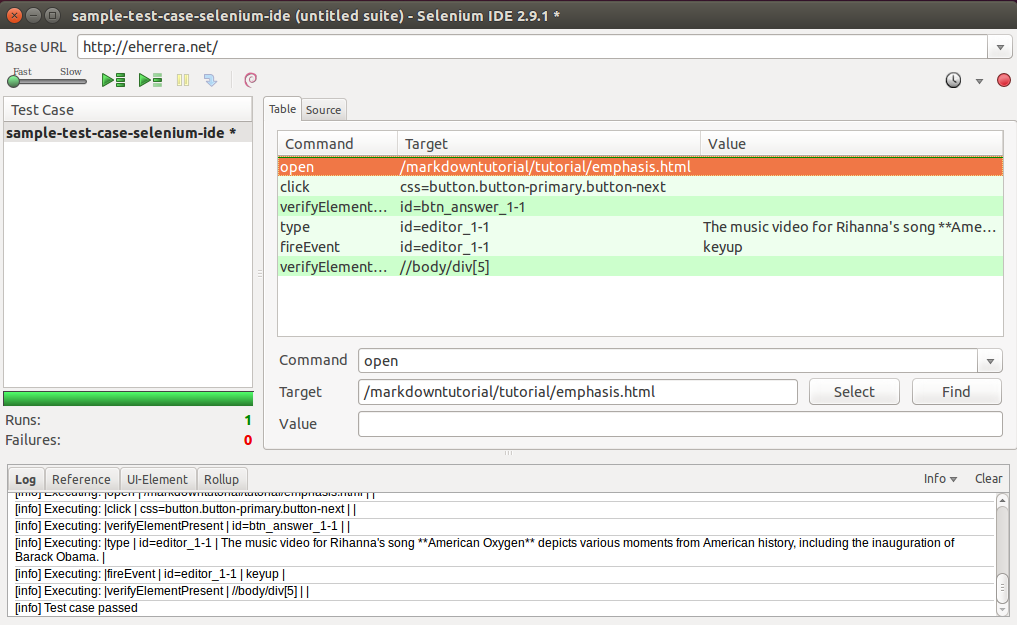
Did you see it? It's very important to know how the web page works and how it's structured.
Save the test and export it as a Java / JUnit 4 / WebDriver test case:
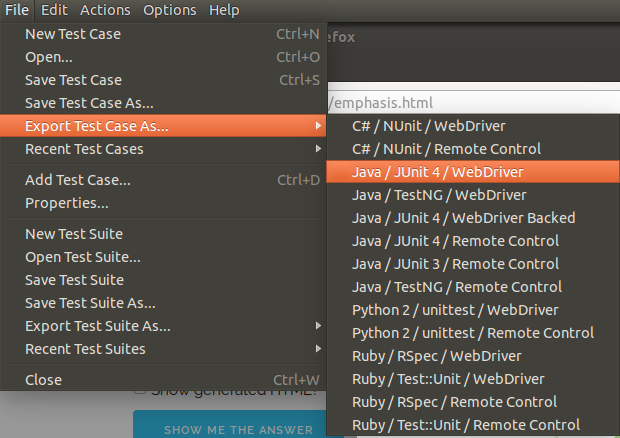
Also, choose other options to see how the Selenium IDE commands are translated into other languages. Across the supported languages, you can find three versions:
- WebDriver, which uses Selenium 2 WebDriver API (this is the preferred option).
- WebDriver Backed, which uses Selenium 2 WebDriver to implement the (old) Selenium 1 Remote Control API.
- Remote Control (RC), which uses the (old) Selenium 1 Remote Control API.
Understanding Selenium commands
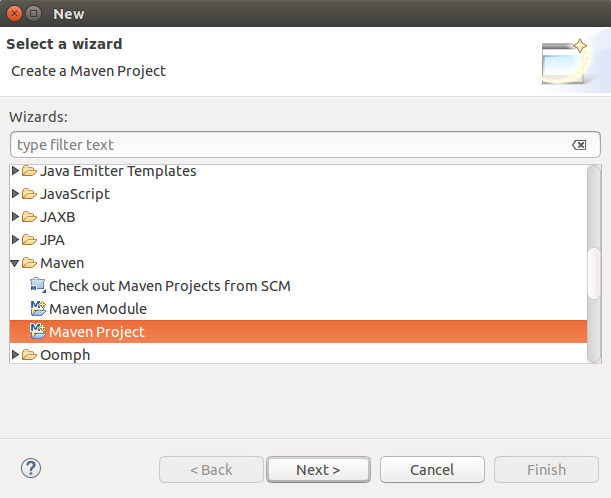
First, let's configure in Eclipse a Java project to run our test class. Go to File -> New -> Other... and choose Maven Project:
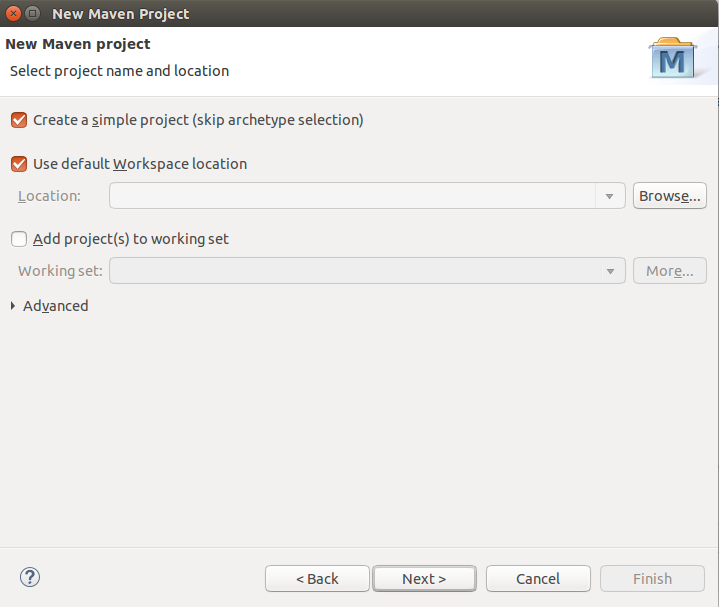
In the next window, check the option Create a simple project (skip archetype selection) and click Next:
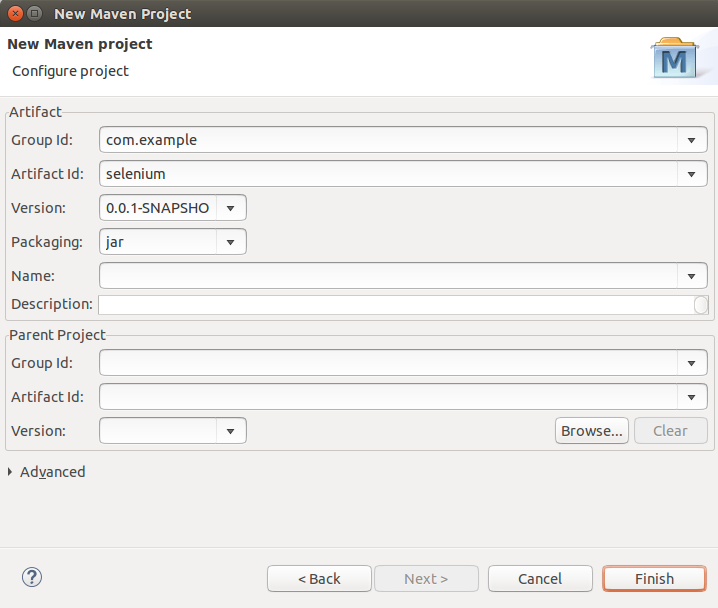
In the following window, enter the project information, for example:
Group ID: com.example
Artifact ID: selenium
Version: 0.0.1-SNAPSHOT
Packaging: jar
This will create a project with a pom.xml file and the following directories:
      src/main/java
src/main/resources
src/test/java
src/test/resources
Open the pom.xml file and modify it so that it looks like this:
      <project xmlns="http://maven.apache.org/POM/4.0.0" xmlns:xsi="http://www.w3.org/2001/XMLSchema-instance"
	xsi:schemaLocation="http://maven.apache.org/POM/4.0.0 http://maven.apache.org/xsd/maven-4.0.0.xsd">
	<modelVersion>4.0.0</modelVersion>
	<groupId>com.example</groupId>
	<artifactId>selenium</artifactId>
	<version>0.0.1-SNAPSHOT</version>

	<dependencies>
		<dependency>
			<groupId>junit</groupId>
			<artifactId>junit</artifactId>
			<version>4.12</version>
			<scope>test</scope>
		</dependency>
		<dependency>
			<groupId>org.seleniumhq.selenium</groupId>
			<artifactId>selenium-java</artifactId>
			<version>2.53.0</version>
			<scope>test</scope>
		</dependency>
		<dependency>
			<groupId>com.saucelabs</groupId>
			<artifactId>sauce_junit</artifactId>
			<version>2.1.21</version>
			<scope>test</scope>
		</dependency>
	</dependencies>
</project>
We're adding the dependencies for the test framework (JUnit), Selenium, and the Sauce Java Helper Library, which will update your Sauce Labs dashboard in real-time with information about the tests that you're running.
Save the file and if the Maven dependencies are not automatically added to the Eclipse project, right-click the name of the project and choose the option Maven -> Update Project....
Next, copy the exported file of the previous section to the src/test/java directory. It should compile with warnings but not errors:
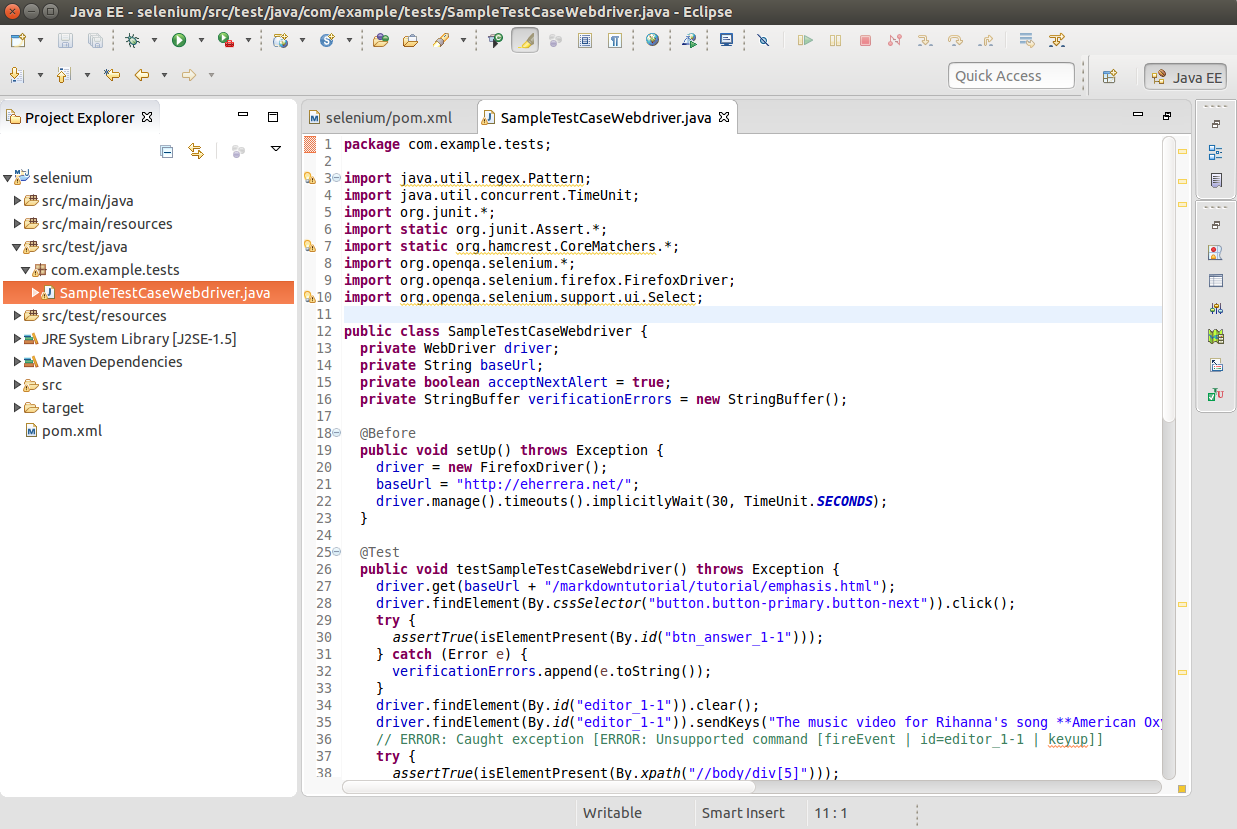
Finally, right-click on the class, choose the option Run As -> JUnit Test, and see how the test is executed:
Now let's explain what the code does in detail.
The setup() method, which is executed before every test method, instantiates the driver and sets up the base URL and the time-out interval for the test:
      @Before
public void setUp() throws Exception {
	driver = new FirefoxDriver();
	baseUrl = "http://eherrera.net/";
    driver.manage().timeouts().implicitlyWait(30, TimeUnit.SECONDS); // 30-second timeout
}
The tearDown() method, which is executed after every test method, closes the driver. If any errors were collected during the test, the test is failed explicitly:
      @After
public void tearDown() throws Exception {
    driver.quit(); // driver closes
    String verificationErrorString = verificationErrors.toString();
    if (!"".equals(verificationErrorString)) {
		fail(verificationErrorString); // test fails explicitly
    }
}
Now let's explain the testSampleTestCaseWebdriver() method. It first opens the web page to test:
driver.get(baseUrl + "/markdowntutorial/tutorial/emphasis.html");
This method is comparable to the Selenium IDE command:
open /markdowntutorial/tutorial/emphasis.html
The next line finds a button by its CSS class and performs a click:
driver.findElement(By.cssSelector("button.button-primary.button-next")).click();
And then verifies (actually, asserts) that the button that shows the answer is present:
      try {
	assertTrue(isElementPresent(By.id("btn_answer_1-1")));
} catch (Error e) {
	verificationErrors.append(e.toString()); /** assertion: if answer is not present, an error is thrown */
}
Again, compare those lines with the Selenium IDE commands:
      click                  css=button.button-primary.button-next
verifyElementPresent   id=btn_answer_1-1
Notice that the test step is implemented using an assert and a try-catch. Remember that when an assert fails, the test is aborted; when a verify fails, the failure is logged and the test continues.
In addition, assertTrue() uses this method to know if an element is present:
      private boolean isElementPresent(By by) {
	try {
		driver.findElement(by);
		return true;
    } catch (NoSuchElementException e) {
		return false;
    }
}
Next, we clear the text box in which we enter the answer to the exercise:
driver.findElement(By.id("editor_1-1")).clear();
And then, with the sendKeys() method, we enter some text:
driver.findElement(By.id("editor_1-1")).sendKeys("The music video for Rihanna's song **American Oxygen** depicts various moments from American history, including the inauguration of Barack Obama.");
Here's the Selenium IDE command that accomplishes the same task:
type id=editor_1-1 The music video for Rihanna's song **American Oxygen** depicts various moments from American history, including the inauguration of Barack Obama.
You may be wondering about the comment:
// ERROR: Caught exception [ERROR: Unsupported command [fireEvent | id=editor_1-1 | keyup]]
Unlike Selenium IDE, WebDriver doesn't support the fireEvent command because sendKeys() fires the events as if the text was entered manually.
The verification for this action is done this way:
      try {
	assertTrue(isElementPresent(By.xpath("//body/div[5]")));
} catch (Error e) {
	verificationErrors.append(e.toString()); // another assertion, since an error is thrown
}
Finally, the class has two methods that are not used in this test:
      private boolean isAlertPresent() {
    try {
		driver.switchTo().alert();
		return true;
    } catch (NoAlertPresentException e) {
		return false;
    }
  }

private String closeAlertAndGetItsText() {
	try {
		Alert alert = driver.switchTo().alert();
		String alertText = alert.getText();
		if (acceptNextAlert) {
			alert.accept();
		} else {
			alert.dismiss();
		}
		return alertText;
    } finally {
		acceptNextAlert = true;
    }
}
Now let's take a moment to talk about an important concept: the ways by which Selenium locates elements using findElement() and the methods of the By class.
You can use the following tags as locators:
- ID. This is the best way to locate an element because an ID should be unique. Unfortunately, either this is not always true or not all elements have an ID.
- Class Name. More than one element can use the same CSS class name, so it's better to use findElements() (which returns a list of matching elements) instead of findElement() (that returns the first matching element found).
- Link Text. This finds a link with the exact text in it.
- Partial Link Text. It also uses the text of a link, but in this case, a wildcard can be used.
- Name. This finds all elements with a given name attribute.
- Tag Name. This finds all elements of a given tag, like div or p.
- CSS Selector. This searches for elements that match a CSS selector, such as #container > img.
- XPath Expression. This searches for elements that match a XPath query, such as //body/ul[@class='container']/li.
When using CSS selectors or XPath expressions, you can use absolute paths:
driver.findElement(By.xpath("/html/body/div[1]/img[2]"));
However, using absolute paths is not recommended since a single change in a part of the path can break the entire expression. It's better to use relative paths.
Create a relative path by getting first the closest parent and then the child element, for example:
      WebElement div = driver.findElement(By.className("container"));
List<WebElements> imgs = div.findElements(By.tagName("img));
WebElement img = (imgs.size() >= 2) ? imgs.get(1) : null;
Back to analyzing the code produced by Selenium IDE (and in general, by any Record/Playback tool). You can see that our code presents some problems:
- The test data and our locators are hardcoded.
- We can't really say that the quality of the code is high.
- The resulting code is an identical copy of the recording, so our test isn't flexible.
- By having actions of the users and assertions (verifications) in the same class, we are violating the Single Responsibility Principle.
For those reasons, it's recommended to use the scripts of tools like Selenium IDE only as starting points. What you can do is to record the user interaction, add assertions and verifications, check that the script is working correctly, and then export the script as source code.
Once you have the source code of the test, you can make adjustments to create better-designed tests. One technique to achieve this is the Page Object pattern, which we'll discuss in the next section.
Page Object Pattern
Simply put, Page Object pattern involves having one class represent a page and everything it can do.
This allows us to separate the implementation from the specification. For example, if we change the ID/name/class of the text box where we enter the answer to an exercise in the Markdown tutorial (i.e. alter the implementation), the specification of testing if our answer is correct does not change accordingly, so we have to update all the tests that use this element.
In contrast, page objects encapsulate implementation details in a single class to save us a lot of hassle when they change.
So, in this pattern, pages (or sections within a page) are represented as objects, and actions that you perform on that page are represented as methods. For example:
      public class LessonPage {
	private WebDriver driver;
	private WebElement textBox;

	// ...

	public LessonPage(WebDriver driver) {
		this.driver = driver;
		textBox = driver.findElement(By.id("editor_1-1"));
	}

	public void enterAnswer(String text){
		textBox.sendKeys(text);
    }

	public String getAnswer(){
		textBox.getText();
    }

	// ...
}
Selenium also gives us the chance to get the elements by using annotations and a PageFactory object:
      public class LessonPage {
	@FindBy(id="editor_1-1")
	private WebElement textBox;

	public static LessonPage getPage(WebDriver driver) {
		return PageFactory.initElements(driver, LessonPage.class);
	}

	// ...
}
@FindBy accepts all the ways of locating elements previously discussed (like tag names and CSS selectors).
The PageFactory object instantiates a page object (if a class object is passed instead of an instance), finds its annotated fields, and then initializes them to the associated elements of the page.
By default, the name of the field in the Java class is assumed to be the ID or name of the element on the page. But you can use this annotation by specifying either one of the location strategies with an appropriate value (like id in the example above) or both how and using.
Check this out:
      @FindBy(how = How.ID, using = "editor_1-1")
private WebElement textBox;
Now, the code of our tests will be free of implementation details:
      LessonPage emphasis = LessonPage.getPage(driver);

String answer = "...";
emphasis.setText(answer);

assertTrue(answer.equals(emphasis.getAnswer());
This is how the Page Object pattern improves the flexibility and maintainability of our tests.
It also increases readability, but here's one tip. If you want to take readability to the next level, use Behavior Driven Development (BDD) with a tool like Cucumber, which has implementations in many languages, or if you're working with Java/Groovy, use the Spock Framework. For more on BDD and Spock, check out this tutorial).
On the other hand, the Page Object pattern increases complexity and, since choosing the right approach to design or implement a page object can be a difficult task, it can quickly become harder to use and maintain.
With this in mind, let's turn the generated Selenium IDE test into a Page Object pattern test.
Create a Page abstract class to hold some common methods and fields:
      package com.example.pages;

import org.openqa.selenium.By;
import org.openqa.selenium.NoSuchElementException;
import org.openqa.selenium.WebDriver;

public abstract class Page {
	protected WebDriver driver;
    protected final String baseUrl = "http://eherrera.net/markdowntutorial/tutorial/";

    protected boolean isElementPresent(By by) {
    	boolean present = true;
        try {
        	driver.findElement(by);
        } catch (NoSuchElementException e) {
        	present = false;
        }

        return present;
	}

}
Next, let's split into two classes the page under test. First, the initial LessonPage:
      package com.example.pages;

import org.openqa.selenium.By;
import org.openqa.selenium.WebDriver;
import org.openqa.selenium.WebElement;
import org.openqa.selenium.support.PageFactory;

public class LessonPage extends Page {

	private WebElement startExerciseBtn;

	public LessonPage (WebDriver driver, String lesson) {
		this.driver = driver;
		driver.get(baseUrl + lesson + ".html");
		startExerciseBtn = driver.findElement(By.cssSelector("button.button-primary.button-next"));
	}

	public ExercisePage getExercise() {
		startExerciseBtn.click();

		ExercisePage page = new ExercisePage(driver);

		PageFactory.initElements(driver, page);

		return page;
	}

}
This class extends from the previous Page class. In the constructor, it navigates to the lesson page and gets a reference to the Start Exercises button. It also has a method to get the ExercisePage. This page is initialized with the PageFactory object.
Here's the code for ExercisePage:
      package com.example.pages;

import org.openqa.selenium.By;
import org.openqa.selenium.WebDriver;
import org.openqa.selenium.WebElement;
import org.openqa.selenium.support.FindBy;

public class ExercisePage extends Page {
	@FindBy(id="editor_1-1")
	private WebElement textBox;

	@FindBy(id="btn_answer_1-1")
	private WebElement showAnswerBtn;

	public ExercisePage (WebDriver driver) {
		this.driver = driver;
	}

	public boolean isShowAnswerBtnPresent() {
		return isElementPresent(By.id("btn_answer_1-1"));
	}

	public boolean isAnswerCorrect() {
		return isElementPresent(By.xpath("//body/div[5]"));
	}

	public void enterAnswer(String text) {
		textBox.clear();
		textBox.sendKeys(text);
	}
}
It gets its elements through annotations and has two methods to check if two elements are present and another method to enter a text on the text box.
Now, let's create another class to do the actual test:
      package com.example.tests;

import static org.junit.Assert.assertTrue;

import org.junit.After;
import org.junit.Before;
import org.junit.Test;
import org.openqa.selenium.WebDriver;
import org.openqa.selenium.firefox.FirefoxDriver;

import com.example.pages.ExercisePage;
import com.example.pages.LessonPage;

public class SampleTestCasePageObject {
	private WebDriver driver;

	@Before
	public void setUp() throws Exception {
		driver = new FirefoxDriver();
	}

	@Test
	public void testSampleTestCasePageObject() {
		LessonPage lessonPage = new LessonPage(driver, "emphasis");
		ExercisePage exercisePage = lessonPage.getExercise();

		assertTrue(exercisePage.isShowAnswerBtnPresent());

		exercisePage.enterAnswer("The music video for Rihanna's song **American Oxygen** depicts various moments from American history, including the inauguration of Barack Obama.");

		assertTrue(exercisePage.isAnswerCorrect());
	}

	@After
	public void tearDown() throws Exception {
		driver.quit();
	}
}
As you can see, this class looks cleaner now. If you run this class as a JUnit test, everything should work as expected.
However, we went from one class to four classes. So always evaluate the tradeoffs.
On a test suite of only a couple of tests, refactoring may be more effective that following the Page Object pattern.
In the final section of this tutorial, we'll use our Page Object implementation to execute our test with Sauce Labs.
Testing with Sauce Labs
Just like developing for multiple browsers, testing in multiple browsers can be a frustrating experience. Some browsers cause more problems than others, so we need to test in as many browsers and configurations as we can.
Sauce Labs solves this problem by automating cross-browser testing in the cloud, starting virtual machines (in parallel if required) to test in more than 700 OS/browser combinations.
The only downside is that the execution of the tests can become slow, since testing locally is not the same as communicating with remote browsers.
However, all of its other features make this issue somewhat negligible, at least for the time being. If you are interested, some other companies that offer similar services are BrowserStack and Xamarin Test Cloud.
There's a Github repo with some example scripts for how to run Java-based Selenium tests with Sauce Labs. For example, here's a basic (hello world style) Sauce Labs test:
      import org.openqa.selenium.WebDriver;
import org.openqa.selenium.remote.DesiredCapabilities;
import org.openqa.selenium.remote.RemoteWebDriver;

import java.net.URL;

public class SampleSauceTest {

  public static final String USERNAME = "YOUR_USERNAME";
  public static final String ACCESS_KEY = "YOUR_ACCESS_KEY";
  public static final String URL = "http://" + USERNAME + ":" + ACCESS_KEY + "@ondemand.saucelabs.com:80/wd/hub";

  public static void main(String[] args) throws Exception {

    DesiredCapabilities caps = DesiredCapabilities.chrome();
    caps.setCapability("platform", "Windows XP");
    caps.setCapability("version", "43.0");

    WebDriver driver = new RemoteWebDriver(new URL(URL), caps);

    /**
     * Goes to Sauce Lab's guinea-pig page and prints title
     */

    driver.get("https://saucelabs.com/test/guinea-pig");
    System.out.println("title of page is: " + driver.getTitle());

    driver.quit();
  }
}
When you replace your Sauce Labs username and access key (remember that you can get it from your My Account option when you log in to Sauce Labs) to run this program, the output will be:
title of page is: I am a page title - Sauce Labs
And when you go to the Automated Tests section on the Sauce Labs dashboard, you should see the record of this test:
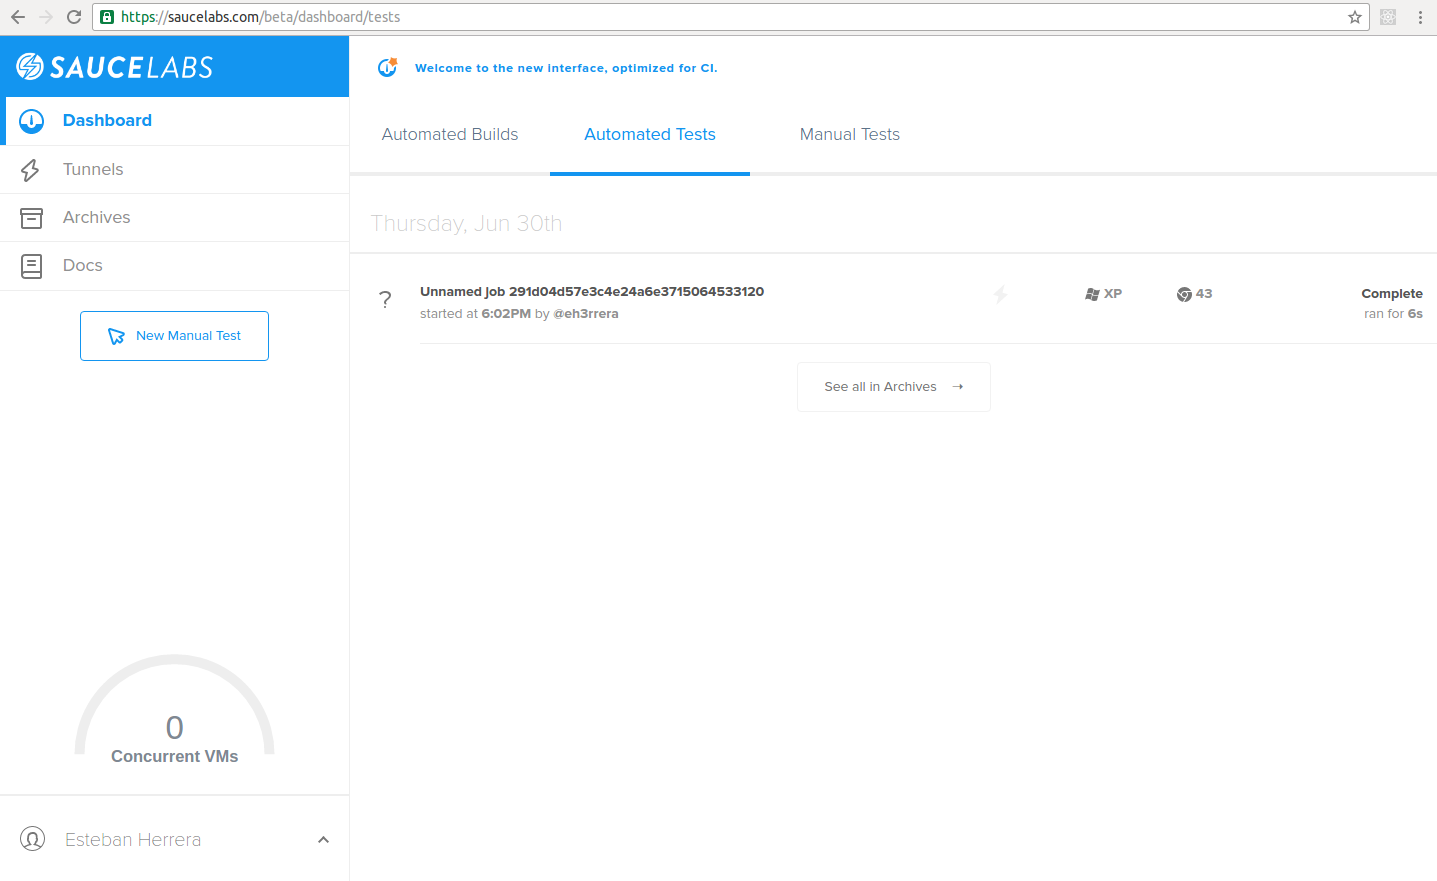
If you click this record, a detail page will be shown with information about the test and options to play a video of the actual test, download a log and a screenshot, and open a manual test session:
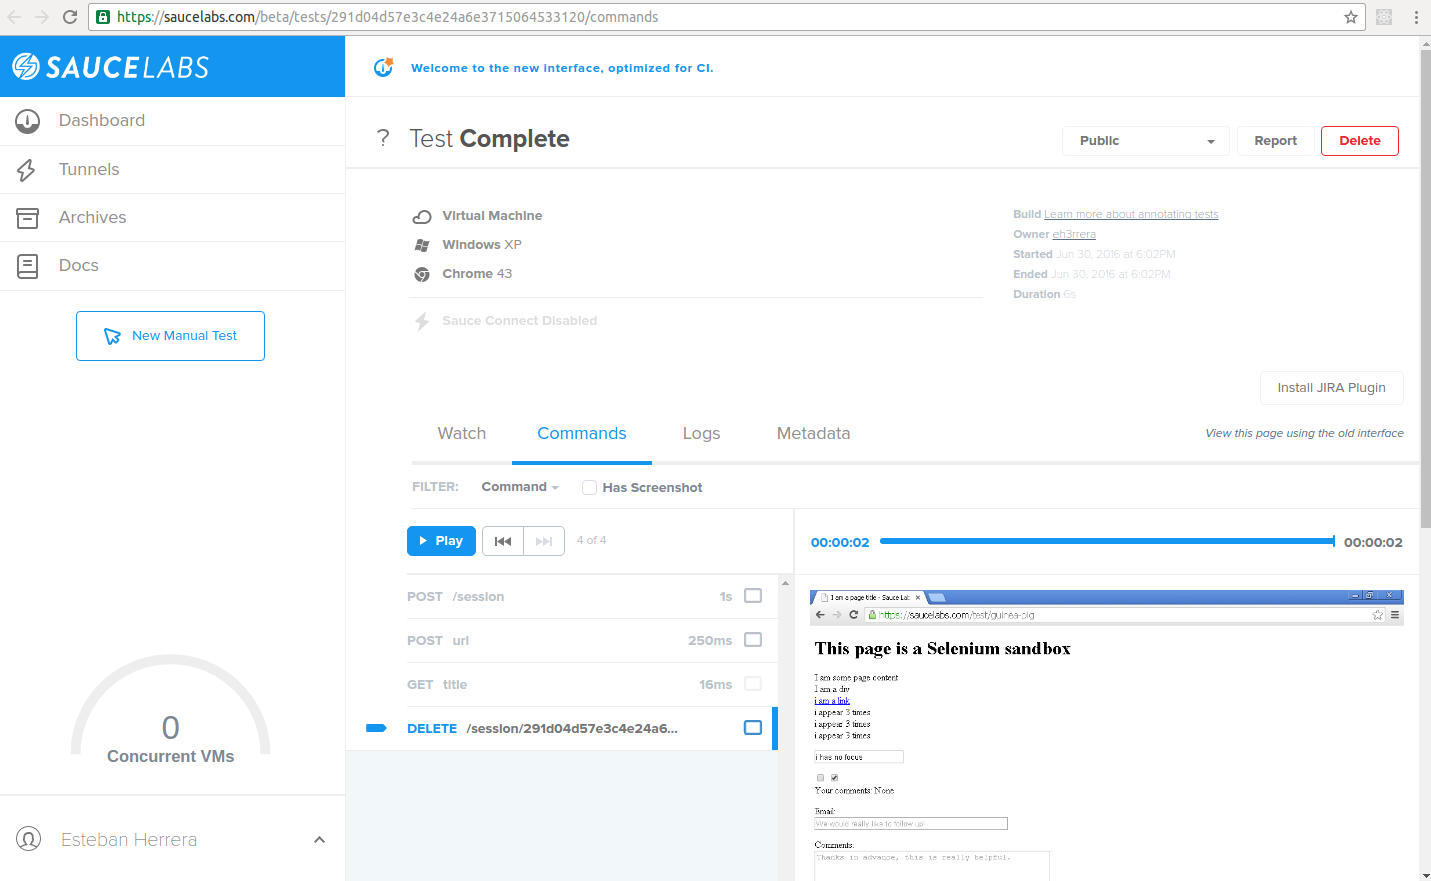
You can review these results here.
As you can see, to use a tool like Sauce Labs, you'll need to test a publicly available website. If you don't have one, you can set up a tunnel with Sauce Connect:
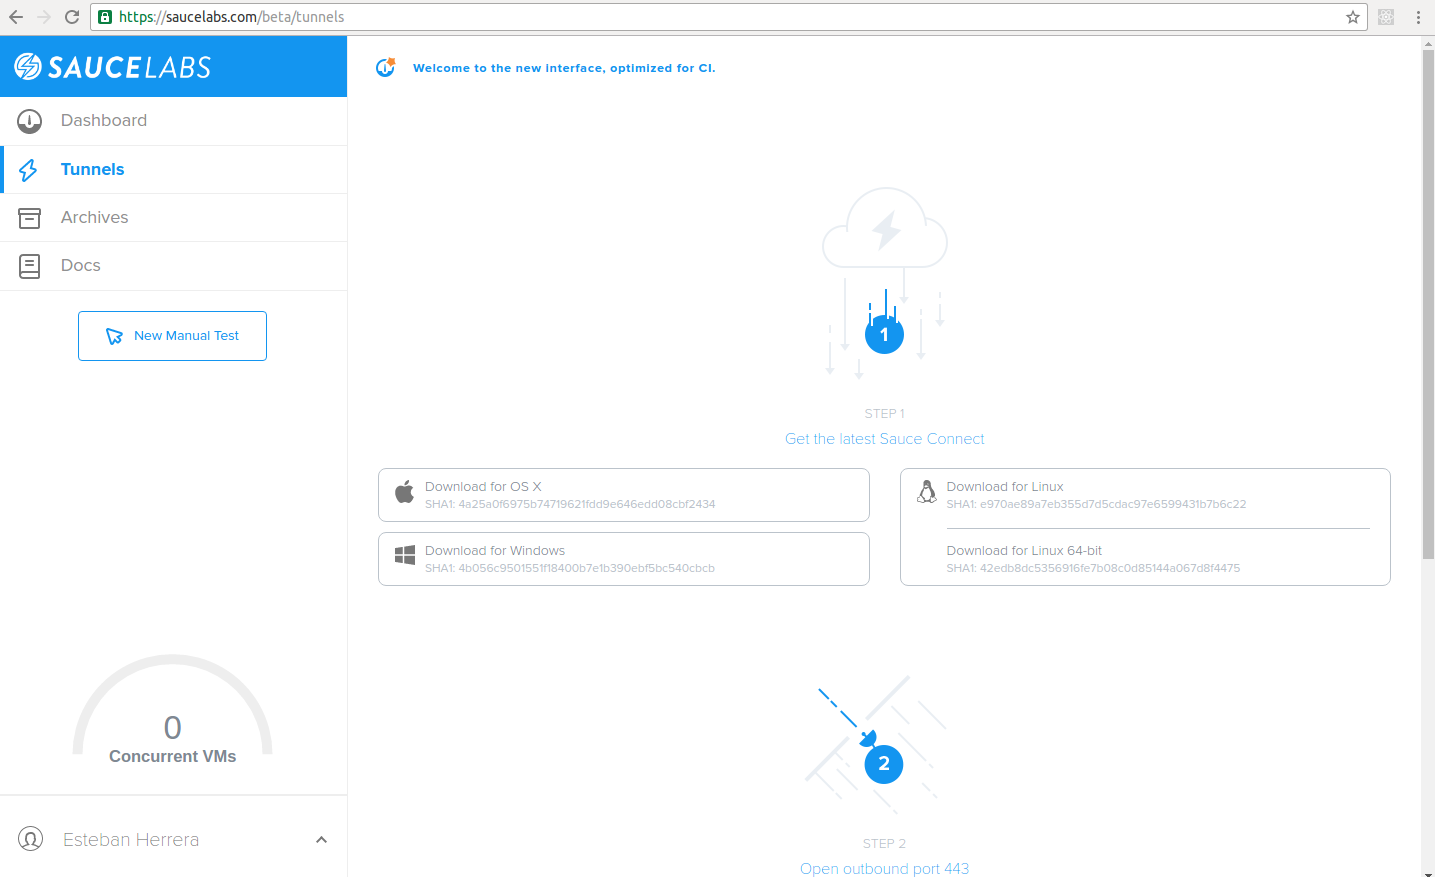
You can find more information about Sauce Connect here.
By the way, here's another repository where you can find more complete examples:
https://github.com/saucelabs-sample-test-frameworks
To work with our example, let's start three parallel tests (the open-source account allows up to five parallel virtual machines) for Internet Explorer versions 9, 10, and 11.
Create a new class SampleTestCaseSauceLabs annotated with @RunWith(ConcurrentParameterized.class):
      @RunWith(ConcurrentParameterized.class)
public class SampleTestCaseSauceLabs {

}
The annotation will allow the test to use multiple browsers in parallel.
Also, instead of hardcoding the username and access key, we're going to take their values from environment properties:
      @RunWith(ConcurrentParameterized.class)
public class SampleTestCaseSauceLabs {
	public static final String USERNAME = System.getenv("SAUCE_USERNAME");
	public static final String ACCESS_KEY = System.getenv("SAUCE_ACCESS_KEY");
	public static final String URL = "http://" + USERNAME + ":" + ACCESS_KEY + "@ondemand.saucelabs.com:80/wd/hub";
}
Next, let's create the method that will return the browser combinations using the annotation @ConcurrentParameterized.Parameters:
      @RunWith(ConcurrentParameterized.class)
public class SampleTestCaseSauceLabs {
	// ...
	@ConcurrentParameterized.Parameters
    public static LinkedList<String[]> browsersStrings() {
        LinkedList<String[]> browsers = new LinkedList<String[]>();

        // windows 7, IE 9
        browsers.add(new String[]{"Windows 7", "9", "internet explorer"});

        // windows 8, IE 10
        browsers.add(new String[]{"Windows 8", "10", "internet explorer"});

        // windows 8.1, IE 11
        browsers.add(new String[]{"Windows 8.1", "11", "internet explorer"});

        return browsers;
    }
}
The values of the returned list will be injected to the constructor of the class. The order of the parameters will be the same as that of the elements within the list:
      @RunWith(ConcurrentParameterized.class)
public class SampleTestCaseSauceLabs {
	// ...
	public SampleTestCaseSauceLabs(String os, String version, String browser) {
        super();
        this.os = os;
        this.version = version;
        this.browser = browser;
    }
}
The values will be stored as fields of the class because they will be used in the setUp() method to configure the capabilities of the test:
      @RunWith(ConcurrentParameterized.class)
public class SampleTestCaseSauceLabs {
	// ...
	@Before
	public void setUp() throws Exception {
		DesiredCapabilities capabilities = new DesiredCapabilities();
		capabilities.setCapability(CapabilityType.BROWSER_NAME, browser);
        capabilities.setCapability(CapabilityType.VERSION, version);

        capabilities.setCapability(CapabilityType.PLATFORM, os);

		driver = new RemoteWebDriver(new URL(URL), capabilities);

		this.sessionId = (((RemoteWebDriver) driver).getSessionId()).toString();

		String message = String.format("SauceOnDemandSessionID=%1$s", this.sessionId);
	    System.out.println(message);
	}
}
Also, notice how the session ID is retrieved from the RemoteWebDriver to avoid hardcoding whenever possible.
At the end, the code should look like this:
      /**
 * Demonstrates how to write a JUnit test that runs tests against Sauce Labs using multiple browsers in parallel.
 */
@RunWith(ConcurrentParameterized.class)
public class SampleTestCaseSauceLabs {

	public static final String USERNAME = System.getenv("SAUCE_USERNAME");

	public static final String ACCESS_KEY = System.getenv("SAUCE_ACCESS_KEY");

	public static final String URL = "http://" + USERNAME + ":" + ACCESS_KEY + "@ondemand.saucelabs.com:80/wd/hub";

	/**
     * Represents the browser to be used as part of the test run.
     */
    protected String browser;
    /**
     * Represents the operating system to be used as part of the test run.
     */
    protected String os;
    /**
     * Represents the version of the browser to be used as part of the test run.
     */
    protected String version;
    /**
     * Instance variable which contains the Sauce Job Id.
     */
    protected String sessionId;

    /**
     * The {@link WebDriver} instance which is used to perform browser interactions with.
     */
    protected WebDriver driver;

    /**
     * Constructs a new instance of the test.  The constructor requires three string parameters, which represent the operating
     * system, version and browser to be used when launching a Sauce VM.  The order of the parameters should be the same
     * as that of the elements within the {@link #browsersStrings()} method.
     * @param os
     * @param version
     * @param browser
     * @param deviceName
     * @param deviceOrientation
     */

    public SampleTestCaseSauceLabs(String os, String version, String browser) {
        super();
        this.os = os;
        this.version = version;
        this.browser = browser;
    }

    /**
     * @return a LinkedList containing String arrays representing the browser combinations the test should be run against. The values
     * in the String array are used as part of the invocation of the test constructor
     */
    @ConcurrentParameterized.Parameters
    public static LinkedList<String[]> browsersStrings() {
        LinkedList<String[]> browsers = new LinkedList<String[]>();

        // windows 7, IE 9
        browsers.add(new String[]{"Windows 7", "9", "internet explorer"});

        // windows 8, IE 10
        browsers.add(new String[]{"Windows 8", "10", "internet explorer"});

        // windows 8.1, IE 11
        browsers.add(new String[]{"Windows 8.1", "11", "internet explorer"});

        return browsers;
    }

	@Before
	public void setUp() throws Exception {
		DesiredCapabilities capabilities = new DesiredCapabilities();
		capabilities.setCapability(CapabilityType.BROWSER_NAME, browser);
        capabilities.setCapability(CapabilityType.VERSION, version);

        capabilities.setCapability(CapabilityType.PLATFORM, os);

		driver = new RemoteWebDriver(new URL(URL), capabilities);

		this.sessionId = (((RemoteWebDriver) driver).getSessionId()).toString();

		String message = String.format("SauceOnDemandSessionID=%1$s", this.sessionId);
	    System.out.println(message);
	}

	@Test
	public void testSampleTestCaseSauceLabs() {
		LessonPage lessonPage = new LessonPage(driver, "emphasis");
		ExercisePage exercisePage = lessonPage.getExercise();

		assertTrue(exercisePage.isShowAnswerBtnPresent());

		exercisePage.enterAnswer("The music video for Rihanna's song **American Oxygen** depicts various moments from American history, including the inauguration of Barack Obama.");

		assertTrue(exercisePage.isAnswerCorrect());
	}

	@After
	public void tearDown() throws Exception {
		driver.quit();
	}
}
To execute the test, configure the username and the access key as environment variables.
In Linux:
      $ export SAUCE_USERNAME=<your Sauce Labs username>
$ export SAUCE_ACCESS_KEY=<your Sauce Labs access key>
In Windows, go to the System Properties window, click on the Advanced tab, and then click the Environment Variables button.
In Eclipse, you can configure the JUnit Run Configuration to set these variables:
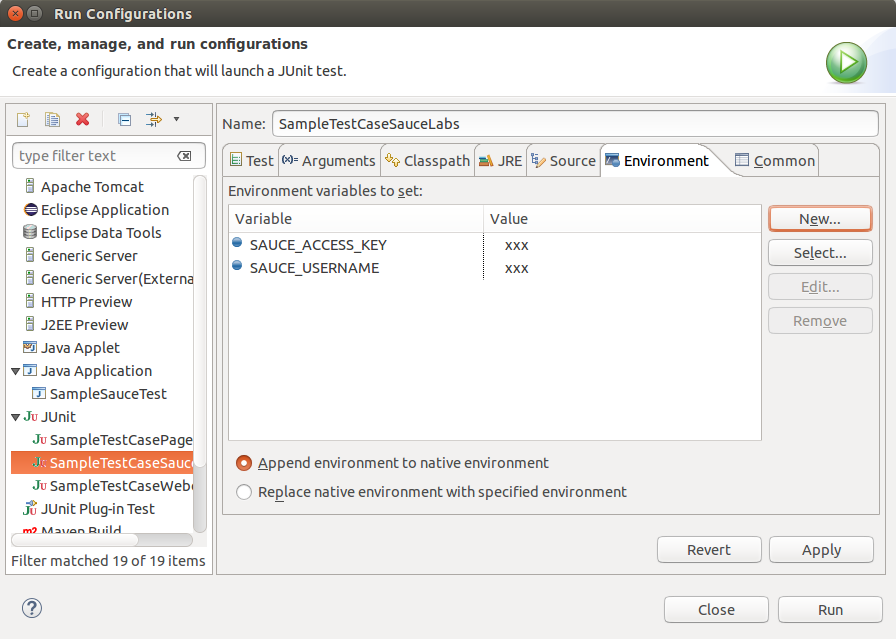
When you run the test, you can see the session IDs of the executions in the output. For example:
      SauceOnDemandSessionID=dfb20d14455c4a37b38e7a33cac478aa
SauceOnDemandSessionID=1401c0fe49164e8b8d3651b443151166
SauceOnDemandSessionID=ba23b84c3464424593dd65909f78e8b3
And in Sauce Labs:
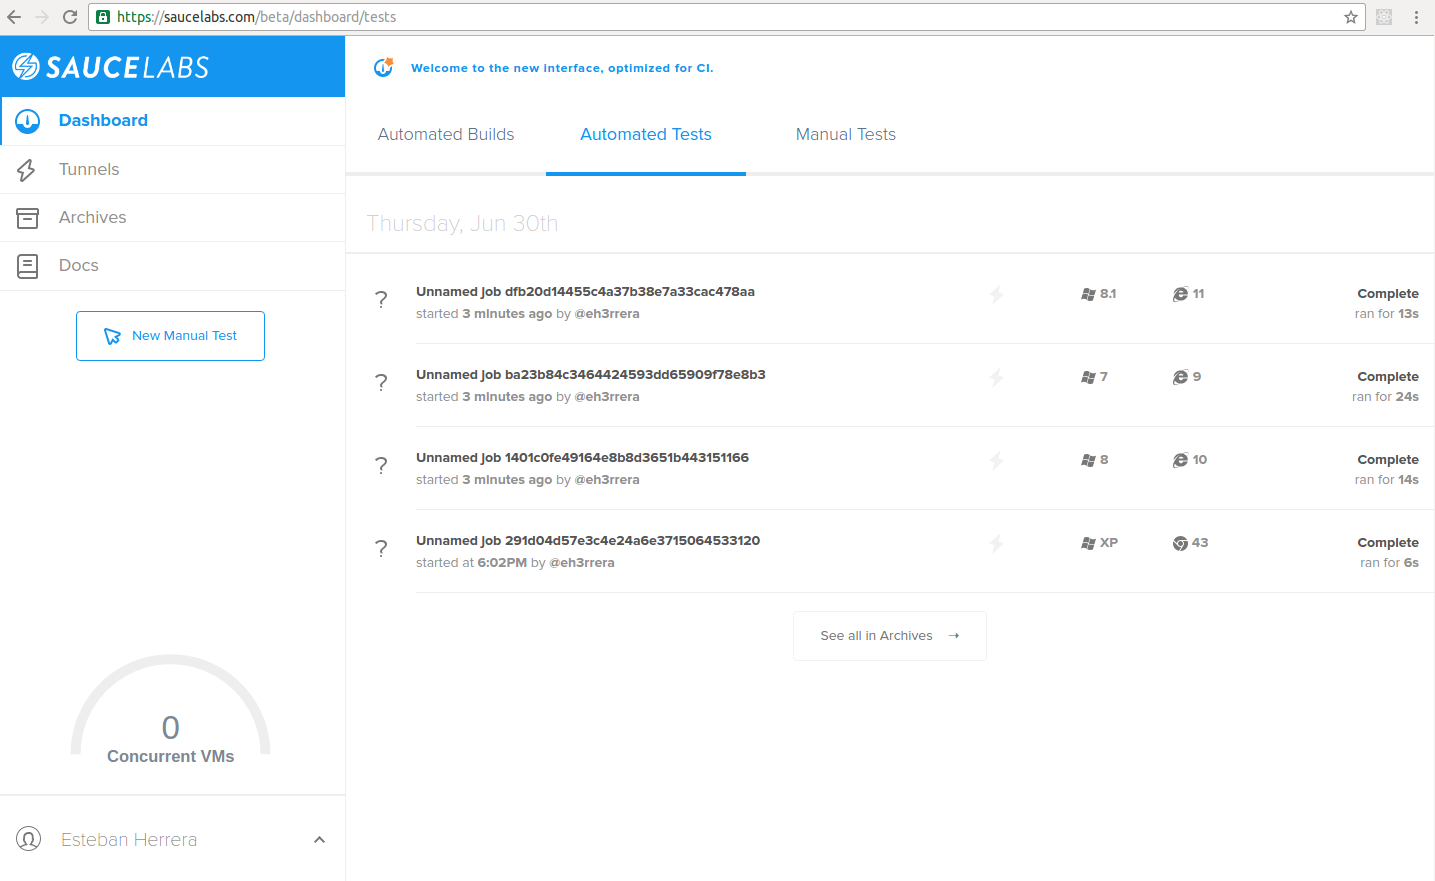
You can check the results of these tests in the following links:
https://saucelabs.com/beta/tests/1401c0fe49164e8b8d3651b443151166/commands
https://saucelabs.com/beta/tests/ba23b84c3464424593dd65909f78e8b3/commands
https://saucelabs.com/beta/tests/dfb20d14455c4a37b38e7a33cac478aa/commands
Conclusion
You got an overview of how to test with Selenium and Sauce Labs and you should be able to start programming your own tests.
Here's a summary of the best practices described in this tutorial:
- Know the structure of the page you're going to test.
- Use the scripts generated by Selenium IDE (or any other Record/Playback tool) as a starting point.
- Don't use brittle locators in your tests. Preferably, use IDs and relative paths.
- Learn to design your tests with the Page Object pattern.
- Combine the Page Object pattern with Behaviour Driven Development to boost readability.
- Don't hardcode your account information; use Environment Variables.
In this page you can see additional best practices and tips.
And remember that you can find the source code of all the tests on Github.
I hope you enjoyed this tutorial. Please contact me if you have questions or feedback!
Advance your tech skills today
Access courses on AI, cloud, data, security, and more—all led by industry experts.
