Introduction to Testing with BDD and the Spock Framework
Take your test driven development (TDD) methods to the next level and find out how to improve your design process with behavior driven development (BDD).
Dec 15, 2018 • 33 Minute Read
Introduction
I'd always use JUnit as the testing framework, a good library and pretty much the standard for testing in Java. However, sometimes you can feel something is missing.
In fact, this feeling is well described in the article Introducing BDD by Dan North (considered the father of BDD):
I had a problem. While using and teaching agile practices like test-driven development (TDD) on projects in different environments, I kept coming across the same confusion and misunderstandings. Programmers wanted to know where to start, what to test and what not to test, how much to test in one go, what to call their tests, and how to understand why a test fails.
There's no doubt that TDD is a useful tool in software development. But more than testing, TDD is about improving the design process.
Of course, writing tests gives you the confidence to know that the system works correctly. However, more important than that, by writing tests before code the behavior of the system is well defined and documented.
Behaviour-Driven Development
This is not always seen, so the aim of Behaviour-Driven Development (BDD) is to make us realize the importance of defining behavior rather than testing per se by using a specific vocabulary to minimize misunderstandings and encourage the collaboration between business analysts, developers, testers, and stakeholders. For this reason, BDD can be considered an extension of TDD.
In BDD, testing and development are based on that common language and the basic unit to describe a feature of the system is a story. Acceptance criteria (the base of tests) are part of the story.
In his article What's in a story?, Dan North suggests the following template for a story:
      Title (one line describing the story)

Narrative:
As a [role]
I want [feature]
So that [benefit]

Acceptance Criteria: (presented as Scenarios)

Scenario 1: Title
Given [context]
And [some more context]...
When [event]
Then [outcome]
And [another outcome]...

Scenario 2: ...
For example:
      Story: Calculate amount to pay for a service (including tip)

As a member of a group
I want to know the amount to pay including tip
So that I can know how much I have to pay

Scenario 1: Service was acceptable
Given the amount of the bill $100
 And the percentage to tip 15%
 And the number of people 2
When the tip is calculated
Then the tip amount should be $15
 And the total to pay should be $115
 And the total per person is $57.50
Based on this template, Dan North developed JBehave, a Java framework that supports BDD and maps the steps of a scenario to Java methods via annotations.
JBehave inspired other frameworks like RSpec, which in turn, inspired the Spock framework, that in my opinion, brings testing to another level. You're going to see why.
Spock Framework
Spock is a testing framework writing in Groovy, which means that runs on the Java Virtual Machine (JVM) and let you test code written in any of the languages the JVM supports.
In this page you'll read ten reasons why you might use Spock. Here, I just want to highlight three of them:
- Easy to learn. It really is, even if you don't know Groovy.
- Detailed information. This alone should make you leave behind any other frameworks.
- Beautiful language. I've tried other BDD frameworks, but Spock has created a better and more expressive domain-specific language (DSL).
But enough talk. Let get to the code.
For this tutorial, we are going to use Eclipse and Maven to test a class in Java using Groovy and Spock.
Why not use IntelliJ IDEA and Gradle? Because setting up Eclipse and Maven is a little more complicated, and at least where I come from, more folks are using these tools.
Setting up the Environment
For Eclipse, first, we need to install the Groovy plugin and some dependencies. Then, we'll create a Maven project, configure all the required dependencies and plugins in the pom.xml file and add a directory where the testing classes will live.
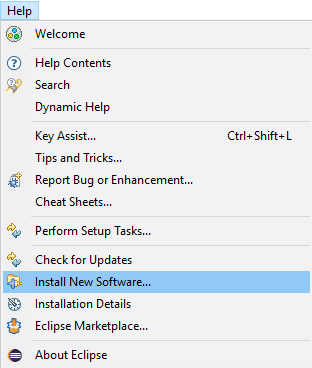
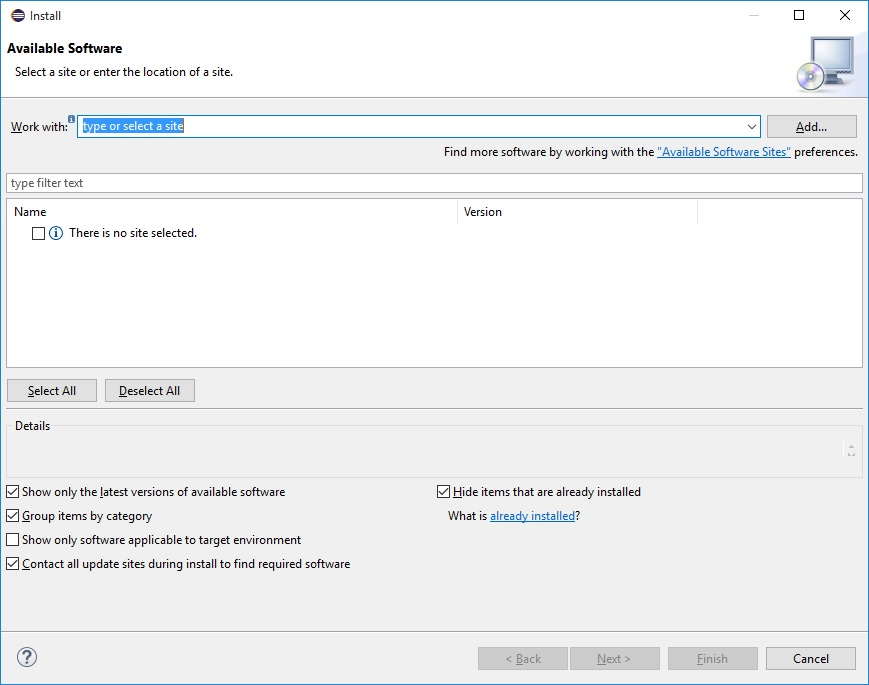
Let's start. I'll assume you're using Eclipse Mars.2 (version 4.5.2, but I shouldn't be very different if you're using a different version), so open Eclipse and to Help -> Install new software.
Click the Add... button
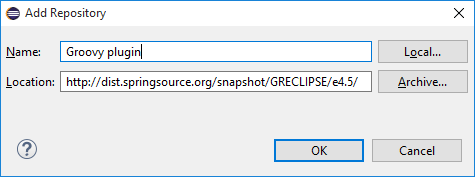
Enter the following information and press OK (if you're using another version of Eclipse, you can find the correct link to the update site here):
Name: Groovy plugin (or any name you want)
Location: https://dist.springsource.org/snapshot/GRECLIPSE/e4.5/
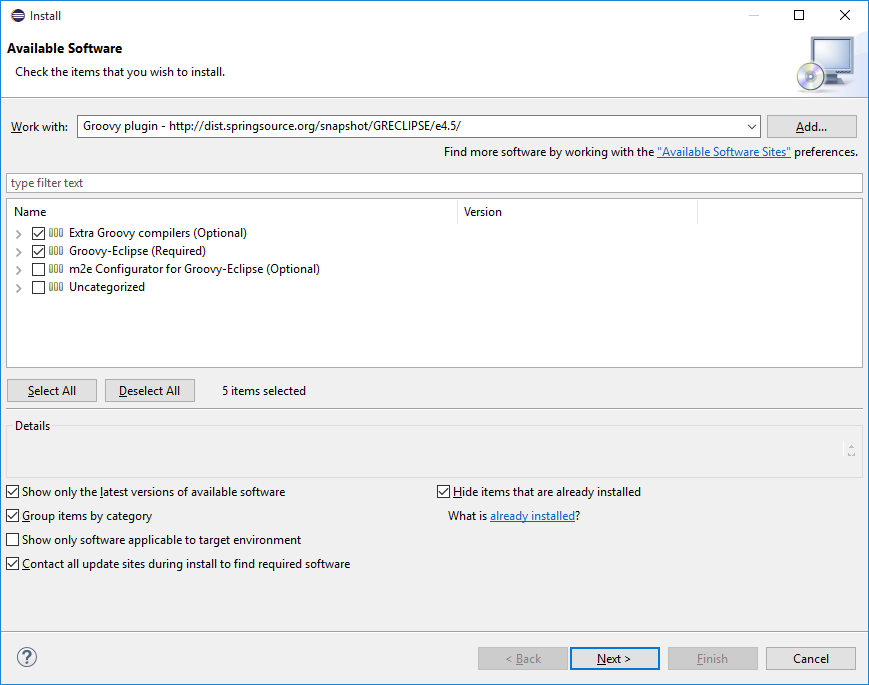
Wait for it to fetch the information and then select the Groovy-Eclipse and Extra Groovy Compilers options and click Next.
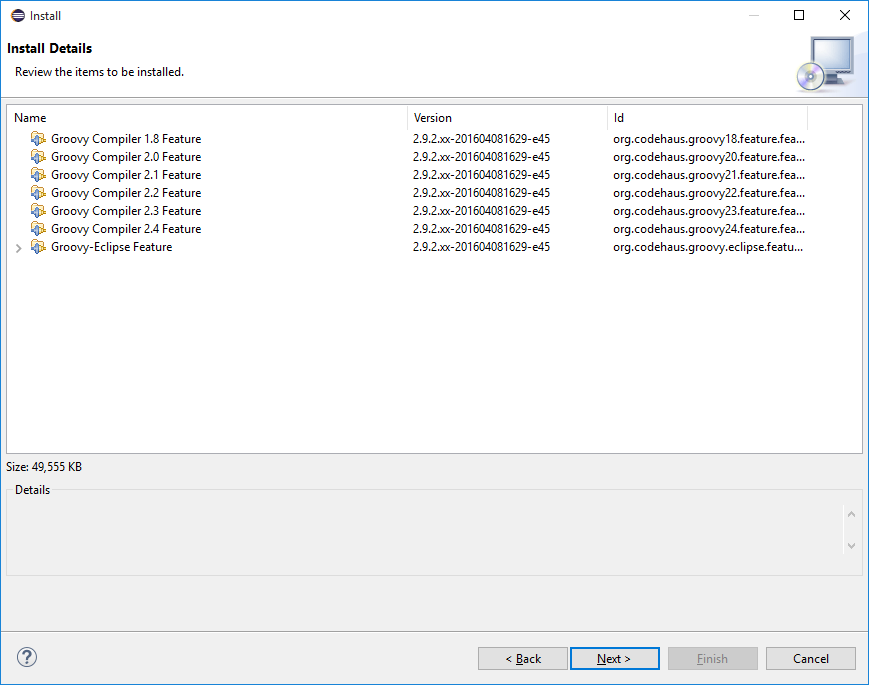
Review the items to install and click Next.
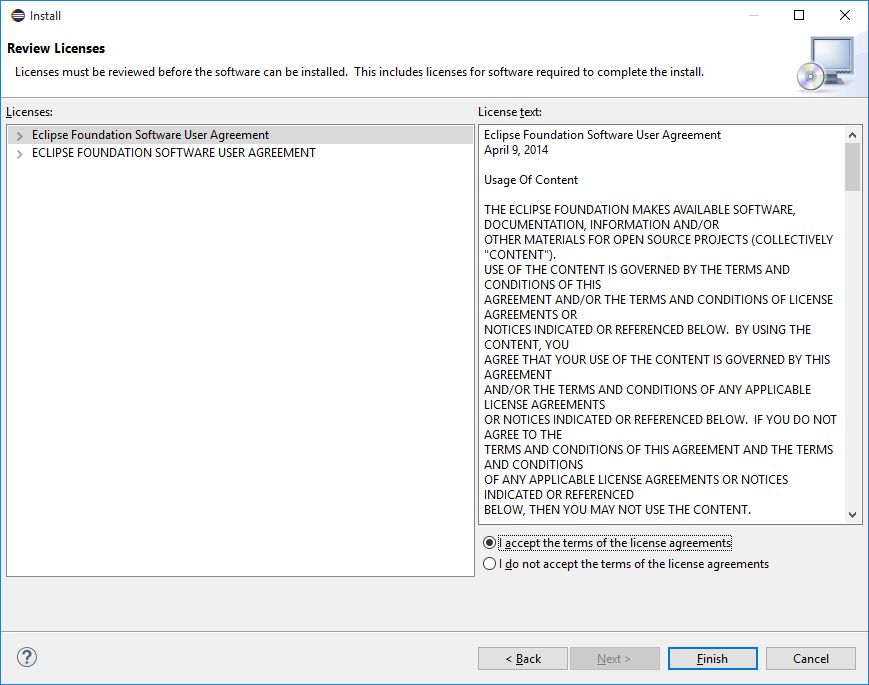
Accept the terms of the license and click Finish.
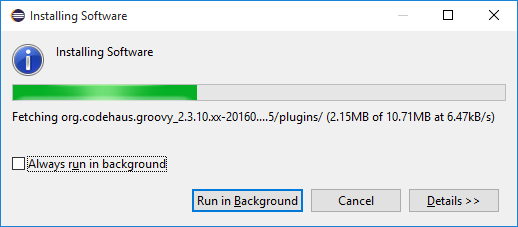
Wait for a while and Eclipse will install the Groovy plugin. You will need to restart Eclipse.
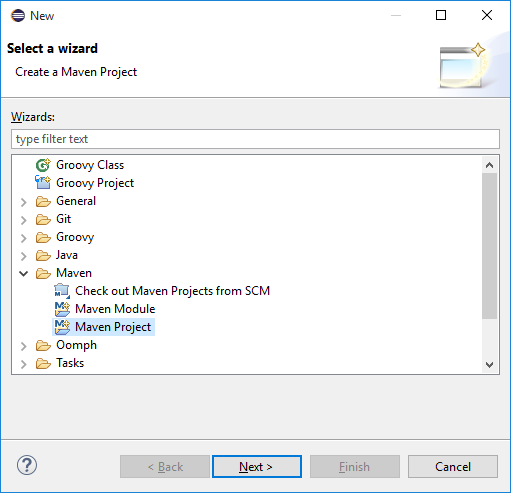
Now let's create the project. Go to File -> New -> Other... and choose Maven Project (notice that thanks to the Groovy plugin, you now have the options to create a Groovy class and a Groovy project)
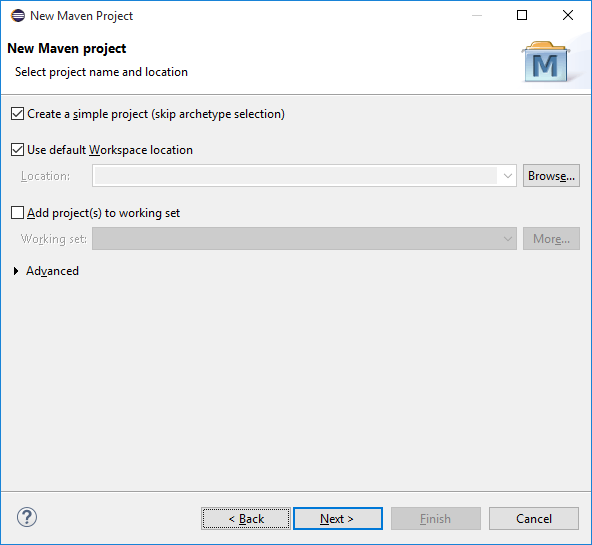
In the next window, check the option Create a simple project (skip archetype selection) and click Next.
In this window, enter the project information, For instance:
Group ID: com.example
Artifact ID: spock
Version: 0.0.1-SNAPSHOT
Packaging: jar

This will create a project with a pom.xml file and the following directories:
      src/main/java
src/main/resources
src/test/java
src/test/resources
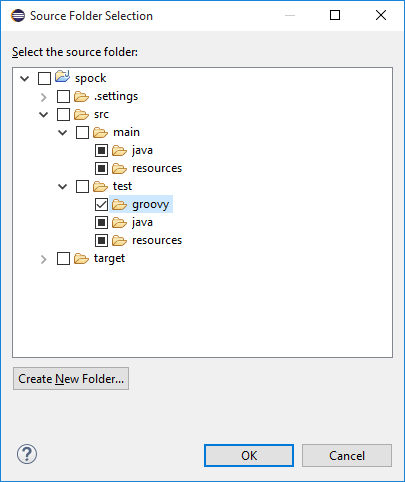
However, since we're going to use Groovy, the right thing to do is create an src/test/groovy directory. To do so, right-click on the name of the project and choose the option Build Path -> Configure Build Path and then the Source tab.
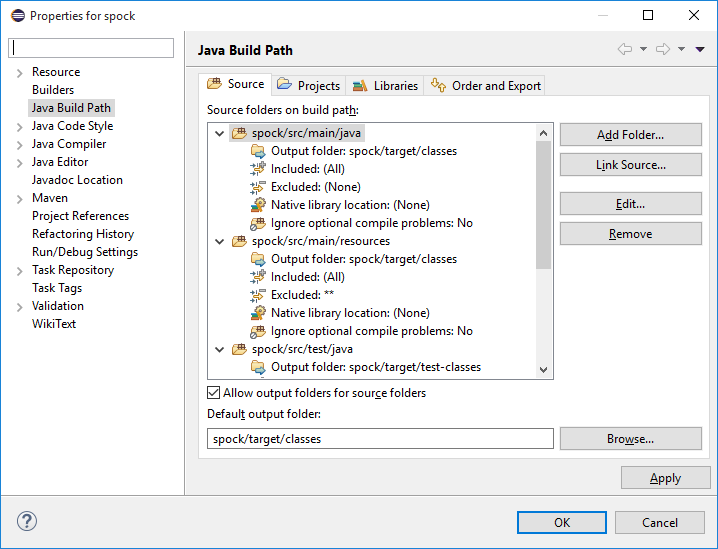
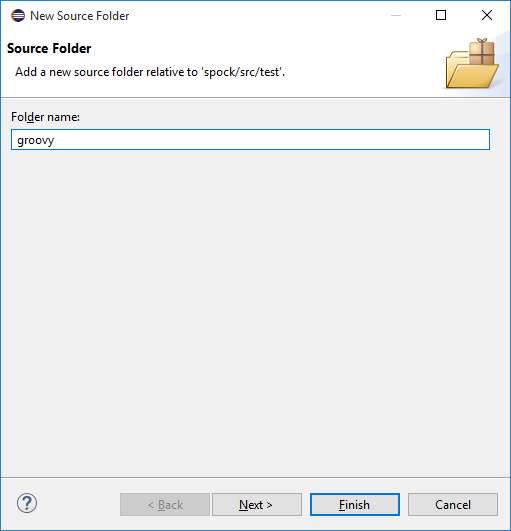
Click Add Folder... and create the new folder (relative to src/test you should only enter groovy) without inclusion or exclusion patterns.

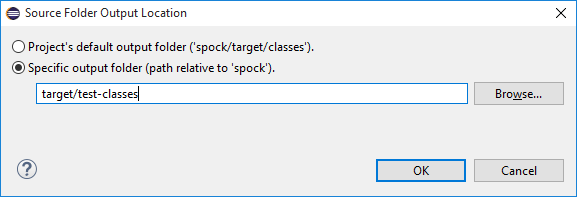
Next, select the new directory's option Output Folder and click Edit.
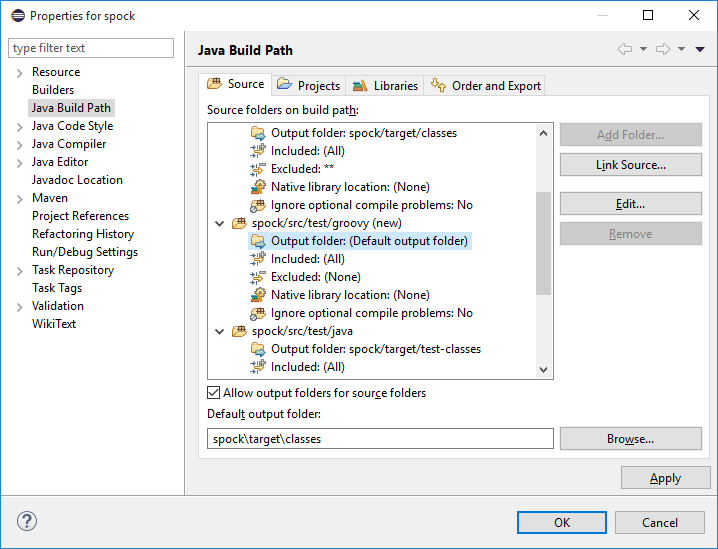
To specify the output directory for tests (target/test-classes) and click OK.
Regarding the pom.xml file, it should look like this:
      <project xmlns="http://maven.apache.org/POM/4.0.0" xmlns:xsi="http://www.w3.org/2001/XMLSchema-instance"
	xsi:schemaLocation="http://maven.apache.org/POM/4.0.0 http://maven.apache.org/xsd/maven-4.0.0.xsd">
	<modelVersion>4.0.0</modelVersion>

	<groupId>com.example</groupId>
	<artifactId>spock</artifactId>
	<version>0.0.1-SNAPSHOT</version>
	<packaging>jar</packaging>

	<name>spock</name>
	<url>http://maven.apache.org</url>

	<build>
		<plugins>
			<!-- Required plugin -->
			<plugin>
				<!-- The gmavenplus plugin is used to compile Groovy code -->
				<groupId>org.codehaus.gmavenplus</groupId>
				<artifactId>gmavenplus-plugin</artifactId>
				<version>1.5</version>
				<executions>
					<execution>
						<goals>
							<goal>compile</goal>
							<goal>testCompile</goal>
						</goals>
					</execution>
				</executions>
			</plugin>
			<!-- Optional plugin-->
			<plugin>
				<artifactId>maven-surefire-plugin</artifactId>
				<version>2.6</version>
				<configuration>
					<useFile>false</useFile>
					<includes>
						<include>**/*Spec.groovy</include>
					</includes>
				</configuration>
			</plugin>
		</plugins>
	</build>

	<dependencies>
		<!-- Required dependency for using Spock -->
		<dependency>
			<groupId>org.spockframework</groupId>
			<artifactId>spock-core</artifactId>
			<version>1.0-groovy-2.4</version>
			<scope>test</scope>
		</dependency>
		<!-- Optional dependencies for using Spock -->
		<dependency> <!-- Specify explicitly the Groovy version that matches the spock version -->
			<groupId>org.codehaus.groovy</groupId>
			<artifactId>groovy-all</artifactId>
			<version>2.4.1</version>
		</dependency>
		<!-- Enables mocking of classes (in addition to interfaces) -->
		<dependency>
			<groupId>cglib</groupId>
			<artifactId>cglib-nodep</artifactId>
			<version>3.1</version>
			<scope>test</scope>
		</dependency>
		 <!-- Enables mocking of classes without default constructor (together with CGLIB) -->
		<dependency>
			<groupId>org.objenesis</groupId>
			<artifactId>objenesis</artifactId>
			<version>2.1</version>
			<scope>test</scope>
		</dependency>
	</dependencies>
</project>
In the plugins section, we're adding the gmavenplus-plugin, required to compile groovy code. Optionally, we can also add the maven-surefire-plugin to generate test reports.
In the dependencies section, we add the required Spock library (and explicitly specify the groovy version to make sure it matches the Spock version). Optionally, we can also add CGLIB and Objenesis to enable mocking of classes.
Save the file and if the Maven dependencies are not added automatically to the Eclipse project, right-click the name of the project and choose the option Maven -> Update Project....
To test your environment, create HelloWorld.groovy (with New -> Other -> Groovy class) in the spock package inside the src/test/groovy directory:
      package spock

import spock.lang.Specification

class HelloWorldSpec extends Specification {

    def 'hello world'() {
		given:
		def i = 4

        expect:
        i % 2 == 0
    }
}
And run it like a JUnit test with Run As -> Junit Test. The output should be the famous green bar.

The super minimal Groovy knowledge you need for Spock
Groovy is a language that it's compiled to bytecode that is executed by the JVM, and it's very similar to Java, but with features comparable to Ruby, Python, or Javascript.
For example, everything is treated as an object and semicolons are optional:
      int x = 4 // Valid
x.getClass() // java.lang.Integer
You can use the def keyword instead of a type to declare a variable, Groovy will determine the type of the variable at runtime, which gives us some flexibility:
      int x = 4
def y = 5
y = "Hello" // Valid
x = "World" // Error
The def keyword can also be used to define methods (which makes them public). Methods can accept arguments without types, and the value of the last expression is returned by default (so a return statement is optional):
      def sum(a, b) {
	a + b
}
The parentheses are optional when calling a method with at least one argument:
      sum(1, 2) // Valid
sum 1, 2 // Also valid
And you can use a full string as a method name:
      def "sum of two numbers"(a, b) {
	a + b
}
Groovy also supports string interpolation, which allows us to substitute any expression into a string:
      def name = "Carl"
def hello = "Hello $name"
println hello // "Hello Carl"
In Java, we have the boolean (or Boolean) type to evaluate true/false expressions. But Groovy treats all variables as true unless the variable is:
- An empty string
- An empty collection
- A null reference
- Zero
- False
This way, in Groovy, statements like these are valid:
      boolean b = "I'm not false" // Evaluates to true
if(10) { } // Evaluates to true
if(map) { } // Equivalent to if(map != null && !map.isEmpty() { }
An important consideration is that in Groovy, the == operator it's like calling the equals() method of the object, it doesn't test for identity like in Java:
      def s1 = new String("A String")
def s2 = new String("A String")
s1 == s2 // true
Finally, we have closures. A closure is an anonymous block of code (like a function) which can be assigned to variables or passed as an argument to a function and has access to data of the context where it was defined. It can be as simple as:
      def hi = {
    println "Hi"
}
hi();
By default, closures have one parameter named it:
      def hi = {
    println it
}
hi("Hi");
If you don't pass the parameter, it will be null. Of course, you can define your own parameters (you can omit the type to pass anything):
      def hi = { a, b ->
    println "$a, $b"
}
hi("Hi", "Jerry");
hi(1, 2);
As you can see, Groovy is not as bulky as Java. Of course, there's a lot more to learn about Groovy, but this should be enough to start coding some tests with Spock. That is what we will do next.
Testing using Spock
In Spock, you write specifications. Every test class must extend from spock.lang.Specification:
      import spock.lang.Specification

class HelloWorldTest extends Specification {

}
This class can have many methods, where each of them is considered a scenario (a test case):
      import spock.lang.Specification

class HelloWorldTest extends Specification {

    def "scenario 1"() {
	}

	def "scenario 2"() {
	}
}
In BDD, these scenarios are described in a given-when-then format. Spock supports this style using labels with an optional description. Notice that the assert keyword is optional:
      import spock.lang.Specification

class HelloWorldTest extends Specification {

    def "scenario 1"() {
		given: "An integer with value 5"
		def i = 5

		when: "This integer is multiplied by 2"
		i = i * 2

		then: "The final value is 10"
		assert i != 5
		i == 10
	}
}
If we change one of the conditions so the test fails:
      import spock.lang.Specification

class HelloWorldTest extends Specification {

    def "scenario 1"() {
		given: "An integer with value 5"
		def i = 5

		when: "This integer is multiplied by 2"
		i = i * 2

		then: "The final value is 10"
		assert i != 5
		i == 11
	}
}
We can see how descriptive Spock presents the failure trace:
      Condition not satisfied:

i == 11
| |
| false
10

at spock.HelloWorldTest.scenario 1(HelloWorldTest.groovy:16)
Spock Blocks
Blocks divide a method into sections. They start with a label and extend either to the beginning of the next block or the end of the method. We already use the given, when and then, but there're six blocks actually:
- setup: (or its alias, given:)
- when:
- then:
- expect:
- cleanup:
- where:
Setup
In the setup: or given: (may people prefer this because it's more readable) block you create the objects and do any setup work for the test. Actually, this block is optional can be implicit, anything between the beginning of the method and the first (different) block represents the setup block:
      setup:
	def i = 5
If any, there can be only one setup: or given: block.
When and Then
The when: and then: blocks always go together. They represent a cause (called stimulus) and an effect (or response). For that reason, the when: block can contain any code but then: can only contain conditions, definitions, or interactions. We can have multiple pairs of when-then blocks:
      when:
i = i * 2

then:
i == 10

when:
i = i * 2

then:
i == 20
Or multiple then blocks after a when (which are evaluated separately):
      when:
i = i * 2

then:
assert i != 5

then:
i == 10
Expect
The expect: block is the same as then:, it can only contain conditions or variable definitions, but it doesn't require a then: block:
      expect:
def i = 5
i * 2 == 10
Cleanup
The optional cleanup: block is used to free resources and is run even if the code before the block has thrown an exception. It's usually the last block in the method, but it may only be followed by a where: block:
      given:
def file = new File('/temp/1.txt')

//...

cleanup:
file.close()
Where
where: is also an optional block that must be the last one because it lets you define values to perform parameterized tests, also known as data-driven tests. It's commonly used with expect::
      def 'data-driven test'() {
    expect:
    x + y == z

    where:
    x  | y  | z
    3  | 4  | 7
    19 | 23 | 42
    71 | 12 | 83
}
Spock will run as many tests as rows in the where block. In the example, Spock will execute three tests, and the vars x, y, and z will be initialized to the following values:
- In the first test, x will be 3, y will be 4, and z will be 7.
- In the second test, x will be 19, y will be 23, and z will be 42.
- In the third test, x will be 71, y will be 12, and z will be 83.
The minimum number of columns for this to work is two, so if you only have one variable, you can do something like this:
      where:
x  | _
3  | _
19 | _
71 | _
The data can be formatted horizontally also. This way, the previous tests can be written as:
      def 'data-driven test'() {
    expect:
    x + y == z

    where:
    x << [3, 19, 71]
    y << [4, 23, 12]
    z << [7, 42, 83]
}
A data pipe (represented by the left-shift operator, <<) connects a variable to a data provider. In the example, the values of each variable are provided by a list, but the data provider can be any iterable object, like a Collection, a String, or other implementations of Iterable. Also, the data can be fetched from external sources, like a database:
      def 'data-driven test'() {
    def sql = Sql.newInstance("jdbc:h2:mem:", "org.h2.Driver")

	//...

    where:
    [id, name, email] << sql.rows("select id, name, email from table")
}
Values can be ignored with an underscore (_):
      def 'data-driven test'() {
    def sql = Sql.newInstance("jdbc:h2:mem:", "org.h2.Driver")

	//...

    where:
    [_, name, email] << sql.rows("select * from table")
}
Variables can be assigned directly also:
      where:
x  | y
3  | 4
19 | 23
71 | 12
z = x + y
And of course, you can use all of these methods at the same time:
      where:
x  | _
3  | _
19 | _
71 | _
y << [4, 23, 12]
z = x + y
And
Although it's not considered a block, there's also an and: label that can be added to any block to describe and individual part of it:
      def "scenario 1"() {
    given: "An integer with value 5"
	def i = 5

	and: "A string with value a"
	def s = "a"

	// ...
}
Error reporting with @Unroll
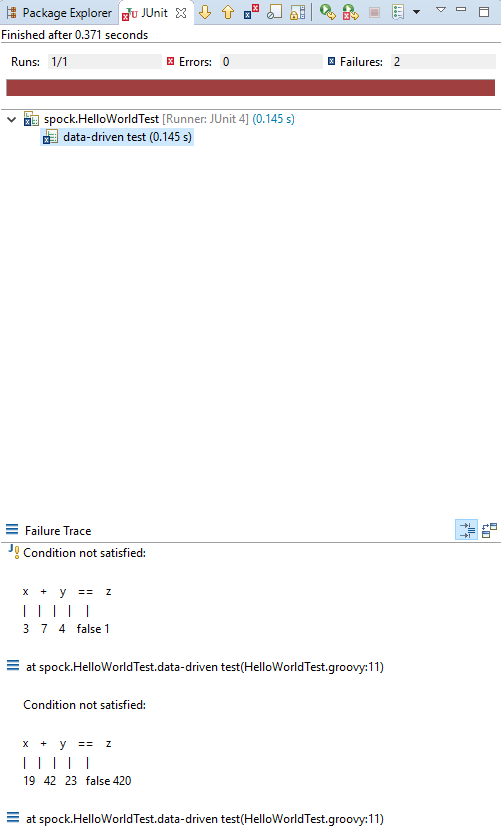
In a data-driven test, we can test many data sets. If one or more fail, for example:
      def 'data-driven test'() {
	expect:
	x    +    y    ==    z

	where:
	x  | y  | z
	3  | 4  | 1
	19 | 23 | 420
	71 | 12 | 83
}
Something like this is the result:
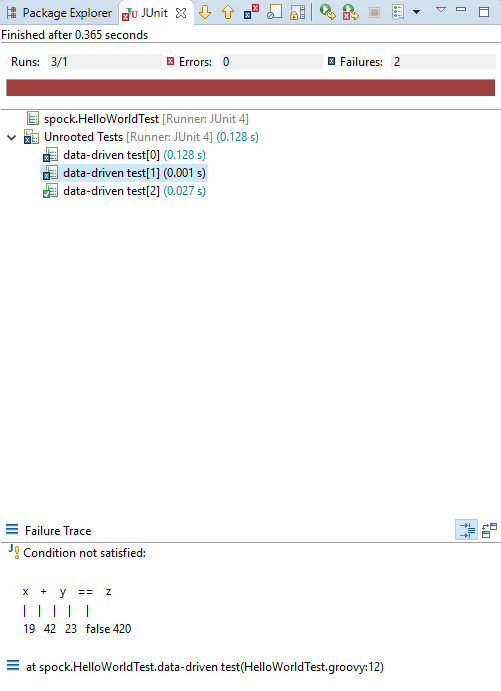
But if we want to be more specific about the failing datasets, we can use the spock.lang.Unroll annotation:
      @Unroll
def 'data-driven test'() {
	expect:
	x    +    y    ==    z

	where:
	x  | y  | z
	3  | 4  | 1
	19 | 23 | 420
	71 | 12 | 83
}
This way, each dataset will be reported separately:

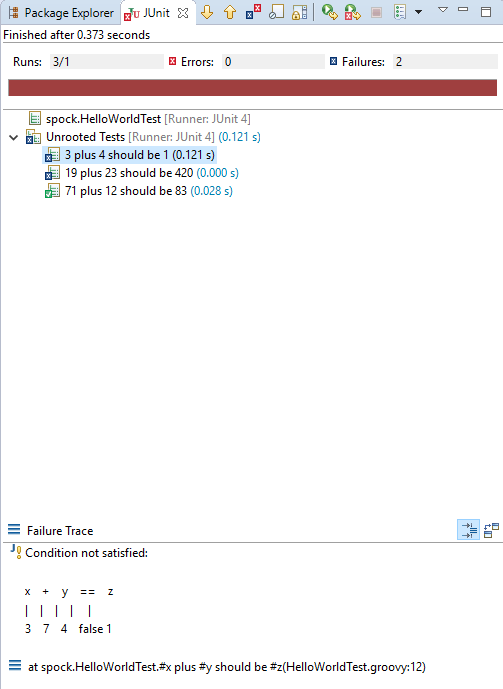
And there's more. We can have custom names with placeholders that will be replaced with the values of the variables defined inside the where: block. Either on the @Unroll annotation:
      @Unroll('#x plus #y should be #z')
def 'data-driven test'() {
	expect:
	x    +    y    ==    z

	where:
	x  | y  | z
	3  | 4  | 1
	19 | 23 | 420
	71 | 12 | 83
}
Or at the method name directly:
      @Unroll
def '#x plus #y should be #z'() {
	expect:
	x    +    y    ==    z

	where:
	x  | y  | z
	3  | 4  | 1
	19 | 23 | 420
	71 | 12 | 83
}
The result:
You also can annotate the whole class to avoid annotating each method:
      @Unroll
class HelloWorldTest extends Specification {

	def '#x plus #y should be #z'() {
		expect:
		x    +    y    ==    z

		where:
		x  | y  | z
		3  | 4  | 1
		19 | 23 | 420
		71 | 12 | 83
	}

	def '#x minus #y should be #result'() {
		expect:
		x    -    y    ==    result

		where:
		x  | y
		3  | 1
		50 | 9
		result = x - y
	}
}
Fixture Methods
Fixture methods execute code before or after tests. There are four of them.
setup() and cleanup() execute before and after each test case respectively. For example:
      class SetupCleanupTest extends Specification {
	def list = {
		println "creating the object"
		[2, 4, 6]
	}() // Execute the closure immediately

	def setup() {
		println "setup()"
	}

	def cleanup() {
		println "cleanup()"
	}

	def 'size'() {
		println "size()"
		expect:
		list.size == 3
	}

	def 'only even numbers'() {
		println "only even numbers()"
		expect:
		list.every {it % 2 == 0}
	}
}
The output will be:
      creating the object
setup()
size()
cleanup()
creating the object
setup()
only even numbers()
cleanup()
As you can see, instance objects are created before each test feature, like if they were defined at the beginning of the setup() method.
The other two fixture methods, setupSpec() and cleanupSpec(), are executed once for the whole class, before and after the test methods. For example:
      class SetupSpecCleanupSpecTest extends Specification {
	def @Shared dummy = {
		println "creating shared object"
	}() // Execute the closure immediately

	def @Shared list

	def setupSpec() {
		println "setupSpec()"
		list = [2, 4, 6]
	}

	def cleanupSpec() {
		println "cleanupSpec()"
	}

	def 'size'() {
		println "size()"
		expect:
		list.size == 3
	}

	def 'only even numbers'() {
		println "only even numbers()"
		expect:
		list.every {it % 2 == 0}
	}
}
The output will be:
      creating shared object
setupSpec()
size()
only even numbers()
cleanupSpec()
You can think of setupSpec() and cleanupSpec() as static methods, and as such, they can only use static variables or the ones annotated with spock.lang.Shared, otherwise, a compiler error will be generated.
As a side note, cleanup() and cleanupSpec() are executed even when the test failed, or an exception is thrown by the test.
Exception Conditions
Sometimes we need to test if an exception is thrown. In Spock we do it like this:
      def 'should throw exception'() {
	when:
	def i = 4 / 0

	then:
	thrown(RuntimeException)
}
Using the thrown(Class<Throwable> type) method to indicate we expect an exception. We can even save a reference to the exception to access its properties:
      def 'should throw exception'() {
	when:
	def i = 4 / 0

	then:
	def e = thrown(RuntimeException)
	e.message != null
}
When the exception is not thrown, an error like the following will be generated:
      Expected exception of type 'java.lang.RuntimeException', but no exception was thrown
	at org.spockframework.lang.SpecInternals.checkExceptionThrown(SpecInternals.java:79)
	at org.spockframework.lang.SpecInternals.thrownImpl(SpecInternals.java:66)
	at spock.ExceptionTest.should throw exception(ExceptionTest.groovy:11)
Certainly, there's a method to indicate that an exception should not be thrown:
      def 'should not throw exception'() {
	when:
	def i = 4 / 2

	then:
	notThrown(RuntimeException)
}
Ignoring tests
Other times, you'll want not to run (ignore) some tests- Spock can provide a way to do this through extensions that are activated by annotations called directives. There are four extensions related to ignoring tests:
- @Ignore
- @IgnoreIf(predicate)
- @IgnoreRest
- @Requires(predicate)
A method annotated with @Ignore will not be executed by Spock no matter what:
      @Ignore("This test shouldn't be run right now")
def "Test 1"() {
    //...
}
A method annotated with @IgnoreIf(predicate) is ignored only if the given predicate evaluates to true. For the predicate part, we can use:
- Any closure that returns a boolean
- The java.lang.System class with its methods to read system properties, getProperty(String) and getProperties()
- The equivalent built-in "sys" property, a map of system properties
- The built-in "env" property, a map of environment variables
- The spock.util.environment.OperatingSystem class through the built-in os property to access information on the current operating system, such as its name, version, and family
- The spock.util.environment.Jvm class through the built-in jvm property to access information on the current JVM, such as its Java version
For example:
      @IgnoreIf({ System.getProperty('user.dir') == '/home' })
def 'should not run if user.dir is /home'() {
    //...
}

@IgnoreIf({ sys['user.name'] != 'root' })
def 'should not run when user is not root'() {
    //...
}

@IgnoreIf({ env.HOME != '/home' })
def 'should not run if user home is /home'() {
    //...
}

@IgnoreIf({ os.macOs })
def 'should not run on Mac'() {
    //...
}

@IgnoreIf({ jvm.java7 })
def 'should not run in Java 7'() {
    //...
}
A method annotated with @IgnoreRest will be executed by Spock, but all the other tests of the class will be ignored. For example:
      class IgnoreTest extends Specification {
    @IgnoreRest
    def 'this one will run'() {
        // ...
    }

    def "this one won't run"() {
        // ...
    }

    def "this one won't run either"() {
        // ..
    }
}
A method annotated with @Requires(predicate) is the opposite of @IgnoreIf, it will be executed only if the given predicate evaluates to true. For example:
      @Requires({ jvm.java8 })
def 'only run in Java 8'() {
    //...
}
@Ignore, @IgnoreIf, and @Requires can annotate the whole class.
Mocks
Suppose we have a DAO (Data Access Object) interface and a service in Java to interact with a database:
      public class User {
	private String email;

	public void setEmail(String email) {
		this.email = email;
	}
	public String getEmail() {
		return this.email;
	}
}

public interface UserDao {
	User save(User user);
	boolean delete(int id);
	User get(String email);
}

public class UserService {
	private UserDao dao;

	public void setDao(UserDao dao) {
		this.dao = dao;
	}

	public boolean registerUser(User user) {
		boolean saved = false;
		if(dao.get(user.getEmail()) == null) {
			dao.save(user);
			saved = true;
		}
		return saved;
	}

	// ...
}
Sometimes we want to test the interaction between classes, but don't want to set up a connection to a database or create a complex object just for a unit test. One option is to create a dummy implementation to simulate results. Such implementation is called a mock object.
To ensure compatibility with Java, Spock uses JDK dynamic proxies when mocking interfaces and CGLIB proxies when mocking classes to generate these dummy objects at runtime.
Here's a simple example of how to create a mock implementation of Dao:
      class MockTest extends Specification {
	def 'Test service with mock DAO'() {
        given:
	    // Creating a mock implementation
        def daoMock = Mock(UserDao)

        // In Groovy, this is one way to call a setter
        def service = new UserService(dao: daoMock)

        // For any string passed as parameter return a dummy user from Mock
        daoMock.get(_ as String) >> {
			String email -> new User(email: email)
		}

        when:
		def user = new User()
		user.email = "[email protected]"

        then:
        service.registerUser(user) == false
    }
}
We can see that to create a mock object, we just have to call the Mock() method and define the behavior of the methods on the mock object (since initially, mock objects have no behavior). In the example, we are using the >> operator to define the return value of the method. Also, _ as String means any object of type String (you can pass any type here) and you can catch the parameter passed inside the closure.
We can also specify the return values of a mock method for more than one call:
      class MockTest extends Specification {
	def 'Test service with mock DAO'() {
        given:
	    // Creating a mock implementation
        def daoMock = Mock(UserDao)
		// Setting return values
		daoMock.delete(_) >> true >> false
		// Or with a list: daoMock.delete(_) >> [true, false]

        expect:
        daoMock.delete(1) == true
        daoMock.delete(1) == false
        daoMock.delete(2) == false
    }
}
In the example, we are define that for the first invocation of UserDao.delete(int), this method must return true, and for the second and subsequent invocations, false.
In the then: or expect: blocks, we can even specify how many times a method may be called with a number or a range:
      n * method()                   // expect n calls
(n..m) * method()              // expect n to m calls
(_..m) * method()              // expect at most m calls
(n.._) * method()              // expect at least n call
n * object.method(_)           // any single argument (including null)
n * object.method(*_)          // any argument list (including the empty argument list)
n * object.method(!null)       // any non-null argument
n * object.method(_ as Type)   // any non-null argument of type Type
n * object._                   // any method of object
n * _                          // match anything
For example:
      class MockTest extends Specification {
	def 'Test service with mock DAO'() {
        given:
	    // Creating a mock implementation
        def daoMock = Mock(UserDao)
		daoMock.get(_ as String) >> null

        def service = new UserService(dao: daoMock)

		when:
		def user = new User()
		user.email = "[email protected]"
		service.registerUser(user)

        then:
        1 * daoMock.save(_ as User) // The save method should be called because the user doesn't exists
    }
}
Conclusion
This has been an introduction to the Spock framework and BDD. I hope you can see how readable and accessible is to test with the help of Groovy and this framework.
Of course, there is a lot of functionality that we didn't cover, but this should be enough to start programming test for most of your needs. You can learn more at https://github.com/spockframework/spock or with the excellent book Java Testing with Spock.
Advance your tech skills today
Access courses on AI, cloud, data, security, and more—all led by industry experts.
