Tips and Cool Tricks to Use in Git
This tutorial is designed not to teach Git fundamentals but to demonstrate some important strategies for using Git. It will cover aliases, autocomplete, checkout/reset, stashes, amending, and differences between Git commits. Check it out today!
Jan 10, 2019 • 7 Minute Read
Introduction
This entry is motivated by a tough week. A week of challenges related to scm (which is not the most relaxing thing in the world). A week full of failed attempts to cherry-pick and other Git things I probably would not use if the code was being managed correctly.
Nonetheless, I learned some cool tricks to using Git that will save you blood, sweat, and tears in the future.
This tutorial is designed not to teach Git fundamentals but to demonstrate some important strategies for using Git.
I will cover aliases, autocomplete, checkout/reset, stashes, amending, and differences between Git commits.
Alias (co > checkout)
You can create alias for any Git command. For example, the following creates an alias st for the Git command status:
$ git config --global alias.st status
Just replace the alias with the name that you want, followed by the original command. With a shell alias of g and git alias of co, the following command will achieve the same effect as git checkout:
$ g co
To create a shell alias you can add a one off alias to your current shell with alias g='git '
To create a "permanent"/persistent alias for your user you can simply add the above command to your user's shell rc file. This will be ~/.bashrc or ~/.zshrc for most systems.
With your favorite editor open the file for your current shell, you can find this shell by running echo $SHELL. Add the following snippet near the bottom of the file, the trailing space is so you can pass additional arguments to the alias and have them passed correctly to the program you can calling, in this case git.
alias g='git '
It is a little different, but over time you earn enough in productivity.
Autocomplete
When using Git via command line, it is always useful to have autocomplete enabled. If you use the git shell by ruWindows, autocomplete should already be set.
If autocomplete is not enabled on your terminal, you can download the autocomplete script for Git from Github.
After downloading, copy the file to the home directory, and add the line below to your .bashrc file:
source ~/git-completion.bash
Now when you enter a git command and press tab, it should display all Git commands which start with co:
$ git co<tab>
commit config
Having this autocomplete ability at your fingertips speeds up implementation.
Checkout and reset on files
You may have used checkout and reset to work with branches and commits. However, you can also use the checkout and reset commands on files.
When we use git reset on a file in git, the reset command will update the staging area, causing a particular file to revert to its previous state.
As a result, users can remove the file "jedi.js" from the staging area and make it equal to its version in HEAD with the command:
$ git reset HEAD jedi.js
As seen in the diagram above, the file is no longer in staging and has the same content as the latest commit.
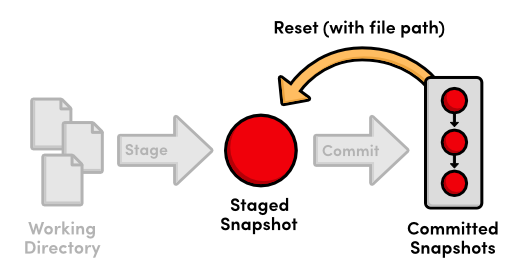
Pretty cool! Now let's take a look at checkout.
Good old git checkout is typically used to switch between branches. When the command is used with a file path, the specified file is reset to the same state as the branch (HEAD in this case).
$ git checkout HEAD jedi.js
The above command restores the file "jedi.html" to the state of the file pointed to by HEAD, and it is removed from staging.
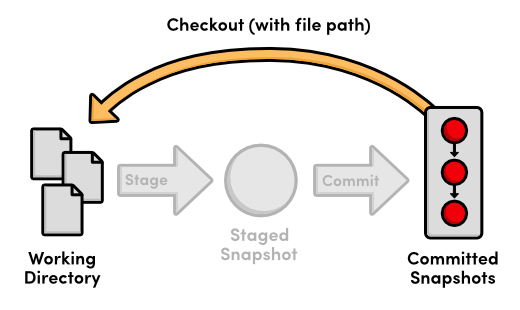
Save it somewhere, really. This file will definitely come in handy.
Thus, you can only restore the file to a version pointed to by another branch (or the same). You can make changes to the file then add this modified file to staging with git add ..
Stash saves time
The command git stash, picks all the changes in staging and save it in a separate place. Thus, this useful and aptly named command clears your staging area.
That way you can save a set of changes you have made but do not yet want to commit.
$ git stash
Or, if you would need to stash untracked changes as well, use -u argument:
$ git stash -u
In particular, I use more stash when I need to git pull and want to avoid conflicts between local changes and changes upstream.
To restore your local changes back to staging, you need to apply your stash. The following command recreates the latest changes that were stashed away:
$ git stash apply
You can have more than one stash. By default, your stashes will be applied in FILO (First-in, last-out) order.
Amend also saves time
If, after committing some changes, you remember that you forgot to add a modification to a file, you can use the _ --amend _ option.
The following demonstrates a use case of amend, another important pro tool:

Here, the parameter _ - no-edit _ fixes the file without changing the commit message.
Differences between commits
To see the changes of the last commit, you can use:
$ git log --stat
$ git diff 0da94be 59ff30c
If you use GitHub, you may better see the differences there. + see how
Advance your tech skills today
Access courses on AI, cloud, data, security, and more—all led by industry experts.
