Setting Up Postman and Automatically Adding Bearer Tokens
Postman is a tool that developers use to mock, organize, and test REST APIs. It also offers many scripting capabilities you may not be fully utilizing.
Oct 2, 2020 • 6 Minute Read
Introduction
When implementing a distributed system, you will often find that you are working across dozens of apps and services. Moreover, these services typically expose their functionality over REST APIs, protected in different ways. Postman is a tool that developers use to mock, organize, and test REST APIs. It also offers many scripting capabilities that you may not be fully utilizing.
In this guide, you will learn how to use pre-request scripts to fetch and attach bearer tokens to make testing your REST APIs easier. The guide will use oauth2 client credential flow as a motivating example since it is a common type of REST API authentication.
Understanding How to Organize Requests in Postman
Postman allows you to organize your requests into three levels of hierarchy:
Workspaces are at the root of the organizational hierarchy of postman. They are shared contexts that allow team members to collaborate, set up different environments, and attach variables to these environments. 2. Collections sit inside a workspace and can be executed by firing all its child requests and hold variables, as well as pre- and post-request scripts. 3. Folders sit inside collections and can also have their own pre- and post-request scripts.
This hierarchy has two main benefits:
- It helps you organize your requests
- It can help you share common functionality, such as acquiring ouath2 access tokens between requests
For the purpose of this guide, you are interested in the second benefit. Since collections, folders, and requests can all have pre-request scripts configured, organizing your requests appropriately can help you reduce code duplication.
For this reason, you may want to organize your requests as demonstrated below:
      orders-collection
 - GET v1/orders
 - POST v1/orders

products-collection
 - GET v1/products
You've created a collection for each API. Within each collection, save a Postman request for each endpoint that API has. Each collection can have a separate pre-request script to attach authorization headers. This is useful if each API requires different credentials. Any additional endpoints that are added under each component will automatically inherit the settings of its parent collection.
Note: If the APIs you want to interact with have OpenAPI documentation, this can be automatically generated by using Postman's official OpenAPI integration.
Attach Scripts to the Collections
Once your requests have been organized appropriately, you can start attaching a pre-request script. You will want to attach your script to the collection so that the requests inside the collection can automatically execute the script in any configuration.
To fetch an oauth2 token using client_credentials, you will use this script:
      const tokenUrl = 'https://authority.com/connect/token';

const clientId = 'xxxxxx';
const clientSecret = 'xxxxxx';

const getTokenRequest = {
  method: 'POST',
  url: tokenUrl,
  body: {
      mode: 'formdata',
      formdata: [
          { key: 'grant_type', value: 'client_credentials' },
          { key: 'client_id', value: clientId },
          { key: 'client_secret', value: clientSecret }
      ]
  }
};

pm.sendRequest(getTokenRequest, (err, response) => {
  const jsonResponse = response.json();
  const newAccessToken = jsonResponse.access_token;

  pm.variables.set('access_token', newAccessToken);
});
The above script makes a request to your identity provider to fetch the bearer token. Then it reads the response and saves it to a variable called access_token.
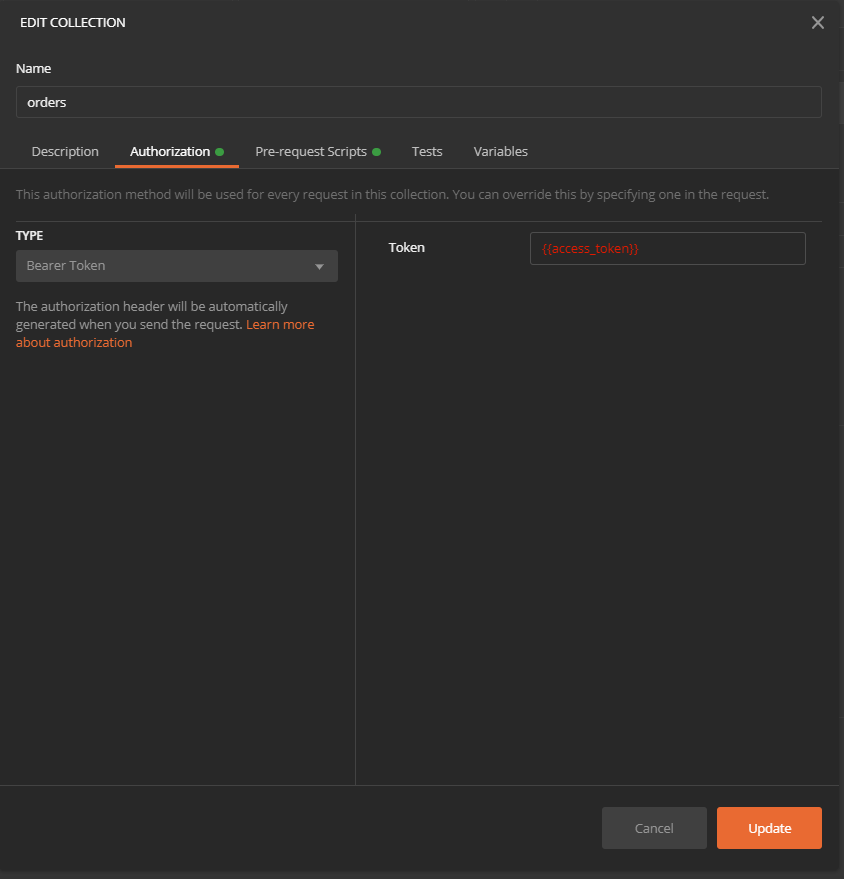
Make sure the authorization details for each endpoint are configured to "inherit auth from parent" and saved in the correct location.
Note: depending on how your identity provider is configured, you may need to pass extra parameters. For example, some providers may require you to explicitly specify requested scopes.
Handle Different Environments
You may want to access different environments with the same collection. Postman has this ability. It allows you to store a set of variables and switch the context of your requests. You can also use this feature to change credentials and identity providers based on environments. To do this, modify your script as demonstrated below:
      let tokenUrl;
let clientId;
let clientSecret;

if (pm.environment.name === 'development') {
  const tokenUrl = 'https://development-authority.com/connect/token';
  const clientId = 'xxxxxx';
  const clientSecret = 'xxxxxx';
else if (pm.environment.name === 'staging') {
  const tokenUrl = 'https://staging-authority.com/connect/token';
  const clientId = 'yyyyyy';
  const clientSecret = 'yyyyyy';
}


const getTokenRequest = {
  method: 'POST',
  url: tokenUrl,
  body: {
      mode: 'formdata',
      formdata: [
          { key: 'grant_type', value: 'client_credentials' },
          { key: 'client_id', value: clientId },
          { key: 'client_secret', value: clientSecret }
      ]
  }
};

pm.sendRequest(getTokenRequest, (err, response) => {
  const jsonResponse = response.json();
  const newAccessToken = jsonResponse.access_token;

  pm.variables.set('access_token', newAccessToken);
});
Conclusion
Testing your APIs is an important part of the development cycle. By using tools like Postman to set up scripts to automate menial tasks, you make your work more enjoyable. As a next step, you may want to try writing scripts to automate authentication with cloud services, such as Amazon Web Services or Microsoft Azure.
Advance your tech skills today
Access courses on AI, cloud, data, security, and more—all led by industry experts.
