A Practical Introduction to RethinkDB
In this guide you'll learn how to work with RethinkDB, how to install RethinkDB and most importantly how to develop a simple application. This RethinkDB tutorial is great for both beginners and advanced developers alike.
Dec 14, 2018 • 52 Minute Read
Summary
Introducing RethinkDB
RethinkDB is an open-source database that, unlike traditional database systems, stores the information in JSON (JavaScript Object Notation) format. Because of this, it's considered a NoSQL (Not Only SQL) database, such as MongoDB, Cassandra, and CouchDB.
NoSQL databases share the following features:
- No required schema or table structure for storing the information.
- Distributed architecture so they are easy to scale horizontally (in clusters)
- Typically stray from the ACID model (Atomicity, Consistency, Isolation, Durability) of transactions. Follow the CAP theorem instead, which states that a distributed system cannot simultaneously provide the following guarantees:
- Consistency (the same data can be read by all the clients of the system)
- Availability (even in case of failure, clients receive a response)
- Partition Tolerance (even in the case of network failure, the system continues to operate)
Many NoSQL databases sacrifice consistency in favor of availability and partition tolerance, offering the concept of eventual consistency, where the changes received in one part of the cluster are eventually replicated to the rest of it. Other NoSQL databases don't mind sacrificing availability or partition tolerance to prioritize consistency.
In the case of RethinkDB, it chooses to keep data consistent (over available) in the case of a network partition. This means that after a write operation, a read operation will always return the latest version of the data.
To make this work, in RethinkDB the data is assigned to a primary server (or individual partitions called shards), and all queries are routed to it. This is the default behavior, but if the data is replicated to other nodes within the cluster, we can instruct the query that it is acceptable to return out-of-date information. As a result, RethinkDB can direct the query to the closest available replica and not necessarily to the primary.
Besides all this, RethinkDB has the following unique features:
- It's easy to use and configure in a cluster with replication and sharding (the process of splitting a table across multiple machines).
- It has powerful query language, ReQL, that even supports joining tables (common in traditional database systems).
- It can also perform map-reduce and geospatial queries.
- It allows us to build real-time applications easily by publishing the table's changes as they occur. This is perhaps RethinkDB's most important and most popular feature.
Now that you know what is RethinkDB all about, let's install it.
Installing RethinkDB
Basically, you have three options to start using RethinkDB:
- Using Docker. There's an official RethinkDB repository on Docker Hub. If you have Docker version 1.11.2 or greater, just execute a command like the following:
docker run -P --name rethink-server -d rethinkdb
Docker will automatically download the image and start an instance.
- Using an official installer package. RethinkDB has installers for Linux, OS X, and Windows. For Linux, there are official packages for Ubuntu, CentOS, and Debian, but you can find community packages for other distributions. For example, in Ubuntu you type the following commands:
      source /etc/lsb-release && echo "deb http://download.rethinkdb.com/apt $DISTRIB_CODENAME main" | sudo tee /etc/apt/sources.list.d/rethinkdb.list
wget -qO- https://download.rethinkdb.com/apt/pubkey.gpg | sudo apt-key add -
sudo apt-get update
sudo apt-get install rethinkdb
The first line will export the variables from the file /etc/lsb-release. One of the is $DISTRIB_CODENAME that contains the version of Ubuntu you're running, and it's used to build the repository URL and save it with the tee command. The second line downloads the PGP key used to sign the RethinkDB packages and adds it to your system. The third command updates the package list, and the last command downloads and install the database.
If you're using OS X 10.9 (Mavericks) or above, maybe the easiest way is to use Homebrew, a popular package manager for OS X:
brew update && brew install rethinkdb
- Building it from source. Use this only if the previous options aren't available, or if you want to customize the database in some way, or if you want to run multiple versions of RethinkDB at the same time. To build from source, you need to install a bunch of dependencies, download and extract the source tarball (or clone it from Github) and build it depending on your platform. Find more information here.
Following any of these methods will successfully install RethinkDB. To start an instance of the database, just execute the following command:
rethinkdb
This command will:
- Create a directory to store the data in your user directory (/home/user/rethinkdb_data for example)
- Start listening for client connections on port 28015
- Start listening for cluster connections on port 29015
- Start a web administration interface on port 8080
By default, this server will only listen for local connections, which means that clients on other machines won't be able to access the database (for security purposes). If you want global access, you can bind to all IPs with the option:
rethinkdb --bind all
If you want to start a second instance to create a cluster on a single machine, execute this command:
rethinkdb --port-offset 1 --directory rethinkdb_data2 --join localhost:29015
This will create another instance on port 28016 (--port-offset 1), use /home/user/rethinkdb_data2 as its data directory, and connect to the first instance to create a cluster (--join localhost:29015).
If you're using two machines, start RethinkDB on one machine with the command:
rethinkdb --bind all
And then, assuming that the IP of the first machine is 192.168.0.1, start the second instance on the other machine with the command:
rethinkdb --join 192.168.0.1:29015 --bind all //Change the IP accordingly
For a complete list of options that can be used on the command line, type rethinkdb --help or read this page.
If you want to run RethinkDB as a service, you have to create a configuration file for initialization options and use init.d or systemd for Linux, or launchd in OS X (if used Homebrew for the installation, this is already done for you). You can refer to this page for more information.
RethinkDB Administration Interfaces
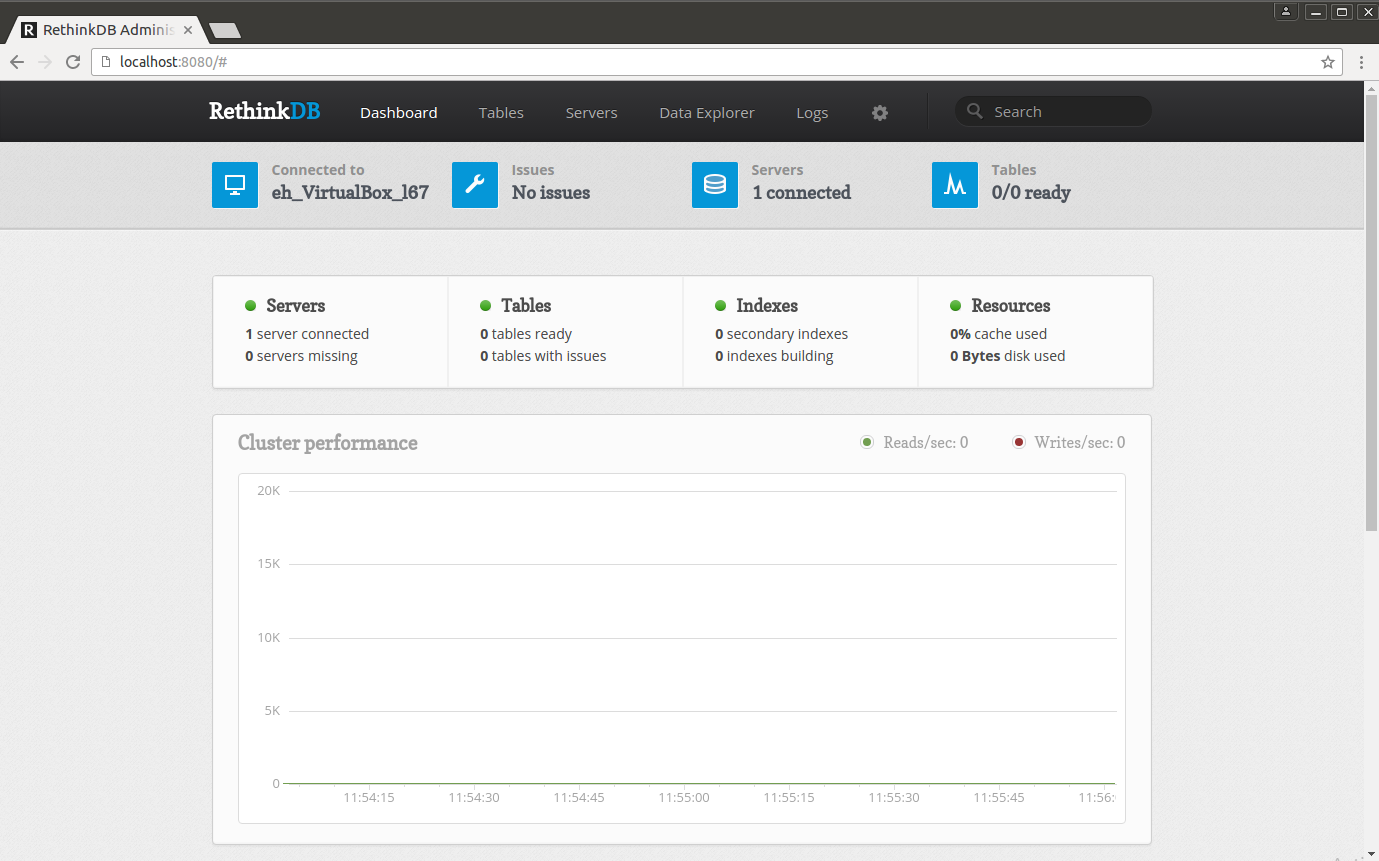
Now that the database is running, we can go to https://localhost:8080 (or any IP your instance is bound to) to access the RethinkDB web interface:
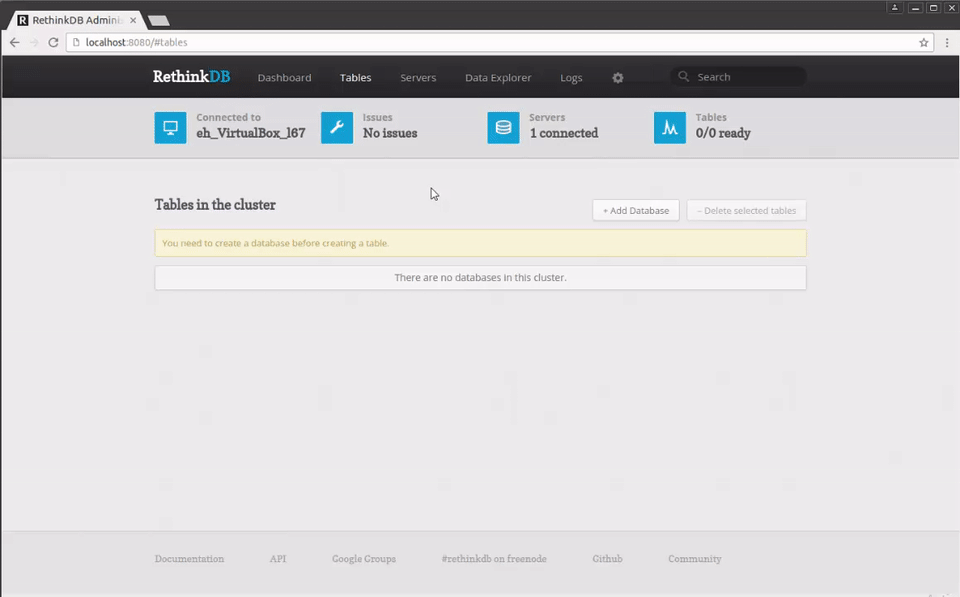
If we click on the Tables option at the top of the page, we'll see the databases and tables we have on our server:

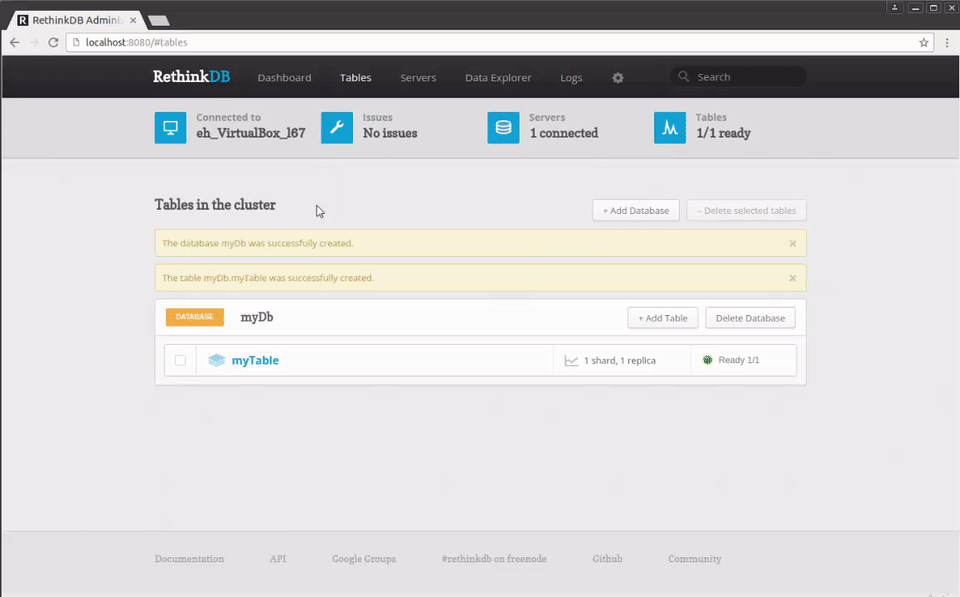
Since this is a new instance, we don't have any databases yet, so let's add one by clicking the +Add Database button and entering the name myDb and then adding a table by clicking the +Add Table button and entering the name myTable:
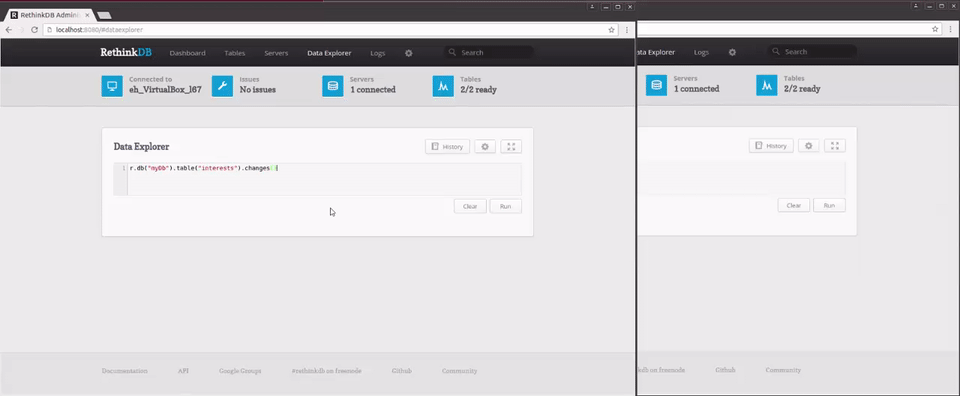
If we click on the Data Explorer section at the top of the page, the web interface will present an interactive shell where you can issue commands, for example, to query the table you just created:
r.db("myDb").table("myTable")
We even get syntax auto-completion and contextual help.
If you're more of a command line person, there are two excellent projects that provide a Command Line Interface (CLI) to RethinkDB. They are both made in javascript with Node.js so you'll need to have node.js and npm (Node Package Manager) installed.
The first one is recli that can either take a ReQL expression as an argument or be used as a REPL (read–eval–print loop, or in other words, an interactive shell):
      $ recli 'r.db("myDb").table("myTable")'
... (JSON output) ...

$ recli
recli> r.db("myDb").table("myTable")
... (JSON output) ...
It uses configuration files and remembers commands that you run in the between REPL sessions.
The second one is ReQL CLI that just work as a REPL but has some helpful built-in commands:
      $ .reql-cli
- RethinkDB Command Line Interface v1.0.0
- Courtesy of Workshape.io
reql-cli> help
[-] Available commands:
  - dbs - print available databases
  - db {db} - change current db to {db}
  - tables - print available tables in current db
  - r... - any rethink valid query, omitting run()

  - press ctrl + c to quit
reql-cli>
Now that you know how to execute queries, let's know more about this ReQL language.
ReQL Query Language
Just as in a traditional database, RethinkDB works with tables. But instead of working with records, it works with documents, which are objects written in JSON, such as in the following example:
      {
    "name": "Andrew",
	"age": 27
}
As you can see, a document begins and ends with curly braces, it has keys and values separated by colons while key/value pairs are separated by commas.
The key is a string. Any Unicode character with the exception of the null character (\0) and the reserved characters . and $. The value can be of type:
- Number (any real number)
- String (any UTF-8 string)
- Binary object (like a file or an image)
- Date/Time (with millisecond precision)
- Boolean (true/false)
- Null (to explicitly denote the absence of a value)
Arrays and objects (which actually are embedded documents) are also accepted:
      {
    "name": "Andrew",
	"age": 20,
	"interests": ["reading", "playing guitar", "pop music"], // An array
	"contact info": {                                        // An object
		"email": "[email protected]",
		"phone": "5555555555"
	}
}
RethinkDB also has specific data types, such as streams (lazy loaded lists) and geometry data types (points, lines, and polygons).
ReQL is the language to make queries in RethinkDB using JSON documents. As you saw in the previous section, a simple ReQL query looks like this:
r.db("myDb").table("myTable")
Let's break down this line of code. Think of ReQL as a fluent API (where functions are chained to provide readability). You start a query with the identifier r and with the . operator. Then you add operations at the end.
For instance, you choose a database: db("myDb")
If you don’t specify a database, the default one is test. table("myTable") selects the table.
This will return all the documents of that table.
But we don't have any document, we need to add one with insert():
      r.db('myDb').table('myTable').insert({
    "name": "Andrew",
	"age": 20,
	"interests": ["reading", "playing guitar", "pop music"],
	"contact info": {
		"email": "[email protected]",
		"phone": "5555555555"
	}
})
The output will look like this:
      {
    "deleted": 0 ,
    "errors": 0 ,
        "generated_keys": [
        "f4f03a8f-c626-4d33-9383-3bc01b6b5911"
    ] ,
    "inserted": 1 ,
    "replaced": 0 ,
    "skipped": 0 ,
    "unchanged": 0
}
Now if we query the table, the output will be:
      {
    "age": 20 ,
    "contact info": {
        "email": [email protected],
        "phone":  "5555555555"
    } ,
    "id":  "f4f03a8f-c626-4d33-9383-3bc01b6b5911" ,
    "interests": [
        "reading" ,
        "playing guitar" ,
        "pop music"
    ] ,
    "name":  "Andrew"
}
RethinkDB generates a UUID (Universal Unique Identifier) as a primary key for the document if none is provided (with the key "id").
You can also insert more than one document in an insert command using an array (which is faster than inserting each one individually):
      r.db('myDb').table('myTable').insert([{
    "name": "Carl",
	"age": 25,
	"interests": ["sports", "pizza", "poetry"],
	"contact info": {
		"email": "[email protected]",
		"phone": "5555555555"
	}
},
{
    "name": "Sophia",
	"age": 21,
	"interests": ["playing golf", "solving puzzles", "rock music"],
	"contact info": {
		"email": "[email protected]",
		"phone": "5555555555"
	}
}])
The output:
      {
    "deleted": 0 ,
    "errors": 0 ,
    "generated_keys": [
        "e7257cb0-bb50-4104-9a0a-9c12aa48884e" ,
        "0530c22a-db04-4d22-a9a9-df82c1b76196"
    ] ,
    "inserted": 2 ,
    "replaced": 0 ,
    "skipped": 0 ,
    "unchanged": 0
}
If you want to get a document, you can use get() passing its primary key:
r.db('myDb').table('myTable').get("0530c22a-db04-4d22-a9a9-df82c1b76196")
The output:
      {
"age": 21 ,
"contact info": {
    "email": [email protected],
    "phone":  "5555555555"
} ,
"id":  "0530c22a-db04-4d22-a9a9-df82c1b76196" ,
"interests": [
    "playing golf" ,
    "solving puzzles" ,
    "rock music"
] ,
"name":  "Sophia"
}
ReQL Query Strategies
If you want to get n number of documents, you can use limit(). For example, to get a single document (you might not get the same document every time):
r.db('myDb').table('myTable').limit(1)
Using filter() we can get all the documents that satisfy a condition. For example:
r.db('myDb').table('myTable').filter({name: "Andrew"})
Returns the document with a name field with value Andrew. Documents that don't contain a name field are skipped.
RethinkDB is case-sensitive, so the previous query is different from the one below:
r.db('myDb').table('myTable').filter({Name: "Andrew"})
You have to be careful about data types. The following query won't return any document because the field age is defined as a number, not a string:
r.db('myDb').table('myTable').filter({age: "21"})
If you prefer the standard data table format, you can rewrite the first query as:
r.db('myDb').table('myTable').filter(r.row("name").eq("Andrew"))
r.row("name") refers to the value of the field name of the current document. This syntax allows for more complex queries. For example, to get people over twenty-two years old:
r.db('myDb').table('myTable').filter(r.row("age").gt(22))
To filter based on a field of an embedded object:
r.db('myDb').table('myTable').filter(r.row("contact info")("phone").eq("5555555555"))
To filter based on two or more conditions:
r.db('myDb').table('myTable').filter(r.row("age").eq("21").or(r.row("age").eq("25")))
To get people who are interested in reading:
r.db('myDb').table('myTable').filter(r.row("interests").contains("reading"))
Using pluck(), you can indicate the keys to be returned, for example:
r.db('myDb').table('myTable').pluck("name", "interests")
This query will output:
      {
    "interests": [
        "playing golf" ,
        "solving puzzles" ,
        "rock music"
    ] ,
    "name":  "Sophia"
}

{
    "interests": [
        "reading" ,
        "playing guitar" ,
        "pop music"
    ] ,
    "name":  "Andrew"
}

{
    "interests": [
        "sports" ,
        "pizza" ,
        "poetry"
    ] ,
    "name":  "Carl"
}
To sort documents by the name field in ascending order:
r.db("myDb").table("myTable").orderBy("name")
To sort in descending order, add r.desc() in the orderBy()field:
r.db("myDb").table("myTable").orderBy(r.desc("name"))
Updating the document
There are two cases for making updates. When the document to be updated does not contain the field to be updated, the update is added to the document. For example, if you want to add the field gender to all the documents of myTable, execute this query:
r.db('myDb').table('myTable').update({gender: "male"})
The output will be:
      {
    "deleted": 0 ,
    "errors": 0 ,
    "inserted": 0 ,
    "replaced": 3 ,
    "skipped": 0 ,
    "unchanged": 0
}
If the field already exists, the value will be updated only:
r.db('myDb').table('myTable').filter({name: "Sophia"}).update({gender: "female"})
The output:
      {
    "deleted": 0 ,
    "errors": 0 ,
    "inserted": 0 ,
    "replaced": 1 ,
    "skipped": 0 ,
    "unchanged": 0
}
Deleting documents, tables, and databases
To delete a document or set of documents, first you need to select them and then call delete():
r.db('myDb').table('myTable').get("0530c22a-db04-4d22-a9a9-df82c1b76196").delete()
Or:
r.db('myDb').table('myTable').filter(r.row("name").eq("Sophia")).delete()
The output of both commands will be:
      {
    "deleted": 1 ,
    "errors": 0 ,
    "inserted": 0 ,
    "replaced": 0 ,
    "skipped": 0 ,
    "unchanged": 0
}
To delete all the documents of a table:
r.db('myDb').table('myTable').delete()
This way, count(), or the number of documents that the table contains, will return zero:
r.db('myDb').table('myTable').count()
We can delete the table itself:
r.db('myDb').tableDrop('myTable')
The output:
      {
    "config_changes": [
    {
        "new_val": null ,
        "old_val": {
            "db":  "myDb" ,
            "durability":  "hard" ,
            "id":  "f9cbd86d-151c-4e61-95cf-6a9834460a4e" ,
            "indexes": [ ],
            "name":  "myTable" ,
            "primary_key":  "id" ,
            "shards": [
            {
                "nonvoting_replicas": [ ],
                "primary_replica":  "eh_VirtualBox_l67" ,
                "replicas": [
                    "eh_VirtualBox_l67"
                ]
            }
            ] ,
        "write_acks":  "majority"
        }
    }
    ] ,
    "tables_dropped": 1
}
And even delete the database:
r.dbDrop('myDb')
The output:
      {
    "config_changes": [
    {
        "new_val": null ,
        "old_val": {
            "id":  "90ab4095-3a11-4124-a387-14f07bdf62f4" ,
            "name":  "myDb"
        }
    }
    ] ,
    "dbs_dropped": 1 ,
    "tables_dropped": 0
}
Recreating elements
Recreate the database with:
r.dbCreate('myDb')
The output:
      {
    "config_changes": [
    {
        "new_val": {
            "id":  "290bfe69-6fa7-4a7f-8525-c7142ab3a1fb" ,
            "name":  "myDb"
        } ,
        "old_val": null
    }
    ] ,
    "dbs_created": 1
}
Now let's create a table with a more meaningful name:
r.db('myDb').tableCreate("people")
The output:
      {
    "config_changes": [
    {
    "new_val": {
        "db":  "myDb" ,
        "durability":  "hard" ,
        "id":  "5be71e23-ecd3-4f9a-acda-171f1af6bd01" ,
        "indexes": [ ],
        "name":  "people" ,
        "primary_key":  "id" ,
        "shards": [
        {
            "nonvoting_replicas": [ ],
            "primary_replica":  "eh_VirtualBox_l67" ,
            "replicas": [
                "eh_VirtualBox_l67"
            ]
        }
        ] ,
        "write_acks":  "majority"
    } ,
    "old_val": null
    }
    ] ,
    "tables_created": 1
}
Let's check that the database was created correctly by accessing the list of all databases on the server:
r.dbList()
We can get the list of all the tables in our database:
r.db("myDb").tableList()
You can also create (secondary) indexes on the fields of a table by using indexCreate():
r.db("myDb").table("people").indexCreate("name")
This will create the index name for the name field.
For compound indexes, indexCreate() takes two parameters, the name of the index (name_age_index) and the field or array of fields that make up the index ([r.row("name"), r.row("age")]):
r.db("myDb").table("people").indexCreate("name_age_index", [r.row("name"), r.row("age")])
While get() is used with the primary key (index) of a document, getAll() is used to get documents with a (secondary) index:
r.db("myDb").table("people").getAll(["Andrew", 21], {index: "name_age_index"})
getAll() takes the value of the fields and optionally, the name of the index to use.
The last feature we are going to cover is relationships between documents. There are two ways to model relationships between documents in RethinkDB:
- By using embedded arrays.
- By joining tables like in traditional relational database systems.
The interests field is an example of an embedded array:
      {
	"id": "9342bd3b-e0e1-43da-8eda-1e4c086722d7",
    "name": "Carl",
	"age": 25,
	"interests": ["sports", "pizza", "poetry"],
	"contact info": {
		"email": "[email protected]",
		"phone": "5555555555"
	}
}
However, we can model this relationship as separated tables. One way would be:
      people:
{
	"id": "9342bd3b-e0e1-43da-8eda-1e4c086722d7",
    "name": "Carl",
	"age": 25,
	"contact info": {
		"email": "[email protected]",
		"phone": "5555555555"
	}
}

interests:
{
    "id": 1,
    "name": "sport",
    "people_id": "9342bd3b-e0e1-43da-8eda-1e4c086722d7"
},
{
    "id": 2,
    "name": "pizza" ,
    "people_id": "9342bd3b-e0e1-43da-8eda-1e4c086722d7"
},
{
    "id": 3,
    "name": "poetry" ,
    "people_id": "9342bd3b-e0e1-43da-8eda-1e4c086722d7"
}
In this case, you need to create a secondary index on the foreing key:
r.db("myDb").table("interests").indexCreate("people_id")
Then, you can use the eqJoin() command as follows to join the tables:
      r.db("myDb").table("people").eqJoin(
    "id",
	r.db("myDb").table("interests"),
	{index: 'people_id'}
)
The first parameter is the field of the left table (in this case people) that will be used to make the join, the second parameter is the table to join (in this case interests), and the third (and optional) parameter is the index in the table to join (again interests) to make the link.
The output will be:
      {
    "left": {
        "age": 25 ,
        "contact info": {
            "email": [email protected], »
            "phone":  "5555555555"
        } ,
        "id":  "9342bd3b-e0e1-43da-8eda-1e4c086722d7" ,
        "name":  "Carl"
    } ,
    "right": {
        "id": 1 ,
        "name":  "sport" ,
        "people_id":  "9342bd3b-e0e1-43da-8eda-1e4c086722d7"
    }
}

{
    "left": {
        "age": 25 ,
        "contact info": {
            "email": [email protected], »
            "phone":  "5555555555"
        } ,
        "id":  "9342bd3b-e0e1-43da-8eda-1e4c086722d7" ,
        "name":  "Carl"
    } ,
    "right": {
        "id": 2 ,
        "name":  "pizza" ,
        "people_id":  "9342bd3b-e0e1-43da-8eda-1e4c086722d7"
    }
}

{
    "left": {
        "age": 25 ,
        "contact info": {
            "email": [email protected], »
            "phone":  "5555555555"
        } ,
        "id":  "9342bd3b-e0e1-43da-8eda-1e4c086722d7" ,
        "name":  "Carl"
    } ,
    "right": {
        "id": 3 ,
        "name":  "poetry" ,
        "people_id":  "9342bd3b-e0e1-43da-8eda-1e4c086722d7"
    }
}
The result set of eqJoin() is an array of objects. Each object returned set will be an object of the form { left: <left-document>, right: <right-document> }, where the field left contains the information from the left table in the query (in this case, people), and the field right contains the information from the right table in the query (in this case, interests). You can use zip() to merge those two fields together. See the last section of this page for more information.
Another way to model the relationship can be:
      people:
{
	"id": "9342bd3b-e0e1-43da-8eda-1e4c086722d7",
    "name": "Carl",
	"age": 25,
	"interest_ids": [1, 2, 3],
	"contact info": {
		"email": "[email protected]",
		"phone": "5555555555"
	}
}

interests:
{
    "id": 1,
    "name": "sport"
},
{
    "id": 2,
    "name": "pizza"
},
{
    "id": 3,
    "name": "poetry"
}
In this case, since we are simulating a subquery, the query is more complicated:
      r.db("myDb").table("people").merge(
function (person) {
    return {
        interest_ids: r.db("myDb").table('interests').filter(function (interestDoc) {
                       return person('interest_ids').contains(interestDoc('id'));
                   }).coerceTo('array')
    }
})
Commands with functions as parameters
Many ReQL commands accept a function as a parameter. merge() joins two or more objects together to construct a new object with properties from all merged objects, in this case, tables people and interests.
The function used by merge() takes the document to be processed as an argument. It returns a new field that will be merged with the rest of the fields of the document of people (since this new field is called interest_ids, it will replace the original interest_ids field.)
Inside the function, the interests table is filtered, only if the id of an interest document is present in the interest_ids field of the people document, it will be returned.
The result of this query is:
      {
    "age": 25 ,
    "contact info": {
        "email": [email protected],
        "phone":  "5555555555"
    } ,
    "id":  "9342bd3b-e0e1-43da-8eda-1e4c086722d7" ,
    "interests": [
    {
        "id": 3 ,
        "name":  "poetry"
    } ,
    {
        "id": 2 ,
        "name":  "pizza"
    } ,
    {
        "id": 1 ,
        "name":  "sport"
    }
    ] ,
    "name":  "Carl"
}
RethinkDB Node.js API
RethinkDB has official client drivers (APIs) for the following languages:
However, there are community-supported drivers for a lot more languages.
For now, we are going to focus in the Node.js API, so you'll need to have installed the latest stable version of Node.js.
With NPM, the package manager used by Node.js to install dependencies, we can execute the following command to get RethinkDB's module:
sudo npm install rethinkdb
This command will download RethinkDB and its dependencies. By default, NPM works in local mode, so it will install these files into the node_modules directory of the current directory.
RethinkDB API is very similar to ReQL. To use it, we import the module with:
r = require('rethinkdb');
And connect to the database with:
r.connect({host: 'localhost', port: 28015})
Optionally, r.connect also accepts the name of the database and authentication information.
Node.js is asynchronous by nature, so, to make a query, this function returns a promise, or an object that represents the eventual result of an operation. RethinkDB uses the [bluebird][bluebird](https://bluebirdjs.com/docs/getting-started.html) library for promises.
      r.connect({host: 'localhost', port: 28015}).then(function(conn) {
	// You are now connected to the database
}).error(function(error) {
	// Something bad happen
});
If the connection succeeds, the function passed to then() will be executed; otherwise, the function passed to error() will be executed.
If you don't want to work with promises, we can use a callback function as the second argument to r.connect() to have the same functionality:
      r.connect({host: 'localhost', port: 28015}, function(error, conn) {
	if(error) {
		// Something bad happen
	}
	else {
		// You are now connected to the database
	}
});
Most functions of the API work by returning a promise or by taking a callback function as an argument.
Either way, once we have a valid connection, we can execute a ReQL query:
      r.connect({host: 'localhost', port: 28015}).then(function(conn) {
	r.db("myDb").table("people").run(conn).then(function(result) {
		console.log(result);
	});
})
Notice that the only difference with executing queries in the Node.js API is that they require the run() function at the end to execute. This function takes the connection object as an argument and, optionally, a callback function that is executed when the query is complete. If no callback is provided, a promise is returned (like in the example).
RethinkDB's real-time functionality
RethinkDB's real-time functionality relies on something called changefeeds, which allow clients to receive changes on a table or document as they occur.
Almost any ReQL query can be converted into a changefeed with the changes() command.
r.db("myDb").table("interests").changes()
As you can see, this query returns any changes made to people returning an object with two fields. old_val is the old version of the document, while new_val is the new version of the document. On an insert, old_val will be null; on a delete, new_val will be null. On an update, both old_val and new_val will be present.
Using Node.js:
      r.db("myDb").table("people").changes().run(conn).then(function(cursor) {
	cursor.each(console.log);
});
changes() returns an infinite cursor that you can iterate to get the changes (with the same old_val/new_val object format).
You can also monitor a single document or a set of documents:
r.db("myDb").table("people").filter(r.row("age").lt(20)).changes()
Depending on the frequency of the changes, you may want to control how often the changes are sent. You can do it with the squash option, for example:
r.db("myDb").table("people").changes({squash: 5})
The values of this parameter are true, false and a numeric value:
- With true, when multiple changes to the same document occur before a batch of notifications is sent, the changes are “squashed” into one change.
- With false, all changes will be sent to the client.
- A numeric value n is similar to true, but the server will wait n seconds to respond in order to squash as many changes together as possible to reduce network traffic.
If the database server becomes unavailable, the changefeed will be disconnected, and a runtime exception will be thrown.
Changefeeds allow us to build real-time applications, where users receive information as soon as it is available (with extremely low latency). A good example of this type of application is Twitter; tweets appear as soon as they get published, without users needing to refresh the page.
One solution to the problem of building real-time applications in the web is to continuously send requests to the server, waiting for a response. This is called polling. As you can imagine, polling is very inefficient.
With the arrival of HTML5, WebSockets has replaced polling to become one of the most popular ways to implement real-time functionality. Websockets is a technology thta opens a bidirectional communication channel between the client and the server so this can push data directly to the client when needed.
A popular library that implements WebSockets is Socket.IO. This library, combined with changefeeds, will allow us to build real-time web applications easily in Node.js.
A Simple Real-Time Example Application
We are going to build a simple voting app. The theme here is movies, but you actually can input any text you want. This app will not contain have authentication, vote throttling, or vote-base sorting.
It has been kept simple on purpose to demonstrate the integration of RethinkDB's API and how to develop a real-time application.
The stack is also simple: RethinkDB + Node.js + Expresss + EJS (as templating language) + Socket.IO + jQuery.
The full code and installation instructions are on this Github repository.
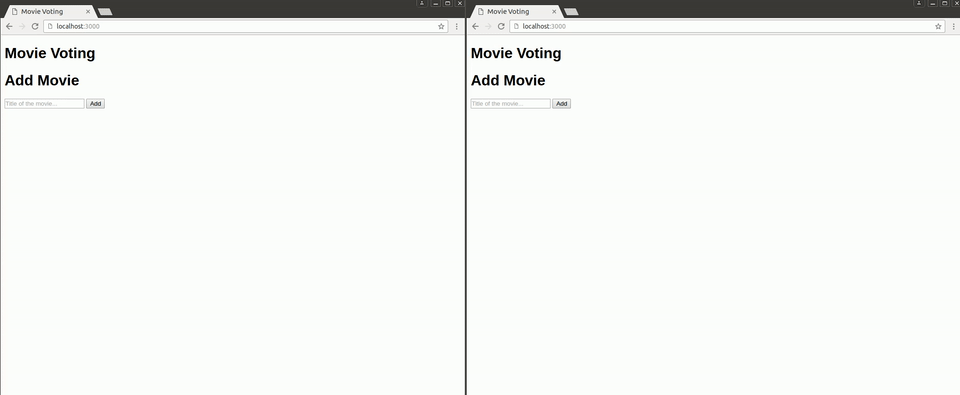
The final application looks like this:
This is the directory structure and files of the application:
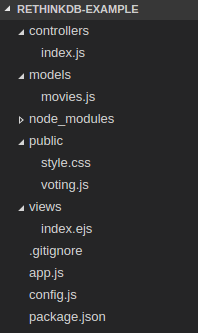
- controllers/index.js contains the route configuration of the application. It receive the requests and call the model to send a response.
- models/movies.js communicates with RethinkDB to implement the database operations.
- node_modules contains the dependencies of the application.
- public/style.css contains the CSS classes to style the web page.
- public/voting.js contains the client-side javascript to respond to click events, form submision and receive Socket.IO events.
- views/index.ejs is the template of the web page.
- app.js is the main file of the Node.js application.
- config.js contains the information to connect to the database and the port where the server will listen for connections.
Let's start by creating a directory for the project, rethinkdb-example (or whatever you want to call it) and cd into it:
      $ mkdir rethinkdb-example
$ cd rethinkdb-example
Execute npm init to initialize the directory as a Node.js project and enter some information about the project:
      $ npm init
This utility will walk you through creating a package.json file.
It only covers the most common items, and tries to guess sensible defaults.

See `npm help json` for definitive documentation on these fields
and exactly what they do.

Use `npm install <pkg> --save` afterwards to install a package and
save it as a dependency in the package.json file.

Press ^C at any time to quit.
name: (rethinkdb-example)
version: (1.0.0)
description: RethinkDB and Node.js  example application
entry point: (index.js) app.js
test command:
git repository:
keywords:
author:
license: (ISC) MIT
About to write to /home/eh/rethinkdb-example/package.json:

{
  "name": "rethinkdb-example",
  "version": "1.0.0",
  "description": "RethinkDB and Node.js  example application",
  "main": "app.js",
  "scripts": {
    "test": "echo \"Error: no test specified\" && exit 1"
  },
  "author": "",
  "license": "MIT"
}


Is this ok? (yes)
This will create a package.json file that contains the configuration of the project. Now, let's add the dependencies of the project to this file by executing this command:
npm install body-parser ejs express path rethinkdb socket.io --save
In addition to downloading the latest versions of all these dependencies to the node_modules directory, the --save option of this command will add them to package.json:
      {
  ...
  "dependencies": {
    "body-parser": "1.15.1",
    "ejs": "2.4.2",
    "express": "4.13.4",
    "path": "0.12.7",
    "rethinkdb": "2.3.2",
    "socket.io": "1.4.6"
  }
}
In this file, you can also set up a shortcut to start the application so instead of executing node app.js, you execute the more generic command npm start:
      {
  ...
  "scripts": {
    "start": "node app.js",
    "test": "echo \"Error: no test specified\" && exit 1"
  },
  ...
}
For the config.js file, let's define (and export) the following variables:
      module.exports = {
  database: {
    db: process.env.RDB_DB || "voting",
    host: process.env.RDB_HOST || "localhost",
    port: process.env.RDB_PORT || 28015
  },

  port: process.env.APP_PORT || 3000
}
If they are not defined as environment variables, they take the default values provided in this file (change them if you want).
In the main file of the application, app.js, import the modules we'll use:
      var express = require('express');
var app = express();
var server = require('http').createServer(app);
var io = require('socket.io')(server);
var path = require('path');
var bodyParser = require('body-parser');
var config = require('./config');
var model = require('./models/movies');
Next, configure Express to indicate that we will receive JSON from the client and define the directory where the view templates can be found, the path for the static resources, and the view engine to use (EJS, which is a simple template language to generate HTML):
      app.use(bodyParser.json());
app.use(bodyParser.urlencoded({ extended: true }));
app.set('views', __dirname + '/views');
app.use(express.static(path.join(__dirname, 'public')));
app.set('view engine', 'ejs');
Next, we define the routes of the application, contained in the file controllers/index:
var routes = require('./controllers/index')(app);
The routes are:
- / That will present the main page of the application, which presents the movies registered.
- /movie To register new movie via a POST requests
- /movie/like/:id To like a movie given its identifier
- /movie/like/:id To unlike a movie given its identifier
We can see those routes implemented in the file controllers/index:
      module.exports = function (app) {
    app.get('/', function (req, res) {
        ...
    });

    app.post('/movie', function (req, res) {
        ...
    });

    app.put('/movie/like/:id', function (req, res) {
       ...
    });

    app.put('/movie/unlike/:id', function (req, res) {
        ...
    });
};
Back in app.js, we then initialize the server to listen for connections in the port specified in the config.js file:
      server.listen(config.port, function() {
    console.log('Server up and listening on port %d', config.port);
    ...
}
To avoid errors and minimize our number of commands, let's automate the process of creating the database and table used by the application.
In the file models.movie.js we'll have a setup method to perform these actions that will take a callback as an argument. The callback will be executed at the end when everything is set up -- more on that in a moment.
      var model = module.exports;

model.setup = function (callback) {
    console.log("Setting up RethinkDB...");

}
Let's also import RethinkDB's module and the configuration file:
      var r = require('rethinkdb');
var config = require('../config');
Now let's connect with the RethinkDB database:
      model.setup = function (callback) {
    console.log("Setting up RethinkDB...");

    r.connect(config.database).then(function(conn) {

	}).error(function(error) {
        throw error;
    });
}
config.database (defined in config.js) just happens to have the same format required for the connect() method to connect to a database. To verify if the database exists, let's try to create it. If an error is thrown, it means that the database already exists:
      r.connect(config.database).then(function(conn) {
	// Does the database exist?
	r.dbCreate(config.database.db).run(conn).then(function(result) {
		console.log("Database created...");
	}).error(function(error) {
		console.log("Database already created...");
	});
}).error(function(error) {
	throw error;
});
After this, we can be sure that we are connected to the database. But we are working with promises (an operation that will be completed in the future), so we have to use the finally() method, which will be executed after the promise is fulfilled, even in the presence of an error:
      // Does the database exist?
r.dbCreate(config.database.db).run(conn).then(function(result) {
	console.log("Database created...");
}).error(function(error) {
	console.log("Database already created...");
}).finally(function() {
	// Does the table exist?
	r.table(MOVIES_TABLE).limit(1).run(conn, function(error, cursor) {
		var promise;
		if (error) {
			console.log("Creating table...");
			promise = r.tableCreate(MOVIES_TABLE).run(conn);
		} else {
			promise = cursor.toArray();
		}
	});
});
We test if a table exists by performing a simple query. The name of the table is held in the MOVIES_TABLE variable. This time, using a callback instead of a promise, we'll create the table (in case of an error) or get the result of the query (in case the table already exists).
The structure of the documents stored in the movie table is very simple, we'll just store the title and the number of likes and unlikes, for example:
      {
    "id":  "11ec4e37-2987-4277-b62d-cc798238d69d",
    "likes": 2 ,
    "title":  "Fight Club" ,
    "unlikes": 1
}
Now, remember that we are working with asynchronous operations, so we need a way to know when any of these operations is done. As such, we need to save the promise returned by these operations. Then, with the promise references in hand, we can hook up the code that will be executed when is safe to assume that the movies table exists.
This last piece of code will set up a changefeed that will monitor the table for changes:
      // Does the table exist?
r.table(MOVIES_TABLE).limit(1).run(conn, function(error, cursor) {
var promise;
if (error) {
	console.log("Creating table...");
	promise = r.tableCreate(MOVIES_TABLE).run(conn);
} else {
	promise = cursor.toArray();
}

// The table exists, setup the update listener
promise.then(function(result) {
	console.log("Setting up update listener...");
	r.table(MOVIES_TABLE).changes().run(conn).then(function(cursor) {
		cursor.each(function(error, row) {
			callback(row);
		});
	});
}).error(function(error) {
	throw error;
});
In a change notification, the callback passed to the setup() function as an argument will be executed, passing to it the actual change.
This callback function is defined in app.js:
      server.listen(config.port, function() {
    console.log('Server up and listening on port %d', config.port);
    model.setup(function(data) {
		if((data.new_val != null) && (data.old_val != null)) {
			// like/unlike update
			io.emit('updates', data.new_val);
		} else if((data.new_val != null) && (data.old_val == null)) {
			// new movie
			io.emit('movies', data.new_val);
		}
    });
});
The job of this callback function is to emit a Socket.IO event to the client when RethinkDB's changefeed notifies us about a change. Remember from the previous section that the object returned by the changefeed has two fields, old_val and new_val. If both fields are set, we are receiving an update. If only new_val is set, we are receiving a new movie. Based on this, we send a different event.
These events are received by the client. public/voting.js is the file that contains the javascript code on the client side. Using jQuery, we'll set up Socket.IO to listen for events when the HTML document is ready:
      $(document).ready(function () {
    var socket = io();

    socket.on('updates', function(movie) {
        $('#' + movie.id + ' .likes').text(movie.likes);
        $('#' + movie.id + ' .unlikes').text(movie.unlikes);
    });
    socket.on('movies', function(movie) {
	    $(".movies").append("<li class='movie' id='" + movie.id + "'>" +
                "<span class='position'>" + ($( "li.movie" ).length+1) + "</span>" +
                "<div class='vote'>" +
                    "<div class='btnVote'>" +
                        "<span class='btnLike'><i class='fa fa-thumbs-up fa-2x'></i></span>" +
                        "<span class='numVotes likes'>" + movie.likes + "</span>" +
                    "</div>" +
                    "<div class='btnVote'>" +
                        "<span class='btnUnlike'><i class='fa fa-thumbs-down fa-2x'></i></span>" +
                        "<span class='numVotes unlikes'>" + movie.unlikes + "</span>" +
                    "</div>" +
                "</div>" +
                "<span class='title'>" + movie.title + "</span></li>");
	});
});
As you can see, when an update event is received, we set the number of likes and unlikes. When a new movie is received, an HTML element is added to the movie container.
This way, when a user navigates to https://localhost:3000, the following code (from controllers/index.js) is executed:
      app.get('/', function (req, res) {
	model.getMovies(function (result) {
		res.render('index', {
			movies: result
		});
	});
});
model.getMovies() gets the documents of the movie table:
      model.getMovies = function (callback) {
    r.connect(config.database).then(function(conn) {
        r.table(MOVIES_TABLE).run(conn).then(function(cursor) {
            cursor.toArray(function(error, results) {
                if (error) throw error;
                callback(results);
            });
        }).error(function(error) {
            throw error;
        });
    }).error(function(error) {
        throw error;
    });
}
toArray() is a function that converts a cursor to an array, which is passed to a callback that renders the file index.ejs with it:
      <!DOCTYPE html>
<html>
    <head>
    <meta charset="utf-8" />
    <title>Movie Voting</title>
    <link rel="stylesheet" href="style.css">
    <script src="http://code.jquery.com/jquery-2.2.4.min.js"></script>
    <script src="/socket.io/socket.io.js"></script>
    <script src="voting.js"></script>
    <link href="http://netdna.bootstrapcdn.com/font-awesome/4.0.3/css/font-awesome.css" rel="stylesheet">
    </head>
    <body>
        <h1>Movie Voting</h1>
        <ul class='movies'>
            <% movies.forEach(function(movie, index){ %>
            <li class='movie' id='<%= movie.id %>'>
                <span class='position'><%= index+1 %></span>
                <div class='vote'>
                    <div class='btnVote'>
                        <span class='btnLike'><i class='fa fa-thumbs-up fa-2x'></i></span>
                        <span class='numVotes likes'><%= movie.likes %></span>
                    </div>
                    <div class='btnVote'>
                        <span class='btnUnlike'><i class='fa fa-thumbs-down fa-2x'></i></span>
                        <span class='numVotes unlikes'><%= movie.unlikes %></span>
                    </div>
                </div>
                <span class='title'><%= movie.title %></span>
            </li>
            <% }) %>
        </ul>
        <form id='form' method='post'>
            <h1>Add Movie</h1>
            <input type='text' id='title' placeholder='Title of the movie...' />
            <button id='btnSubmit' type='submit'>Add</button>
        </form>
    </body>
</html>
index.ejs is a simple HTML file that uses EJS as templating language and presents the movies retrieved (in no particular order) along with a form to post a new movie.
In EJS, the <% ... %> tag is used to control flow. In this case, to iterate over the movies collection:
      <% movies.forEach(function(movie, index){ %>
...
<% }) %>
Meanwhile, the <%= ... %> tag outputs the (escaped) value of a variable:
      ...
<li class='movie' id='<%= movie.id %>'>
...
When you submit the form, this snippet of code in public/voting.js is executed:
      $('#form').on('submit', function (event) {
	event.preventDefault();
	var input = $('#title');
	var t = input.val();
	if(!t || t.trim().length === 0) {
		alert('The title is required');
		return false;
	} else {
		$.ajax({
			type: 'POST',
			url: '/movie',
			data: {
				title: t
			},
			success: function(data) {
				input.val('');
			}
		});
	}
});
It checks that we actually input a movie title (otherwise, an alert is sent), and then, an AJAX (Asynchronous JavaScript And XML) POST request is made to /movie. In the server side, the following code is executed:
      app.post('/movie', function (req, res) {
	var movie = {
		title:req.body.title,
		likes:0,
		unlikes:0
	};
	model.saveMovie(movie, function (success, result) {
		if (success) res.json({
			status: 'OK'
		});
		else res.json({
			status: 'Error'
		});
	});
});
Here a JSON object is constructed and sent to model.saveMovie() to be saved.
Finally, when we click the like or unlike buttons, the event is received by the javascript code on the client side (in the case of a like, but for an unlike is almost the same code):
      $('.movies').on('click', 'span.btnLike', function (e) {
	var movieId = $(this).parent('div').parent('div').parent('li')[0].id;
	$.ajax({
		type: 'PUT',
		url: '/movie/like/' + movieId
	});
});
Since the element (the movie) might not exist when at the time the click event was bound (because it was added later), we have to bind the event the container (.movie), which always exists, and then select the child of that element that will trigger the click event (span.btnLike). This way, the event will be received correctly.
Then, the line var movieId = $(this).parent('div').parent('div').parent('li')[0].id; will navigate through the DOM (Document Object Model) to find the element that contains the movie identifier. Since the "like" button is the source of the click event, the search starts relative to this element (that's why we have to go up three levels).
Once the request reaches the server, the following route is executed:
      app.put('/movie/like/:id', function (req, res) {
   vote(req, res, 'likes');
});
Since "like" and "unlike" are very similar, we extract the functionality of both to the private (because is not part of the exported section of the module) vote() function:
      var vote = function (req, res, action) {
    var movie = {
        id:req.params.id
    };
    model.updateMovie(movie, action, function (success, result) {
        if (success) res.json({
            status: 'OK'
        });
        else res.json({
            status: 'Error'
        });
    });
}
The action parameter contains the name of the field to update, so in the model.updateMovie() method:
      model.updateMovie = function (movie, field, callback) {
    r.connect(config.database).then(function(conn) {
        r.table(MOVIES_TABLE).get(movie.id).update(function(movie) {
            return r.object(field, movie(field).add(1));
        }).run(conn).then(function(results) {
           callback(true, results);
        }).error(function(error) {
            callback(false, error);
        });
    }).error(function(error) {
        callback(false, error);
    });
}
To perform the update, we use a function instead of an object. Remember that in ReQL, some operations can take a function as an argument. As a result, we can dynamically specify the field to update with:
r.object(field, movie(field).add(1));
The movie document to be updated is passed as an argument to the function so we can get the current value and add one ("like" or "unlike") to set the new value.
This covers all the functionality of our basic application. To run it, start RethinkDB and then type npm start.
Conclusion
This concludes this introduction to RethinkDB. Once again, the code for the whole example application is on Github.
Advance your tech skills today
Access courses on AI, cloud, data, security, and more—all led by industry experts.
