Building a multiplayer space shooter: Part I
In part 1 of this front-end Javascript tutorial, we'll show you how to build your own web-based space shooter game! This guides makes learning Javascript fun, start today!
Dec 15, 2018 • 17 Minute Read
Introduction
Space - the final frontier. Also a surprisingly good place to blow stuff up.
In this tutorial we'll build a multiplayer space shooter, but one with a twist: rather than everyone playing away on their own computer, we'll bring the spirit of good old living-room co-op to the modern age.
The game itself will run in a single browser window. Every player opens a URL on their smartphone which turns it into a gamepad and allows their ship to join the game.
What we'll be using
Let's keep things simple: We'll use Pixi.js for rendering and deepstream.io as a multiplayer server.

Pixi.JS is a 2D rendering library for browsers. It uses WebGL (Web Graphics Library) and leaves the heavy lifting to the GPU (Graphics Processing Unit) if possible. Otherwise, Pixi.JS resorts to canvas if not. Pixi is just that: a rendering library, giving you all the Stage, Sprite and Container objects you'd expect, but no game logic constructs - those are our job.

deepstream.io is a new type of server for realtime connectivity. It handles all sorts of persistent connections, such as TCP or Websocket for browsers, and provides high level concepts like data-sync, pub-sub and request-response. Most importantly, deepstream.io is superfast.
60 FPS
We want a velvety smooth 60 FPS framerate, and we want our controls to play along. This means that every touch on the gamepad needs to translate to an action on the screen in less than 16.6 milliseconds (or one frame). Luckily, pixi and deepstream are perfectly capable of this feat.
But there's also network latency! Information needs time to travel. In fact, optic fiber takes about 67 ms for every 10.000km, not counting switches, routers and other network hops that further slow it down. That means that if you're running your server in the US and play in Europe, your game won't feel particularly responsive.
About this tutorial
This tutorial will take you through the high level concepts and all the tricky bits of the implementation - for brevity's sake it skips a lot of project setup, css / styling and most of the more common aspects. To get an impression of how everything fits together, just head over to the Github Repository.
Latest browsers needed
This tutorial makes liberal use of new browser features like WebGL and ES6 syntax. Our game works best on all the latest browsers (tested in Chrome 51, FF 47 & Edge 25), and it won't be much fun on your good old IE 8.
The structure
Let's start by creating the three files below:
- game.js will contain the main game object that creates the PIXI stage, adds and removes spaceships to it and manages the game loop (more about that later)
- spaceship.js will represent a single player / spaceship
- index.js will start everything up
Creating the stage
PIXI is based on hierarchies of display objects such as "sprites" or "movie clips". These objects can be grouped in "containers". Every PIXI project starts with an outermost container that we'll call "stage".
      //in game.js
class Game {
  constructor(element) {
    this.stage = new PIXI.Container();
  }
}
To turn your object-hierarchy into an image, you'll need a "renderer". PIXI will try to use WebGL for rendering, but can fall back to canvas if necessary.
For our space-shooter, we'll leave it to PIXI to decide which renderer to use. The only requirements are that the renderer needs to extend to the full size of the screen and shouldn't have a background color so that we can place a space-based image behind it.
To create a renderer, add the following lines to your game class' constructor:
      this.renderer = PIXI.autoDetectRenderer(
    window.innerWidth,
    window.innerHeight,
    {transparent: true},
    false
);
element.appendChild( this.renderer.view );
}
Adding a spaceship
Time to add a spaceship to our stage. Our ship will be composed of small images, called "Sprites". To create one, we'll tell PIXI to create a PIXI.Sprite.fromImage( url ) and move it to its initial coordinates. By default, these coordinates specify the top-left corner of our sprite. Instead, we want them to specify the center, so we also need to set the sprite's anchor position to 0.5 for both x and y. This will also be used as the pivot-point when we rotate the sprite later on. Finally, we'll add the spaceship to the stage.
      // in spaceship.js
class SpaceShip {
  constructor(game, x, y) {
    this._game = game;
    this._body = PIXI.Sprite.fromImage("/img/spaceship-body.png");
    this._body.position.x = x;
    this._body.position.y = y;
    this._body.anchor.x = 0.5;
    this._body.anchor.y = 0.5;
    this._game.stage.addChild(this._body);
  }
}
Rendering the stage
So where's our spaceship? We've created a stage and a renderer so far, but we haven't told the renderer to render the stage yet. We'll do this by adding a method called _tick().
_tick()
Why call our rendering method tick() and not render()? This method will actually become the pacemaker for our game. Every time a frame is about to be rendered, this method will calculate the amount of time that has passed since the last frame, notify all the objects in the game about the impeding update, render the stage, and finally schedule the next frame.
For this, we'll use a browser method called requestAnimationFrame( callback ). This schedules a function to be executed the next time a frame can be drawn. We'll add this method twice in game.js - once at the end of our constructor to draw the initial frame and once within our _tick() method itself.
      // in game.js
constructor( element ) {
    ...
    requestAnimationFrame( this._tick.bind( this ) )
}

_tick() {
    this.renderer.render( this.stage );
    requestAnimationFrame( this._tick.bind( this ) );
}
If everything worked, your game should now look like this:

A bit of color
So far, so good, but our spaceship still looks a bit pale. And no wonder, the sprite we've used was just a grayscale image. To add a different color for each player, we need to set a property called tint.
this._body.tint = 0x00ff00; // green in hex
This tint property results in the following image:

Adding the turret
Next up: the turret. A bit of refactoring is in order. The spaceship's body and turret have to move in unison and need to be positioned relative to each other. To achieve this, we'll create a PIXI.Container and put both our spaceship's body and the turret inside.
Let's change the code in the spaceship's constructor to:
      // container
this._container = new PIXI.Container();
this._container.position.x = x;
this._container.position.y = y;

// body
this._body = PIXI.Sprite.fromImage("/img/spaceship-body.png");
this._body.tint = this.tint;
this._body.anchor.x = 0.5;
this._body.anchor.y = 0.5;
this._container.addChild(this._body);

// turret
this._turret = PIXI.Sprite.fromImage("/img/spaceship-turret.png");
this._turret.tint = this.tint;

// the turret doesn't sit exactly at the center of the ship
this._turret.anchor.x = 0.45;
this._turret.anchor.y = 0.6;

// the turret's pivotin point is towards the bottom of the sprite
this._turret.pivot.x = 1;
this._turret.pivot.y = 7;
this._container.addChild(this._turret);

// add the whole container to the stage
this._game.stage.addChild(this._container);
Our spaceship now looks reasonably complete:

Controls
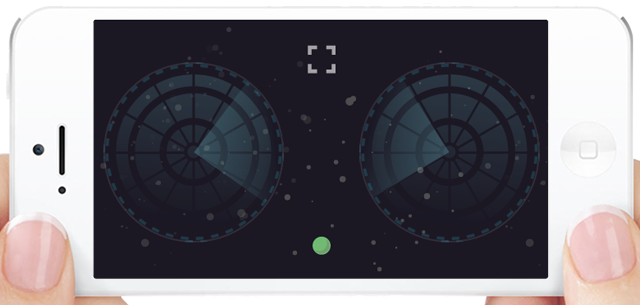
Each spaceship will be individually controlled by a player via a smartphone-turned-gamepad. The control scheme is simple: the left pad moves the ship, the right pad shoots, and both sides are independent and work at 360 degrees. If you've ever played games like Super Smash TV on the Super Nintendo you know the drill.
Technically, the gamepad is just another HTML page with its own CSS and JavaScript. Both the controls and the game are connected to a deepstream server. User-input from each player's gamepad is stored in a record which deepstream syncs with the game itself.
Starting a deepstream server
From here on, you'll need a running deepstream server. Just get the version for your operating system from the install page and follow the instructions there.
Connecting to the server
Once your server is running, its time to get started on the controls. We'll gloss over the HTML and CSS and focus purely on the JavaScript part.
deepstream uses small client libraries to connect to the server and interact with it. For our example, we'll need the JavaScript client. You can get it from a CDN
<script src="https://cdn.rawgit.com/deepstreamIO/deepstream.io-client-js/master/dist/deepstream.min.js"></script>
or install it via Bower or NPM
      bower install deepstream.io-client-js
npm install deepstream.io-client-js
To connect your controls to the server, simply add a javascript file, e.g. controls.js and call
      ds = deepstream("localhost:6020").login({}, function(success) {
  // the code for our controls will go in here
});
You might notice that we've fallen back to function and ES5 syntax. ES6 support isn't as established on phones as it is on desktops. If you prefer to stick with ES6, you can always use a transpiler like Babel.
Creating a record
Time to dive into the mechanics behind our game: records. Records are small bits of data that can be manipulated and observed. They have get(), set() and subscribe() methods that let you interact with the whole data structure or with a path within it. For example, ship.subscribe( 'turretRotation', angle => {/.../}).
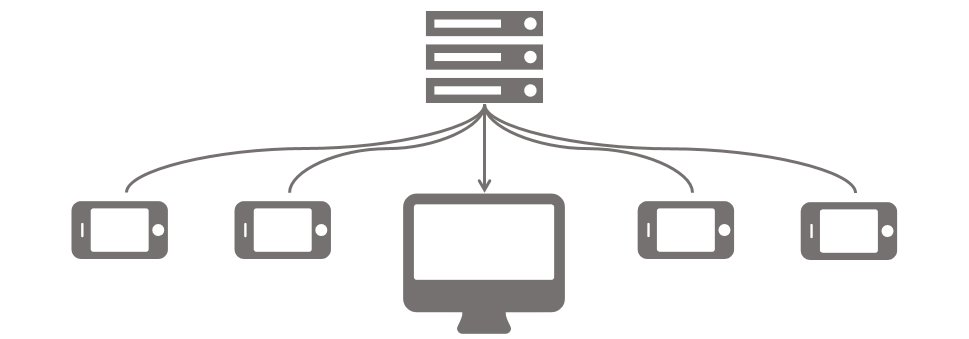
Each change to a record is synced across all connected clients. For our tutorial, all game logic will live in the main browser window. Meanwhile, user-input from the gamepads is written to records and synced with the game via deepstream.
Each record is identified by a unique name. For our game, we'll use the player's username, e.g. player/johndoe.
      ds.record.getRecord(`player/johndoe`).whenReady(function(record) {
  // Interact with the record here
});
Now that the record is ready, we can set its initial value:
      record.set({
  // the name of the player
  name: name,
  // is the move pad currently touched?
  moving: false,
  // is the shoot pad currently touched?
  shooting: false,
  // in radians
  bodyRotation: 0,
  // in radians
  turretRotation: 0
});
Wiring up the control pads
From here on, these values will be updated whenever the user interacts with one of the control pads. We'll use a simplified version of the code for this tutorial, to get the full picture have a look here
First off, let's start with some basic interactions. Every time the user touches a pad, we want to set moving or shooting to true and back to false again as soon as the touch ends. Use an area variable.
      var area = $(".area");

area.on("touchstart", function(event) {
  record.set("moving", true);
});

area.on("touchend", function(event) {
  record.set("moving", true);
});
Next up, we want to sync the angle of the user's touch with the ship / turret in the game. Every touchmove event provides the x and y coordinates of where the touch happened. Since we know the center of our gamepad, we can now calculate the angle of the touch in radians:
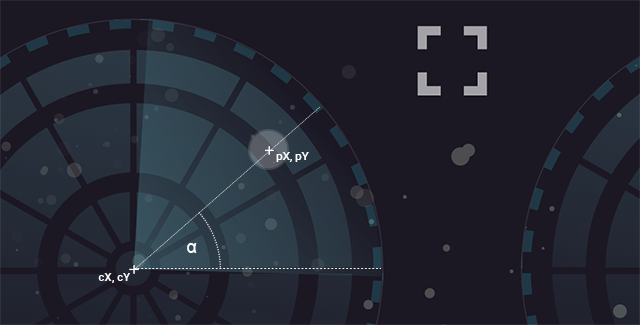
For this, we'll use the arctangent function with two arguments. Don't worry, it's easier than it sounds:
      var radius = area.width() / 2;
var cX = area.offset().left + radius;
var cY = area.offset().top + radius;

area.on("touchmove", function(event) {
  var pX = event.targetTouches[0].clientX;
  var pY = event.targetTouches[0].clientY;
  var angle = Math.PI / 2 + Math.atan2(pY - cY, pX - cX);
  record.set("bodyRotation", angle);
});
Making our spaceship turn
Let's head back to our main game. The first thing we'll have to do is to connect our game to the deepstream server as well and request the same player/johndoe record from within our spaceship class. To do this, just follow the same steps as for the controls.
Creating a game-loop
A game loop is a central concept of almost every game. Game loops typically consist of two phases: "update" and "draw".
In the update phase, each entity within the game updates its position, orientation, health, status, and so on.
This is usually followed by a global update phase that determines whether each player is still alive, being hit, etc.
Finally, the next frame of the game is drawn by the renderer. This loop happens continuously for every frame, ideally 60 times a second. This means that logic that's executed on every tick needs to be as high-performance as possible.
For our spaceshooter, we'll create a simple gameloop by having the game class emit an update event every time before the renderer kicks in. Our spaceship can now subscribe to this event. As usual, we'll keep things simple for this tutorial. You can find the full update cycle for the spaceship here
To apply the input from our controls, we simply get the data from the record and set it as the body's and turret's rotation parameter
      module.exports = class SpaceShip {
  constructor(game, name) {
    this._record = global.ds.record.getRecord("player/" + name);
    this._game = game;

    //...
    this._game.on("update", this._update.bind(this));
  }

  _update() {
    var data = this._record.get();
    this._container.rotation = data.bodyRotation;
    this._turret.rotation = data.turretRotation - data.bodyRotation;
    //...
  }
};
Now we have visible movement on the ship body and on the turret whenever we touch the corresponding control pads:
Part 1 Complete
Phew, thanks for holding out with me for so long. We've now got all the essential bits in place, but at the moment our spaceship doesn't move or shoot. It just sits and spins. The good news is that we'll cover all the good stuff in part 2 of this tutorial.
There you'll learn how to add and remove players dynamically whenever a client connects, add proper asset loading, handle shooting and hit detection, handcraft some awesome explosions and deal with player destruction and recreation.
Advance your tech skills today
Access courses on AI, cloud, data, security, and more—all led by industry experts.
