Building a Real-time Application with React, React Router, Horizon.io, and OAuth
Learn how to build a real-time application by integrating React, React Router, Webpack, Babel, Node.js, Express, Horizon with OAuth authentication in this tutorial.
Dec 15, 2018 • 40 Minute Read
Introduction
In this tutorial, we're going to build an application that shows how to integrate React, React Router, and Horizon.io with OAuth authentication from beginning to end.
The application is simple. It just stores and presents messages in real-time:
The entire source code is available on Github. Big thanks to Bartek Kus who help me update the code to Horizon 2.0.
Requirements
Horizon.io is a real-time backend for Javascript apps built on top of RethinkDB. If you don't know this NoSQL database, here's a tutorial that shows how it works.
So first, you'll need to install RethinkDB. There are packages for all major operative systems, here are the instructions.
Horizon is a Node.js application, so you'll also need version 4.4 or higher of Node.js and NPM installed. You can download an installer for your platform here.
Then, install Horizon (globally) by executing:
npm install -g horizon
We'll be using Horizon's version 2.0.0, if you need/want to specify this version, execute this command instead:
npm install -g [email protected]
About React, you don't need to be a guru to follow this tutorial, but you'll need to have some basic knowledge about components and how this library works.
Now that we have all we need, let's get started.
Creating an Horizon app
First, execute the following command:
hz init react-horizon
This will create a Horizon application in the directory react-horizon with the following structure:
      .hz
 |- config.toml
 |- schema.toml
 |- secret.toml
dist
 |- index.html
src
.gitignore
.hz/config.toml is the TOML main configuration file for the Horizon server.
.hz/schema.toml is optionally used for the database schema and permissions.
.hz/secret.toml specifies authentication information and token secrets.
You can know more about these configuration files here.
dist is the directory where the public and static files will be stored.
src is the directory where the client side code will be stored.
.gitignore contains the following:
      rethinkdb_data
**/*.log
.hz/secrets.toml
For authentication, Horizon requires us to work with https, so we need to hava a SSL certificate. Luckily, Horizon comes with a tool to create a self-signed certificates (you just need to have OpenSSL installed), so cd into this directory
cd react-horizon
To keep things organized, let's create a directory to store all the configuration files of our app and cd into it:
mkdir config && cd config
Now create a directory to store the certificates:
mkdir tls && cd tls
And execute the command:
hz create-cert
This will create a horizon-cert.pem and a horizon-key.pem. By default, Horizon will look for these files in the root directory of the application when starting a secure server. If you want to change the name or the location of these files (as in our case), uncomment and change the following section of the .hz/config.toml file:
      ###############################################################################
# HTTPS Options
# 'secure' will disable HTTPS and use HTTP instead when set to 'false'
# 'key_file' and 'cert_file' are required for serving HTTPS
#------------------------------------------------------------------------------
# secure = true
# key_file = "horizon-key.pem"
# cert_file = "horizon-cert.pem"
To:
      ###############################################################################
# HTTPS Options
# 'secure' will disable HTTPS and use HTTP instead when set to 'false'
# 'key_file' and 'cert_file' are required for serving HTTPS
#------------------------------------------------------------------------------
secure = true
key_file = "config/tls/horizon-key.pem"
cert_file = "config/tls/horizon-cert.pem"
Now, the command to start the server in a development environment is:
hz serve --dev
The --dev option will set the following flags:
- --start-rethinkdb that will start a RethinkDB server automatically
- --secure no that will start an insecure server (with no SSL)
- --permissions no that will disable the permissions system
- ----auto-create-collection and --auto-create-index that will create tables and indexes if they don't exist
- --server-static ./dist that will configure dist as the directory from which the static content will be served
However, since we are going to use HTTPS, we need to redefine the secure option, so go to the root directory of the app (cd ../..) and start the server with the following command:
hz serve --dev --secure yes
The output of this command should be similar to the following:
      App available at https://127.0.0.1:8181
RethinkDB
   ├── Admin interface: http://localhost:46398
   └── Drivers can connect to port 35109
Starting Horizon...
🌄 Horizon ready for connections
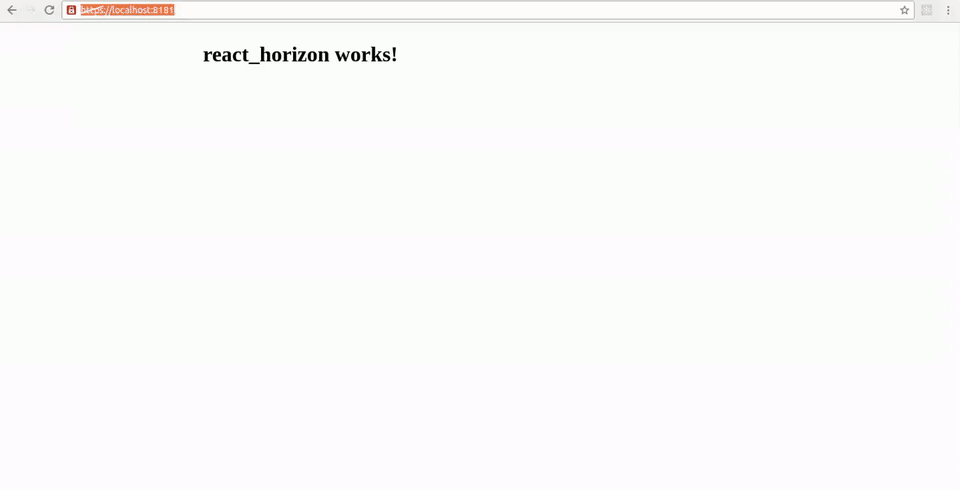
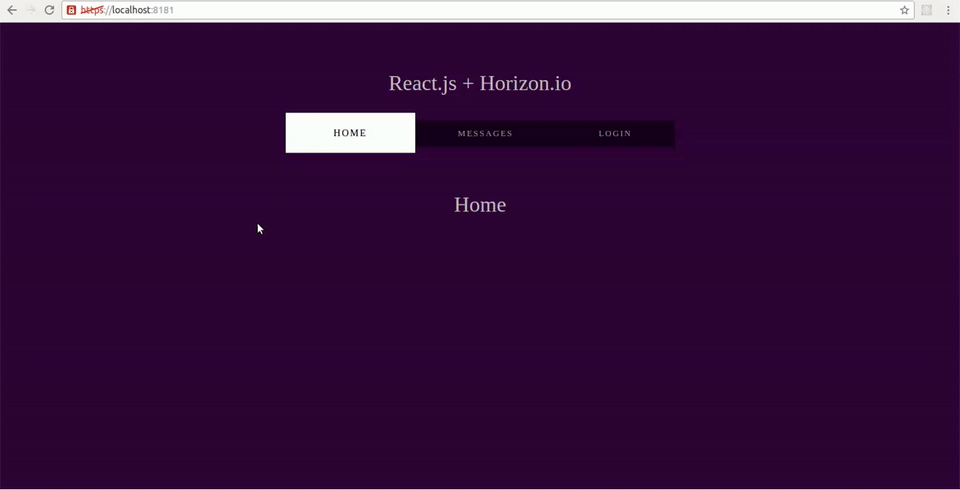
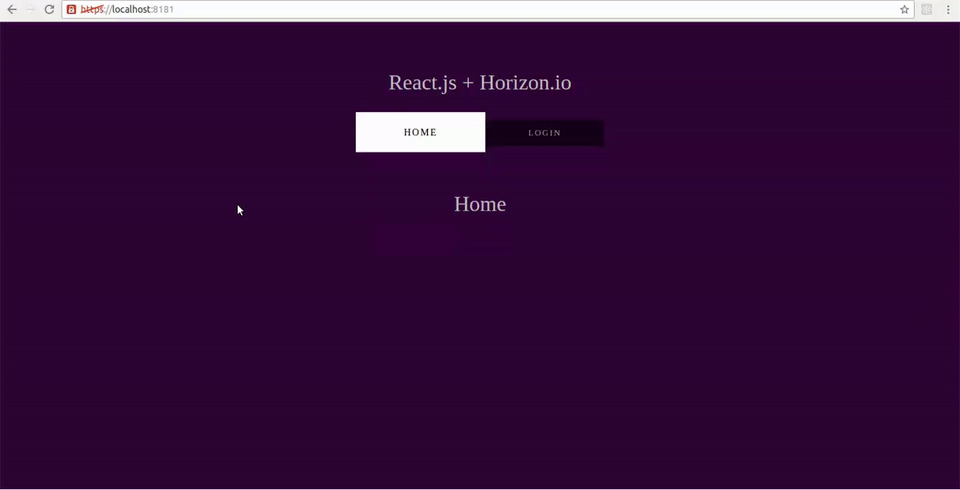
If you go to https://localhost:8181 you should see this (after accepting the warning of the self-signed certificate):
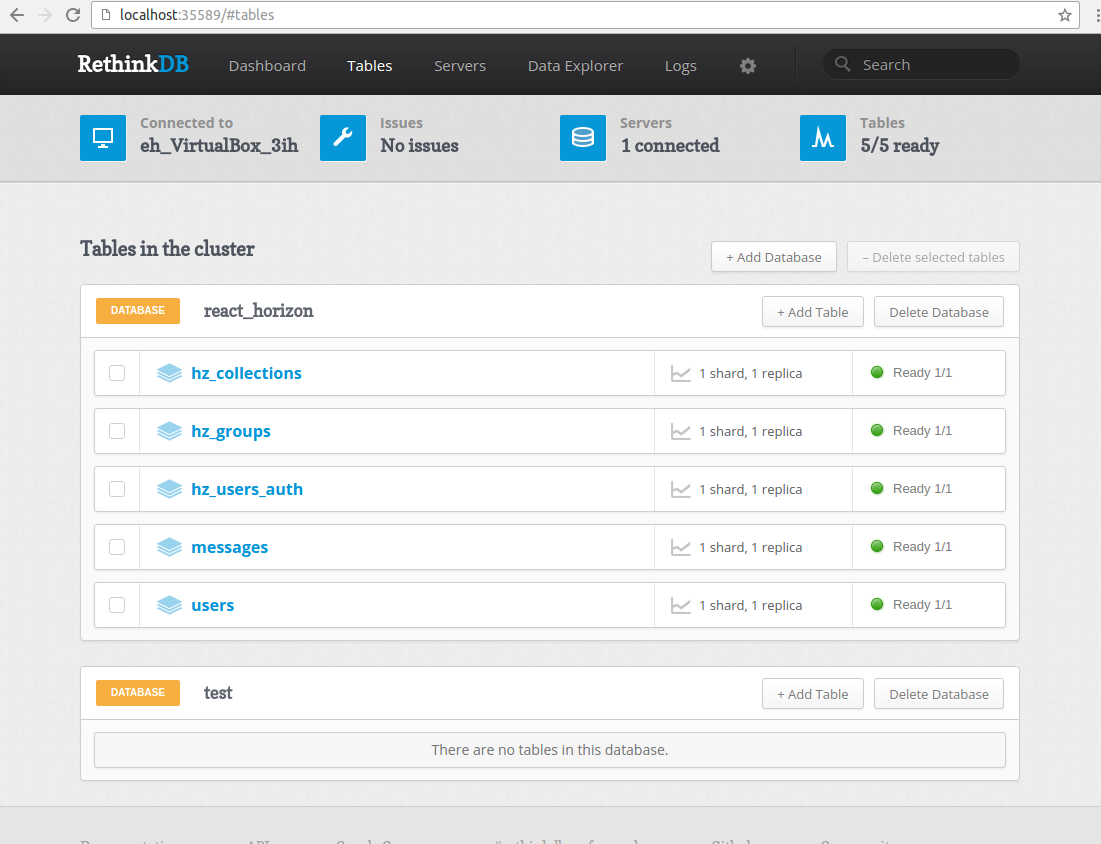
Moreover, a RethinkDB server will be started automatically and a rethinkdb-data directory will be created. When you go to https://localhost:46398 (or whatever address Horizon gives you in the console), and then to the Tables section, you should see the following:
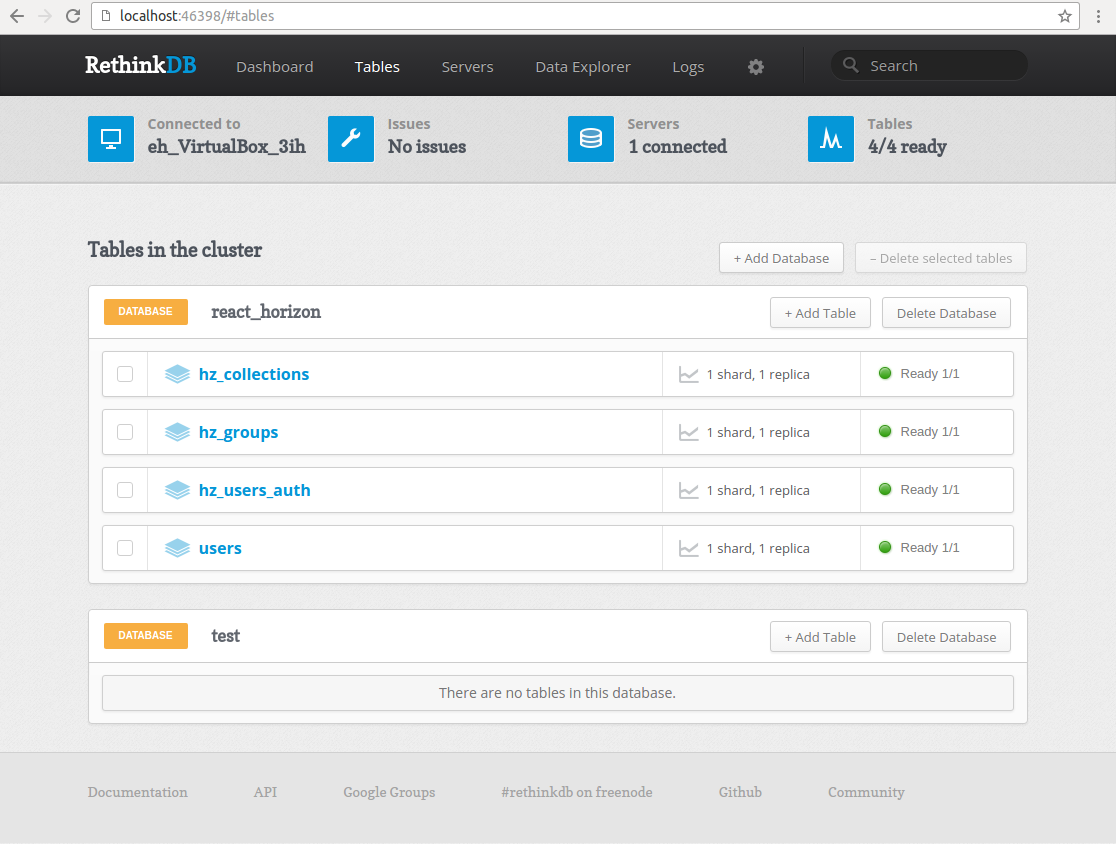
As you can see, Horizon has created a database with the name of the project and stores metadata about collections, users, and groups. Also, it will store the data used by collections in the application.
Setting up React
We're going to use ECMAScript 2015 so let's set up Babel to transform this syntax to one most browsers can understand by creating its configuration file:
echo '{ "presets": ["react", "es2015", "stage-0"] }' > .babelrc
Babel 6.x does not ship with any transformations enabled, so you need to explicitly tell it what transformations to run by using a preset.
The first two are very self-descriptive. The stage-x presets are changes to the language that haven’t been approved to be part of a release of Javascript.
The TC39 categorizes proposals into 4 stages:
- stage-0 - Strawman: just an idea, possible Babel plugin.
- stage-1 - Proposal: this is worth working on.
- stage-2 - Draft: initial spec.
- stage-3 - Candidate: complete spec and initial browser implementations.
- stage-4 - Finished: will be added to the next yearly release.
stage-0 includes all plugins from presets of all levels. stage-1 includes all plugins from presets 1 to 4 and so on.
To execute Babel and bundle our scripts with their dependencies, we'll use Webpack and npm. Let's install Webpack (globally) with:
npm install -g webpack
And add a package.json configuration file with:
npm init
Or if you want to accept all the defaults:
npm init -y
Next, install the Babel dependencies and presets (and a polyfill to emulate a full ES2015 environment) with:
      npm install --save-dev babel-core babel-loader
npm install --save-dev babel-preset-es2015 babel-preset-react babel-preset-stage-0 babel-polyfill
Do the same with Webpack and React:
      npm install --save-dev webpack
npm install --save react react-dom react-router
At the time of this writing, the following are the versions saved to the package.json file:
      {
  ...
  "devDependencies": {
    "babel-core": "^6.13.2",
    "babel-loader": "^6.2.5",
    "babel-polyfill": "^6.13.0",
    "babel-preset-es2015": "^6.13.2",
    "babel-preset-react": "^6.11.1",
    "babel-preset-stage-0": "^6.5.0",
    "webpack": "^1.13.2"
  },
  "dependencies": {
    "react": "^15.3.1",
    "react-dom": "^15.3.1",
    "react-router": "^2.7.0"
  }
}
Now, create a webpack.config.js file at root level with the following content:
      var path = require('path');

module.exports = {
    entry: ["./src/app.js"],

    output: {
        filename: "dist/js/bundle.js",
        sourceMapFilename: "dist/js/bundle.map"
    },

    devtool: '#source-map',

    module: {
        loaders: [
            {
                loader: 'babel',
                exclude: /node_modules/
            }
        ]
    }
}
This way, Webpack will create a dist/js/bundle.js file with all the JavaScript code of the application (from the script /src/app.js).
Finally, let's add to package.json the following start script that packs our application and starts the Horizon server:
      {
  ...
  "scripts": {
    "start": "webpack && hz serve --dev --secure yes"
  },
  ...
}
Creating the app with React and React Router
Let's start by defining the HTML file that will contain our React application, dist/index.html:
      <!doctype html>
<html>
  <head>
    <meta charset="UTF-8">
    <title>React.js + Horizon.io</title>
    <link rel=stylesheet href=/css/style.css />
  </head>
  <body>
    <h1>React.js + Horizon.io</h1>
   <div id="root"></div>
   <script src="/js/bundle.js"></script>
  </body>
</html>
And the CSS to style it, dist/css/style.css:
      body {
  background: #300637;
  padding: 4em;
  text-align: center;
  font-family: "Arial, Helvetica, sans-serif";
  color: #c0c0c0;
}

h1 {
  font-weight: 100;
}

.menu {
  margin-top: 3em;
  margin-bottom: 5em;
}

.menu-option {
  color: #999;
  background: rgba(0, 0, 0, 0.5);
  padding: 1em 5em;
  font-size: 0.8em;
  text-decoration: none;
  letter-spacing: 2px;
  text-transform: uppercase;
}

.menu-option:hover {
  background: rgba(0, 0, 0, 0.4);
  color: #fff;
}

.menu-option.active {
  border: none;
  background: rgba(0, 0, 0, 0.4);
  background: #fff;
  padding: 1.5em 5em;
  color: #000;
  font-size: 0.9em;
}

.login-btn {
  border: none;
  color: #999;
  background: rgba(0, 0, 0, 0.5);
  padding: 1.5em 5em;
  font-size: 0.9em;
  text-transform: uppercase;
  cursor: pointer;
}

.message-input {
  display: block;
  margin: 0.5em;
  padding: 0.8em;
  width: 90%;
  border: none;
  font-family: sans-serif;
  font-size: 0.9em;
}

.message-container {
  margin: 2em auto;
  padding: 0.8em;
  width: 80%;
}

.message-btn {
  padding: 0.75rem;
  margin: 0.5em auto 1.5em;
  width: 6em;
  text-align: center;
  cursor: pointer;
}

.message-row {
  padding: 0.75em;
  margin: 0.75em;
  box-shadow: 0 0 1px 1px #999;
}
src will store the JavaScript code of our application. The starting file will be app.js:
      import React from "react";
import ReactDOM from "react-dom";

import Router from "./router";

ReactDOM.render(Router, document.getElementById("root"));
This way, router.js will contain all the routes of the application:
      import React from "react";
import { Router, Route, browserHistory, IndexRoute } from "react-router";

// Layout
import MainLayout from "./components/main-layout";

// Pages
import Home from "./components/home";
import MessageContainer from "./components/message-container";
import Login from "./components/login";

export default (
  <Router history={browserHistory}>
    <Route path="/" component={MainLayout}>
      <IndexRoute component={Home} />
      <Route path="messages" component={MessageContainer} />
      <Route path="login" component={Login} />
    </Route>
  </Router>
);
We'll have three nested routes (so MainLayout can serve as a template):
- / is our home
- /login is our login page
- /messages is the page with the message functionality
Now let's create the components that represent these pages in the components directory.
components/main-layout.js contains the general layout of the app:
      import React, { Component } from "react";
import { Link } from "react-router";
import Menu from "./menu";

export default class MainLayout extends Component {
  render() {
    return (
      <div className="app">
        <div>
          <Menu />
        </div>
        <div>{this.props.children}</div>
      </div>
    );
  }
}
The menu is delegated to the components/menu.js component:
      import React, { Component } from "react";
import { Link, IndexLink } from "react-router";

export default class Menu extends Component {
  render() {
    var menu = (
      <div className={"menu"}>
        <IndexLink to="/" className={"menu-option"} activeClassName="active">
          Home
        </IndexLink>
        <Link to="/messages" className={"menu-option"} activeClassName="active">
          Messages
        </Link>
        <Link to="/login" className={"menu-option"} activeClassName="active">
          Login
        </Link>
      </div>
    );

    return menu;
  }
}
An <IndexLink> is like a <Link>, but it's only active when the current route is exactly the linked route (otherwise, since all of these are nested routes, / and /messages will be marked as active at the same time).
For now, components/login.js will just contain a button to login with Github:
      import React, { Component } from "react";

export default class Login extends Component {
  render() {
    return (
      <div>
        <button className={"login-btn"}>Login with Github</button>
      </div>
    );
  }
}
components/home.js will contain:
      import React, { Component } from "react";

export default class Home extends Component {
  render() {
    return <h1>Home</h1>;
  }
}
While components/message-container.js will contain:
      import React, { Component } from "react";

export default class MessageContainer extends Component {
  render() {
    return <h1>Message Container</h1>;
  }
}
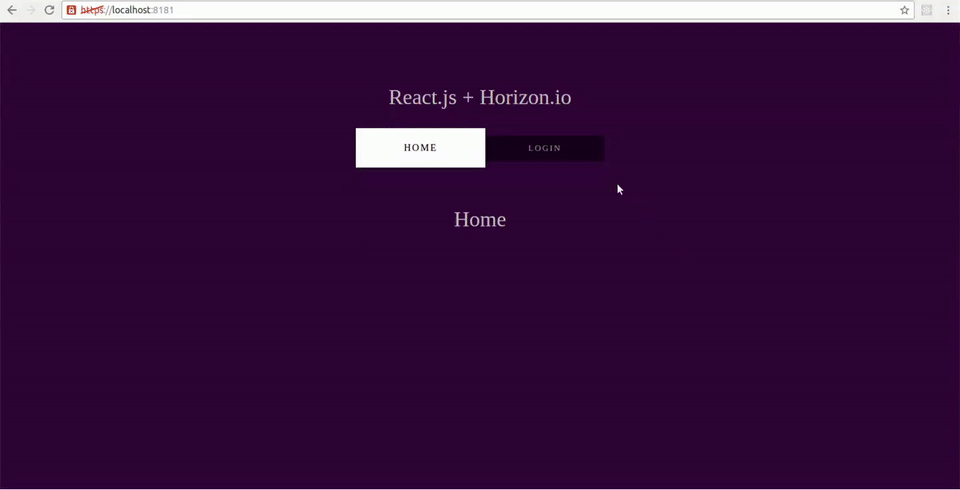
If you run the application at this point with:
npm start
It should look like this:
Adding real-time functionality with Horizon
Now let's use Horizon to add real-time functionality to the application.
First, add the Horizon client dependency to package.json:
npm install --save @horizon/client
You can force the installation of version 2.0.0 with:
npm install --save @horizon/[email protected]
Then, we are going to create a container for the Horizon object, src/horizon-container.js. This will allow us to use Horizon in any part of the application with the same settings, and wrap functions to use them easily. However, right now, it will contain just:
      import Horizon from "@horizon/client";

const _horizon = Horizon();

export default {
  get: () => _horizon
};
The Horizon() object accepts some optional arguments that you can see in this page. Here we're just using the defaults.
In components/message-container.js, we're going to create a Horizon collection to hold the messages. A collection represents a table in RethinkDB, and it lets you store, retrieve, and filter documents. In this page you can know about its API.
Here's the code:
      import React, { Component } from "react";
import Messages from "./messages";
import Horizon from "../horizon-container";

const _horizon = Horizon.get();
const _messageCollection = _horizon("messages");

export default class MessageContainer extends Component {
  constructor(props) {
    super(props);
    this.state = { text: "", errorDescription: "" };
  }

  handleChangeText = e => {
    this.setState({ text: e.target.value });
  };

  handleSubmit = () => {
    if (this.state.text === "" || this.state.author === "") {
      this.setState({ errorDescription: "The message is required" });
    } else {
      this.storeMessage("", this.state.text);
    }
  };

  storeMessage = (user, text) => {
    const message = {
      text: text,
      author: user
    };
    _messageCollection.store(message);
    this.setState({ text: "", errorDescription: "" });
  };

  render() {
    return (
      <div>
        <div className={"message-container"}>
          <div>{this.state.errorDescription}</div>
          <input
            onChange={this.handleChangeText}
            className={"message-input"}
            type="text"
            placeholder="Enter your message"
            value={this.state.text}
          />
          <button className={"message-btn"} onClick={this.handleSubmit}>
            Submit
          </button>
          <Messages messages={_messageCollection} />
        </div>
      </div>
    );
  }
}
Notice how we create the message collection:
const _messageCollection = _horizon("messages");
And how a message is inserted:
_messageCollection.store(message);
The complete collection API is here.
In the next section we'll add the authenticated user ID. For now, we are just passing an empty string.
Also, notice that the component binds the method using arrow functions (since they capture the correct value of this in the actual context) instead of using a regular function and bind(this):
      <button className={"message-btn"} onClick={this.handleSubmit.bind(this)}>
  Submit
</button>
Then, the message collection is passed to a Messages component (components/messages.js):
      import React, { Component } from "react";
import Message from "./message";

export default class Messages extends Component {
  constructor(props) {
    super(props);
    this.messageCollection = this.props.messages;
    this.state = { messages: [] };
  }

  componentDidMount() {
    this.messageCollection.watch().subscribe(
      collection => {
        if (collection) {
          this.setState({ messages: collection });
        }
      },
      err => {
        console.log(err);
      }
    );
  }

  render() {
    const messagesMapped = this.state.messages.map((result, index) => {
      return <Message message={result} key={index} />;
    });

    return <div>{messagesMapped}</div>;
  }
}
The watch() method allows us to listen for changes in the collection in real-time. It returns an object that receives the entire collection of documents, even when a single one changes, which fits perfectly with the way React works.
This way, everything a change is detected, the state of the component changes, and this is re-rendered.
The final piece is the Message component (components/message.js), which just prints a single message:
      import React, { Component } from "react";

export default class Message extends Component {
  constructor(props) {
    super(props);
  }

  render() {
    const { text, author } = this.props.message;
    return (
      <div className={"message-row"}>
        <div>
          <b>Author:</b> {author}
        </div>
        <div>
          <b>Text:</b> {text}
        </div>
      </div>
    );
  }
}
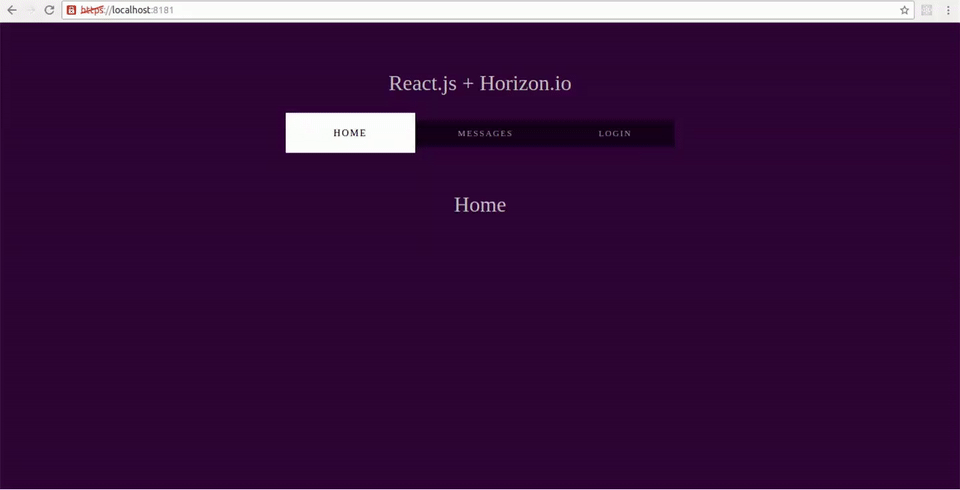
If we run the application at this point, it should look like this:
And in the console, the following messages will be shown (once you've entered to the Messages page):
      warn: Auto-creating collection (dev mode): messages
warn: Collection created (dev mode): "messages"
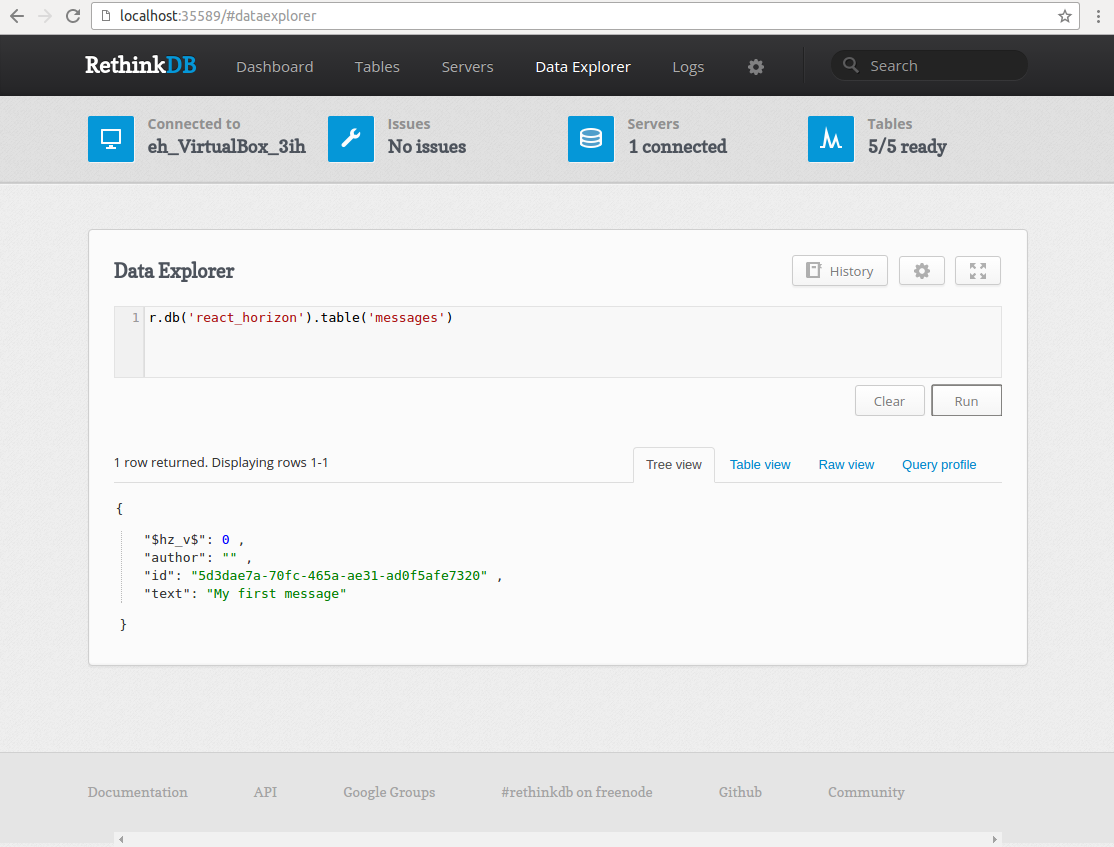
If you go to the RethinkDB web interface (remember to look for the URL when you start the server), you'll notice the table for the collection (in this case, messages):
If you query this table, you'll see the stored message(s):
Adding Horizon OAuth authentication
Let's add authentication to our app by using Horizon's support for OAuth. For simplicity, we're going to use Github only, but the steps and configuration are almost the same for other providers (like Google or Twitter).
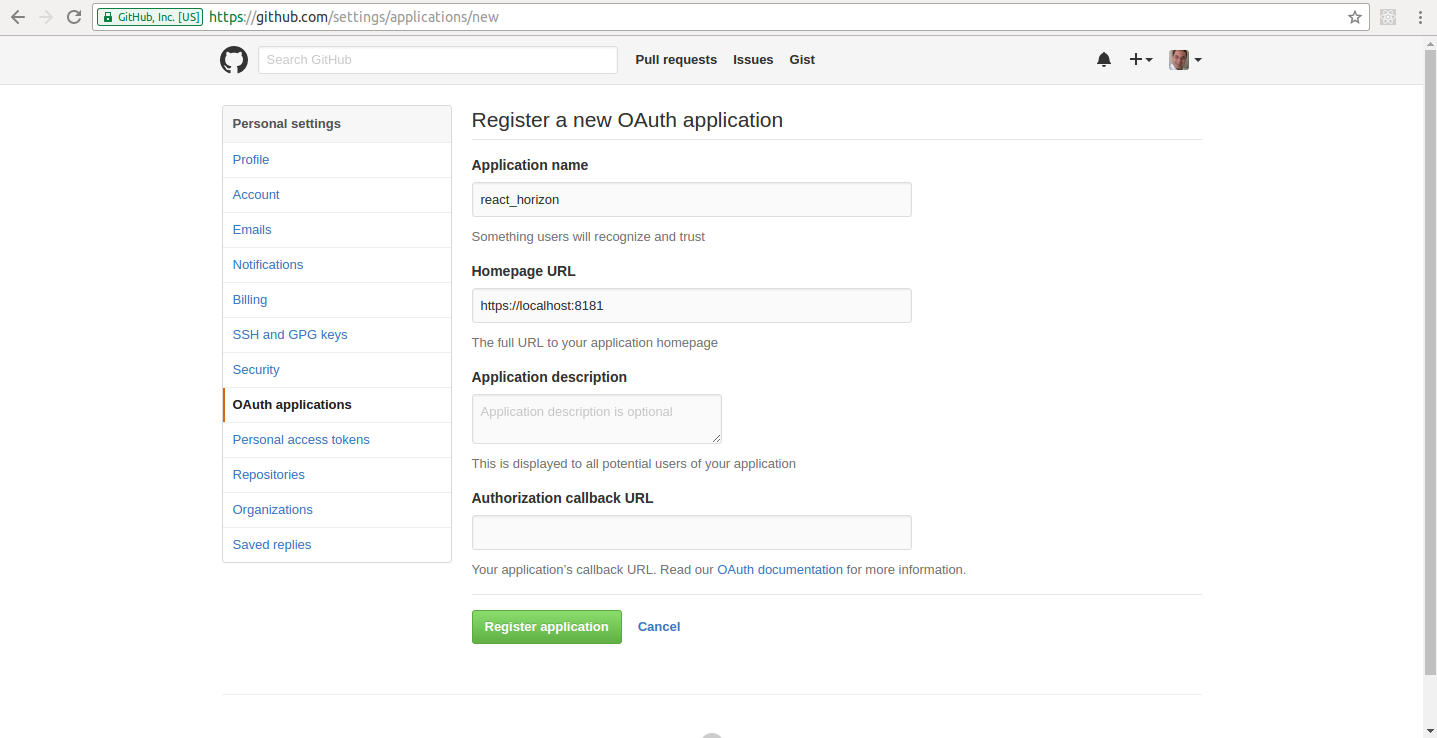
We'll need a client ID and a client secret. Go to https://github.com/settings/applications/new to register an application and enter the following information:
- Application name: react_horizon (any name will do)
- Homepage URL: https://localhost:8181 (or whatever your URL is, just remember the https part)
When you register the application, the client ID and client secret will be presented:

Then, you have to configure these values in the .hz/secrets.toml file:
      token_secret = "NnvpIpep8g9msem6pQHap6g38/wZ0GYQH9/NtXnUTRWlSHT28UtrbAHxxJhi+7673koIJx2Ay5kFX+zHua3fjQ=="

###############################################################################
# RethinkDB Options
# 'rdb_user' is the user account to log in with when connecting to RethinkDB
# 'rdb_password' is the password for the user account specified by 'rdb_user'
#------------------------------------------------------------------------------
# rdb_user = 'admin'
# rdb_password = ''

# [auth.auth0]
# host = "0000.00.auth0.com"
# id = "0000000000000000000000000"
# secret = "00000000000000000000000000000000000000000000000000"
# redirect_url = ""
#
# [auth.facebook]
# id = "000000000000000"
# secret = "00000000000000000000000000000000"
#
# [auth.google]
# id = "00000000000-00000000000000000000000000000000.apps.googleusercontent.com"
# secret = "000000000000000000000000"
#
# [auth.twitter]
# id = "0000000000000000000000000"
# secret = "00000000000000000000000000000000000000000000000000"
#
# [auth.github]
# id = "00000000000000000000"
# secret = "0000000000000000000000000000000000000000"
#
# [auth.twitch]
# id = "0000000000000000000000000000000"
# secret = "0000000000000000000000000000000"
#
# [auth.slack]
# id = "0000000000000000000000000000000"
# secret = "0000000000000000000000000000000"
Horizon uses JSON Web Tokens (JWTS) for user authentication. When the .hz/secrets.toml file is created, a token_secret is generated to sign JWTS, so just replace the client ID and the client secret and uncomment the Github section:
      auth.github]
id = "ea89158619f776d0703c"
secret = "df0ab9c5bff3aae9209ac08241cc7fbdd4ab4144"
Now, let's modify the file src/horizon-container.js to support authentication. First, configure Horizon to support authentication with JWTS:
const _horizon = Horizon({authType: 'token'});
Then, add the method clearAuthTokens() to delete the token on logout and a method to get the current user. The code should look like this:
      import Horizon from "@horizon/client";

const _horizon = Horizon({ authType: "token" });

export default {
  get: () => _horizon,
  clearAuthTokens: () => Horizon.clearAuthTokens(),
  getCurrentUser: callback => {
    _horizon
      .currentUser()
      .fetch()
      .subscribe(user => callback(user));
  }
};
There is more than one way to implement authentication in a React/React Router application. The one that we'll use in this tutorial is high-order components.
A high-order component is a function that takes another component and returns another one that wraps it. In our case, a high-order component will be used to wrap the route to protect by checking if the user is authenticated before rendering it.
This will be the job of src/authenticate-route.js. Here's the code:
      import React, { Component, PropTypes } from "react";
import Login from "./components/login";
import Horizon from "./horizon-container";

const _horizon = Horizon.get();

export default ChildComponent => {
  class AuthenticatedComponent extends Component {
    constructor(props) {
      super(props);
      this.state = { currentUser: "" };
    }

    componentDidMount() {
      if (_horizon.hasAuthToken()) {
        Horizon.getCurrentUser(user => {
          this.setState({ currentUser: user.id });
        });
      }
    }

    render() {
      return _horizon.hasAuthToken() ? (
        <ChildComponent {...this.props} user={this.state.currentUser} />
      ) : (
        <Login />
      );
    }
  }

  return AuthenticatedComponent;
};
The user ID will be stored in the state and passed to the component that wraps. This way, when it changes (because it's fetched asynchronously), the child component will be re-rendered.
In the render() function, we check if the authentication token is present so the child component can be rendered. Otherwise, the login page is presented.
In the Login component (components/login.js), we add the logic to present the Github login with the method authEndpoint():
      import React, { Component } from "react";
import Horizon from "../horizon-container";

const _horizon = Horizon.get();

export default class Login extends Component {
  handleAuth = () => {
    _horizon.authEndpoint("github").subscribe(endpoint => {
      window.location.replace(endpoint);
    });
  };

  render() {
    return (
      <div>
        <button className={"login-btn"} onClick={this.handleAuth}>
          Login with Github
        </button>
      </div>
    );
  }
}
This way, we protect a route (in src/router.js), in this case /message, like this:
      import authenticate from './authenticate-route'

...

export default (
  <Router history={browserHistory}>
    <Route path="/" component={MainLayout}>
      <IndexRoute component={Home} />
      <Route path="messages" component={authenticate(MessageContainer)} />
      <Route path="login" component={Login} />
    </Route>
  </Router>
);
Also, for this application we're going to show a different menu for authenticated users. Open the file src/components/menu.js and modify it so it looks like this:
      import React, { Component } from "react";
import { Link, IndexLink } from "react-router";
import Horizon from "../horizon-container";

export default class Menu extends Component {
  logout = e => {
    e.preventDefault();
    Horizon.clearAuthTokens();
    this.context.router.push("/");
  };

  render() {
    var menu = Horizon.get().hasAuthToken() ? (
      <div className={"menu"}>
        <IndexLink to="/" className={"menu-option"} activeClassName="active">
          Home
        </IndexLink>
        <Link to="/messages" className={"menu-option"} activeClassName="active">
          Messages
        </Link>
        <a href="#" className={"menu-option"} onClick={this.logout}>
          Log out
        </a>
      </div>
    ) : (
      <div className={"menu"}>
        <IndexLink to="/" className={"menu-option"} activeClassName="active">
          Home
        </IndexLink>
        <Link to="/login" className={"menu-option"} activeClassName="active">
          Login
        </Link>
      </div>
    );

    return menu;
  }
}

Menu.contextTypes = {
  router: React.PropTypes.object
};
Using the method hasAuthToken(), we're going to show a menu with the Messages and Logout options for authenticated users.
The logout function deletes the token and redirects the user to the home page. In order to do this, we need the router object, and since we're using an ES6 class, we have to inject it like this:
      Menu.contextTypes = {
  router: React.PropTypes.object
};
The authentication component passes to the child the ID of the user, so let's modify the message components to use it.
In components/message-container.js you just need to update the handleSubmit() method to get the ID from the properties:
      handleSubmit = () => {
  if (this.state.text === "" || this.state.author === "") {
    this.setState({ errorDescription: "The message is required" });
  } else {
    this.storeMessage(this.props.user, this.state.text);
  }
};
And pass it to the Messages component:
      render() {
	return (
		<div>
			<div className={'message-container'}>
				<div>{this.state.errorDescription}</div>
				<input onChange={this.handleChangeText} className={'message-input'} type='text' placeholder='Enter your message' value={this.state.text}/>
				<button className={'message-btn'} onClick={this.handleSubmit}>Submit</button>
				<Messages messages={_messageCollection} user={this.props.user}/>
			</div>
		</div>
	);
}
This way, the Messages component can use it to filter the messages:
      export default class Messages extends Component {

	constructor(props) {
        super(props);
        this.messageCollection = this.props.messages;
        this.userId = '';
        this.state = {messages: []};
	}

	componentWillReceiveProps(nextProps) {
        if (nextProps.user !== this.userId) {
            this.userId = nextProps.user;
            this.messageCollection.findAll({author: this.userId}).watch().subscribe(
                (collection) => {
                    if(collection) {
                        this.setState({messages: collection});
                    }
                },
                (err) => {
                    console.log(err);
                }
            );
        }
	}

	render() {
        ...
	}
}
Notice that we had to replace componentDidMount() by componentWillReceiveProps(nextProps).
The reason is that componentDidMount() of the child components is invoked before that of parent components. So, when the user ID is received, the child components are re-rendered but the componentDidMount() method of components/messages.js is not executed again with this value, so the changes of that user are not received.
componentWillReceiveProps(nextProps) is invoked when a component is receiving new properties and we can be used to update the state due to a property change before render() is executed.
However, this will make the component continuously re-render (because of the state changes of components/message-container.js), so we have to put a condition to only execute the watch() query when we first receive the user ID:
      componentWillReceiveProps(nextProps) {
	if (nextProps.user !== this.userId) {
		this.userId = nextProps.user;
		this.messageCollection.findAll({author: this.userId}).watch().subscribe(
			...
		);
	}
}
Finally, we're ready to test the authentication. Execute npm start to pack the changes and start the server.
The first time you log into the application, it will prompt you to authorize it on Github:

Notice that the menu now changes for (un)authenticated users and, since we're filtering by user ID, the previously entered messages are not shown.
In the logs of the server, you should also see this line:
      warn: Auto-creating index on collection "users": [["id"]]
warn: Auto-creating index on collection "messages": [["author"]]
In development mode, Horizon will create an index to speed up the queries automatically.
After this, every time you log into the application, if you have a session on Github, it should log you in automatically, otherwise, it will prompt you for your credentials.
Additionally, you can go to https://github.com/settings/developers to view the number of registered user in your application and change the settings if you want.
Integrating Express and Horizon
Now that we have the authentication part done, we just have one final problem to solve.
The routes work by clicking on the links, but what happens when we enter directly the route in the browser:

This is because the Horizon server doesn't know about the routes configured in React, it just serves whatever files are in the dist directory.
The solution is to integrate Horizon with a web server that redirects all requests to index.html. For this app, we are going to use Express, but integrating other frameworks like Koa or Happi with Horizon is very similar.
However, we need to make some major changes:
- We 're not going to start the server with hz serve, which means that a RethinkDB server won't be automatically started.
- When using Horizon on the client side, the file .hz/config.toml holds the configuration of the framework. When using Horizon on the server side, we need to pass all these configurations to the server when we create it.
- Because of this, we'll need to configure Express for HTTPS
Let's start by adding the dependencies we're going to need to our package.json file:
npm install --save express path @horizon/server
Once again, you can force the installation of version 2.0.0 with:
npm install --save @horizon/[email protected]
Next, let's add a server.js file to the root directory, importing the libraries we're going to need and creating the Express object:
      const express = require("express");
const https = require("https");
const path = require("path");
const fs = require("fs");
const horizon = require("@horizon/server");

const app = express();
Now configure the routes for the public files and to redirect all requests to index.html
      // Serve our static stuff like css
app.use(express.static(path.join(__dirname, "dist")));

// Send all requests to index.html
app.get("*", function(req, res) {
  res.sendFile(path.join(__dirname, "dist", "index.html"));
});
Next, configure Express to use HTTPS. We can reuse our self-signed certificates:
      const options = {
  key: fs.readFileSync(path.resolve(__dirname, "./config/tls/horizon-key.pem")),
  cert: fs.readFileSync(
    path.resolve(__dirname, "./config/tls/horizon-cert.pem")
  )
};
const PORT = process.env.PORT || 8181;

const server = https.createServer(options, app);

server.listen(PORT, function() {
  console.log("Express server running at localhost:" + PORT);
});
Now that we have an HTTPS server, we configure Horizon to use it. We'll need to copy the token_secret and Github client ID and client secret from the .hz/config.toml file:
      const horizon_server = horizon(server, {
  project_name: "react_horizon",
  permissions: true,
  auth: {
    token_secret:
      "NnvpIpep8g9msem6pQHap6g38/wZ0GYQH9/NtXnUTRWlSHT28UtrbAHxxJhi+7673koIJx2Ay5kFX+zHua3fjQ=="
  }
});

// Add Github authentication
horizon_server.add_auth_provider(horizon.auth.github, {
  path: "github",
  id: "2660ef72dc60e109b088",
  secret: "a844d51e652d74a6760ab71815050cba58a70d88"
});
As you can see, the server is passed to Horizon along with options that are similar to the ones defined in the .hz/config.toml file. In the above code, we set the project name, enable permissions (more of this in a moment), and use token authentication. You can find more information about all the options here.
Finally, we use the add_auth_provider method to set up the OAuth Github provider. You can extract all this configuration data to an external file if you want (like a config.js file).
By default, Horizon will connect to a RethinkDB server on localhost:28015. We're also enabling permissions (which is actually the default option).
In this configuration, Horizon doesn't allow access to collections by default, even for authenticated users, which means that we won't be able to use neither our message collection nor getting the user ID (from the users table).
To fix this, we need to manually import the permission rules to the database we're going to use. If you execute this command:
hz schema save -n react_horizon --start-rethinkdb yes -o schema.toml
Horizon will start the development RethinkDB server, and extract the schema, validation rules, collection and index specifications of the react_horizon application (it won't extract the collection's data) as a TOML file, schema.toml. Here's what this file contains:
      # This is a TOML document

[collections.messages]
[[collections.messages.indexes]]
fields = [["author"]]

[collections.users]
[[collections.users.indexes]]
fields = [["id"]]

[groups.admin]
[groups.admin.rules.carte_blanche]
template = "any()"
Since we were using Horizon in development mode (where no permissions are enforced), there are no permissions rules set up, so we will have to add the following to schema.toml:
      groups.authenticated.rules.read_own_messages]
template = "collection('messages').findAll({author: userId()})"

[groups.authenticated.rules.write_own_messages]
template = "collection('messages').store({author: userId()
You can learn about permission rules in this page, but what the above lines do is to allow the authenticated user to read and write their own messages, and to read the users table to get the data by their ID.
Move this file to config/rethinkdb/schema.toml, once again, to keep things organized.
To import these rules to our new database, first you have to start it (in another terminal and, preferably, in another directory) with:
rethinkdb
And then, execute this command from the root directory of the application:
hz schema apply -n react_horizon -c localhost:28015 config/rethinkdb/schema.toml
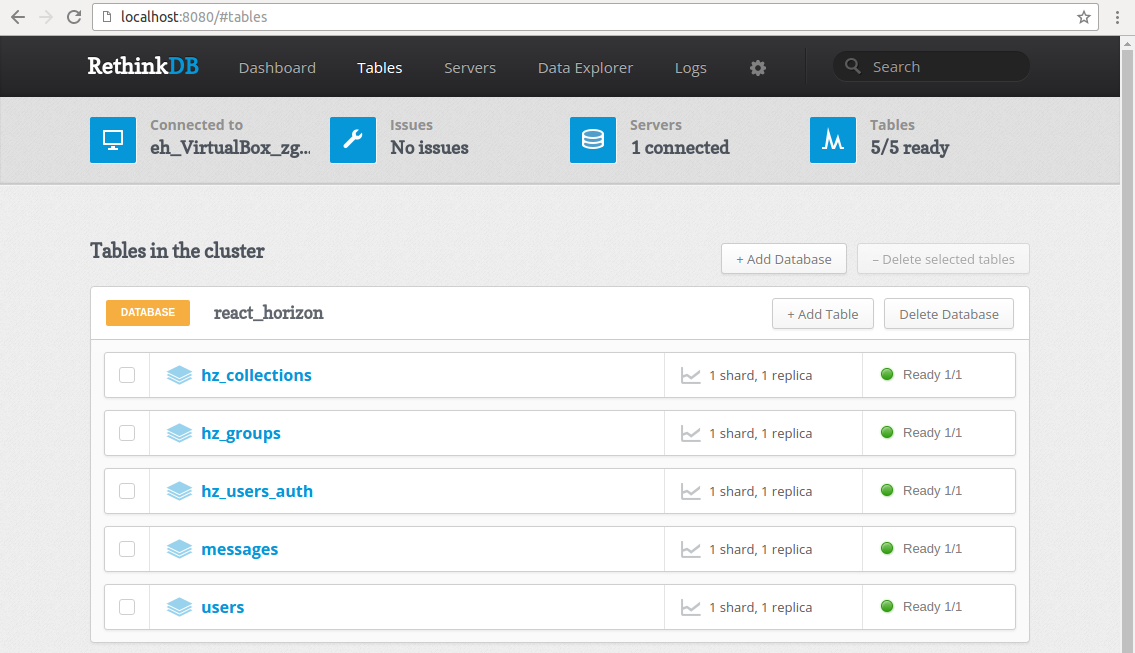
If you go to https://localhost:8080/#tables, you should see the imported databases:
And now that we won't be using the files of the .hz directory and the rethinkdb-data directory, you can delete them.
Finally, change the start script on package.json to start the Express server instead of the Horizon development server:
      {
  ...
  "scripts": {
    "start": "webpack && node server.js"
  },
  ...
}
When you run the application (don't forget to start the RethinkDB server also), the problem with entering the URL directly in the browser should be solved:
You can also test the rest of the functionality to make sure everything is working correctly.
Conclusion
There you have it. We created a single page application with authentication and real-time capabilities using React, React Router, Webpack, Babel, Node.js, Express, and of course, Horizon.
There are some limitations of what you can do with Horizon because, at the time of this writing, it is a relatively new framework. However, it has a lot of features that make real-time programming easier, not without mentioning its growing and strong community.
Remember that the code of the application is on Github and if you have any questions or comments, don' hesitate to contact me.
Advance your tech skills today
Access courses on AI, cloud, data, security, and more—all led by industry experts.
