Building a Redux Application with Angular 2 - Part 1
In part 1 of this tutorial we will cover the core concepts of Redux and how they boost Angular 2 applications. You will see Redux in practice and learn component structrue and utilizing the asyncPipe.
Jan 10, 2019 • 28 Minute Read
Introduction
State management has been an ongoing issue in front-end frameworks. Front-end frameworks' key tenet of state mutation at multiple levels makes the standard MVC (Model-View-Controller) approach ineffective. This multi-layered state mutation was evident in Angular 1, where the logic for managing the application state was distributed between directives, controllers, and service, and each level had its own logic for mutating the state. The segmented application state became prone to causing inconsistencies and was difficult to test.
Such issues have become more apparent and difficult to circumvent as front-end applications started to become increasigly complex and more reactive to user input. However, increasingly popular traits of front-end development, such as an emphasis on functional programming, have given birth to a novel state management model called Redux. Redux centralizes the state into a single entity, granting developers access to the most recent state anywhere in the application.
Even though Redux arose through the React community, third-party libraries such as ngrx/store and extensions such as rxJS, have made Redux an equally suitable concept for use in Angular 2 applications.
In this guide, I will cover the core concepts of Redux and how they boost Angular 2 applications.
Main concepts of Redux
Redux comprises three main parts
- The main store
- Reducers
- Actions
Each of these parts plays a different role in the mutation of the application's state. _ Middlewares, which are used to handle asynchronous requests (such as API calls), will be covered in part two._
The Main Store
The store combines the whole application state into a single entity, acting as the database for the web application. The store is broken down into different states, which represent different types of data in the application. The state is immutable, but it can be altered by explicitly defined actions. Thus, state mutation is restricted and centralized, simplifying the debugging process and making code more understandable.
Reducers
If the store is the database of the application, the reducers are the tables. Reducers represent slices, or structures in the application that are composed in a particular fashion. A reducer is a pure function that defines how a slice of the state is going to change when an action is being dispatched. It accepts two arguments, the previous state and an action, and returns the new state.
      export interface Reducer<T> {
  (state: T, action: Action): T;
}
Example
      export const itemsReducer: ActionReducer<number> = (state = [], action: Action) => {
  switch (action.type) {
    case ADD_ITEM: //adding an item
      const item:Item = action.payload;
      //KEEPING THE STATE IMMUTABLE:
      // We don't perform actions that alter the state such as
      // array.push, array.shift and so on.
      // Instead, we concatenate the item, preserving the state.
      return [ ...state, item ];
    }

    case REMOVE_ITEM://removing the item
    // Again, we don't remove the item, we just filter the new state so
    // that it won't contain the item we're removing
      return state.filter(item => {
        return item.id !== action.payload.id;
      });
    }
}
Actions
Actions represent payloads of information that are dispatched to the store from the application and are usually triggered by user interaction. Each reducer has a set of action types that define how the state should be changed. An action is composed a type and a payload:
      export interface Action {
 type: string;
 payload?: any;
}
Example:
      //making an action for adding an item
dispatch({type: ADD_ITEM, payload: {id: 1, name: 'An item' , category: 'miscellaneous'}})
Overview
When an action is dispatched, the reducer takes it and applies the payload depending on the action type, and outputs the new state.

The store encompasses the whole state, the reducers return fragments of the state, and actions are pre-defined, user-triggered events that communicate how a given fragment of the state should change. Middlewares are used in cases the actions require asynchronous requests. The reducer takes its previous state, applies the new action to it, and returns it back.
Projecting data
As you already know, the Store is a tree-like structure representing the application state, that is composed of reducers, which represent different slices of the state. In the case of Angular 2's ngrx/store, the store is an observable, hence making the access to the application's state reactive. An observable store also allows us to mix the values of several states using RxJS's operators.
      //getting a single slice of the state
store.select('items')

//combining multiple slices
Observable.combineLatest(
  store.select('items'),
  store.select('categories'),
  (items, categories) => {

})
Redux in practice
Now that you know the main concepts, you're probably wondering how they tie together in an Angular 2 application. To illustrate how Redux works, we are going to build a simple financial accounting tool that will keep track of your transactions using the Redux architecture. It will feature operations which will either add or deduct money from an imaginary account. Later on, we are going to add a way to see your current balance and some additional statistics.
Setup
We'll use angular-cli to setup the project:
      ng new financials_app
 cd financials_app
ngrx/store is a state container that is specifically built for Angular 2 applications. It is going to provide the utilities and the building blocks for the Redux architecture.
npm install @ngrx/core @ngrx/store --save
Optionally, you can also install Bootstrap to make the application look good and well-structured:
npm install bootstrap@next
Add the following lines to angular-cli.json.
In the app.scripts array, as an object property:
      "scripts": [
  "../node_modules/jquery/dist/jquery.js",
  "../node_modules/tether/dist/js/tether.js",
  "../node_modules/bootstrap/dist/js/bootstrap.js"
],
In the app.styles array:
      "styles": [
  "../node_modules/bootstrap/dist/css/bootstrap.css",
  "styles.css"
]
Your first reducer
The first thing to do in a Redux application is to define your store and start attaching reducers to it. For the first iteration of the application, we will add the state of financial operations.
In your Angular 2 app, make a new directory that will contain the reducers of your application:
      cd src/app
  mkdir common
First, let's make a model of our financial operation:
      //src/app/common/operation.model.ts
export class Operation {
  id: number;
  amount: number;
  reason: string;

  constructor() {}
}
Defining a reducer function
Next, create a file that will contain the definitions of the actions and the reducer for the financial operations:
      //src/app/common/operations.ts
import {ActionReducer, Action, State} from '@ngrx/store';
import {Operation} from "./operation.model";


//definitions of the actions that alter the state
export const ADD_OPERATION = 'Add an operation';
export const REMOVE_OPERATION = 'Remove an operation';
export const INCREMENT_OPERATION = 'Increment an operation';
export const DECREMENT_OPERATION = 'Decrement an operation';


//the initial state of the operations
const initialState:State = [];

//the operationsReducer function: a pure function that is responsible for maintaining the
//financial operations state of your store
export const operationsReducer: ActionReducer = (state = initialState, action: Action) => {
  switch (action.type) {
   //In Redux, you cannot mutate the state. In this case using .push(), .pop(),
   // .shift() or .unshift() is against the convention.
    case ADD_OPERATION: //Action type
      const operation:Operation = action.payload;//the contents of an operation
      return [ ...state, operation ];

    case INCREMENT_OPERATION:
      const operation = ++action.payload.amount;
      return state.map(item => {
        return item.id === action.payload.id ? Object.assign({}, item, operation) : item;
      });

    case DECREMENT_OPERATION:
      const operation = --action.payload.amount;
      //update the state by creating a new object using Object.assign()
      return state.map(item => {
        return item.id === action.payload.id ? Object.assign({}, item, operation) : item;
      });

    case REMOVE_OPERATION:
      return state.filter(operation => {
        //filter items to exclude the item in the payload
        return operation.id !== action.payload.id;
      });


    default: //if the action.type is unknown, return the state
      return state;
  }

};
The reducer's state is an array of financial operations. For each action that is dispatched to the reducer (or, to put it simply, every time the reducer function is called), a switch operator creates a new state, depending on the action type, with the changes applied. If the action type does not match any of the defined actions, the state is simply returned.
Note that the state is immutable. Instead of changing the array of operations, we create a copy of it and apply the changes to the new copy.
Initializing the store
Next, put the reducer into the store.
      // src/app.module.ts
import { AppComponent } from './app.component';
import {StoreModule} from "@ngrx/store";
import {operationsReducer} from "./common/operations";//import the reducer
import {CommonModule} from "@angular/common";


@NgModule({
  bootstrap: [ AppComponent ],
  declarations: [
    AppComponent
    //...
  ],
  imports: [ // import StoreModule
    //...
    StoreModule.provideStore({ operations: operationsReducer }) //provideStore accepts an object with reducers.
  ],
})
export class AppModule {
  constructor() {}
}
At this stage of the application, there is only one slice of the state and consequently, only one reducer. However, at later stages, we'll have multiple reducers and we'll use combineReducers to provide a helper for dispatching actions. combineReducers simply acts as a helper for combining all the returned states from the reducers in a single entity that will represent the application store.
By putting the operationsReducers as an argument in provideStore, you can access the state of operations in any place of the application by importing Store from @ngrx/store. Here is how you can do it:
Projecting the state
      //src/app/app.component.ts
import { Component, ViewEncapsulation } from '@angular/core';
import {Operation} from "./common/operation.model";
import {State, Store} from "@ngrx/store";
@Component({
  selector: 'app-root',
  template: `{{ operations | json }}`
})
export class AppComponent {

  public operations:Array<Operation>;

  constructor(private _store: Store<State>) {
    //By using observables, @ngrx/store lets you have access to the most recent state in real time
    _store.select('operations').subscribe(state => this.operations= state)
  }
}
By injecting the store and using store.select(), you can access one of the states in the application (from the reducers you put in provideStore(). In this case, we only have operations. The store always returns an observable, so you have to subscribe to it, or, if you are passing it in a child component, use the async pipe (an example will be given at a later stage).
Go to your terminal and build the application:
ng serve
Open your browser and go to https://localhost:4200.
At this point, everything you'll see is an empty array ([]), coming from the json pipe being used on operations.
Dispatching actions
The state of the store is updated through pre-defined actions, which are dispatched from user events and are used as input for the reducer functions. Naturally, the first action we are going to implement in the application will be the ADD_OPERATION action which, as the name suggests, is going to attach a new financial operation to the array of operations.
      // src/app/app.component.ts
 import {ADD_OPERATION,} from "./common/operations"; //import the operation type

 //...
 export class AppComponent {


  public id:number = 0 ; //simulating IDs
  public operations:Array<Operation>;

  //initialize a new operation class instance
  public operation:Opeation =  new Operation();


  constructor(private _store: Store<State>) {
    _store.select('operations').subscribe(state => this.operations= state)
  }


  addOperation() {
    //use the dispatch() function to send an action with type and payload
    this._store.dispatch({type: ADD_OPERATION , payload: {
      id: ++ this.id,//simulating ID increments
      reason: this.operation.reason,
      amount: this.operation.amount
    }});
  }
The action is dispatched using the built-in dispatch() function in the store provided by @ngrx/store. As an argument, we send a valid action type that we previously defined in src/app/common/operations.ts.
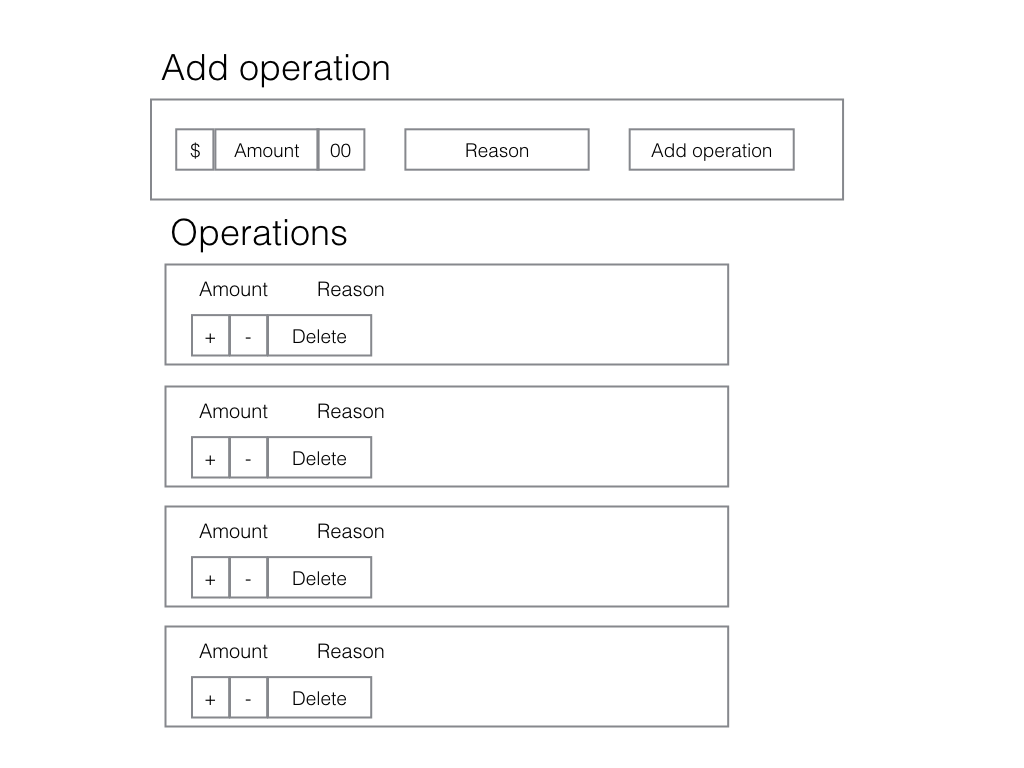
But how is the user going to input the information about the financial operation? Let's add a form that will let the user populate the Operation model with information
      // src/app/app.component.ts

    @Component({

     template: `<div class="row">
    <div class="col-md-12">
      <form class="form-inline" >
        <div class="form-group">
          <div class="input-group">
            <div class="input-group-addon">$</div>
            <input type="text" class="form-control"  [(ngModel)]="operation.amount" name="amount" placeholder="Amount">
            <div class="input-group-addon">.00</div>
          </div>
        </div>
        <div class="form-group">
          <input type="text" [(ngModel)]="operation.reason"  name="reason" class="form-control" placeholder="Reason">
        </div>

        <button type="submit" (click)="addOperation()" class="btn btn-primary">Add operation</button>
      </form>
    </div>
  </div>
  {{operations | json}}`

   //...

    })
In the template, we simply use [(ngModel)] to bind the Operation's attributes to the input fields and call the addOperation() when the button is clicked.
If we try to insert something into the state right now, you'll see it popping in on the template as JSON. This is not a pleasant user experience, and it limits our ability to add more functionality. To counter, let's make operations into a list:
In the place of {{operations | json}}, put the following:
      <div class="row">
  <div class="col-md-12">
    <ul class="list-group" >
      <li *ngFor="let operation of operations"class="list-group-item" [ngClass]="{'list-group-item-success': operation.amount > 0 ,'list-group-item-danger': operation.amount < 0 }">
        <h3 class="h3">$ {{operation.amount}}</h3>
        <p><span class="text-muted">Reason:</span> {{operation.reason}}</p>
      </li>
    </ul>
  </div>
</div>
Using *ngFor and some built-in boostrap styles, we now see a financial operation popping up every time we add one.
What we just implemented is a full cycle of a simple action. By clicking on the Add Operation button, we dispatched an ADD_OPERATION action to the store, which called the operations reducer. The reducer applied the action and returned the new state in the store. The operations observable received a new value of the state and displayed it on the template.

Let's add the rest of the actions - REMOVE_OPERATION , ICREMENT_OPERATION , DECREMENT_OPERATION. Here is the complete code for the AppComponent class:
      // src/app/app.component.ts
import {ADD_OPERATION, REMOVE_OPERATION, INCREMENT_OPERATION, DECREMENT_OPERATION} from "./common/operations";


export class AppComponent {

 public id:number = 0 ; //simulating IDs
 public operations:Array<Operation>;
 public operation:Operation = new Operation();

 constructor(private _store: Store<State>) {
   _store.select('operations').subscribe(state => this.operations= state)

 }

 addOperation() {
   this._store.dispatch({type: ADD_OPERATION , payload: {
     id: ++ this.id,//simulating ID increments
     reason: this.operation.reason,
     amount: this.operation.amount
   }});
 }

 //Adding REMOVE_OPERATIOn , INCREMENT_OPERATION , DECREMENT_OPERATION

 incrementOperation(operation){
   this._store.dispatch({type: INCREMENT_OPERATION, payload: operation})
 }

 decrementOperation(operation) {
   this._store.dispatch({type: DECREMENT_OPERATION, payload: operation})
 }

 deleteOperation(operation) {
   this._store.dispatch({type: REMOVE_OPERATION, payload: operation})
 }

}
The rest of the actions follow the same pattern by sending an action type and the operation itself as a payload. In the template, we just need to add the corresponding buttons to trigger our actions. Let's add a button group in the .list-group-item div for the actions that can be done on a single operation.
      <!--src/app/app.component.ts -->
<!-- rest of the template -->
<li *ngFor="let operation of operations"class="list-group-item" [ngClass]="{'list-group-item-success': operation.amount > 0 ,'list-group-item-danger': operation.amount < 0 }">
  <h3 class="h3">$ {{operation.amount}}</h3>
  <p><span class="text-muted">Reason:</span> {{operation.reason}}</p>

  <div class="btn-group">
      <button class="btn btn-success" (click)="incrementOperation(operation)">+</button>
      <button class="btn btn-warning" (click)="decrementOperation(operation)">-</button>
       <button class="btn btn-danger" (click)="deleteOperation(operation)"> Delete</button>
  </div>
</li>
Go to https://localhost:4200 and play around with your Redux app!
Component structure
Right now, our view is contained into one single single component - AppComponent. The code already starts to pile, and it has to get separated into smaller components. Redux uses its own specific approach for structuring components. In a Redux application, they are divided in two types - container and children.
Container components
Container components are routable components that contain child components inside them. They are responsible for containing most of the logic - having the connection with the store, dispatching actions, and distributing the data to the child components.
Child components
The role of the child components is primarily representational. They accept input from the container component and display it to the user. They are also responsible for handling and outputting user interactions to the container component.
In our application, we can delegate some of the representational logic from AppComponent to two child components - NewOpreration and OperationsList:
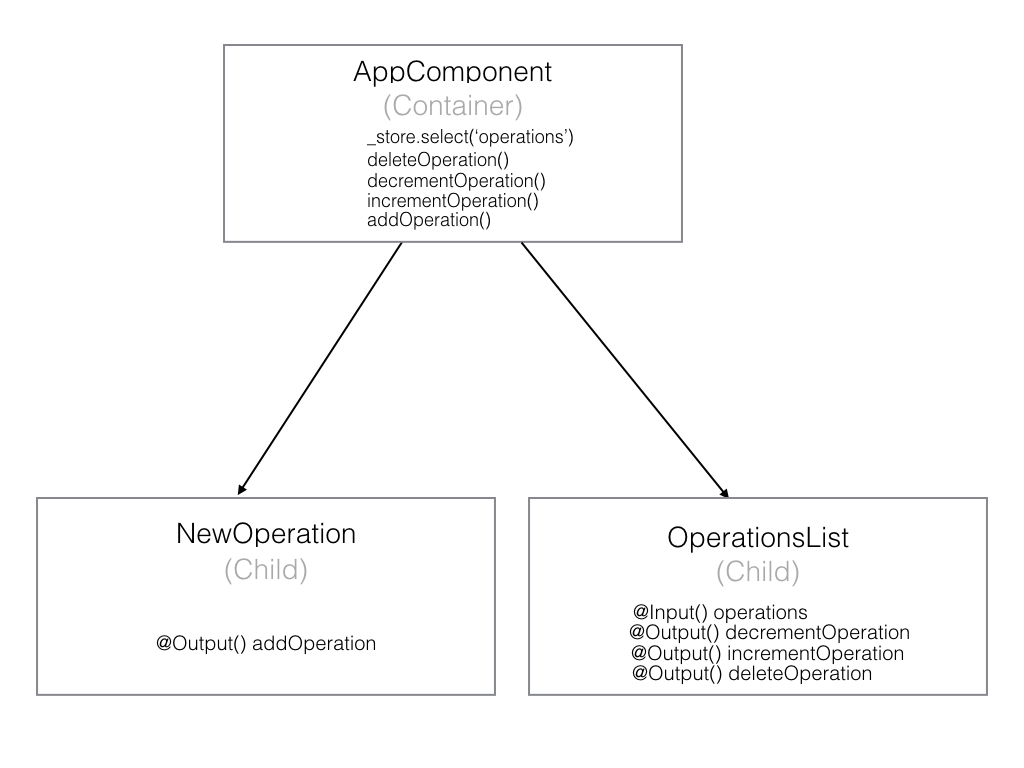
Here is how the code for the three components looks after we divide them:
app.component.ts - container component
      // src/app/app.component.ts
import { Component } from '@angular/core';
import {Operation} from "./common/operation.model";
import {State, Store} from "@ngrx/store";
import {ADD_OPERATION, REMOVE_OPERATION, INCREMENT_OPERATION, DECREMENT_OPERATION} from "./common/operations";


@Component({
  selector: 'app-root',
  template: `<div class="container">
      <new-operation (addOperation)="addOperation($event)"></new-operation>
      <!-- utilizing the async pipe to handle all subscribing to observables -->
      <operations-list [operations]="operations | async"
      (deleteOperation)="deleteOperation($event)"
      (incrementOperation)="incrementOperation($event)"
      (decrementOperation)="decrementOperation($event)"></operations-list>
</div>

`
})

 //All of the interactions with the store such as selecting and dispatching are in the
 //'container component'
export class AppComponent {

  public id:number = 0 ; //simulating IDs
  public operations:Array<Operation>;


  constructor(private _store: Store<State>) {
    this.operations = _store.select('operations')

  }


  addOperation(operation) {
    this._store.dispatch({type: ADD_OPERATION , payload: {
      id: ++ this.id,//simulating ID increments
      reason: operation.reason,
      amount: operation.amount
    }});
  }

  incrementOperation(operation){
    this._store.dispatch({type: INCREMENT_OPERATION, payload: operation})
  }

  decrementOperation(operation) {
    this._store.dispatch({type: DECREMENT_OPERATION, payload: operation})
  }


  deleteOperation(operation) {
    this._store.dispatch({type: REMOVE_OPERATION, payload: operation})
  }


}
new-operation.component.ts - child component
      //src/app/new-operation.component.ts
import {Component, Output, EventEmitter, ChangeDetectionStrategy} from '@angular/core';
import {Operation} from "./common/operation.model";

@Component({
  selector: 'new-operation',
  templateUrl: './new-operation.template.html',
  //ChangeDetectionStartegy.OnPush
  changeDetection: ChangeDetectionStrategy.OnPush

})

export class NewOperation {
  public operation:Operation;
  constructor() {
    this.operation = new Operation();
  }

  @Output() addOperation = new EventEmitter();

}
new-operation.template.html
      <!-- src/app/new-operation.template.html -->
<div class="row">
  <div class="list-group-item">
    <form class="form-inline" >
      <div class="form-group">
        <div class="input-group">
          <div class="input-group-addon">$</div>
          <input type="text" class="form-control"  [(ngModel)]="operation.amount" name="amount" placeholder="Amount">
          <div class="input-group-addon">.00</div>
        </div>
      </div>
      <div class="form-group">
        <input type="text" [(ngModel)]="operation.reason"  name="reason" class="form-control" placeholder="Reason">
      </div>
      <button type="submit" (click)="addOperation.emit(operation)" class="btn btn-primary">Add operation</button>
    </form>
  </div>
</div>
operations-list.component.ts - child component
      //src/app/operations-list.component.ts
import {
  Component,
  Input,
  Output,
  EventEmitter,
  ChangeDetectionStrategy
} from "@angular/core";
import { Operation } from "./common/operation.model";

@Component({
  selector: "operations-list",
  templateUrl: "./operations-list.template.html",
  changeDetection: ChangeDetectionStrategy.OnPush
})
export class OperationsList {
  @Input() operations: Array<Operation>;

  constructor() {}

  @Output() deleteOperation = new EventEmitter();
  @Output() incrementOperation = new EventEmitter();
  @Output() decrementOperation = new EventEmitter();
}
operations-list.template.html
      <!-- src/app/operations-list.template.html -->
<div class="row">
  <div class="col-md-12">
    <ul class="list-group" >
      <li *ngFor="let operation of operations"class="list-group-item" [ngClass]="{'list-group-item-success': operation.amount > 0 ,'list-group-item-danger': operation.amount < 0 }">
        <h3 class="h3">$ {{operation.amount}}</h3>
        <p><span class="text-muted">Reason:</span> {{operation.reason}}</p>
        <div class="btn-group">
          <button class="btn btn-success" (click)="incrementOperation.emit(operation)">+</button>
          <button class="btn btn-warning" (click)="decrementOperation.emit(operation)">-</button>
          <button class="btn btn-danger" (click)="deleteOperation.emit(operation)"> Delete</button>
        </div>
      </li>
    </ul>
  </div>
</div>
ChangeDetectionStrategy.OnPush
changeDetection: ChangeDetectionStrategy.OnPush is put on the decorators of the two child components. To better understand what it does, you have to know how a component works; Each component has its own change detector which checks the component's state every time an event happens and stores the new and the previous state of the component.
If you've ever used OnChanges, you have already seen the component's change detector in action. ChangeDetectionStrategy determines when the change detector 'listens' for changes. By setting the strategy to OnPush, the changeDetector runs only when the component @Input() changes.
Because the state of the child compoents relies sonly on their @Input, using OnPush reduces the times the component's internal change detector runs, giving a tremendous performance boost to your application.
Utilizing the asyncPipe
Looking closely on the differences between the new and the old AppComponent, you'll notice that the old one has the following code snippet in its constructor:
_store.select('operations').subscribe(state => this.operations= state)
Whereas the new one simply has this:
this.operations = _store.select('operations')
If you've ever dealt with observables, you know that you have to subscribe to an observable to get its most recent values and unsubscribe when you don't need it anymore.
Let's compare the code above. In the first code snippet, everything looks normal, but the second code snippet looks strange, because the application still functions normally without subscribing to the observable. This is because we are using the AsyncPipe
<operations-list [operations]="operations | async" >
The AsyncPipe is a special built-in pipe that is used for handling the values of Promises and Observables. AsynchPipe automates subscribing to, retrieving data from, and unsubscribing from the observable. The same applies for promises, where the pipe gets the thenable and returns it as a value.
In this case, the operations input of operations-list does not retrieve an observable object. Instead, it retrieves the values from the subscription.
Conclusion
If you got stuck or need a reference for the code, I have uploaded it to a GitHub repository. You are free to fork it and play around with it.
That was all for part one! In part two, we will continue to expand the application and we will learn more about:
- Handling more than one state and reducer .
- Composing states and filtering.
- Structuring larger applications.
- Role and application of effects (ngrx/effects) in Redux.
Thanks for reading this tutorial. Stay tuned for part two!
Advance your tech skills today
Access courses on AI, cloud, data, security, and more—all led by industry experts.
