Data Structures in Swift - Part 2
In part 2 of this free Swift tutorial, you'll learn some of the most popular data structures used in Swift today. Specifically, learn about Swift stacks, queues, and linked lists.
Sep 6, 2019 • 20 Minute Read
Data Structures You Should Know
This is the second part of a two-part series on data structures in Swift. In the first part, we delved into generics and built-in Swift collection types. Check it out in case you missed it.
In this tutorial, we’re going implement some of Swift's most popular data structures from scratch.
Swift provides some handy collection types. We can use the generic Array, Set, and Dictionary structures right away. However, we may need custom collection types in specific instances. In the upcoming chapters, we’ll take a closer look at stacks, queues, and linked lists and discuss when we could use these specialized structures.
The Stack
Properties
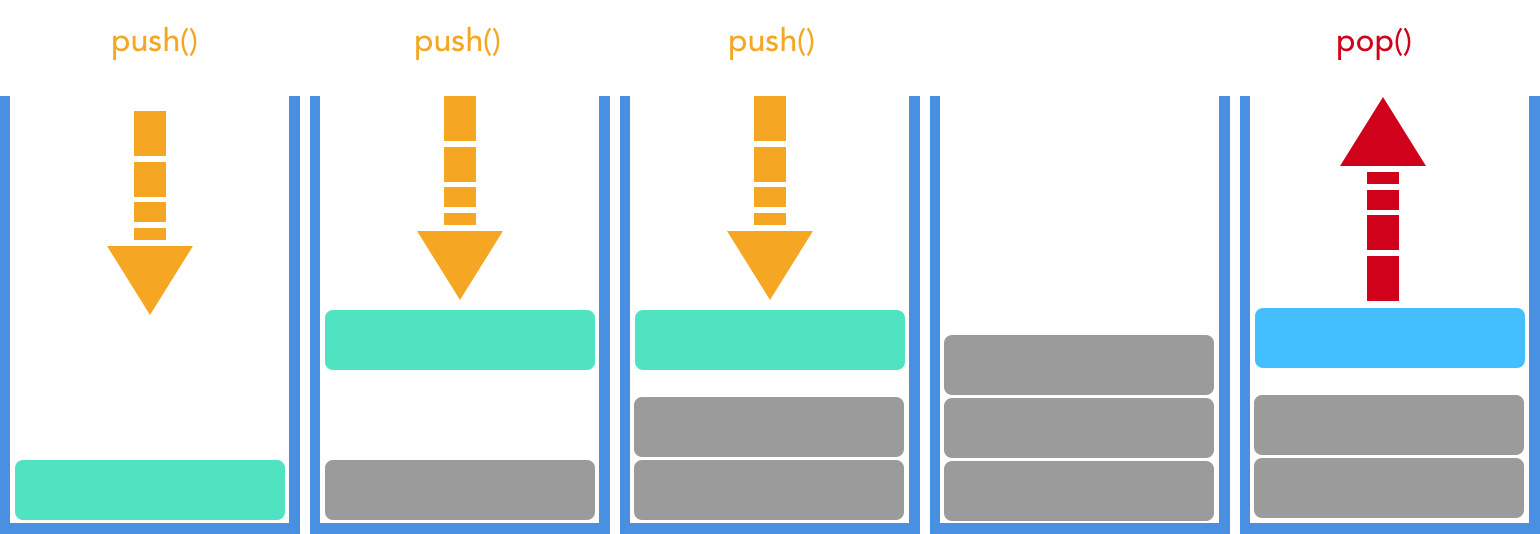
The stack behaves like an array, in that it stores the elements in a specific order. However, unlike arrays, we can’t insert, retrieve and delete items from a stack using random access. Instead, the stack provides fast, constant time control over the first element in the list: it permits pushing a new item onto the start of the stack, peeking at the first item in the stack, and popping the most accessible item off the stack.
The stack provides a Last-In-First-Out (LIFO) access. The most recently added item can be accessed first (peek or pop). Here’s LIFO in action!
Using Stacks
The stack is useful if we need to retrieve the elements in the order in which we added them. For example, a stack would be useful for modeling an ever-growing pile of dirty laundry. The piece of clothing that you last tossed onto the pile is the first one that you can pick up to clean. Here, we are unable to pick out specific clothing randomly from within the enormous pile of clothes. Instead, our only way of picking clothes is off the top. This produces the LIFO system described above. Similar use cases exist for representing recursive calls, modeling paperwork on someone's desk, or keeping track of server transactions.
Stack: Array Implementation?
We could fulfill these requirements using an Array:
      var numbers = [Int]()
numbers.append(1)
numbers.append(2)
numbers.append(3)
var last = numbers.last // peek - returns 3
last = numbers.popLast() // pop - returns 3
last = numbers.popLast() // pop - returns 2
last = numbers.popLast() // pop - returns 1
But, the array does not prevent us from (accidentally) accessing the elements in a different order:
      last = numbers[2]
numbers.remove(at: 3)
Thus, if we want strict LIFO behavior, we have to use a stack implementation that does not operate as an array.
Our Stack needs three methods:
- push() - to append a new item
- peek() - gets the last element without removing or modifying it
- pop() - removes the last element and returns it
Optionally, we can add a removeAll() method to clear the stack of its values.
Stack: Protocol-Oriented Approach
There are different ways to implement these requirements. Let’s follow a protocol-oriented approach and declare a protocol first.
      protocol Stackable {
    associatedtype Element
    mutating func push(_ element: Element)
    func peek() -> Element?
    mutating func pop() -> Element?
    mutating func removeAll()
}
The Stackable protocol defines all the requirements needed to define a stack.
We use an associatedtype called Element that acts as a placeholder. Types that adopt the Stackable protocol can provide the exact type.
Notice the use of the mutating identifier next to all methods that change the contents of the stack. We must mark methods that modify a structure as mutating. Class methods can always modify the class. Thus we don’t need to use the mutating keyword in classes.
We used the mutating keyword in the Stackable protocol to also allow structs adopt it.
Stack: Generic Implementation
Next, we implement a generic stack.
      struct Stack<T>: Stackable {
    typealias Element = T

    fileprivate var elements = [Element]()

    mutating func push(_ element: Element) {
        elements.append(element)
    }

    func peek() -> Element? {
        return elements.last
    }

    mutating func pop() -> Element? {
        return elements.popLast()
    }

    mutating func removeAll() {
        elements.removeAll()
    }
}
Using generics in the protocol declaration (Stack<T>), we can make our Stack work with any type.
      var stackInt = Stack<Int>()
var stackString = Stack<String>()
var stackDate = Stack<Date>()
We can use the stack as follows:
      stackInt.push(1)
print("push() ->", stackInt)
// Output: push() -> [1]

stackInt.push(2)
print("push() ->", stackInt)
// Output: push() -> [1, 2]

stackInt.push(3)
print("push() ->", stackInt)
// Output: push() -> [1, 2, 3]

print("peek() ->", stackInt.peek() ?? "Stack is empty")
// Output: peek() -> 3

print("peek() ->", stackInt.peek() ?? "Stack is empty")
// Output: peek() -> 3

print("peek() ->", stackInt.peek() ?? "Stack is empty")
// Output: peek() -> 3

print("pop() ->", stackInt.pop() ?? "Stack is empty")
// Output: pop() -> 3

print("pop() ->", stackInt.pop() ?? "Stack is empty")
// Output: pop() -> 2

print("pop() ->", stackInt.pop() ?? "Stack is empty")
// Output: pop() -> 1

stackInt.pop()
print(stackInt) // Output:[]
For better readability, we can add a custom description through a type extension. The CustomStringConvertible protocol defines the description computed property. By implementing it, we can add a custom description to our type. For our Stack type, we simply log the contents of the internal elements array.
      extension Stack: CustomStringConvertible {
    var description: String {won'
        return "\(elements)"
    }
}
Queues
Queues: Properties
Unlike the stack, the queue is open at both ends. The queue provides First-In-First-Out (FIFO) access. New elements are added to the bottom of the queue. We can retrieve elements from the top of the queue.
Here’s an illustration of the queue in action:
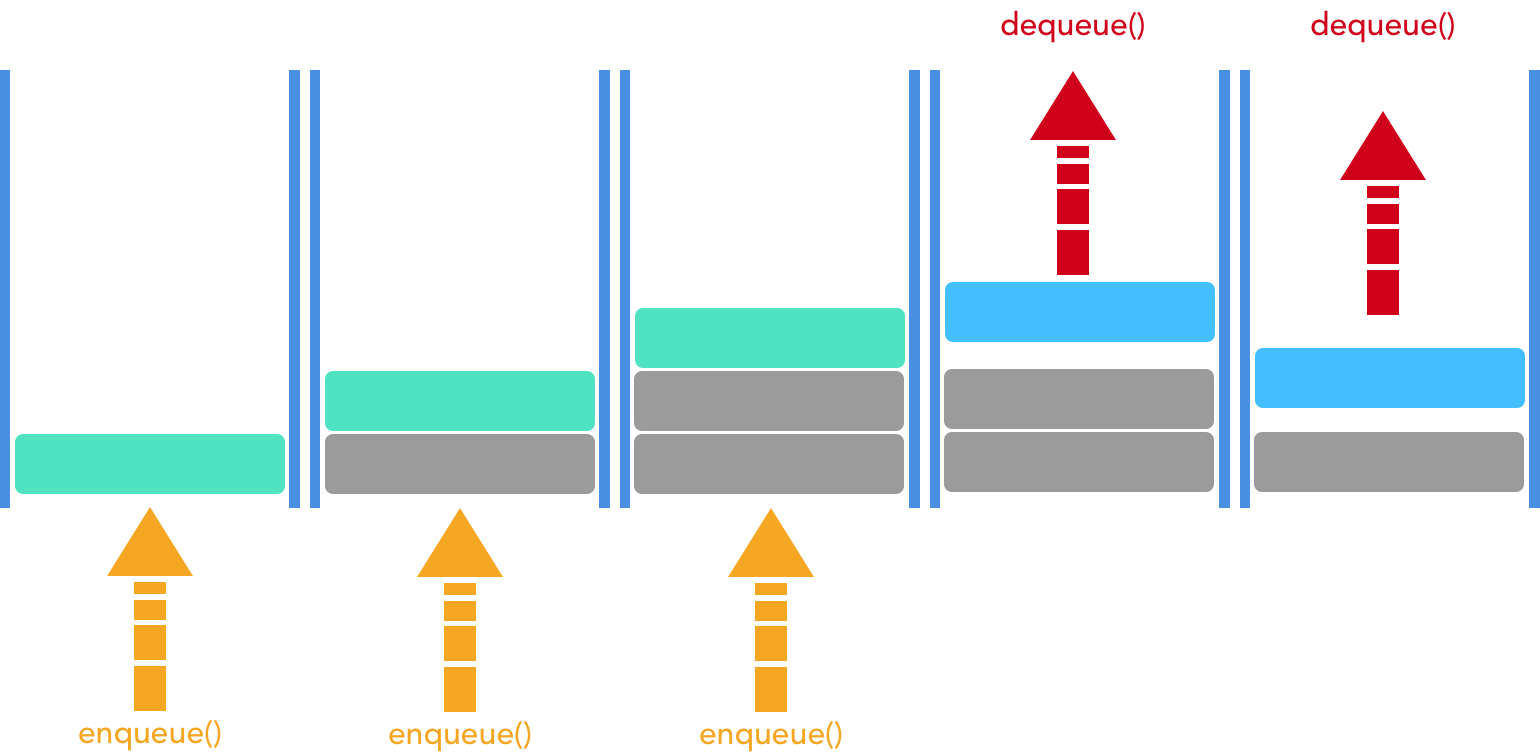
We would use the queue to put things in line. Consider it when modeling lines for restaurants: people who are in line first get tables first. Similarly, we could model water coming out of a tube using a queue, snce water that goes through one end of the tube first leaves the other end first. Our queue needs to be able to:
- Enqueue -- add items to the end of the queue
- Dequeue -- pull the next items off the front of the queue
- Peek -- check the next item in the queue
We will also add a removeAll method to our implementation.
Queues: Implementation
The Enqueuable protocol defines the requirements for a basic queue:
      protocol Enqueuable {
    associatedtype Element
    mutating func enqueue(_ element: Element)
    func peek() -> Element?
    mutating func dequeue() -> Element?
    mutating func removeAll()
}
The enqueue(:) method adds an item to the bottom of the queue, whereas the dequeue() method removes and returns the element from the top. peek() simply returns the top element without removing it.
We could implement the Enqueuable protocol as follows:
      struct Queue<T>: Enqueuable {
    typealias Element = T

    fileprivate var elements = [Element]()

    mutating func enqueue(_ element: Element) {
        elements.append(element)
    }

    func peek() -> Element? {
        return elements.first
    }

    mutating func dequeue() -> Element? {
        guard elements.isEmpty == false else {
            return nil
        }
        return elements.removeFirst()
    }

    mutating func removeAll() {
        elements.removeAll()
    }
}

extension Queue: CustomStringConvertible {
    var description: String {
        return "\(elements)"
    }
}
We now have a generic Queue -- denoted by Queue<T> in the protocol declaration. We can use it with any type:
      var queueInt = Queue<Int>()
var queueString = Queue<String>()
var queueData = Queue<Data>()

queueInt.enqueue(1)
print("enqueue() ->", queueInt)
// Output: enqueue() -> [1]

queueInt.enqueue(2)
print("enqueue() ->", queueInt)
// Output: enqueue() -> [2]

queueInt.enqueue(3)
print("enqueue() ->", queueInt)
// Output: enqueue() -> [3]

print("peek() ->", queueInt.peek() ?? "Stack is empty")
// Output: peek() -> 1

print("peek() ->", queueInt.peek() ?? "Stack is empty")
// Output: peek() -> 1

print("peek() ->", queueInt.peek() ?? "Stack is empty")
// Output: peek() -> 1

print("dequeue() ->", queueInt.dequeue() ?? "Stack is empty")
// Output: dequeue() -> 1

print("dequeue() ->", queueInt.dequeue() ?? "Stack is empty")
// Output: dequeue() -> 2

print("dequeue() ->", queueInt.dequeue() ?? "Stack is empty")
// Output: dequeue() -> 3

queueInt.dequeue()
print(queueInt)
// Output: []
Linked Lists
Linked lists are collections of data made of nodes that store a value and a pointer to the next node in the chain. Unlike arrays, linked lists do not allocate fixed amounts of memory in advance to store items. Instead, the items in a linked list are separate instances. Each block in the linked list is usually called node and gets added when needed.
A node is the individual part of a larger data structure.
You will encounter the node when considering other data structures like trees or graphs.
As mentioned before, each node in a linked list has a link to the next item. This type of node lets us create a singly-linked list, where each node holds a link to the next node.
This node structure means that we do not have constant time access to the elements in the middle of the linked list. However, this converts resizing and accessing the next node into constant time operations.
An example of a linked list would be a locomotive train. Each of the cars in the train are nodes: they each store something and have a link to the next car in the train. The train continues until one of the nodes (the caboose) points to nothing, marking the end of the list.

If a node has references for both the next and the previous node, we can build a doubly-linked list. This would be equivalent to each car in the train knowing the car before it and the car after it.

A node also needs to hold the data we want to store. So basically, for a double linked list we need a type which has a property for storing data and two properties which represent links to the previous and the next nodes.
Linked List Implementation
Let's create a protocol which defines these requirements. I'm going to call it Linkable.
The protocol should not restrict the node's data type. Thus, we'll use a placeholder type using the associatedtype keyword.
Each node can link to the previous and the next node. So, we need two read-write properties. Let's call them simply next and previous. These should be optional properties, since they both can be nil:

Finally, we add an initializer and we're almost done with the Linkable protocol. Here's what we've got so far:
      protocol Linkable {
    associatedtype D
    var value: D { get }
    var next: Self? { get set }
    var previous: Self? { get set }

    init(value: D)
}
There is still an issue that we need to address. To surface the problem, let's see what happens if we try to adopt the protocol in a value type.
So, we declare the StringNode structure and make it conform to the ``Linkable` protocol. Xcode will generate the following code to satisfy the protocol requirements:
      struct StringNode: Linkable {
    var value: String
    var next: StringNode?
    var previous: StringNode?

    init(value: String) {
        self.value = value
    }
}
Unfortunately, this code won't compile: "Value type 'StringNode' cannot have a stored property that recursively contains it." The reason for this strange compiler error is not obvious, so let's try to clarify it a bit.
Structs and Memory Allocation
The error has to do with memory allocation. Value types keep their data directly in their storage location. Whereas with reference types, the data exists somewhere else and the storage location only stores a reference to it.
And here's what that means for us: StringNode is a value type (a struct). As such, it must store its data in its storage location. Thus, the compiler must know the exact size of the struct is before allocating the required amount of memory. To figure out the size of the struct, the compiler must know the size of the struct's properties, too.
A StringNode instance could contain two values of the same type. And each of these properties could also contain two values of StringNode type, and so on. Because of this recursion, there is no way to calculate the StringNode's memory requirements.
Thus, the compiler won't let us create a structure that recursively contains another instance of the same type.
The Workaround
We need to enforce reference type semantics for our node types. We change the Linkable protocol to a class-only protocol by inheriting from AnyObject. (AnyObject is a protocol that can only be adopted by classes.)
      protocol Linkable: AnyObject {
    associatedtype D
    var value: D { get }
    var next: Self? { get set }
    var previous: Self? { get set }

    init(value: D)
}
We're going to unleash the power of generics to create a Node class that can hold arbitrary types:
      final fileprivate class Node<T>: Linkable {
    private var storage: T

    var next: Node<T>?
    var previous: Node<T>?

    var value: T {
        return storage
    }

    init(value: T) {
        storage = value
    }
}
The Node class file is private because clients should not interact with it directly. It’s final to prevent subclassing. This ensures that abstraction is not breached.
DLL Implementation
Alright, now it's time to switch gears and start implementing our Double Linked List. As usual, we'll first come up with a protocol.
      protocol LinkedListProtocol {
    associatedtype T
    func append(value: T)
    subscript(index: Int) -> T? { get set }
    var first: T? { get }
    var last: T? { get }
}
The append() method lets us add new values to the linked list. The LinkedList protocol defines a subscript to set and retrieve values by index.
For a double linked list, it is useful to have a reference to the first and the last value in the list. So, we introduce the first and last gettable property requirements.
Next, we'll implement a conforming generic type. LinkedList allows creating a linked lists out of any type. The head and the tail properties are used as internal storage for the first and last properties.
      final class LinkedList<T>: LinkedListProtocol {
    fileprivate var head: Node<T>?
    fileprivate var tail: Node<T>?

    var first: T? {
        return head?.value
    }

    var last: T? {
        return tail?.value
    }
    …
}
The append() method first creates a new node with the provided value. We append the new node to the list. If the list is empty, this will be the very first node and the head and the tail will point to it.
      func append(value: T) {
    // create new node
    let node = Node(value: value)
    // if tail is nil, the list is empty
    if let last = tail {
        node.previous = last
        last.next = node
        tail = node // set tail
    } else {
        head = node // first node, both head and tail point to it
        tail = node
    }
}
Next, we implement the index subscript.
      subscript(index: Int) -> T? {
    get {
        let node = self.node(at: index)
        return node?.value
    }
    set {
        guard index >= 0 else {
            return
        }
        if let value = newValue {
            // newValue non-nil -> insert
            let node = Node(value: value)
            self.insert(node: node, at: index)
        } else {
            // newValue nil -> remove
            self.remove(at: index)
        }
    }
}

// Returns the node at given index
private func node(at index: Int) -> Node<T>? {
    // check for valid index and non-empty list
    guard index >= 0,
        head != nil else {
            return nil
    }

    var node = head
    var i = 0
    while node != nil {
        if i == index {
            return node
        }
        i += 1
        node = node?.next
    }
    return nil
}
The getter calls the private helper method node(at:), which traverses the list of nodes by following the subsequent next pointers.
The getter either returns a valid value or nil (if the index is invalid or in case of validation issues.)
The setter serves two purposes: if we assign a valid value, it will insert a new node at the given index. If we assign nil, it will delete the node.
For insertion, we rely on the insert(node: at:) helper method. Which in turn uses the node(at:) method to find the node at the given index.
      private func insert(node: Node<T>, at index: Int) {
    if index == 0,
        tail == nil {
        head = node
        tail = node
    } else {
        guard let nodeAtIndex = self.node(at: index) else {
            print("Index out of bounds.")
            return
        }

        if nodeAtIndex.previous == nil {
            head = node
        }

        // set previous and next links
        // set new node's previous link
        node.previous = nodeAtIndex.previous
        nodeAtIndex.previous?.next = node

        // set new node's next link
        node.next = nodeAtIndex
        nodeAtIndex.previous = node
    }
}
We're going to insert the new node between the node at the given index and the previous one. We must also take care of edge cases like empty list or inserting at the front of the linked list.
To remove a value from the linked list, we must assign nil to the node at the given index. The remove(at:) helper method performs the logic required to unlink the selected node and deallocate it. Also, we must update the head and tail pointers when the node is removed from the beginning or the end of the list.
      private func remove(at index: Int) {
    var nodeAtIndex = self.node(at: index)
    guard nodeAtIndex != nil else {
        print("Index out of bounds.")
        return
    }

    let previousNode = nodeAtIndex?.previous
    let nextNode = nodeAtIndex?.next

    // head?
    if previousNode == nil {
        head = nextNode
    }

    // tail?
    if nodeAtIndex?.next == nil {
        tail = previousNode
    }

    // set previous and next links
    // we unlink nodeAtIndex from its neighbours
    previousNode?.next = nextNode
    nextNode?.previous = previousNode

    // finally, delete the node
    nodeAtIndex = nil
}
Now, we have a working Doubly-Linked List implementation. We can append, insert, retrieve and delete values from it.
Conclusion
We could add further features like e.g. the ability to iterate over its elements. But I'll leave this as an exercise to the reader!
Hint: make the LinkedList class conform to the Sequence and the IteratorProtocol protocols and implement the next() method. The next() method returns an optional T? instance.
Internally, the method must keep track of the current node, which is initially set to the head node. Subsequent calls to the next() method set the current node to the next node in the linked list. Once you have these in place, you can use a for - in loop to traverse the linked list.
Stay tuned! I'm going to talk about the Iterator pattern and the other behavioral design patterns in my upcoming Pluralsight course. In the meantime, head over to my Swift courses on Pluralsight
I hope you found this guide informative or engaging. Thanks for reading!
Advance your tech skills today
Access courses on AI, cloud, data, security, and more—all led by industry experts.
