How to Host Your Static Webpages on GitHub Pages
Sep 15, 2020 • 6 Minute Read
Introduction
Once you have created a web app, you need some way to make it accessible to the rest of the world. GitHub Pages offers free hosting for static content; this is useful for hosting a blog or documentation site for a library.
This guide will walk you through deploying Static webpages onto GitHub Pages. We will demonstrate how to enable GitHub Pages on a GitHub repository, set up continuous deployment with Github Actions, and finally test the page. This guide uses SnapShot, a simple React app, throughout as a sample static website to get started. A basic understanding of the Git command line and GitHub is assumed knowledge for this guide. You can watch Getting Started on GitHub if these tools are new to you.
GitHub is in the process of changing their default branch name from master to main. This guide will use the term master branch since it is the current default branch name at the time of writing. You can learn more about this change by reading GitHub's official documentation on renaming the default branch from master.
Enable GitHub Pages on a GitHub Repository
Before beginning to use GitHub Pages, you need two things:
- Static web content you want hosted
- A GitHub repository to store the static web content you would like to share
If you don't already have static web content, you can follow this guide by cloning SnapShot into a new GitHub repository that you've created.
Once you have committed the source code to your repository, you need to configure where in your repository GitHub will look for static content to serve. There are three main patterns that are supported:
- Serve the static content from the root folder of a specific branch. This branch is typically named gh-pages by convention.
- Serve the /docs folder of specific branch such as master
- Serve the root folder of the master branch of a separate repository. One repository holds the source code, the other stores build artifacts to be served.
Since you are deploying a React app, you'll want to use the first deployment pattern. This pattern has several advantages:
- You aren't mixing concerns by committing source code and building artifacts to the same branch.
- You don't need to manage two separate GitHub repositories.
Start by pushing a gh-pages branch. The initial contents of the branch doesn't matter since it will be overridden with the build artifacts on the next step of this guide.
      git checkout -b gh-pages
git push -u origin gh-pages
Then check your project's configuration. Go to your GitHub repository, click on the settings tab, and scroll down to the GitHub Pages section. The branch should be configured to gh-pages and the folder set to / (root) as illustrated below.
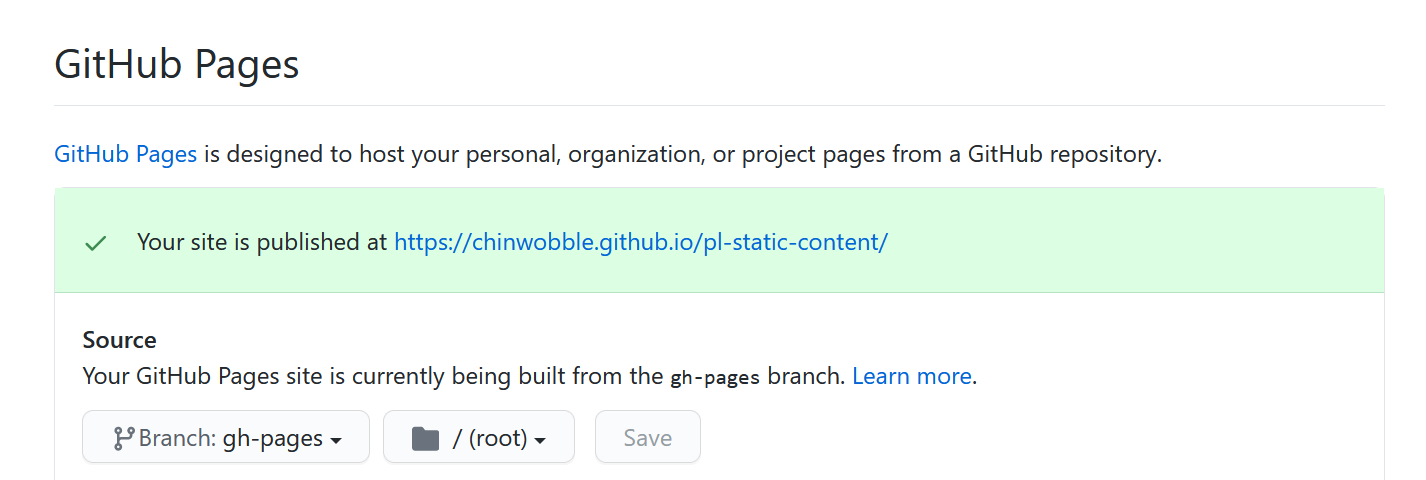
Note the URL for the website, you will use it later in the guide.
Set Up Continuous Deployment with GitHub Actions
Every time the source code is updated, you want GitHub Pages to be updated automatically with the new content. An easy way to set this up is to use GitHub Actions.
Create the following yaml definition inside the repository at /.github/workflows/publish.yaml.
      name: Publish to gh-pages

on:
  repository_dispatch:
  push:
    branches:
      - master

jobs:
  build:
    runs-on: ubuntu-latest
    steps:
    - uses: actions/checkout@v2
    - name: Use Node.js
      uses: actions/setup-node@v1
      with:
        node-version: '12.x'
    - run: yarn
    - run: yarn run build
    - name: Deploy
      uses: peaceiris/actions-gh-pages@v3
      with:
        github_token: ${{ secrets.GITHUB_TOKEN }}
        publish_dir: ./build
This file instructs GitHub to perform the following sequence of actions on every push to the master branch:
- Install your dependencies.
- Build the production bundles. In this guide they are placed in the /dist.
- Deploy the contents of the /dist into the gh-pages branch of the same repository.
Commit the yaml file in the location described above and push to master. The action will appear automatically in the Actions tab of the repository.
Test Your Website
After GitHub Actions has finished executing, it may take a few minutes for your content to be publicly visible. Wait a few minutes and then navigate to the URL you saved earlier in this guide: https://{username}.github.io/{repositoryname}.
Fix the Base URL

      {
  "homepage": "https://chinwobble.github.io/pl-static-content"
}
Note that you will need to replace the homepage property with the URL that was presented earlier.
After pushing the updated package.json file and waiting for the GitHub Action to finish, you should see your website load correctly this time.
Conclusion
In this guide we went through how to deploy a React app to GitHub Pages, and we used GitHub Actions to glue everything together. Sharing your web content was quick and simple. As a next step you may want to add a custom domain to your website.
Advance your tech skills today
Access courses on AI, cloud, data, security, and more—all led by industry experts.
