Passing State of Parent to Child Component as Props
Nov 24, 2020 • 8 Minute Read
Introduction
React enables developers to write reusable code in the form of components. This modular approach makes it simple to develop robust apps by following a parent-child structure and adding those components in as many times as needed. To configure a component, you can use props (data you pass to the component) whereas state allows you to manage the data that may change inside of that specific component. In other words, with state you can control how it behaves and renders. This guide will demonstrate how to make a parent component aware of actions or changes in the child by passing state as props. Although we will use functional components, the same applies to class-based ones.
To illustrate, we will store an array of basketball players as objects in the state of the main app component. Next, we will pass that piece of state to a child (Player) component for visualization purposes. Finally, we will set up a function to remove players one by one and see how that impacts the state of the parent. The final code—including all the files—is available in Codesandbox and GitHub.
Setting up State in the Parent Component
To begin, create the following App.js file:
      import React, { useState } from "react";
import Player from "./components/Player/Player";
import "./styles.css";

export default function App() {
  const [players, setPlayers] = useState([
    {
      name: "LaMarcus Aldridge",
      yearsPro: 14,
      position: "Center-Forward"
    },
    {
      name: "Marco Belinelli",
      yearsPro: 13,
      position: "Guard"
    },
    {
      name: "DeMar DeRozan",
      yearsPro: 11,
      position: "Guard-Forward"
    }
  ]);

  const playersList = players.map(({ name, yearsPro, position }) => (
    <li key={name.replace(" ", "").toLowerCase()}>
      <Player
        allPlayers={players}
        removePlayer={setPlayers}
        name={name}
        yearsPro={yearsPro}
        position={position}
      />
    </li>
  ));

  return (
    <div className="App">
      <h1>Team Members ({players.length})</h1>
      <ul className="List">{playersList}</ul>
    </div>
  );
}
Now, examine what you have so far step by step.
- Three standard imports:
      import React, { useState } from "react";
import Player from "./components/Player/Player";
import "./styles.css";
-
React (as expected) and the useState hook. The latter will allow you to access and manipulate the state of the current component.
-
A Player component (which you will add later)
-
The CSS file used for styling
- A list of basketball players. Through useState, you initialize a piece of state in a variable named players and a function (setPlayers) to update it later
      const [players, setPlayers] = useState([
  {
    name: "LaMarcus Aldridge",
    yearsPro: 14,
    position: "Center-Forward"
  },
  {
    name: "Marco Belinelli",
    yearsPro: 13,
    position: "Guard"
  },
  {
    name: "DeMar DeRozan",
    yearsPro: 11,
    position: "Guard-Forward"
  }
]);
- An array that consists of a series of children components. Here you will be passing the state (the players variable and the setPlayers function) as props to each instance of Player. This will allow you to manipulate the parent's state from each child.
      const playersList = players.map(({ name, yearsPro, position }) => (
    <li key={name.replace(" ", "").toLowerCase()}>
      <Player
        allPlayers={players}
        removePlayer={setPlayers}
        name={name}
        yearsPro={yearsPro}
        position={position}
      />
    </li>
  ));
- The return statement that will display the number and list of players (which you will modify via the state):
      return (
  <div className="App">
    <h1>Team Members ({players.length})</h1>
    <ul className="List">{playersList}</ul>
  </div>
);
Once you put the child component in place in the next section, you will observe how the number of players (players.length) and therefore the list itself (playersList) are impacted by actions that occur in it.
Creating the Child Component
The Player component consists of a span element that displays the player's name, position, and years of experience. In addition, the handleRemove function will make it possible to remove each player from the parent's state when you click on the corresponding item in the list. To accomplish this, insert the following lines in a file called Player.js:
      import React from "react";
import "./Player.css";

// Destructuring props in the function arguments.
const Player = ({ allPlayers, name, yearsPro, position, removePlayer }) => {
  const handleRemove = () => {
    const filteredPlayers = allPlayers.filter((player) => player.name !== name);
    removePlayer(filteredPlayers);
  };

  return (
    <span onClick={handleRemove}>
      {name} ({position}) | Years pro: {yearsPro}
    </span>
  );
};

export default Player;
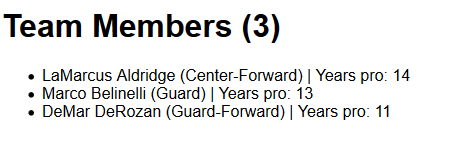
At this point, you should see the following in the browser:
Next up, see what happens when the handleRemove function is triggered in a given Player component.
Changing the State of the Parent Through the Child Component
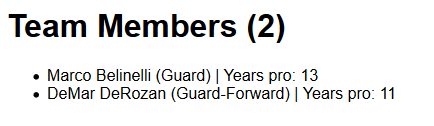
Now that you have set up the state in the parent and passed it to the child as props, click on any of the players and see how it is removed from the list:
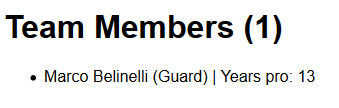
As you can see, the number of players is now two. If you click on another player, it will decrease to one:
Thus, you can confirm that the actual list of players (which resides in App.js) is modified when you manipulate the props in Player.
Alternatively, you can inspect the components using the React Developer Tools:
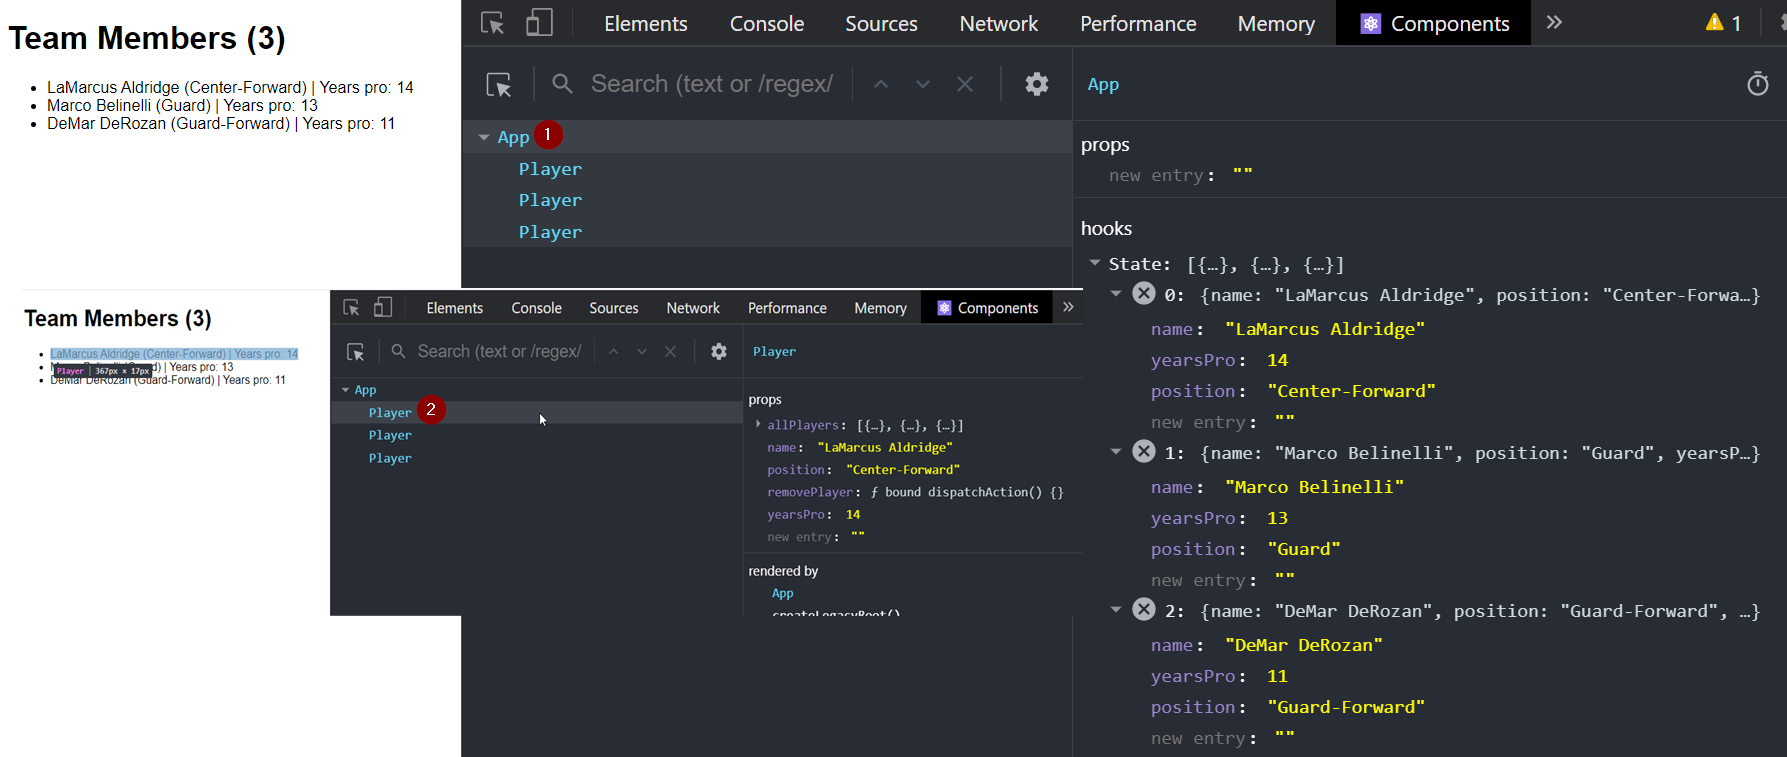
First, click on App and observe its state under the Hooks section on the right pane. Second, click on a given player component and examine its props. Finally, click on any of the items in the page and see how the state and props of the parent and child components are updated, respectively.
Conclusion
While the example in this guide is rather simple, you will find this same principle in all kinds of React-based apps. For example, you can think of a shopping cart with the total price as the parent component and each purchased item with its corresponding subtotal and individual quantity as a child.
Passing state as props from parent to child components is a core concept of React. By keeping state in only a few components and passing it to as many children as needed in the form of props, you will be able to write code that is easier to maintain, and you will thank yourself down the road.
Learn More
Explore these React courses from Pluralsight to continue learning:
Advance your tech skills today
Access courses on AI, cloud, data, security, and more—all led by industry experts.
