Proof of existence in the Blockchain with Tierion, RethinkDB, and PubNub
Learn how to create a web appl using Node.JS, Tierion, RethinkDB, PubNub, and jsreport-core that will allow you to store the hash of a file in Bitcoin's Blockchain.
Dec 15, 2018 • 56 Minute Read
Introduction
In this tutorial, we're going to create a web application very similar to Proof of Existence and Origin Stamp using Node.js, Tierion, RethinkDB, PubNub, and jsreport-core.
In a few words, these sites allow you to store the hash of a file in Bitcoin's Blockchain so that anyone can certify that the file existed at a specific time.
This has the following advantages:
- It demonstrates data ownership without revealing actual data.
- It checks for document integrity.
- Using the blockchain, you can certify the existence of the document without the need of a central authority.
- In practice, this decentralized proof can't be erased or modified by anyone.
- It's anonymous, so others cannot identify you or your data.
This page has a more thorough explanation of proof of existence and covers more sites dedicated to enabling it.
Using our application, we will be able to upload a file by dragging and dropping it to a marked area. Then, its SHA256 digest will be calculated and sent to the Blockchain using Tierion Hash API
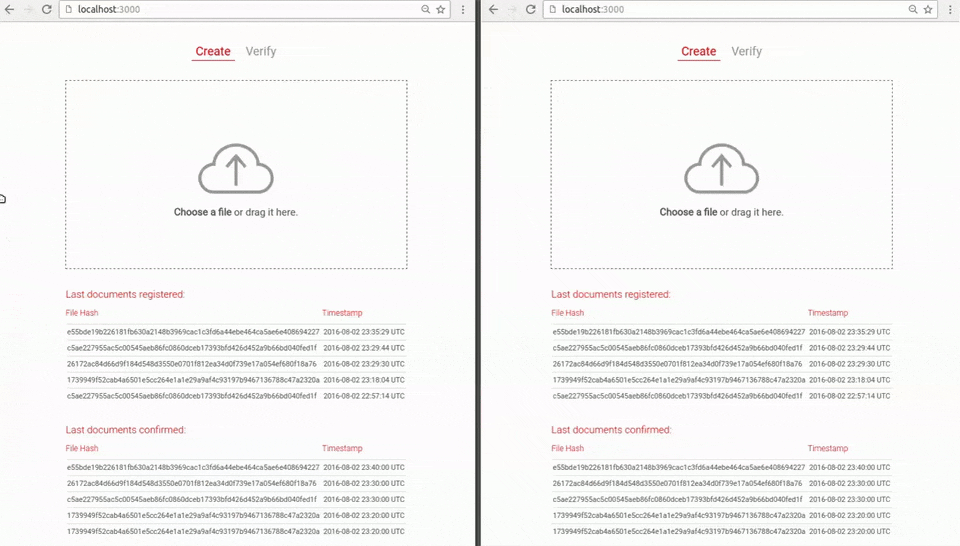
Notice how the list of last documents registered is updated in real-time; we'll be using PubNub's Storage and Playback to gain real-time syncing.
The hash of the file and the Blockchain receipt given by Tierion is stored in RethinkDB, a NoSQL database with real-time capabilities. When Tierion alerts us that a block of hashes has been processed, we update the verification page (and the list of verified documents) in real-time, using RethinkDB's changefeed:
As you can see, once the hash is anchored to the Blockchain, we can check it using sites like Block Explorer or Blockchain.info and get the receipt in PDF format using jsreport-core.
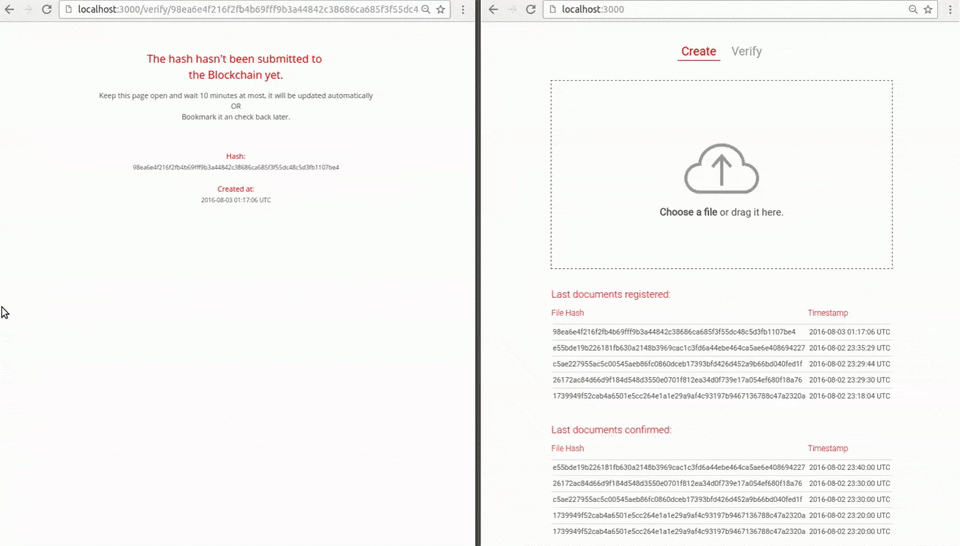
You can also verify that a file has been certified in the Blockchain by selecting the Verify option:
In case you stumble or want to skip ahead, the tutorial source code is available on Github.
The Blockchain
Before diving into the code, let's explain what is the Bitcoin's Blockchain (referred to as the Blockchain).
Wayne Vaughan, founder and CEO of Tierion, launched a challenge during the 2016 Consensus Hackathon: What is the Blockchain? The winner was Lilia Vershinina, who answered:
"The Blockchain is a trust layer for the Internet".
Interesting. Let's see if we can clarify this statement. By the way, you can see the whole story behind this (as well as other answers) here.
One of the main philosophies behind Bitcoin is decentralization. Rather than trusting a single party (like a government or an institution) to manage and produce currency, Bitcoin is a peer-to-peer system with no central point of failure. As such, the blockchain is a public database of Bitcoin transactions distributed across a global network of nodes.
The blockchain comprises all Bitcoin transactions, which are represented as a chain of blocks linked together, since 2009, the year of its inception. These transactions span from the genesis block, or the first block of the blockchain, to the latest block.
When Bitcoin transactions are broadcasted, miners pick them up locally to form a Bitcoin block. Miners verify this block using a designated mathematical formula.
A hash is used to represent the verification of the block. This hash is computed using this block and the hash of the previous block, thereby forming a chain of hashes. You can see the concept of trust here; if any transaction is modified or voided, the hash, as well as the rest of the chain, becomes invalid.
For this reason, as the chain grows and more copies of it are kept by miners, the more difficult it becomes to modify the blockchain. Moreover, the increasing mining difficulty causes blocks to be generated about every ten minutes, a rather slow pace.
This is a (very) high-level overview of the blockchain. There are countles articles and books that explain and discuss it. If you want to know more, try this search.
Now that we understand blocks, blockchain, Bitcoin, and mining, let's dive into our web application.
Requisites
Tierion
We'll need a Tierion free account. You can signup here.
In addition to its Hash API, Tierion offers datastores to record any data in the blockchain. Depending on your plan, you can use a certain number of datastores and records per month. However, we'll be using the Hash API (that just record hashes in the blockchain), which at the time of this writing, it's free to use with some limitations.
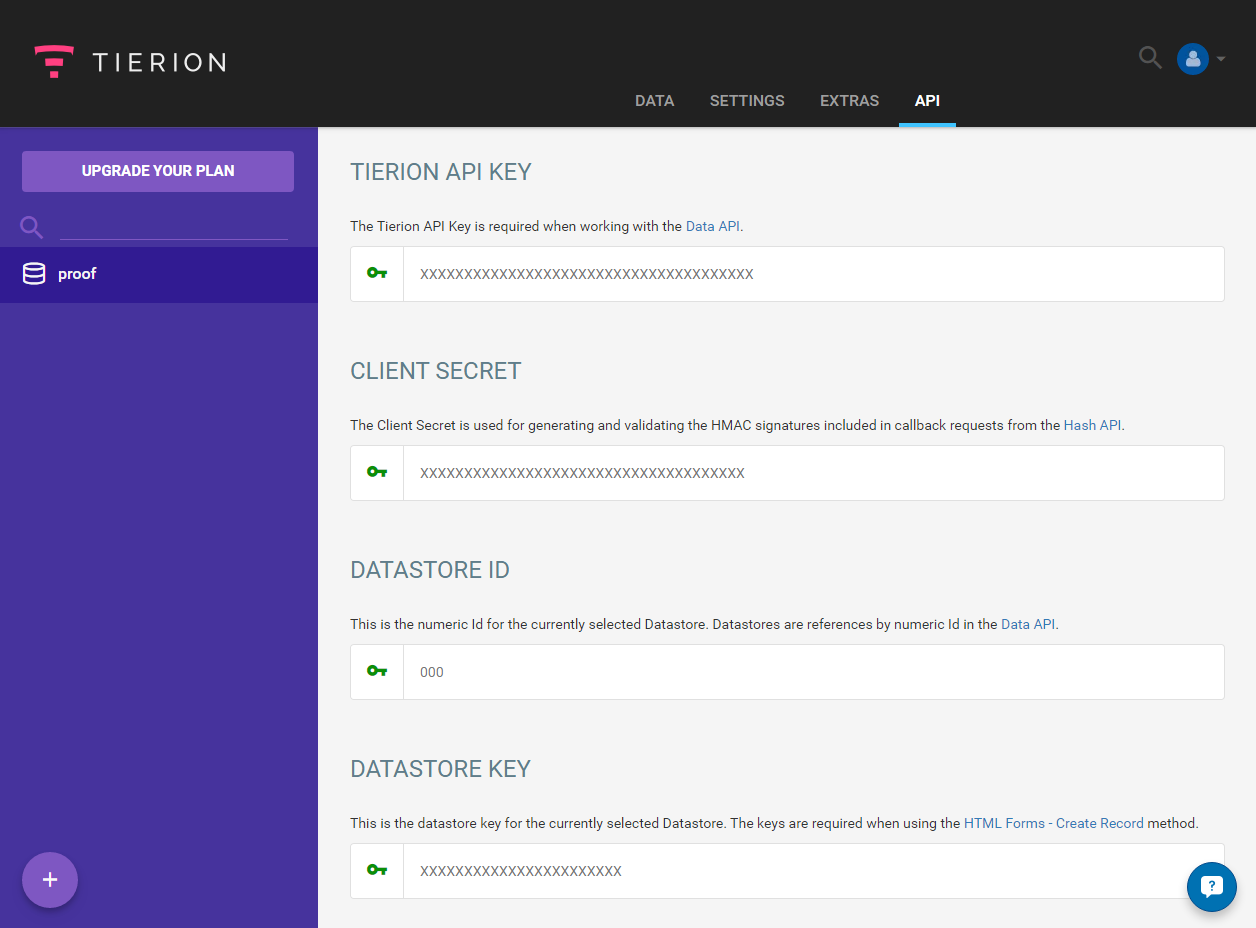
When your account is ready, go to your Dashboard and in the API tab, copy your client secret, we'll need it later:
RethinkDB
You'll need to install RethinkDB server. The easier way to install it is with one of the official packages.
This tutorial won't cover the basics of RethinkDB, but you can consult RethinkDB's ten-minute guide or my getting started guide if you haven't work with it.
PubNub
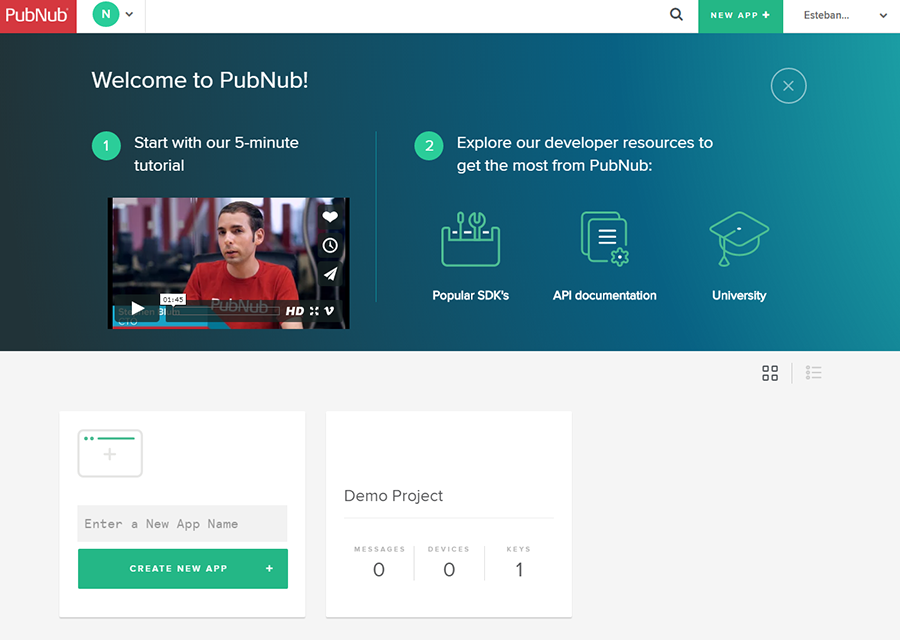
Go to https://admin.pubnub.com/#/register and sign in. Create a new account if necessary. When you log in, you will be presented with this screen:
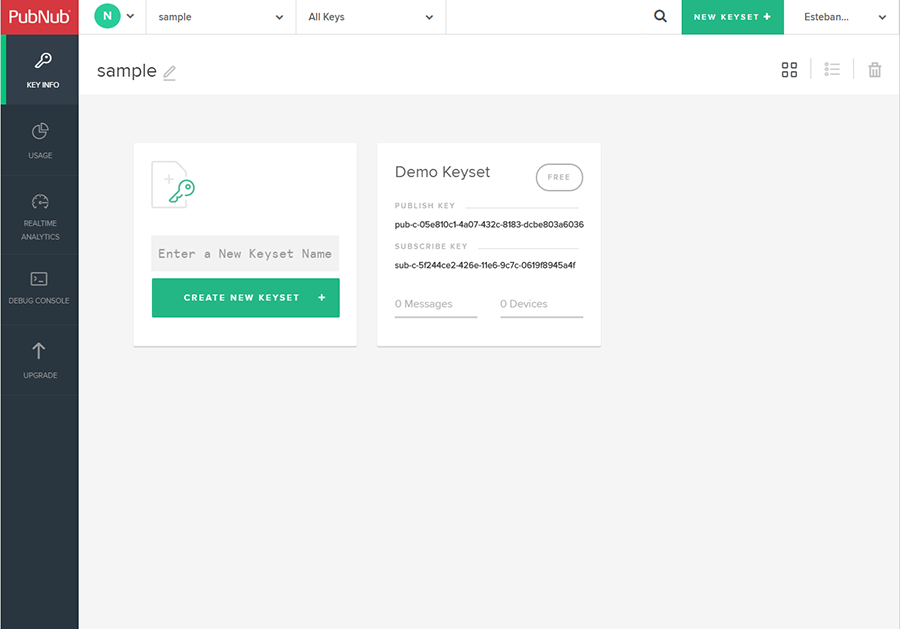
You can either create a new app or use the demo app. When you click on it, you'll something like the following:
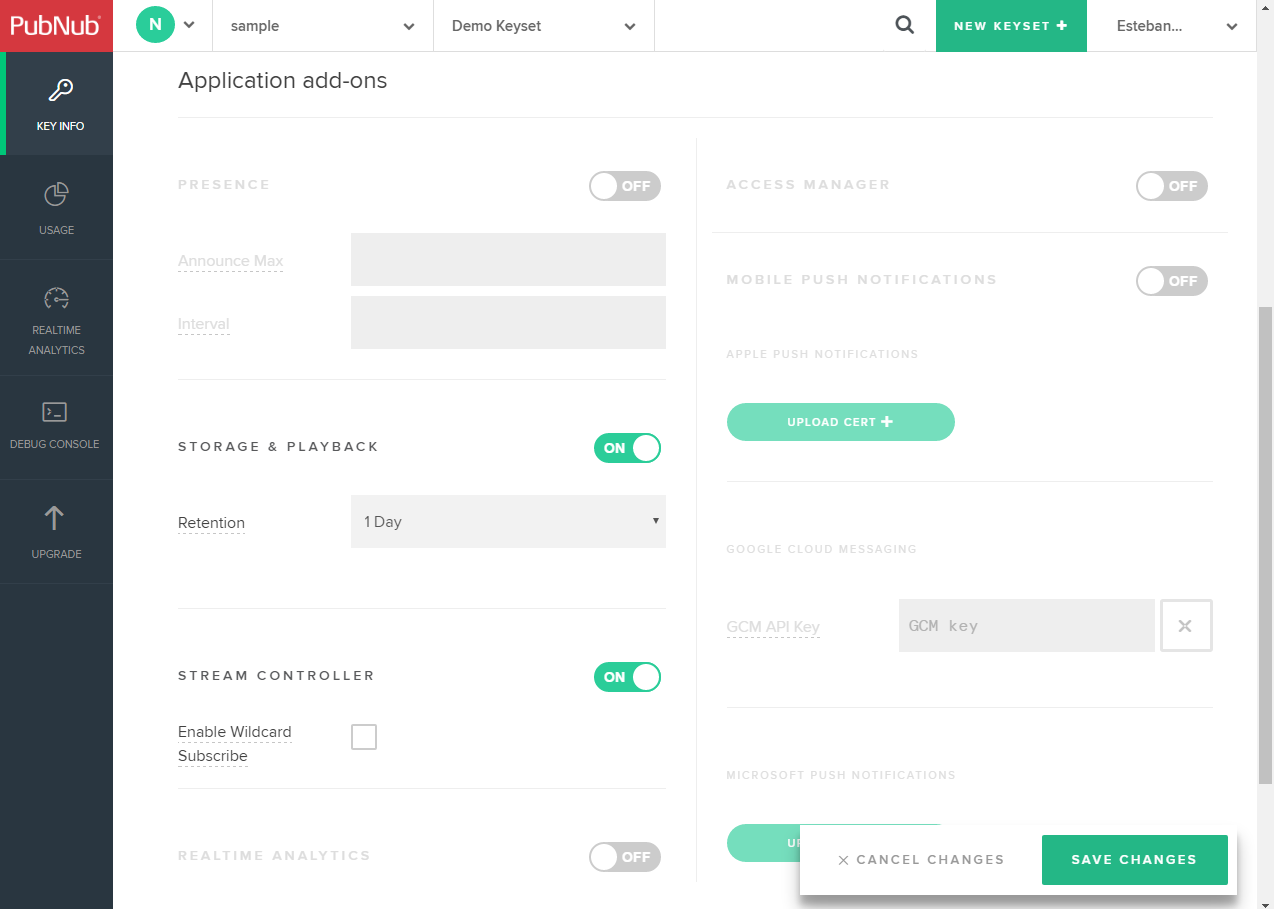
Save your publish and subscribe keys because we'll need them later. Now click on the keyset panel, and go to the Application add-ons section to enable the Storage and Playback. Pubnub's Storage and Playback will let us determine the time period we want the messages to be stored. Enable Stream Controller add-ons as well. Finally, save the changes:
We'll be using the brand-new PubNub SDK for Javascript version 4, which is a little different than version 3. Here's the Node.js documentation and the Javascript (Web) documentation.
Ngrok
Tierion will trigger a webhook (similar to a callback) when a block of hashes has been anchored in the blockchain. An HTTP request will be made to our server, so we'll need to deploy our application on the cloud or keep it locally and use a service like ngrok.
Ngrok proxies external requests to your local machine by creating a secure tunnel and giving you a public URL.
ngrok is a Go program, distributed as a single executable file (no additional dependencies needed). For now, just download it from https://ngrok.com/download and unzip the compressed file.
Node.js
You'll also need Node.js and npm installed. You can download an installer for your platform here.
Requirements met, we can start on the app.
Setting up the project
Directories and Dependencies
Create a new directory and cd into it:
mkdir blockchain-proof && cd blockchain-proof
Now create a package.json file either with:
npm init
Or to accept the default values:
npm init -y
We will use the next dependencies:
- hashapi-lib-node (to use the Tierion Hash API)
- rethinkdbdash (to use RethinkDB)
- pubnub (to use the PubNub API)
- jsreport-core (to create the receipt)
- jsreport-jsrender (as the template library to create the receipt)
- jsreport-wkhtmltopdf (to create the receipt in PDF)
- express (as the web framework)
- ejs (as the template library)
- body-parser (to parse incoming request bodies)
Add them with the following npm command:
npm install --save hashapi-lib-node rethinkdbdash pubnub jsreport-core jsreport-jsrender jsreport-wkhtmltopdf express ejs body-parser
The project will have the following directory structure:
      |— models
| |— receipt.js
| |— subscription.js
|— public
| |— css
| | |— index.css
| | |— verify.css
| |— img
| | |— cloud-upload.css
| |— js
| | |— index.js
| | |— pubnub-index.js
| | |— pubnub-verify.js
| | |— qrcode.min.js
|— routes
| |— app.js
|— templates
| |— receipt.html
|— views
| | |— index.ejs
| | |— verify.ejs
| |— config.js
| |— package.json
| |— server.js
The config.js file stores all the important configuration (use your own keys in place of the Xs):
      module.exports = {
  tierion: {
    client_secret: "XXXXXXXXXXXXXXXX",
    username: "[email protected]",
    password: "xxxxxxxxxx"
  },

  pubnub: {
    ssl: false,
    publish_key: "pub-c-xxxxx-xxx-xxxx-xxxx-xxxx",
    subscribe_key: "sub-c-xxxxxx-xxxx-xxx-xxxx-xxx",
    registered_channel: "registered_channel",
    confirmed_channel: "confirmed_channel"
  },

  url: "http://xxxxxxxx.ngrok.io",

  db: "existence",

  port: process.env.APP_PORT || 3000
};
Start up RethinkDB
Start RethinkDB with this command:
rethinkdb
Go to the Data Explorer section of your RethinkDB's dashboard and execute the following commands:
      r.dbCreate("existence");
r.db("existence").tableCreate("subscription");
r
  .db("existence")
  .table("subscription")
  .insert({ id: 1, "subscription-id": "" });
r.db("existence").tableCreate("receipt");
r
  .db("existence")
  .table("receipt")
  .indexCreate("timestamp");
These commands will create the database and tables of the application. You can leave the server running in the background while we work on the rest of the application.
Start up ngrok
Now, in a new terminal window, navigate to the directory where you unzipped ngrok.
We'll start ngrok by telling it which port we want to expose to the Internet. In our example, the port 3000:
./ngrok http 3000
Alternatively, if you're on Windows:
ngrok http 3000
Now, you should see something like this:
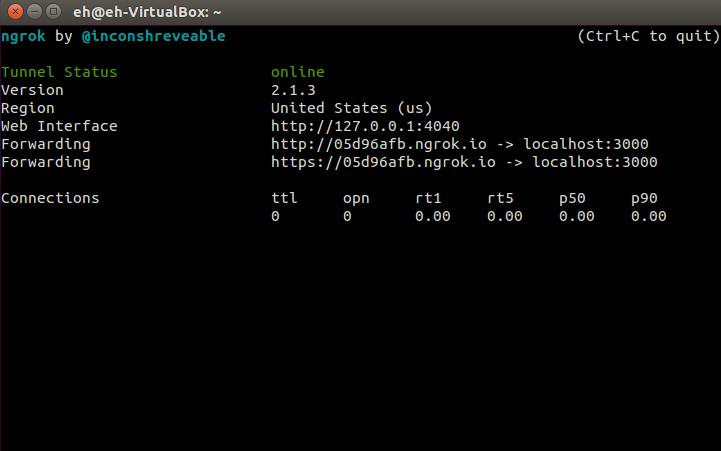
See that URL in the Forwarding row(s) with the ngrok.io domain? That's your public URL. Yours will be different; ngrok generates a random URL every time you run it.
Change the url property on the config.js file to that URL.
This URL is not permanent. If you restart ngrok, it will give you another URL.
You can specify a subdomain. For example, to get the URL https://app.ngrok.io use the command:
ngrok http -subdomain=app 3000
However, this requires a paid plan. You can get more info and acquire the paid version on this page.
Nevertheless, as long as you don't stop or restart ngrok, your public URL won't change. Let's leave ngrok running for now.
Next, let's review the server-side code starting with the Tierion Hash API.
Tierion Hash API
Tierion Hash API is simple. First, you send your email and password to get a token that you must include in all requests. Next, you submit the token to get a receipt ID, which you'll use to get the Blockchain Receipt about ten minutes later.
With Block Subscriptions there's no need to check constantly for the receipt, a callback will alert you when a block of hashes has been processed and the corresponding receipts have been generated.
This is a REST API, or a Representational State Transfer Application Program Interface. Luckily, Tierion offers a client library for Node.js that makes things easier.
There are only two tricky parts when using this Block Subscription:
- To authenticate the Block Subscription callback, we have to access the request raw body.
- Block Subscriptions are not automatically deleted after a certain number of failed requests; they live indefinitely, so we have to manage their creation and update them on our side.
Let's start by creating the server.js file with a standard Express configuration with EJS as the template engine:
      var express = require("express");
var app = express();
var bodyParser = require("body-parser");
var path = require("path");
var config = require("./config");

var app = express();

app.use(bodyParser.json());
app.use(
  bodyParser.urlencoded({
    extended: true
  })
);

app.use(express.static(path.join(__dirname, "public")));
app.set("views", path.join(__dirname, "views"));

app.set("view engine", "ejs");

app.listen(config.port, function() {
  console.log("Server up and listening on port %d", config.port);
});
To make the raw body available to in our request objects, we can configure body-parser like this:
      app.use(
  bodyParser.urlencoded({
    extended: true,
    verify: function(req, res, buf) {
      req.rawBody = buf.toString();
    }
  })
);
This way, rawBody will contain the raw body of the request, for example:
id=5796c41f8f5944de49bc0d1d&startTimestamp=1470758399&endTimestamp=1470758999
For the Block Subscriptions, we'll store the subscription in the subscription table so we can do something like this:
- Check if the table has a subscription ID (from previous requests).
- If there's an ID stored, try to get a reference to the subscription: - If the reference is invalid, create a new subscription and update the ID for future requests.
- If the reference is valid, check if the URL where the callback request is received is still the same: - If it's the same, we're done! - If it's different, update it.
- If there's no ID stored, create a new subscription and save the ID for future requests.
Let's translate this into code using the following approach:
- First, we setup the Hash API client and the block subscription.
- Then we configure the routes of the application by passing a reference to the Hash API client.
- Then, we start the server.
- Finally, we set up RethinkDB's changefeed to listen for changes in the status of the receipts.
Create the models/subscription.js file. This will contain the code for the Block Subscription set up. The first part is:
      var config = require("../config");
var r = require("rethinkdbdash")({
  db: config.db
});
var hashapi = require("hashapi-lib-node");

var SUBSCRIPTION_TABLE = "subscription";

var URL = config.url + "/tierion";
It creates the variables required to do the work.
For this project, instead of using the official RethinkDB driver for Node.js, we'll be using rethinkdbdash. Now, the connections are managed by the driver with a connection pool, so we don't need to call r.connect or pass a connection to the run function.
Let's create a function to create a block subscription. It looks like this:
      var createSubscription = function(callback) {
  hashClient.createBlockSubscription(URL, function(err, subscription) {
    console.log("Create subscription");
    if (err) {
      console.log(err);
    } else {
      r
        .table(SUBSCRIPTION_TABLE)
        .get(1)
        .update({ "subscription-id": subscription.id })
        .run()
        .then(function(updateResult) {
          callback(hashClient);
        });
    }
  });
};
The createBlockSubscription function configures a new Block Subscription callback to our server (with the URL variable). If it's created successfully, we update the table in our database with the returned ID of the subscription. When this operation is completed, a callback will be executed.
Now, the function to setup the block subscription:
      module.exports.setup = function(callback) {
  console.log("Setting up Block Subscription...");

  hashClient.authenticate(
    config.tierion.username,
    config.tierion.password,
    function(err, authToken) {
      if (err) {
        console.log(err);
      } else {
        //console.log(authToken);

        r
          .table(SUBSCRIPTION_TABLE)
          .get(1)
          .run()
          .then(function(result) {
            var id = result["subscription-id"];

            if (id === "") {
              createSubscription(callback);
            } else {
              hashClient.getBlockSubscription(id, function(errGet, result) {
                // The subscription doesn't exists
                if (errGet) {
                  console.log("Subscription doesnt exists");
                  createSubscription(callback);
                } else {
                  // Let's check the callback URL hasn't change. If it has changed, update the URL
                  if (result.callbackUrl === URL) {
                    callback(hashClient);
                  } else {
                    hashClient.updateBlockSubscription(id, URL, function(
                      errUpdate,
                      result
                    ) {
                      console.log("Update susbcription");
                      if (errUpdate) {
                        console.log(errUpdate);
                      } else {
                        callback(hashClient);
                      }
                    });
                  }
                } // else subscription exists
              });
            } // else exists subscription ID
          });
      } // else authentication
    }
  );
};
First, we authenticate to Tierion's API. Then, we get the ID of the subscription from the database. If no ID exists, we create a subscription. Otherwise, the ID's validated according to the plan we laid out before.
Now, if we update the last part of server.js, it should look like this:
      var subscription = require("./models/subscription");

subscription.setup(function(hashClient) {
  app.listen(config.port, function() {
    console.log("Server up and listening on port %d", config.port);
  });
});
But before starting the server, let's configure the routes of the application. This will the topic of the next section.
The routes
Our application will have five routes:
- / will render the main page
- /verify/:hash will render the verification page for the hash passed as a parameter
- /hash to register a new hash
- /tierion will receive the block subscription callback (you already saw it in the previous section)
- /pdf/:id will render the receipt in PDF format
The code of these routes is simple, so it's better to keep them all in one file. They'll use the Hash API client, so let's pass it as a parameter. Modify the last part of server.js as so:
      var subscription = require("./models/subscription");

subscription.setup(function(hashClient) {
  var routes = require("./routes/app")(app, hashClient);

  app.listen(config.port, function() {
    console.log("Server up and listening on port %d", config.port);
  });
});
In the routes/app.js file, enter these definitions:
      var fs = require("fs");
var url = require("url");
var crypto = require("crypto");
var jsreport = require("jsreport-core")();
var model = require("../models/receipt");
var config = require("../config");

jsreport.use(require("jsreport-wkhtmltopdf")());
jsreport.use(require("jsreport-jsrender")());
jsreport.init();

var receiptTemplate = fs.readFileSync(
  __dirname + "/../templates/receipt.html",
  "utf8"
);

var validateRequest = function(rawBody, providedSignature) {
  var hmac = crypto
    .createHmac("sha256", config.tierion.client_secret)
    .update(rawBody, "utf8");
  var calculatedSignature = hmac.digest("hex");

  return providedSignature == calculatedSignature;
};
First, we require() the modules that we're going to use. We'll see the code of the models/receipt.js file in the next section.
Then, we load the modules used by jsreport to render a PDF, (jsreport-wkhtmltopdf) and (jsreport-jsrender), so we can initialize the library.
The following line will read (in a synchronous way) the HTML of the file that will serve as the template for the PDF generated by jsreport:
      var receiptTemplate = fs.readFileSync(
  __dirname + "/../templates/receipt.html",
  "utf8"
);
Notice the use of __dirname to build the absolute path to the file. In Node.js, you should be very careful with relative paths. The only place where you can use relative paths reliably is in require() statements.
The next function will validate that the request received by Tierion's block subscription really comes from Tierion:
      var validateRequest = function(rawBody, providedSignature) {
  var hmac = crypto
    .createHmac("sha256", config.tierion.client_secret)
    .update(rawBody, "utf8");
  var calculatedSignature = hmac.digest("hex");

  return providedSignature == calculatedSignature;
};
Every callback includes a header containing the HMAC-SHA256 signature of the request. We have to calculate the signature using the raw body of the request and our account's Client Secret. If the calculated and the provided signatures match, we have a valid request.
Now the routes. The first one simply shows the main page of the site:
      module.exports = function(app, hashClient) {
  app.get("/", function(req, res) {
    res.render("index", { config: config });
  });
};
The next one will get the hash from the database through the model object, and it will render the verification page on success
      module.exports = function (app, hashClient) {

	...

	app.get('/verify/:hash', function (req, res) {
        model.getReceiptByHash(req.params.hash, function (success, result) {
            if(success) {
                res.render('verify', {
                    data: result,
                    config: config
                });
            } else {
                res.sendStatus(404); // Not found
            }
        });
    });
}
To register a new hash, we have to check if the hash the user is sending has already been registered. If not, we send it to Tierion and store a receipt object with the information we got at this point:
      module.exports = function (app, hashClient) {

	...

	app.post('/hash', function (req, res) {
        model.getReceiptByHash(req.body.hash, function (success, result) {
            if(success) { // Exists, redirect to verify
                res.json({
                    status: 'Exists'
                });
            } else { // Doesn't exist, send it to Tierion
                hashClient.submitHashItem(req.body.hash, function(err, result){
                    if(err) {
                        console.log(err);
                        res.json({
                            status: 'Error'
                        });
                    } else {
                        console.log(result);

                        var receipt = {
                            id: result.receiptId,
                            timestamp: result.timestamp,
                            sent_to_blockchain: false,
                            blockchain_receipt: null,
                            created_at: new Date(result.timestamp * 1000)
                                            .toISOString()
                                            .replace(/T/, ' ')
                                            .replace(/.000Z/, ' UTC'),
                            hash: req.body.hash
                        };

                        model.saveReceipt(receipt, function (success, result) {
                            if (success) res.json({
                                status: 'OK'
                            });
                            else res.json({
                                status: 'Error'
                            });
                        });
                    }
                });
            }
        });
    });
}
To keep things simple, the application will only support time in UTC (Coordinated Universal Time). The timestamp returned by Tierion is a UNIX timestamp, which represents the number of seconds since January 1, 1970, 00:00:00 UTC. Since the argument of the Date object in Javascript is the number of milliseconds since the Unix epoch, we have to multiply it by 1000.
The next route (for the Tierion callback) uses the validateRequest function showed before and simply marks the receipts once they've been sent to the blockchain. Marking will trigger RethinkDB's changefeed to get the actual receipt objects and send the updates using Pubnub (more on this in the next section):
      module.exports = function (app, hashClient) {

	...

	app.post('/tierion', function(req, res) {
        var validRequest = validateRequest(req.rawBody, req.get('x-tierion-sig'));

        if(validateRequest) {
            model.markReceiptsAsSent(req.body.startTimestamp, req.body.endTimestamp);
        } else {
            return res.status(403).send('Request validation failed');
        }

        res.sendStatus(200); // OK
    });
}
Notice that we're using rawBody to authenticate the request and a signature provided by Tierion. A request from Tierion looks like this:
      {
	id: '5796c41f8f5944de49bc0d1d',
    merkleRoot: '21e31466867ab47e079421a7eeadaf5fae300a3c9eba8436ddab8b5cb90bf04b',
    transactionId: 'f42f4b074e2d46ab0f3883a907dac52b6bb373b97c1282f5b4111632df1d225f',
    startTimestamp: '1470758399',
    endTimestamp: '1470758999'
}
Finally, the route to present the PDF receipt looks like this:
      module.exports = function (app, hashClient) {

	...

	app.get('/pdf/:id', function (req, res) {
       model.getReceipt(req.params.id, function(success, receipt) {
           if(success) {
               var requestUrl = url.format({
                    protocol: req.protocol,
                    host: req.get('host')
                });

                jsreport.render({
                    template: {
                        content: receiptTemplate,
                        engine: 'jsrender',
                        recipe: 'wkhtmltopdf'
                        },
                        data: {
                            r: receipt,
                            url: requestUrl
                        }
                }).then(function(obj) {
                    res.set(obj.headers);
                    res.send(obj.content);
                });
           } else {
               res.sendStatus(500);
           }
        });
    });
}
It gets the receipt object by its ID from the database and uses jsreport-core to generate the PDF file from the HTML template with jsrender.
In the next section, we'll review the receipt model.
The core of the application
The core of the application is the models/receipt.js file. It contains the functions that interact with RethinkDB and PubNub to implement the functionality related to the blockchain receipts provided by Tierion.
The first part requires the modules used by the functions and creates the PubNub and RethinkDB objects:
      var Pubnub = require("pubnub");
var config = require("../config");

var pubnub = new Pubnub({
  ssl: config.pubnub.ssl,
  publishKey: config.pubnub.publish_key,
  subscribeKey: config.pubnub.subscribe_key
});

var r = require("rethinkdbdash")({
  db: config.db
});

var RECEIPT_TABLE = "receipt";
The first function sets up RethinkDB's changefeed, which will get the receipt object from Tierion, save it to the database, and publish the objects so the pages presented to the user can be updated in real-time:
      module.exports.setup = function(hashClient) {
  // Setup changefeed
  r
    .table(RECEIPT_TABLE)
    .filter(
      r.and(
        r.row("sent_to_blockchain").eq(true),
        r.row("blockchain_receipt").eq(null)
      )
    )
    .changes()
    .run()
    .then(function(cursor) {
      cursor.each(function(error, row) {
        if (row && row.new_val) {
          hashClient.getReceipt(row.new_val.id, function(err, result) {
            if (err) {
              console.log(err);
            } else {
              var obj = JSON.parse(result.receipt);
              // Save receipt to the database
              r
                .table(RECEIPT_TABLE)
                .get(row.new_val.id)
                .update({ blockchain_receipt: obj })
                .run()
                .then(function(updateResult) {
                  // Publish the object so the verification page is updated with the blockchain information
                  pubnub.publish(
                    {
                      channel: row.new_val.hash,
                      message: Object.assign({ id: row.new_val.id }, obj),
                      storeInHistory: false
                    },
                    function(status, response) {
                      console.log(status, response);
                    }
                  );

                  // Publish the object so the list of last confirmed files on the main page is update
                  var formattedTimestamp = new Date()
                    .toISOString()
                    .replace(/T/, " ")
                    .replace(/.\d{3}Z/, " UTC");
                  pubnub.publish(
                    {
                      channel: config.pubnub.confirmed_channel,
                      message: {
                        hash: row.new_val.hash,
                        timestamp: formattedTimestamp
                      }
                    },
                    function(status, response) {
                      console.log(status, response);
                    }
                  );
                })
                .error(function(error) {
                  console.log(error);
                });
            }
          });
        }
      });
    });
};
If you're curious, this is how a receipt object (version 2.0) from Tierion looks like:
      {
	"@context": "https://w3id.org/chainpoint/v2",
	"anchors": [
		{
			"sourceId":  "e8e92ff3efcb2660922e8a870a4ebcda54c41978f0db3374b4c5d31173f0d720" ,
			"type":  "BTCOpReturn"
		}
	] ,
	"merkleRoot":  "a82c3e4b04bcdec045695129c50221b15eadd2bfff6b65533a17867c201bbde0" ,
	"proof": [
		{
			"right":  "8b6aafc21661aed7ff5a7e8fce857ca0d2f4cef576c1c47c454d58a58ce4c09c"
		}
	] ,
	"targetHash":  "691b6e0b3db43e22466734f7ec4b15d17687d5d8a92212fb99691e454cb9d9c4" ,
	"type":  "ChainpointSHA256v2"
}
Now that we have this function, let's update the last part of server.js, so it can be called upon server initialization:
      var subscription = require("./models/subscription");
var receipt = require("./models/receipt");

subscription.setup(function(hashClient) {
  var routes = require("./routes/app")(app, hashClient);

  app.listen(config.port, function() {
    console.log("Server up and listening on port %d", config.port);
    receipt.setup(hashClient);
  });
});
Back to receipt.js, this changefeed is triggered when sent_to_blockchain is set to true (and the record doesn't have a blockchain_receipt). This is done by the markReceiptsAsSent function, called when Tierion's callback is received:
      module.exports.markReceiptsAsSent = function(startTimestamp, endTimestamp) {
  r
    .table(RECEIPT_TABLE)
    .between(
      r.epochTime(parseInt(startTimestamp)),
      r.epochTime(parseInt(endTimestamp)),
      { index: "timestamp" }
    )
    .update({ sent_to_blockchain: true })
    .run();
};
Using RethinkDB's time and date features, we mark all the records between the timestamps of processed hashes provided by Tierion.
To save a receipt object, we first clone the original object with the Object.assign() function, so we can safely change the timestamp property to use RethinkDB's time type, insert it into the database, and publish an update to the registered document channel (more on this in the next section):
      module.exports.saveReceipt = function(receipt, callback) {
  var formattedTimestamp = new Date(receipt.timestamp * 1000)
    .toISOString()
    .replace(/T/, " ")
    .replace(/.000Z/, " UTC");
  var clonedReceipt = Object.assign({}, receipt);
  clonedReceipt.timestamp = r.epochTime(receipt.timestamp);

  r
    .table(RECEIPT_TABLE)
    .insert(clonedReceipt)
    .run()
    .then(function(results) {
      pubnub.publish(
        {
          channel: config.pubnub.registered_channel,
          message: {
            hash: receipt.hash,
            timestamp: formattedTimestamp
          }
        },
        function(status, response) {
          console.log(status, response);
          callback(true, clonedReceipt);
        }
      );
    })
    .error(function(error) {
      console.log(error);
      callback(false, error);
    });
};
The other two methods on this file just get a receipt object by its hash and ID respectively:
      module.exports.getReceiptByHash = function(hash, callback) {
  r
    .table(RECEIPT_TABLE)
    .filter(r.row("hash").eq(hash))
    .run()
    .then(function(result) {
      if (result.length > 0) {
        callback(true, result[0]);
      } else {
        callback(false, result);
      }
    })
    .error(function(error) {
      console.log(error);
      callback(false, error);
    });
};

module.exports.getReceipt = function(id, callback) {
  r
    .table(RECEIPT_TABLE)
    .get(id)
    .run()
    .then(function(result) {
      callback(true, result);
    })
    .error(function(error) {
      console.log(error);
      callback(false, error);
    });
};
Now let's review the code of the HTML pages.
The index.html page
Here's the complete code for the index page template:
<!DOCTYPE html>
<html lang="en">
<head>
<meta charset="utf-8">
<title>Tierion/RethinkDB/Twilio Sync Demo</title>
<meta name="viewport" content="width=device-width,initial-scale=1" />
<link rel="stylesheet" href="https://fonts.googleapis.com/css?family=Roboto:300,300italic,400" />
<link rel="stylesheet" href="css/index.css" />
</head>
<body>
<div class="container" role="main">
<nav role="navigation">
<a id="create-link" href="#" class="is-selected">Create</a>
<a id="verify-link" href="#">Verify</a>
</nav>
<div id="drag-zone" class="box upload">
<div class="box-input">
<img class="icon" src="/img/cloud-upload.png" />
<input type="file" name="files" id="file" class="file" />
<label for="file"><strong>Choose a file</strong></label> or drag it here.
</div>
<div class="uploading">Reading…</div>
<div class="success">
Done!<br/>The hash of the file is:
<span id="hash"></span>
<a id="submit-link" href="#">Submit</a> or <a id="read-another-link" href="#">read another file</a>.
</div>
<div class="error">Error. Try again!</div>
</div>
<footer>
<h2>Last documents registered:</h2>
<table class="table" id="latest-registered">
<tr>
<th>File Hash</th><th>Timestamp</th>
</tr>
</table>
<h2>Last documents confirmed:</h2>
<table class="table" id="latest-confirmed">
<tr>
<th>File Hash</th><th>Timestamp</th>
</tr>
</table>
</footer>
</div>
      <script id="item-template" type="text/x-jsrender">
  <tr><td><a href="verify/{{:hash}}">{{:hash}}</a></td><td>{{:timestamp}}</td></tr>
</script>
<script src="https://code.jquery.com/jquery-2.2.4.min.js"></script>
<script src="https://cdnjs.cloudflare.com/ajax/libs/jquery.blockUI/2.70/jquery.blockUI.min.js"></script>
<script src="https://cdnjs.cloudflare.com/ajax/libs/jsrender/0.9.80/jsrender.min.js"></script>
<script src="https://cdn.pubnub.com/sdk/javascript/pubnub.4.0.0.js"></script>
<script>
var REGISTERED_CHANNEL = '<%= config.pubnub.registered_channel %>';
var CONFIRMED_CHANNEL = '<%= config.pubnub.confirmed_channel %>';
var pubnubConfig = {
subscribeKey: '<%= config.pubnub.subscribe_key %>'
};
</script>
<script src="js/index.js"></script>
<script src="js/pubnub-index.js"></script>
</body>
</html>
It's a simple HTML page. Before the <script> tags, we define a template that contains the HTML to add to the lists of the latest registered and confirmed documents:
<script id="item-template" type="text/x-jsrender">
<tr><td><a href="verify/{{:hash}}">{{:hash}}</a></td><td>{{:timestamp}}</td></tr>
</script>
About the Javascript files, we're going to focus only on the essential parts. You can see the complete code for the Javascript (and CSS files) on the Github repository for this application.
For the public/js/index.js file, the important part is where the hash of the file is generated. We're going to use the FileReader and cryptographic libraries of Javascript.
First, we test if the browser supports them. If that's not the case, an alert is presented:
      if (
  !(
    window.File &&
    window.FileReader &&
    window.crypto &&
    window.crypto.subtle &&
    window.crypto.subtle.digest
  )
) {
  alert(
    "No File API support. Please use the latest vesion of Firefox or Chrome."
  );
}
To read the file when it's dragged or chosen, we have the following code:
      dragZone.on( 'drop', function(evt)
{
	var files = evt.originalEvent.dataTransfer.files;

	handleFile(files);
});

inputFile.on('change', function(evt) {
	var files = evt.originalEvent.target.files;

	handleFile(files);
});

function handleFile(files) {
	if (!files.length) {
		return;
	}
	var file = files[0];

	var reader = new FileReader();
	reader.readAsArrayBuffer(file);

	reader.onload = function(e) {
		var data = e.target.result;

		...
	};
One downside is that this approach won't work with large files. Large generally means in the 200MB+ range, but the definition depends on your computer memory. A more robust implementation would read the file in blocks using workers. However, that's a little complicated and beyond the scope of this tutorial.
Then, to calculate the hash (as a SHA256 digest), we use the digest function, which returns the hash as an ArrayBuffer. Then we convert to its hexadecimal (HEX) representation:
      reader.onload = function(e) {
	var data = e.target.result;

	window.crypto.subtle.digest({name: 'SHA-256'}, data).then(function(hash) {
		var hexString = '';
		var bytes = new Uint8Array(hash);

		for (var i = 0; i < bytes.length; i++) {
			var hex_i = bytes[i].toString(16);
			hexString += hex_i.length === 1 ? '0' + hex_i : hex_i;
		}

		$('#hash').text(hexString);
        calculatedHash = hexString;

		...
	}).catch(function(e) {
		showError(e);
	});
	};
Now we have a HEX representation of the the original hash.
The next section will cover using PubNub's Storage and Playback functionality to get the list of the latest registered and confirmed documents.
PubNub's Storage and Playback and Multiplexing features
PubNub's Storage and Playback feature allows you to store messages so they can be retrieved at a later time.
In the setup and save functions of the receive module, we saw how you can publish to channels using version 4 of PubNub SDK.
Notice how you can indicate not to storage a message with storeInHistory: false (when the storage add-on is enabled, by default, all messages in all channels are stored). setup function:
      ...
pubnub.publish({
		channel : row.new_val.hash,
		message : Object.assign({id: row.new_val.id}, obj),
		storeInHistory: false
	},
	function(status, response) {
		console.log(status, response);
	}
);
...
pubnub.publish({
		channel : config.pubnub.confirmed_channel,
		message : {
			hash: row.new_val.hash,
			timestamp:formattedTimestamp
		},
	},
	function(status, response) {
		console.log(status, response);
	}
);
...
save function:
      ...
pubnub.publish({
		channel : config.pubnub.registered_channel,
		message : {
			hash: receipt.hash,
			timestamp:formattedTimestamp
		}
	},
	function(status, response) {
		console.log(status, response);
		callback(true, clonedReceipt);
	}
);
...
This way, on the public/js/pubnub-index.js file, we create some variables and the PubNub object:
      $(document).ready(function() {
    var DOCS_TO_SHOW = 5;
    var listRegistered = '#latest-registered';
    var listConfirmed = '#latest-confirmed';
    var itemTemplate = $.templates('#item-template');

    var pubnub = new PubNub(pubnubConfig);
}
With multiplexing, we can subscribe to the channel for registered and confirmed documents:
      pubnub.addListener({
  message: function(data) {
    console.log(data);

    var el = listRegistered;
    if (data.subscribedChannel === CONFIRMED_CHANNEL) {
      el = listConfirmed;
    }

    $(itemTemplate.render(data.message))
      .hide()
      .insertAfter($(el + " tr:first-child"))
      .fadeIn();

    var elements = $(el + " tr").length - 1;
    if (elements > DOCS_TO_SHOW) {
      $(el + " tr")
        .last()
        .remove();
    }
  }
});

pubnub.subscribe({
  channels: [REGISTERED_CHANNEL, CONFIRMED_CHANNEL]
});
Multiplexing means listening to multiple data streams on a single connection. Notice that our addListener function must come before our subscribe function.
Inside addListener, we use the subscribedChannel property to know from which channel the message comes from. The actual message is in the message property.
This is for listening to new documents after the page is fully loaded. For the initial list when the page just loads, we call the history function on both channels to retrieve the last five new documents on the channels (using reverse and count):
      pubnub.history(
  {
    channel: REGISTERED_CHANNEL,
    reverse: false,
    count: DOCS_TO_SHOW
  },
  function(status, response) {
    console.log(response);

    response.messages.forEach(function(item) {
      $(listRegistered + " tr:first-child").after(
        itemTemplate.render(item.entry)
      );
    });
  }
);

pubnub.history(
  {
    channel: CONFIRMED_CHANNEL,
    reverse: false,
    count: DOCS_TO_SHOW
  },
  function(status, response) {
    console.log(response);

    response.messages.forEach(function(item) {
      $(listConfirmed + " tr:first-child").after(
        itemTemplate.render(item.entry)
      );
    });
  }
);
Next, we'll move onto the verification page.
The verification page
The verification page is simple too:
      <!DOCTYPE html>
<html lang="en">
<head>
	<meta charset="utf-8">
	<title>Tierion/RethinkDB/Twilio Sync Demo</title>
	<meta name="viewport" content="width=device-width,initial-scale=1" />
	<link rel="stylesheet" href="https://fonts.googleapis.com/css?family=Open+Sans:400,700" />
	<link rel="stylesheet" href="/css/verify.css" />
</head>
<body>
<div class="container">

	<div id="notice">
		<span class="title">The hash hasn't been submitted to <br/>the Blockchain yet.</span>

		<p>Keep this page open and wait 10 minutes at most, it will be updated automatically<br/>OR<br/> Bookmark it an check back later.</p>
	</div>

	<div id="info">
		<p>
			<span class="subtitle">Hash:</span>
			<small><%= data.hash %></small>
		</p>

		<p>
			<span class="subtitle">Created at:</span>
			<small><%= data.created_at %></small>
		</p>

	</div>

    <div id="links"></div>
</div>

<script id="message-template" type="text/x-jsrender">
  <span class="title">The hash was submitted to <br/>the Blockchain.</span>
</script>

<script id="blockchain-data-template" type="text/x-jsrender">
	<p>
        <span class="subtitle">Transaction ID:</span>
        <small>{{:tx_id}}</small>
    </p>

	<p>
        <span class="subtitle">Merkle Root:</span>
        <small>{{:merkle_root}}</small>
    </p>
</script>

<script id="links-template" type="text/x-jsrender">
	<div class="verify">
		<p>Verify the blockchain info at:<br/>
		<small><a href="https://blockexplorer.com/tx/{{:tx_id}}" target="_blank">https://blockexplorer.com/tx/{{:tx_id}}</a></small></p>
	</div>

	<div id="pdf-link">
		<p><a href="/pdf/{{:recepit_id}}" target="_blank">View PDF receipt</a></p>
	</div>
</script>

<script src="https://code.jquery.com/jquery-2.2.4.min.js"></script>
<script src="https://cdnjs.cloudflare.com/ajax/libs/jsrender/0.9.80/jsrender.min.js"></script>
<script src="https://cdn.pubnub.com/sdk/javascript/pubnub.4.0.0.js"></script>
<script src="/js/pubnub-verify.js"></script>
<script>
    $(document).ready(function() {

        var pubnubConfig = {
            subscribeKey: '<%= config.pubnub.subscribe_key %>'
        };

        var addBlockchainInfo = function(params1, params2, params3) {
            var notice = $('#notice');
            var info = $('#info');
            var links = $('#links');

            var template = $.templates('#message-template');
            notice.html(template.render(params1));

            template = $.templates('#blockchain-data-template');
            info.append(template.render(params2));

            template = $.templates('#links-template');
            links.append(template.render(params3));
        }

        <% if (data.sent_to_blockchain) { %>
        var params1 = {};

        var params2 = {
            tx_id: '<%= data.blockchain_receipt.anchors[0].sourceId %>',
            merkle_root: '<%= data.blockchain_receipt.merkleRoot %>'
        };

        var params3 = {
            tx_id: '<%= data.blockchain_receipt.anchors[0].sourceId %>',
            recepit_id: '<%= data.id %>'
        };

        addBlockchainInfo(params1, params2, params3);
        <% } else { %>

        setupPubNub(pubnubConfig, '<%= data.hash %>', addBlockchainInfo);

        <% } %>
    });
</script>

</body>

</html>
After the .container div, you can find the templates to add the blockchain information. If a user comes to this page after the receipt is generated, the information is added on page load. Otherwise, PubNub is set up with the function setupPubNub, which allows it to listen for updates.
The code of this function can be found on public/js/pubnub-verify.js:
      var setupPubNub = function(pubnubConfig, hash, callback) {
  var pubnub = new PubNub(pubnubConfig);

  pubnub.addListener({
    message: function(data) {
      console.log(data);

      var params1 = {};

      var params2 = {
        tx_id: data.message.anchors[0].sourceId,
        merkle_root: data.message.merkleRoot
      };

      var params3 = {
        tx_id: data.message.anchors[0].sourceId,
        recepit_id: data.message.id
      };

      var container = $(".container");

      container.css("opacity", "0");

      callback(params1, params2, params3);

      container.animate(
        {
          opacity: 1
        },
        1500
      );
    }
  });

  pubnub.subscribe({
    channels: [hash]
  });
};
Here, we're just subscribing to the channel with name equals to the hash we're verifying to add the blockchain information when a message is received.
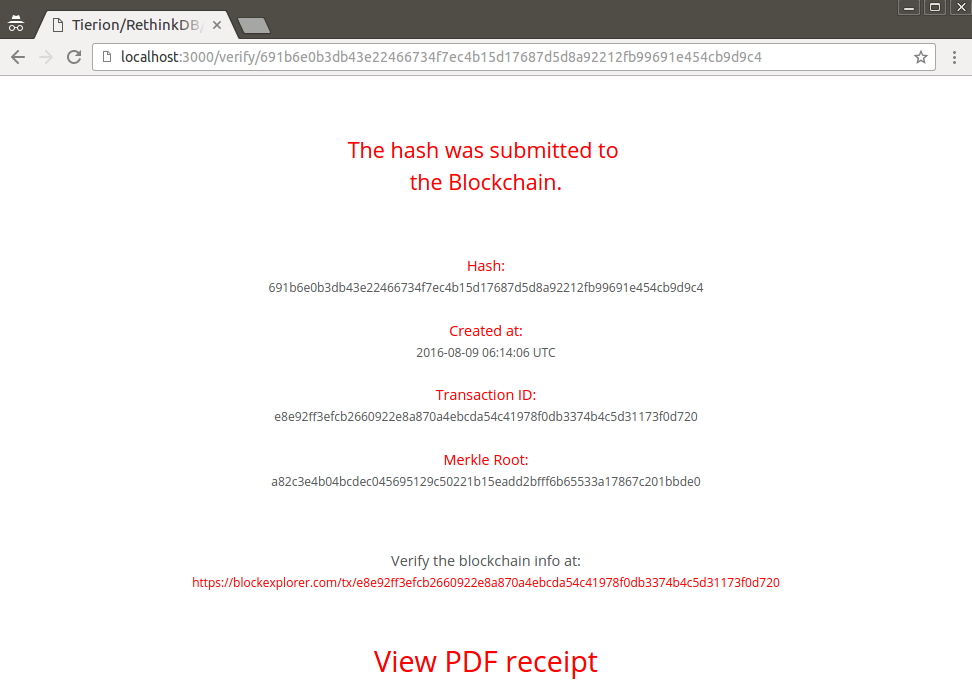
This way, the page of a verified hash looks like the following:
And the receipt in PDF format looks like this:

The template for the PDF receipt is similar to this page, the only significant difference is the QR code generated with QRCode.js. To create a QR code, use the JavaScript below:
      <div id="qrcode"></div>

<script src="js/qrcode.min.js" type="text/javascript"></script>
<script type="text/javascript">
var qrcode = new QRCode(document.getElementById("qrcode"), {
    text: "https://blockexplorer.com/tx/:{{r.blockchain_receipt.anchors[0].sourceId}}",
    width: 128,
    height: 128,
    colorDark : "#000000",
    colorLight : "#ffffff",
    correctLevel : QRCode.CorrectLevel.H
});
</script>
And that's it, the whole application. Remember that the entire code is on Github in case you want to review the files not covered here or if you missed something.
How do I verify the existence in the Blockchain?
I guess you may be thinking, but what are these merkle root, transaction id, and proof values that Tierion is returning? How can all this act as a proof of existence?.
Well, first of all, the file's SHA256 digest is unique. You need to have the exact same file to generate the same hash. (Just try checking the hash of a file, and then adding a space to see how the new hash is completely different). This proves that the file existed at least as early as the time the transaction was confirmed. Otherwise, the hash we used would not have been generated.
About Tierion's receipt:
- The targetHash value is the hash of the record you wish to verify.
- This and other recorded hashes are combined into a Merkle Tree.
- With the Merkle Tree, a merkleRoot is calculated and inserted into the blockchain.
With a Merkle tree, you can prove that something belongs to a set, without having to store the whole set.
To validate a receipt, you must confirm that targetHash is part of a Merkle Tree, and the tree's Merkle root has been published to a Bitcoin transaction.
Receipts generated from Tierion conform to the Chainpoint 2.0 standard. You can know more about this standard and how a receipt can be verified in this whitepaper, but in summary here's the procedure:
- Concatenate targetHash and the first hash in the proof array. The right or left designation specifies which side of the concatenation that the proof hash value should be on.
- Hash the resulting value.
- Concatenate the resulting hash with the next hash in the proof array, using the same left and right rules.
- Hash that value and continue the process until you've gone through each item in the proof array.
- The final hash value should equal the merkleRoot value if the proof is valid, otherwise, the proof is invalid.
If your targetHash was the only element in the Merkle Tree, it would be equal to merkleRoot.
Let's see an example. To verify the hash of this receipt (691b6e0b3db43e22466734f7ec4b15d17687d5d8a92212fb99691e454cb9d9c4):
      {
	"@context": https://w3id.org/chainpoint/v2,
	"anchors": [
		{
			"sourceId":  "e8e92ff3efcb2660922e8a870a4ebcda54c41978f0db3374b4c5d31173f0d720" ,
			"type":  "BTCOpReturn"
		}
	] ,
	"merkleRoot":  "a82c3e4b04bcdec045695129c50221b15eadd2bfff6b65533a17867c201bbde0" ,
	"proof": [
		{
			"right":  "8b6aafc21661aed7ff5a7e8fce857ca0d2f4cef576c1c47c454d58a58ce4c09c"
		}
	] ,
	"targetHash":  "691b6e0b3db43e22466734f7ec4b15d17687d5d8a92212fb99691e454cb9d9c4" ,
	"type":  "ChainpointSHA256v2"
}
We concatenate the targetHash value with the right value of proof in the following way:
691b6e0b3db43e22466734f7ec4b15d17687d5d8a92212fb99691e454cb9d9c48b6aafc21661aed7ff5a7e8fce857ca0d2f4cef576c1c47c454d58a58ce4c09c
Then, we get the SHA-256 hash of that string to verify that is equal to the merkleRoot value.
Since proof has one element, we only have to perform this operation. Otherwise, we'd have to repeat the process for each value of proof concatenating it either to the left or right of the previously calculated hash.
The catch is that the hash generation is done with the binary values (as raw binary data buffers) of targetHash and proof, rather than with their hexadecimal string representations (the ones shown), which means that we can't use an online SHA256 calculator to perform the operations.
Luckily, Tierion provides the following tools to validate your receipts:
- Tierion's receipt validation web page
- Data API validatereceipt endpoint
- Node.js Chainpoint validation library
And here's a tip. If you really want to see the code that does the validation, take a look at the validateProof(proof, targetHash, merkleRoot) function of Tierion's library for working with Merkle trees.
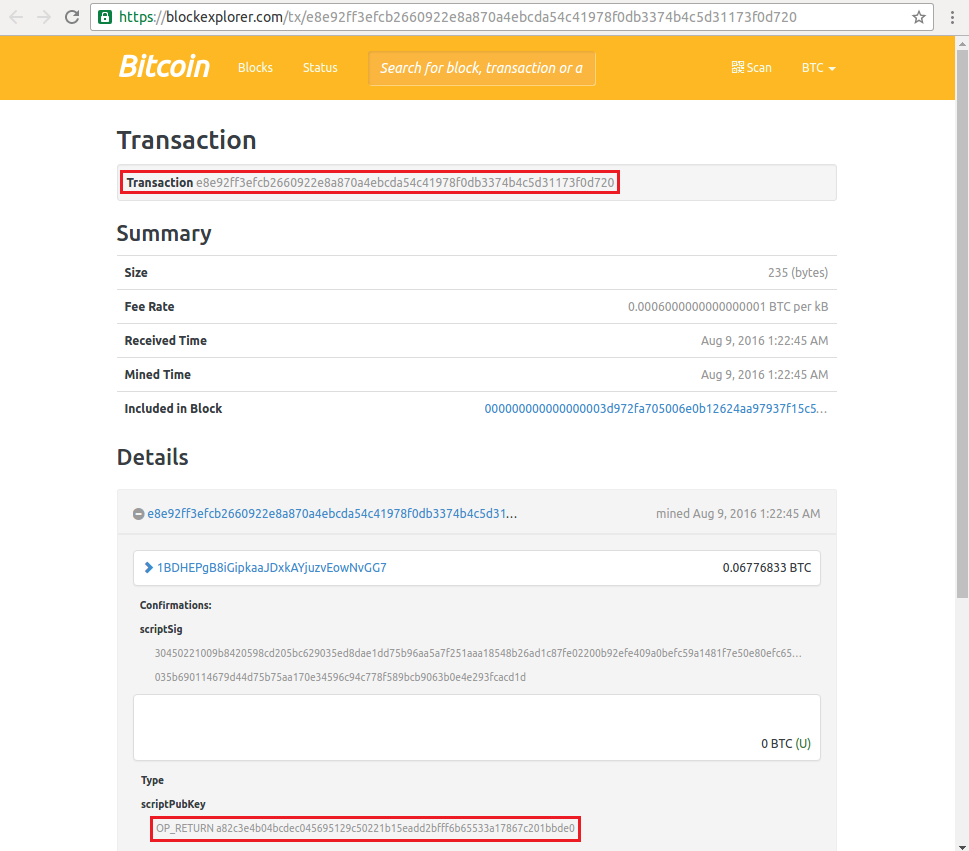
Now that you've proven the value of the merkleRoot, take the Bitcoin transaction ID (sourceId property from the anchors array with type BTCOpReturn) to review the transaction on an online site like https://blockchain.info/ or https://blockexplorer.com/.
The transaction must include the merkleRoot value in the OP_RETURN output. If the value is in the output, the receipt is valid:
Conclusion
As we have seen, we can access the blockchain in an easy way using Tierion. Furthermore, we can benefit from the real-time features of RethinkDB and Pubnub to improve user experience and sync data. This proves once again that by combining the right APIs, you can build simple but powerful applications.
I hope you found this tutorial informative and entertaining. Thank you for reading. Please leave comments and feedback in the discussion section below. Please favorite this guide if you found it useful!
Advance your tech skills today
Access courses on AI, cloud, data, security, and more—all led by industry experts.
