Scalable Analytics in Plain Java with Keen IO and Spring Boot
Learn how to build a plain Java 8 web app that uses Keen IO to store events and shows statistical information on a scalable dashboard. Follow this analytics tutorial today!
Jan 10, 2019 • 22 Minute Read
Introduction
In this tutorial we are going to create a web application that collects events and shows statistical information on a dashboard. All this will be done in plain Java without the use of JavaScript or HTML and without installation or configuration of any web servers or SQL/NoSQL databases.
To give you an idea of what we are going to implement, take a look at the following screenshot of the finished application:
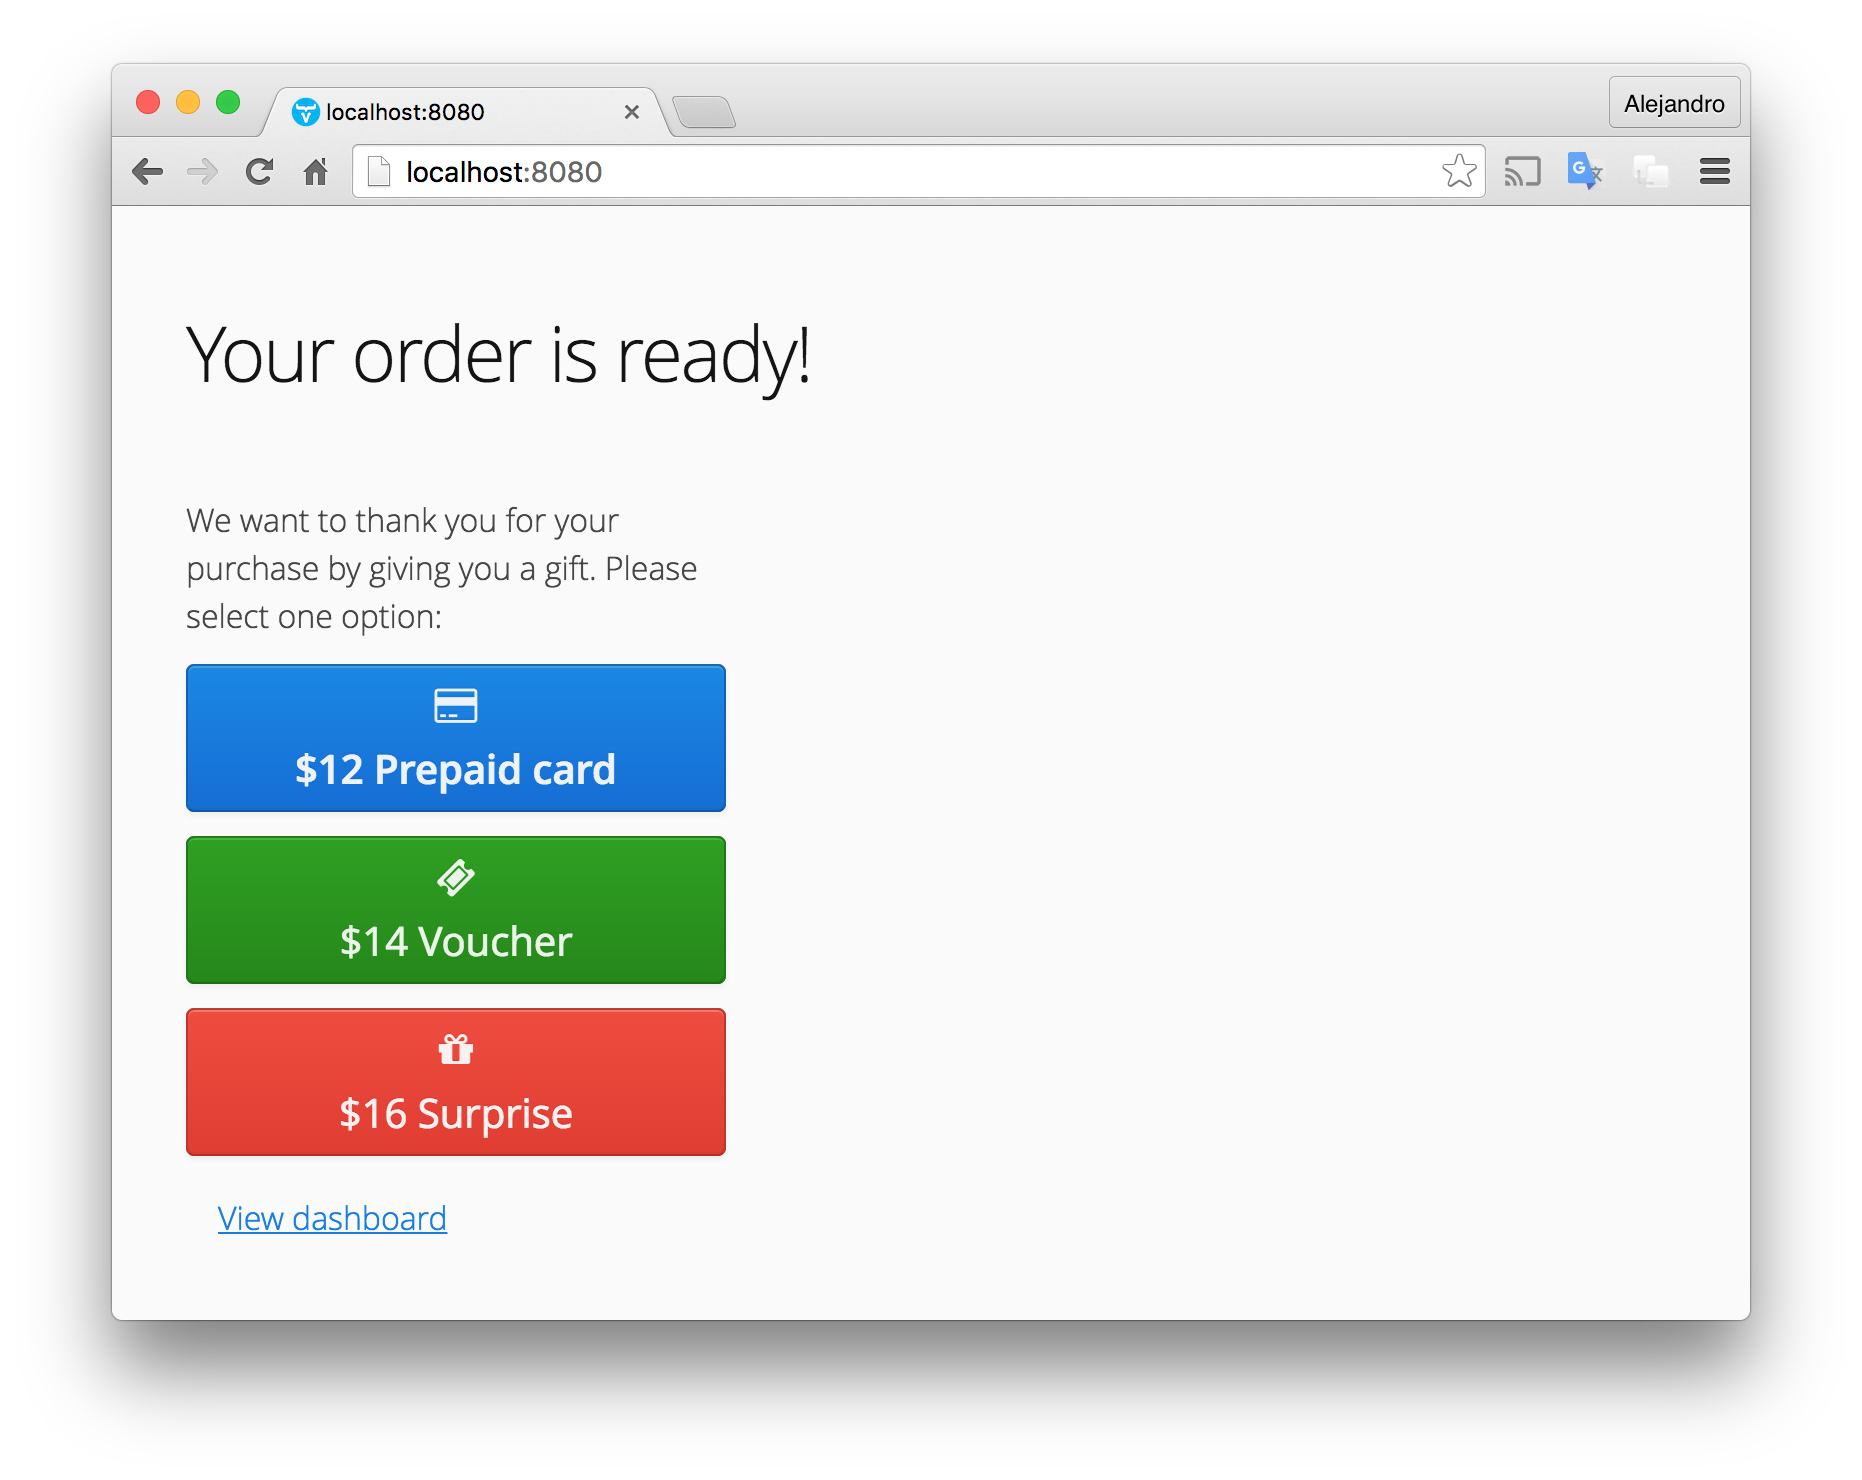
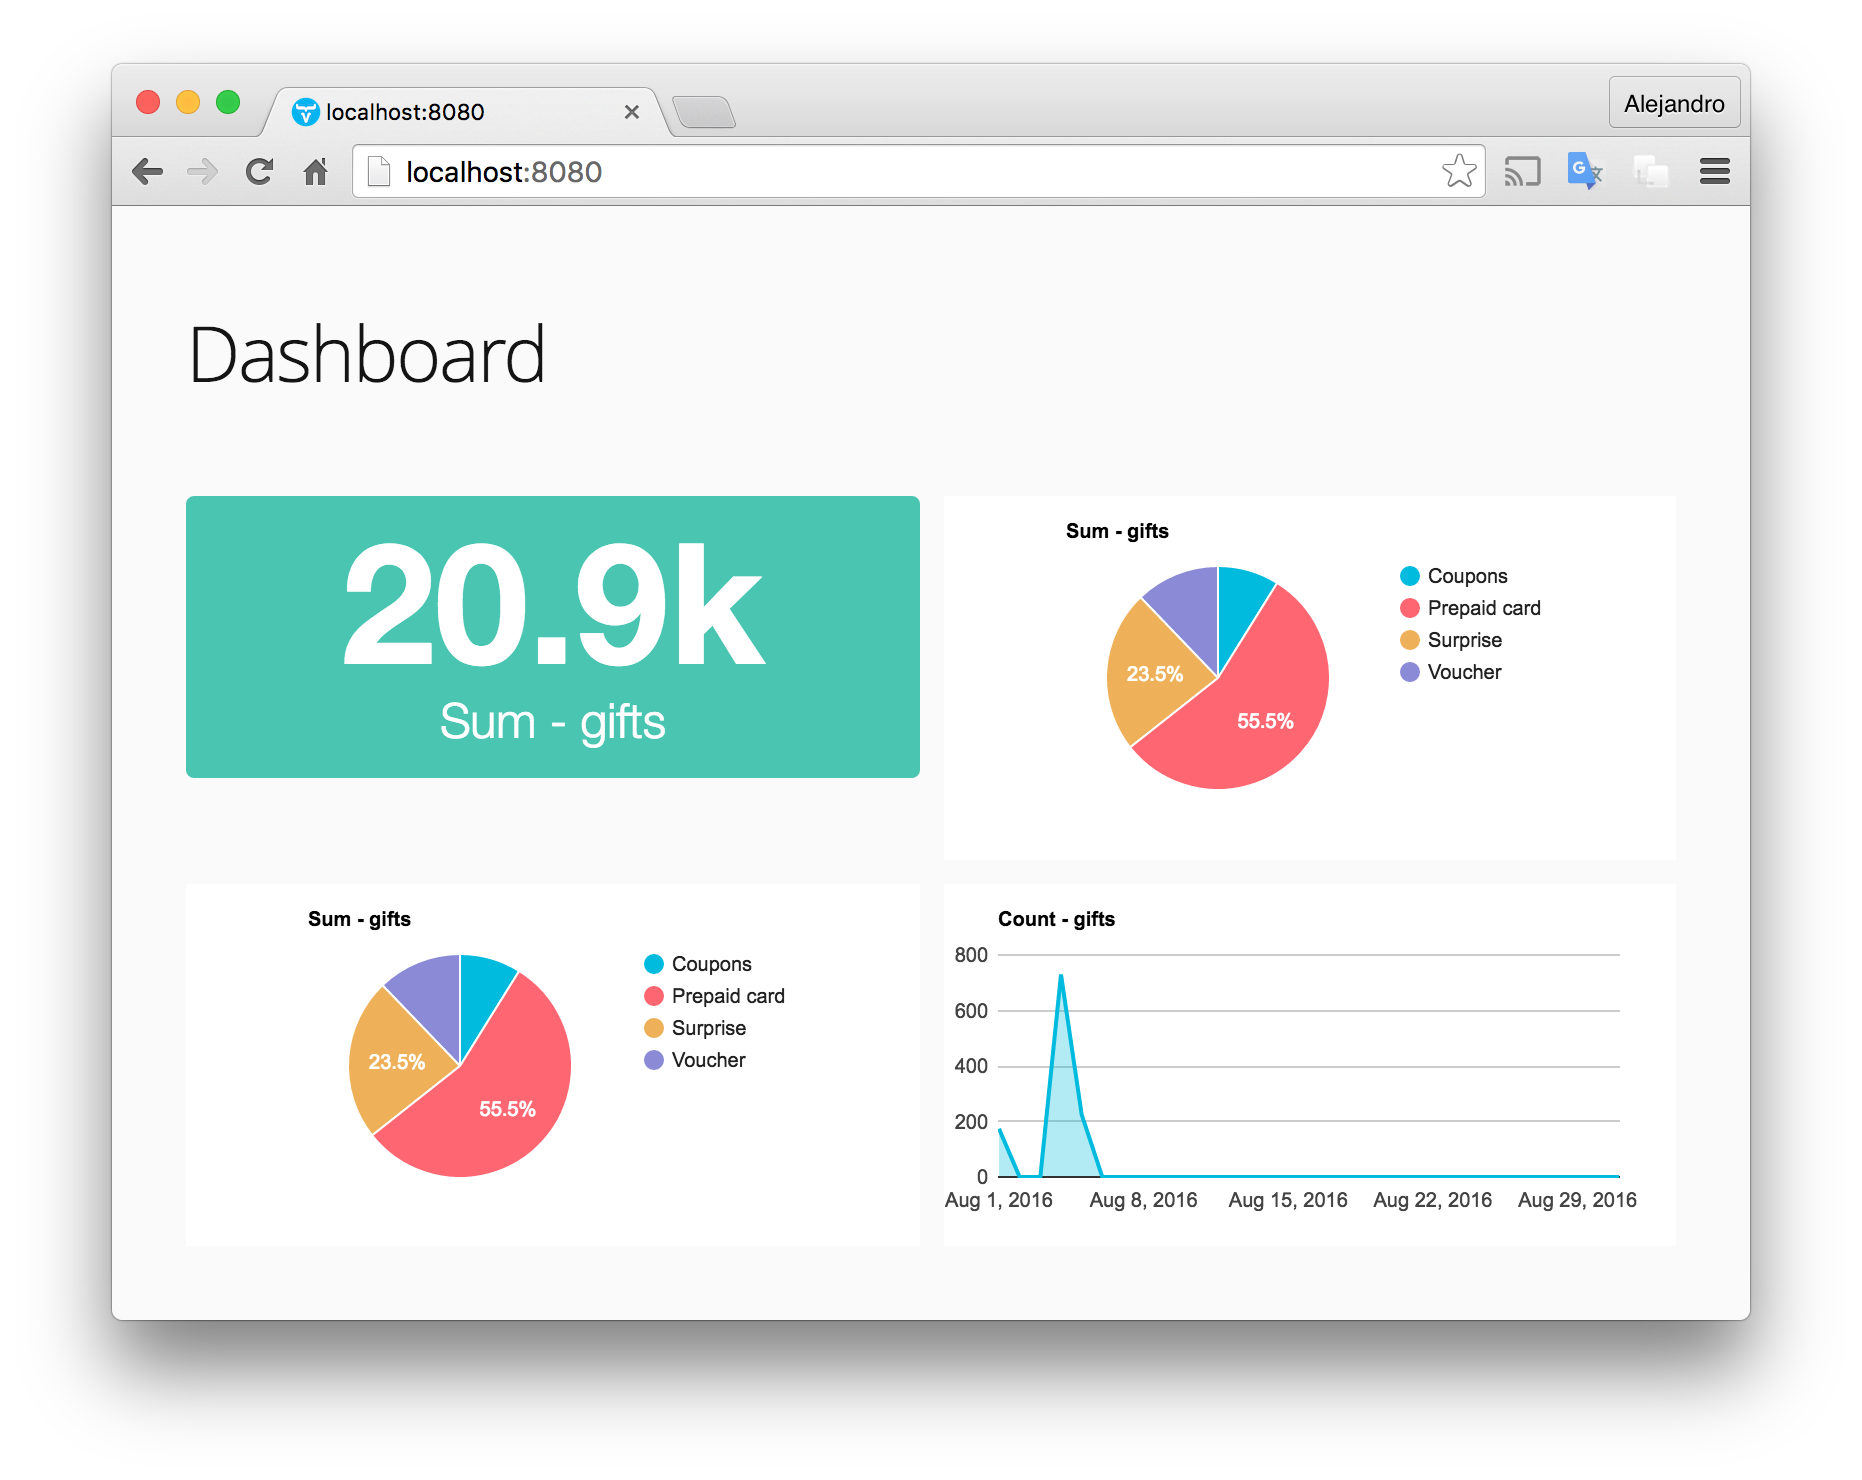
The application simulates the last step of an online shopping process: the confirmation that the order has been received. As a gesture of gratitude, this hypothetical last step allows the user to select a “gift”. We won’t implement any extra business logic to actually process any orders; we will limit the UI to merely show a confirmation message. However, we are going to use Keen IO to store the selected option and display the population data on the dashboard shown in the following screenshot.
Remember that we will be coding in Java only!
Prerequisites
- Have Java 8 installed. Follow installation guidelines here
- Install Maven and make sure it works.
- Use your favorite IDE
- Obtain a Keen IO account. If you haven't officially used Keen.IO, sign up for free.
We are going to use Spring and Vaadin frameworks as well, but you don’t really need to have any previous experience with these frameworks to follow this tutorial.
Create a Spring Boot project
Spring Framework is a popular enterprise application framework that allows you to create high-performing, easily testable, and reusable code. Although Spring Framework has many modules, we will use it as an Inversion of Control container. One of the easiest ways of creating a web application with Spring Framework is by using Spring Boot and Spring Initializr.
Go to Spring Initializr to generate a project with the configuration shown in the following screenshot:
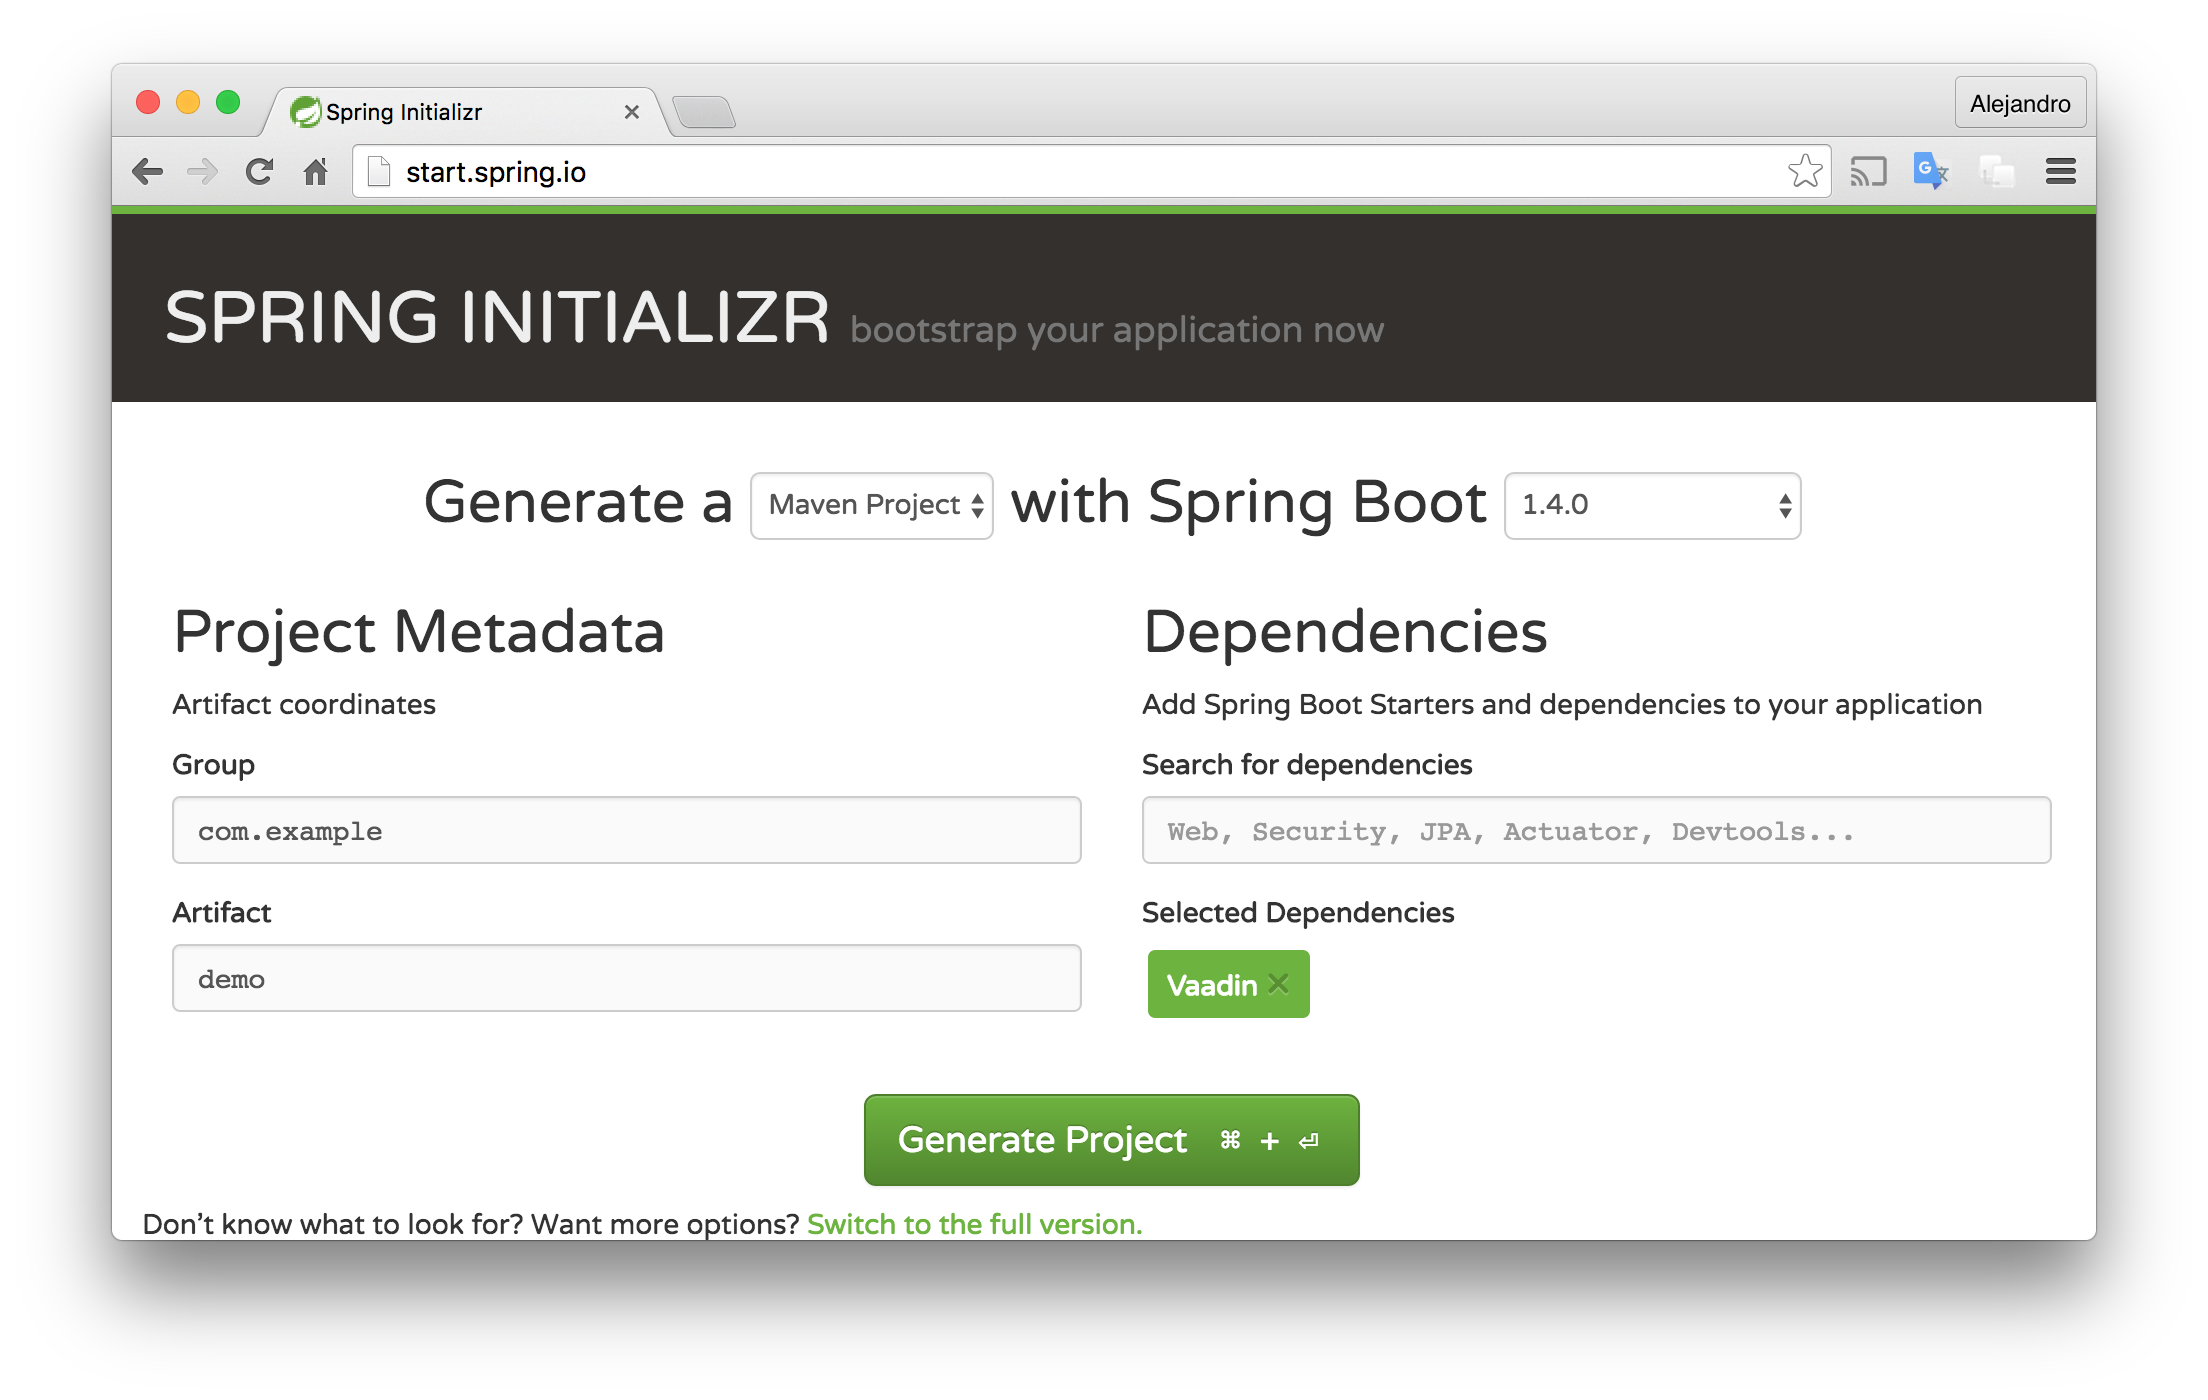
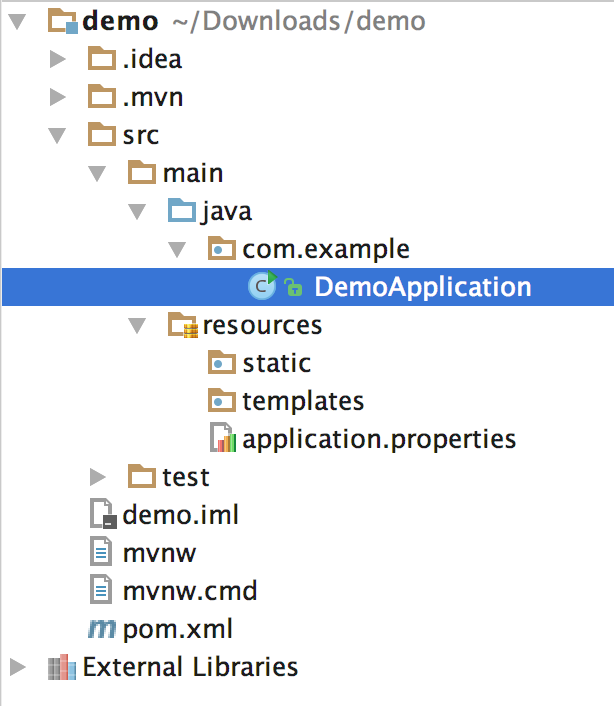
Make sure you added the Vaadin dependency. Click the Generate Project button and extract the generated zip file. You should retrieve a Maven project that you can import into your favorite IDE:
Create a web UI in plain Java
Time to start coding! Let’s begin by creating the first screen. Create the following Java class next to the DemoApplication class:
      package com.example;

import com.vaadin.annotations.Theme;
import com.vaadin.server.VaadinRequest;
import com.vaadin.spring.annotation.SpringUI;
import com.vaadin.ui.Notification;
import com.vaadin.ui.UI;
import com.vaadin.ui.themes.ValoTheme;

@SpringUI // this allows us to inject other Spring beans into instances of this class
@Theme(ValoTheme.THEME_NAME)
public class WebUI extends UI {

    // the entry point of the web application
    @Override
    protected void init(VaadinRequest request) {
        Notification.show("It works!");
    }
}
This is already a web application, and, thanks to Spring Boot, we don’t need to worry about configuring any web server. Just compile the application using your IDE or the command line and run the Spring Boot application:
      mvn clean install
mvn spring-boot:run
Most IDEs allow creating run configurations. You may want to create one to run the Spring Boot Java Application directly in your IDE. Alternatively, you can start the application by running the jar file created in the target directory. In the end, a Spring Boot application is simply a Java standalone application. You can find the standard main method defined in the DemoApplication class.
Once you have executed the Java application, Spring Boot will configure and start a Tomcat server on port 8080, so you can access the application at https://localhost:8080 and see the “It works” notification.
How does it work? The previous class is just a minimal implementation of a web UI using Vaadin. It should extend org.vaadin.ui.UI and thus implement the init method. The init method is the starting point of the web application, similar to the main method in DemoApplication class.
The WebUI class also includes two annotations. @SpringUI allows Spring Framework to create instances of this class for us. We don’t need to instanciate it manually. Instead, it will be automatically discovered and new instances will be created when a new browser or browser tab points to the application’s URL. The @Theme annotation changes the overall look-and-feel of the application to the Valo theme. There are other themes available, such as reindeer, chameleon, and runo, but those are not as modern and attractive as valo.
There are tons UI components you can use to create a web UI in a similar way to how you would implement a desktop application using Swing or JavaFX. For example, you can use the TextField, ComboBox, CheckBox, and Grid classes and arrange them into a VerticalLayout or HorizontalLayout.
Let’s use more UI components to implement UI we want. Change the implementation of the WebUI class to the following:
      package com.example;

import com.vaadin.annotations.Theme;
import com.vaadin.server.FontAwesome;
import com.vaadin.server.VaadinRequest;
import com.vaadin.spring.annotation.SpringUI;
import com.vaadin.ui.*;
import com.vaadin.ui.themes.ValoTheme;

@SpringUI // this allows us to inject other Spring beans into instances of this class
@Theme(ValoTheme.THEME_NAME)
public class WebUI extends UI {

    // all components are going to be added into this layout
    private VerticalLayout layout = new VerticalLayout();

    // the entry point of the web application
    @Override
    protected void init(VaadinRequest request) {
        layout.setMargin(true); // add space around the layout
        layout.setSpacing(true); // add space between the components inside the layout
        setContent(layout); // set the content of this web UI to be the layout

        Label title = new Label("Your order is ready!"); // a Label is just static text on the page
        title.addStyleName(ValoTheme.LABEL_H1); // make the text big
        layout.addComponent(title); // add the label into the layout

        Label instructions = new Label("We want to thank you for your purchase by giving you a gift. Please select one option:");
        instructions.setWidth("270px"); // adjust the width to get some word-wrapping.
        layout.addComponent(instructions); // add the label into the layout

        // add some "gift" options
        addGiftOption("Prepaid card", FontAwesome.CREDIT_CARD, ValoTheme.BUTTON_PRIMARY, 12);
        addGiftOption("Voucher", FontAwesome.TICKET, ValoTheme.BUTTON_FRIENDLY, 14);
        addGiftOption("Surprise", FontAwesome.GIFT, ValoTheme.BUTTON_DANGER, 16);
    }

    // creates a button with the given configuration
    private void addGiftOption(String name, FontAwesome icon, String styleName, int value) {
        Button button = new Button("$" + value + " " + name, icon);
        button.setWidth("270px");
        button.addStyleName(ValoTheme.BUTTON_LARGE);
        button.addStyleName(ValoTheme.BUTTON_ICON_ALIGN_TOP);
        button.addStyleName(styleName);
        layout.addComponent(button);

        // call the giftSelected method when the button is clicked
        button.addClickListener(event -> giftSelected(name, value));
    }

    // this gets called when any of the "gift" buttons are clicked
    private void giftSelected(String name, int value) {
        Notification.show("Thank you! Your gift will be sent soon!");
    }
}
You may have to rebuild the application and run it again if you want to see the changes in action.
Although most of the code is self-explanatory, let’s review some key parts:
- setContent(layout): This is a method in the UI class we are extending. This is how you set the component that is going to be rendered in this UI.
- title.addStyleName(ValoTheme.LABEL_H1): This simply adds a CSS class to the component. The Valo theme comes with many ready-to-use styles we can use to change the appearance of the components.
- layout.addComponent(title): This is how we can add components into layouts. In this case, layout is a VerticalLayout meaning all the contained components will be aligned, well, vertically. There are other kinds of layouts, such as HorizontalLayout and GridLayout.
- button.addClickListener(event -> giftSelected(name, value)): We can add click listeners to buttons in order to respond to click events on them. In this case, we are using a lambda expression to define the ClickListener implementation as a call to the giftSelected method.
Configure Keen IO
Now that we have a web UI implemented. We can start collecting events any time a button is clicked. The first step of course, is configuring Keen IO. Go ahead and add the Keen IO Java API into the dependencies section of the pom.xml file:
      <dependency>
    <groupId>io.keen</groupId>
    <artifactId>keen-client-api-java</artifactId>
    <version>4.0.0</version>
</dependency>
We need to configure Keen IO by using Spring Framework. Create the following Config class:
      package com.example;

import io.keen.client.java.JavaKeenClientBuilder;
import io.keen.client.java.KeenClient;
import io.keen.client.java.KeenProject;
import org.springframework.beans.factory.annotation.Value;
import org.springframework.context.annotation.Bean;
import org.springframework.context.annotation.Configuration;

@Configuration
public class Config {

    @Value("${keen.projectId}")
    private String projectId;

    @Value("${keen.writeKey}")
    private String writeKey;

    @Value("${keen.readKey}")
    private String readKey;

    @Bean
    public KeenProject keenProject() {
        return new KeenProject(projectId, writeKey, readKey);
    }

    @Bean
    public KeenClient keenClient(KeenProject keenProject) {
        KeenClient keenClient = new JavaKeenClientBuilder().build();
        keenClient.setDefaultProject(keenProject());
        return keenClient;
    }
}
This class will be detected by Spring Framework, which in turn will create a bean of type KeenProject and a bean of type KeenClient. Beans are created and managed in Spring IoC (Inversion of Control) Containers. We will inject the KeenClient bean later in the WebUI class and use it to send events to Keen IO.
Notice the @Value annotations on the projectId, writeKey, and readKey fields. With this annotation we can specify a property name defined in the application.properties file and Spring Framework will set the corresponding value accordinly. This means we have to add the three properties in the application.properties file as follows:
      keen.projectId=YOUR_PROJECT_ID
keen.writeKey=YOUR_WRITE_KEY
keen.readKey=YOUR_READ_KEY
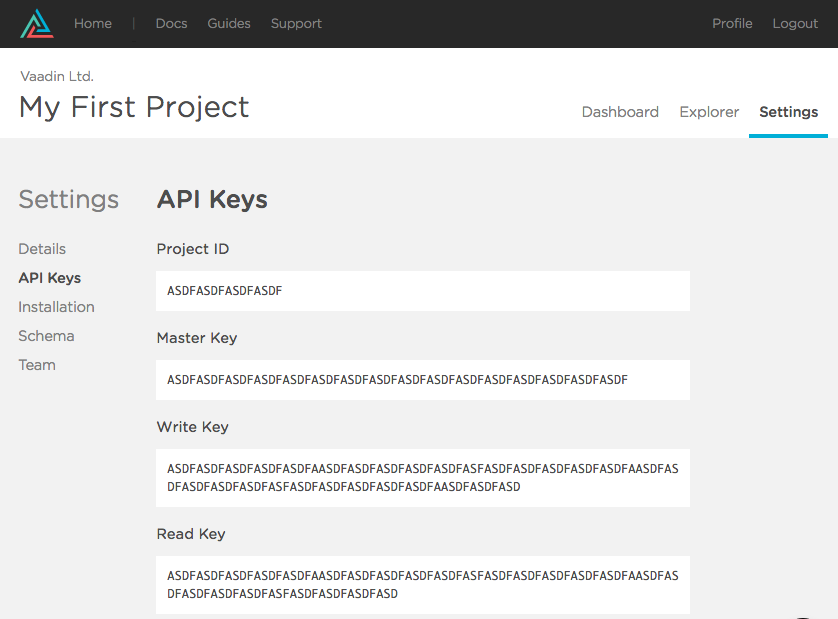
Log into your Keen IO account, create a new project, and get your project ID and keys from the Settings --> API Keys:
Send events to Keen IO
We are ready to use the Keen IO API directly in the WebUI class. First, inject the KeenClient bean in the WebUI class as follows:
      package com.example;
...
import io.keen.client.java.KeenClient;
import org.springframework.beans.factory.annotation.Autowired;
...
public class WebUI extends UI {

    @Autowired
    private KeenClient keenClient;
    ...
}
Notice how we used the @Autowired annotation to tell Spring Framework that it should inject an instance of this bean. Notice that there’s no new operator but we won’t get any null pointer exceptions.
With this in place, we can add the event-sending logic inside the giftSelected method of the WebUI class as follows:
      ...
import java.util.HashMap;
import java.util.Map;
...
public class WebUI extends UI {
    ...
    private void giftSelected(String name, int value) {
        ...
        // send the event to Keen IO

        Map<String, Object> event = new HashMap<>(); // create a map with the data to send
        event.put("name", name);
        event.put("value", value);
        // send the event asynchronously so the user doesn't have to wait to see the notification
        keenClient.addEventAsync("gifts", event);
    }
}
...
As you can see, we can send key/value pairs to Keen IO using a map. We don't have to define any schema prior to start sending events. Also notice we are using the addEventAsync method which sends the event asynchronously, so that the user doesn't have to wait until this event is sent. You can also use the addEvent method if you need to wait until the event is sent.
In this example application, it makes sense to use the asynchronous version because we are just gathering data for statistical calculations only. Notice how we used the "gifts” string as the name of the collection. Think of this collection as a way of grouping the same kind of events (a user clicked a gift option). The collection name will be used later when we create queries.
Now you should be able to use the application and start collecting events. Try rebuilding the project, starting the application again, and clicking the buttons. Although the application looks the same as before, we are now collecting events.
Create a Dashboard in plain Java
It’s time to analyze and visualize the data we are collecting! One way to quickly see something interesting on the screen is by defining a query directly in https://keen.io. You shouldn’t have any trouble exploring the website and creating some queries and even making a dashboard by yourself! Go ahead and try it if you want.
However, this tutorial will focus on creating a dashboard using the Java programming language.
First off, we need to add the following two dependencies into the pom.xml file:
      <dependency>
    <groupId>io.keen</groupId>
    <artifactId>keen-client-api-query</artifactId>
    <version>4.0.0</version>
</dependency>

<dependency>
    <groupId>org.vaadin.keen.charts</groupId>
    <artifactId>keen-charts</artifactId>
    <version>1.1</version>
</dependency>
With this two dependencies in place, we can now define Keen IO queries and pass them to KeenCharts objects. But first, we need to add a link in the web application UI to show the dashboard. Modify the WebUI class to include the following:
      ...
public class WebUI extends UI {

    @Autowired
    private Dashboard dashboard;
    ...
    protected void init(VaadinRequest request) {
        ...
        // add a Button to visualize the dashboard
        Button viewDashboard = new Button("View dashboard");
        viewDashboard.addStyleName(ValoTheme.BUTTON_LINK); // make the button look like a link
        layout.addComponent(viewDashboard); // add the button to the layout

        viewDashboard.addClickListener(event -> showDashboard()); // call showDashboard() when the button is clicked
    }
    ...
    private void showDashboard() {
        setContent(dashboard); // sets the content of this UI to be the dashboard instead of the layout
    }
}
Of course, this won’t compile because we haven’t implemented the Dashboard class. So let’s implement this class as follows:
      package com.example;

import com.vaadin.spring.annotation.SpringComponent;
import com.vaadin.ui.GridLayout;
import com.vaadin.ui.HorizontalLayout;
import com.vaadin.ui.Label;
import com.vaadin.ui.VerticalLayout;
import com.vaadin.ui.themes.ValoTheme;
import org.springframework.context.annotation.Scope;

import javax.annotation.PostConstruct;

@SpringComponent
@Scope("prototype")
public class Dashboard extends VerticalLayout {

    @PostConstruct
    public void init() {
        setSizeFull();
        setMargin(true);
        setSpacing(true);

        Label title = new Label("Dashboard");
        title.addStyleName(ValoTheme.LABEL_H1);
        addComponent(title);

        GridLayout chartsLayout = new GridLayout(2, 2);
        chartsLayout.setSizeFull();
        chartsLayout.setSpacing(true);
        addComponent(chartsLayout);
        setExpandRatio(chartsLayout, 1);
    }
}
This is an empty dashboard right now. We are just extending a UI component, VerticalLayout and marking the class with the @SpringComponent annotation to allow Spring to manage this class. The @Scope("prototype") tells Spring to create a new instance of this class any time we inject a bean of this type.
Also note how we defined the init method by marking it with the @PostConstruct annotation. Spring will call this method after creating the instance. But let’s not worry too much about definitions and instantiation; you can find dozens of good tutorials and documentation about Spring on the web. Instead, let’s add some Keen charts to the dashboard!
You need to define a query per each chart. How do you do this? Super-easy:
      Query query = new Query.Builder(QueryType.SUM)
        .withEventCollection("gifts")
        .withTargetProperty("value")
        .withTimeframe(new AbsoluteTimeframe("2016-08-01T00:00", "2016-08-31T23:59"))
        .build();
As you can see, there’s a Builder class that allows you to easily create a new query. In this query, we are summing (new Query.Builder(QueryType.SUM)) all the values in the "values" property (withTargetProperty("value")) of the "gifts" collection (withEventCollection("gifts")) that were created between the specified times (withTimeframe(new AbsoluteTimeframe("2016-08-01T00:00", "2016-08-31T23:59"))).
Using your own ID and Read Key, pass this query to a KeenChart object as follows:
KeenChart chart = new KeenChart("YOUR_PROJECT_ID", "YOUR_READ_KEY", query);
This chart instance is a UI component you can add into any layout. Let’s go ahead and put some charts into the dashboard. Modify the Dashboard class as follows:
      package com.example;
...
import io.keen.client.java.AbsoluteTimeframe;
import io.keen.client.java.Query;
import io.keen.client.java.QueryType;
import org.springframework.beans.factory.annotation.Value;
import org.vaadin.keen.charts.KeenChart;

...
public class Dashboard extends VerticalLayout {

    @Value("${keen.projectId}")
    private String projectId;

    @Value("${keen.readKey}")
    private String readKey;

    @PostConstruct
    public void init() {
        ...
        KeenChart total = new KeenChart(projectId, readKey, new Query.Builder(QueryType.SUM)
                .withEventCollection("gifts")
                .withTargetProperty("value")
                .withTimeframe(new AbsoluteTimeframe("2016-08-01T00:00", "2016-08-31T23:59"))
                .build());

        KeenChart distribution = new KeenChart(projectId, readKey, new Query.Builder(QueryType.SUM)
                .withEventCollection("gifts")
                .withTargetProperty("value")
                .withTimeframe(new AbsoluteTimeframe("2016-08-01T00:00", "2016-08-31T23:59"))
                .withGroupBy("name")
                .build());

        KeenChart value = new KeenChart(projectId, readKey, new Query.Builder(QueryType.SUM)
                .withEventCollection("gifts")
                .withTargetProperty("value")
                .withTimeframe(new AbsoluteTimeframe("2016-08-01T00:00", "2016-08-31T23:59"))
                .withGroupBy("name")
                .build());

        KeenChart count = new KeenChart(projectId, readKey, new Query.Builder(QueryType.COUNT)
                .withEventCollection("gifts")
                .withTimeframe(new AbsoluteTimeframe("2016-08-01T00:00", "2016-08-31T23:59"))
                .withInterval("daily")
                .build());
        ...
        chartsLayout.addComponents(total, distribution, value, count);
    }
}
Build, run the application, and click the View dashboard link. You should see some nice-looking charts now!
Summary
Congratulations! You’ve just developed a web application with scalable analytics features using only Java. Thanks to Keen.IO, you should now be able to send millions of events without having scalability issues. And thanks to Vaadin, you can develop the web application in plain Java. And last, but not least, thanks to Spring, you can develop high-performing, easily testable, reusable code.
You can find the full source code of the application on GitHub.
If you are planning to develop a dashboard application with the technologies described here, you may want to take a look at the following websites:
- Keen IO APIs: https://keen.io/docs
- Vaadin documentation: https://vaadin.com/docs
- Spring documentation: https://spring.io/docs
Advance your tech skills today
Access courses on AI, cloud, data, security, and more—all led by industry experts.
