Visualizing Tweets with Pubnub's Stream Controller and CSS3 Animations
Learn how to use channel groups in this tutorial by visualizing tweets with PubNub's Stream Controller and CSS3 animations and certain hashtags in real-time.
Jan 10, 2019 • 29 Minute Read
Summary
This tutorial will show you how to use channel groups with PubNub's Stream Controller API by building a web app to visualize tweets with certain hashtags in real-time.
This is the stack we're going to use:
- Node.js as the server-side language,
- Express as a web framework,
- Handlebars as the template library,
- Twitter Streaming API to get the tweets in real-time,
- PubNub's Stream Controller with channel groups to control the tweets to show,
- jQuery for client-side interaction, and
- CSS3 animations to visualize the tweets.
The app will track tweets with the following hashtags (these are configurable):
- #news
- #family
- #quote
- #love
- #today
- #programming
Each hashtag will have its own PubNub channel (where the tweets will be published). All the channels will belong to a channel group.
The client will listen to messages on this channel group to present tweets as pulsating circles of different colors (each hashtag has it own color):
There's also an admin page that will turn on/off each hashtag by adding or removing channels to the PubNub channel group:
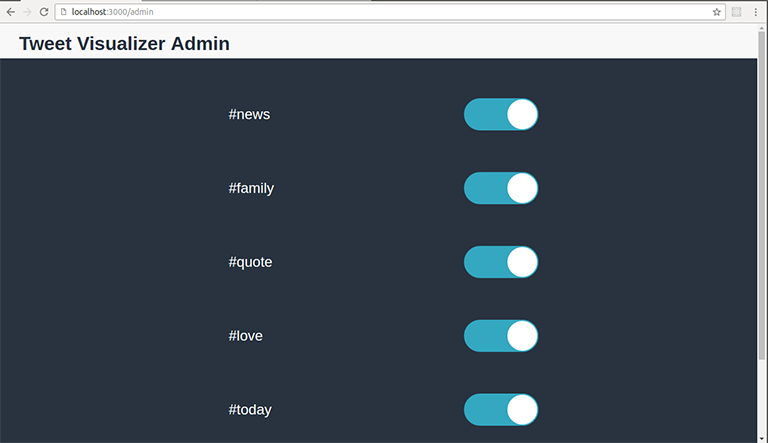
Changes made on the admin page are reflected on the client(s) in real time:
For simplicity, the admin page (and their server-side routes) won't implement authentication.
The entire source code is available on Github.
Requirements
Log in to your Twitter account and go to https://dev.twitter.com/apps/new to create a new application.
You must add your mobile phone to your Twitter profile before creating an application. Please read https://support.twitter.com/articles/110250-adding-your-mobile-number-to-your-account-via-web for more information.
You'll have to enter the following:
- Name (your application name, for instance, sample_eh3rrera)
- Description (your application description)
- Website (your application's publicly accessible home page. We're not going to use it, so you can just enter https://127.0.0.1).
After you agree to Twitter's developer agreement, your application will be created:
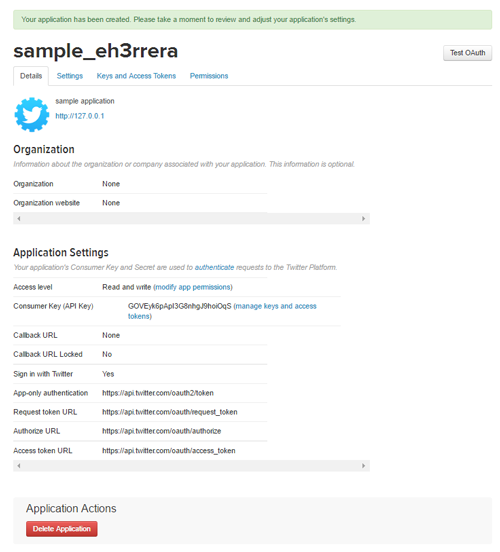
Now go to the Keys and Access Token section and create you access token by clicking on the Create my access token:
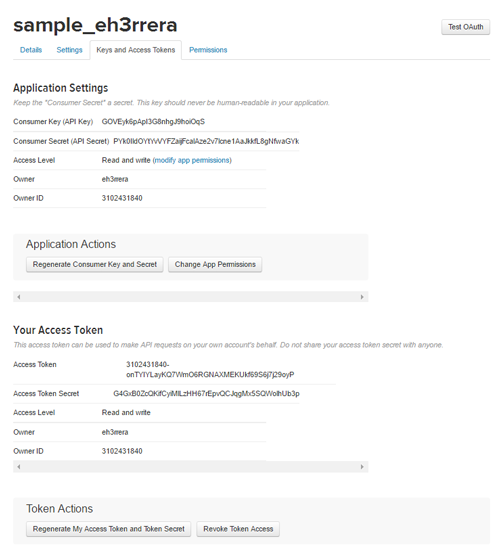
Save your consumer key, consumer secret, access token, and access token secret since we'll need it later.
PubNub
Go to https://admin.pubnub.com/#/register and register a new account. When you log in, you will be presented with this screen:
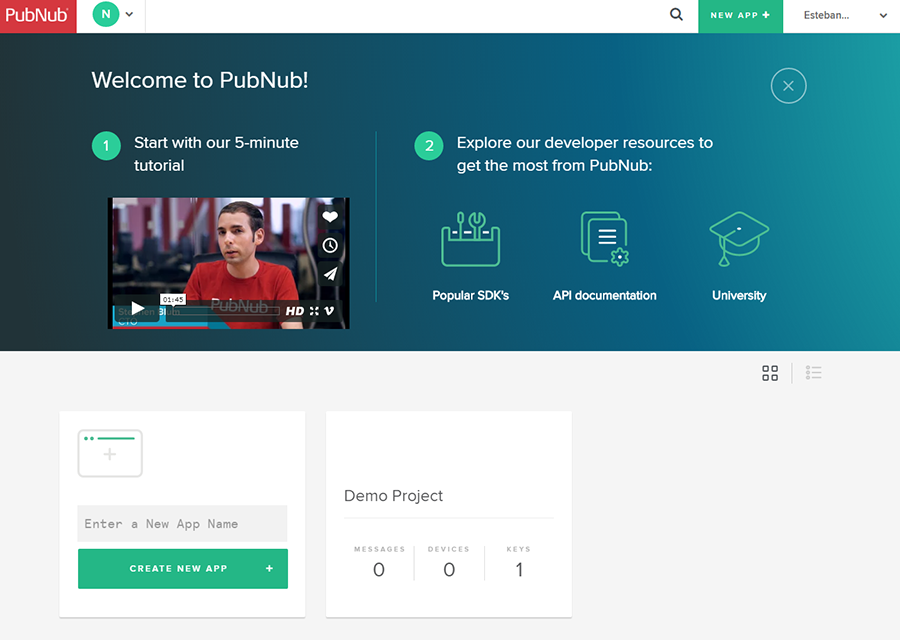
You can either create a new app or use the demo app already created. When you click on this app, you'll something like the following:
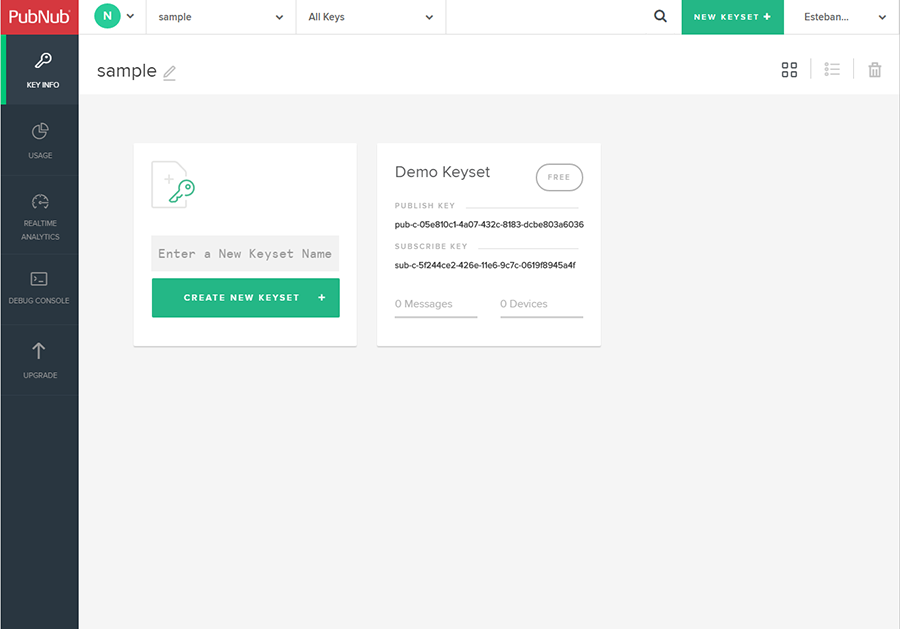
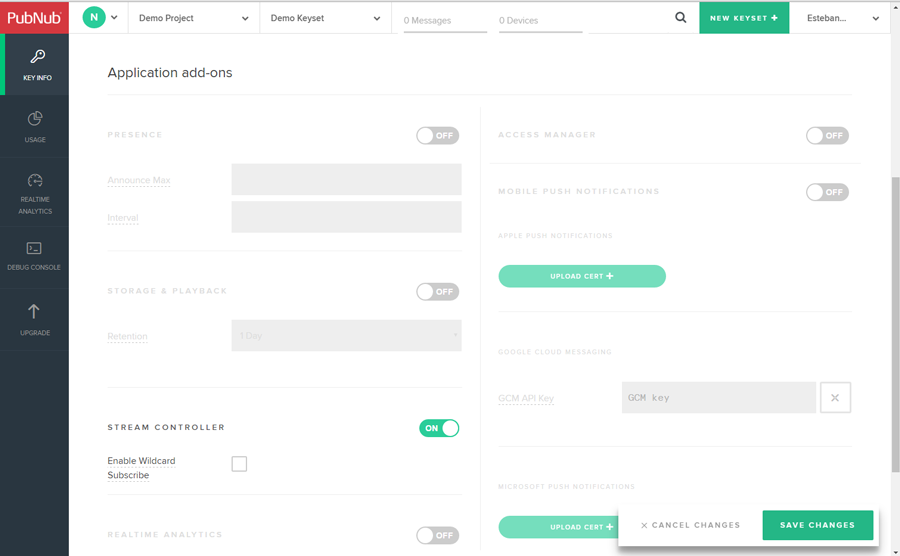
Save your publish and subscribe keys since we'll need it later. Now click on the keyset panel and go to the Application add-ons section to enable the Stream Controller add-on and save the changes:
Node.js
We'll need to have the latest version of Node.js installed.
Now let's get started.
Creating the app structure
Create a new directory and cd into it:
mkdir visual-tweets && cd visual-tweets
Now create a package.json file either with:
npm init
Or to accept default values:
npm init -y
We will use the next dependencies (and their latest versions at the time of this writing):
- twit, version 2.2.4 (to use the Twitter Stream API)
- pubnub, version 4.0.6 (to use the PubNub API)
- express, version 4.14.0 (as the web framework)
- express-handlebars, version 3.0.0 (as the template library)
Add them with the following command:
npm install --save twit pubnub express express-handlebars
The project will have this directory structure:
      |— public
| |— css
| | |— admin.css
| | |— hashtags.css
| | |— style.css
| | |— switch.css
| |— js
| | |— admin.js
| | |— index.js
|— routes
| | |— admin.js
| | |— index.js
|— views
| | |— admin.hbs
| | |— index.hbs
| |— app.js
| |— config.js
| |— package.json
The config.js file stores all the important configuration in this way (don't forget to use your own keys):
      module.exports = {
  twitter: {
    consumer_key: "GOVEyk6pApI3G8nhgJ9hoiOqS",
    consumer_secret: "PYk0IldOYtYvVYFZaijFcalAze2v7lcne1AaJkkfL8gNfwaGYk",
    access_token: "3102431840-onTYIYLayKQ7WmO6RGNAXMEKUkf69S6j7j29oyP",
    access_token_secret: "G4GxB0ZcQKifCyiMlLzHH67rEpvQCJqgMx5SQWolhUb3p"
  },
  pubnub: {
    ssl: false,
    publish_key: "pub-c-05e810c1-4a07-432c-8183-dcbe803a6036",
    subscribe_key: "sub-c-5f244ce2-426e-11e6-9c7c-0619f8945a4f"
  },
  hashtagsToTrack: [
    "#news",
    "#family",
    "#quote",
    "#love",
    "#today",
    "#programming"
  ],
  channelGroup: "hashtags",
  channelUpdates: "hashtag_updates",
  port: process.env.APP_PORT || 3000
};
With this in mind, let's review the server-side code.
Creating the server
The app.js file will contain code for the server. Start by importing the dependencies:
      var express = require("express");
var app = express();
var exphbs = require("express-handlebars");
var config = require("./config");
var Handlebars = require("handlebars");
var Twit = require("twit");
var PubNub = require("pubnub");
Then, create the objects to work with the Twitter and PubNub APIs:
      var T = new Twit({
  consumer_key: config.twitter.consumer_key,
  consumer_secret: config.twitter.consumer_secret,
  access_token: config.twitter.access_token,
  access_token_secret: config.twitter.access_token_secret
});

var pubnub = new PubNub({
  ssl: config.pubnub.ssl,
  publishKey: config.pubnub.publish_key,
  subscribeKey: config.pubnub.subscribe_key
});
In the config.js file, we define the hashtags to track with the # character, however, since we are going to use these tags as parameters and in other places, it'd be useful to have a version of this array without this character:
      var tagsToTrack = config.hashtagsToTrack.map(function(val) {
  return val.substr(1);
});
Next, configure Handlebars and the views and public directory:
      var hbs = exphbs.create({
  extname: ".hbs"
});

app.set("views", __dirname + "/views");
app.use(express.static(__dirname + "/public"));

app.engine(".hbs", hbs.engine);
app.set("view engine", ".hbs");
However, when rendering the template, we'll need to know if a certain hashtag is active (it's part of the channel group). This can be done with a helper function in Handlebars.
This helper will take as arguments the hashtag and the group of active hashtags (in addition to the options argument required by the helper), and it will add a boolean attribute (active) to indicate if the hashtag is active or not:
      var hbs = exphbs.create({
  extname: ".hbs",
  helpers: {
    active: function(hashtag, group, options) {
      var data;
      if (options.data) {
        data = Handlebars.createFrame(options.data);
      }
      data.active = data && group.indexOf(hashtag) > -1;

      return options.fn(hashtag, { data: data });
    }
  }
});
By defining the helper in the hbs object, it will be available to all the views. You can know more about helpers here.
Next up, our application will provide the following routes:
      /                      - The page to visualize the tweets
/admin                 - The admin page
/admin/add/:channel    - The endpoint to add a channel to the PubNub channel group
/admin/remove/:channel - The endpoint to remove a channel from the PubNub channel group
To keep things organized, we're going to have a routes/index.js to configure the / route and a routes/admin.js to configure the rest of the routes (you'll see the content of these files in a moment). To avoid creating the objects we're going to use in these routes, let's set them at the app level also:
      app.set("pubnub", pubnub);
app.set("tagsToTrack", tagsToTrack);

var indexRoutes = require("./routes/index");
var adminRoutes = require("./routes/admin");

app.use("/", indexRoutes);
app.use("/admin", adminRoutes);
To set up the web server, create the channel group first:
      app.listen(config.port, function() {
  console.log("Server up and listening on port %d", config.port);

  // Add channels to the group
  pubnub.channelGroups.addChannels(
    {
      channels: tagsToTrack,
      channelGroup: config.channelGroup
    },
    function(status) {
      if (status.error) {
        console.log(JSON.stringify(status));
      } else {
        // Success
      }
    }
  );
});
PubNub's Stream Controller allows you to receive messages on multiple channels from a single network connection. You can use it in two ways:
- Multiplexing. It enables you to subscribe to 50 channels over one TCP socket.
- Channel Groups. It allows you to create groups of channels that can all be subscribed to with a single call. The channel limit per group is 2,000, and each client connection can subscribe to 10 channel groups.
In the code above, you're adding to a channel group the hashtags to track, in addition to defining success and error callbacks. When the channel group is successfully created, you'll receive an object like the following:
      {
    "error":false,
    "operation":"PNAddChannelsToGroupOperation",
    "statusCode":200
}
Once you've created the channel group, let's add the code to get the tweets from the Twitter Stream API
      // Get tweets from the hashtags to track
var stream = T.stream("statuses/filter", { track: config.hashtagsToTrack });
stream.on("tweet", function(tweet) {
  console.log(tweet);
});
Using the statuses/filter endpoint of the API, we'll start to track tweets that contain the configured hashtags.
Tweets are delivered as JSON objects. Here's a sample tweet object:
      {
  created_at: 'Mon Jul 04 05:06:34 +0000 2016',
  id: 749831746275930100,
  id_str: '749831746275930963',
  text: '#God loves you. & I #love you too:).',
  source: '<a href="http://ifttt.com" rel="nofollow">IFTTT</a>',
  truncated: false,
  in_reply_to_status_id: null,
  in_reply_to_status_id_str: null,
  in_reply_to_user_id: null,
  in_reply_to_user_id_str: null,
  in_reply_to_screen_name: null,
  user:
   { id: 4568541503,
     id_str: '4568541503',
     name: 'Example',
     screen_name: 'example',
     location: 'New Jersey, USA',
     url: 'http://www.example.com',
     description: 'My description',
     protected: false,
     verified: false,
     followers_count: 18008,
     friends_count: 5977,
     listed_count: 356,
     favourites_count: 2,
     statuses_count: 216006,
     created_at: 'Tue Dec 22 14:27:38 +0000 2015',
     utc_offset: -25200,
     time_zone: 'Pacific Time (US & Canada)',
     geo_enabled: false,
     lang: 'en',
     contributors_enabled: false,
     is_translator: false,
     profile_background_color: 'F5F8FA',
     profile_background_image_url: '',
     profile_background_image_url_https: '',
     profile_background_tile: false,
     profile_link_color: '2B7BB9',
     profile_sidebar_border_color: 'C0DEED',
     profile_sidebar_fill_color: 'DDEEF6',
     profile_text_color: '333333',
     profile_use_background_image: true,
     profile_image_url: 'http://pbs.twimg.com/profile_images/679660186131369984/8lfidXI7_normal.png',
     profile_image_url_https: 'https://pbs.twimg.com/profile_images/679660186131369984/8lfidXI7_normal.png',
     profile_banner_url: 'https://pbs.twimg.com/profile_banners/4568541503/1450882189',
     default_profile: true,
     default_profile_image: false,
     following: null,
     follow_request_sent: null,
     notifications: null },
  geo: null,
  coordinates: null,
  place: null,
  contributors: null,
  is_quote_status: false,
  retweet_count: 0,
  favorite_count: 0,
  entities:
   { hashtags:
      [ {"text":"God","indices":[0,4]},
        {"text":"love","indices":[24,29]} ],
     urls: [],
     user_mentions: [],
     symbols: [],
     media: [ [Object] ] },
  extended_entities: { media: [ [Object] ] },
  favorited: false,
  retweeted: false,
  possibly_sensitive: false,
  filter_level: 'low',
  lang: 'en',
  timestamp_ms: '1467608794169'
}
Now, what we need to do is determine which of the tracked hashtags the tweet belongs to.
Since the tweet can contain more than one hashtag (and it can even have two or more of the hashtags we're tracking), let's stop at the first that matches one of our tracked hashtags, and let's store it in the channel variable:
      stream.on("tweet", function(tweet) {
  var channel = "";

  // Which hashtag the tweet belongs to?
  for (var index in tweet.entities.hashtags) {
    var hashtag = tweet.entities.hashtags[index].text.toLowerCase();

    if (tagsToTrack.indexOf(hashtag) > -1) {
      channel = hashtag;
      break;
    }
  }
});
Once we have the hashtag, let's publish to the PubNub channel (that belongs to the channel group) an object with the values we're going to use on the client (notice how the tweet's URL is built):
      // Publish tweet data
if (channel !== "") {
  var obj = {
    text: tweet.text,
    url:
      "https://twitter.com/" +
      tweet.user.screen_name +
      "/status/" +
      tweet.id_str,
    hashtag: channel
  };

  pubnub.publish(
    {
      channel: channel,
      message: obj
    },
    function(status, response) {
      if (status.error) {
        console.log(status);
      } else {
        console.log(response);
      }
    }
  );
}
Once the message is published successfully, the callback prints to the console an object like this:
      {
  timetoken: "14715559578183158";
}
Back to the routes, routes/index.js will contain the following code:
      var express = require("express");
var config = require("../config");

var router = express.Router();

router.get("/", function(req, res, next) {
  req.app.get("pubnub").channelGroups.listChannels(
    {
      channelGroup: config.channelGroup
    },
    function(status, response) {
      if (status.error) {
        console.log(JSON.stringify(status));
        return;
      }

      res.render("index", {
        hashtagsToTrack: req.app.get("tagsToTrack"),
        hashtagsInGroup: response.channels,
        config: config
      });
    }
  );
});

module.exports = router;
When the / route is requested, we'll get the active channels in the group at that moment. The listChannels method returns an object like the following on success:
      {
    "channels": [
        "family",
        "love",
        "news",
        "programming",
        "quote",
        "today"
    ]
}
Notice that we pass these channels and others objects as parameters to render the view:
      callback : function(m){
    res.render('index', {
        hashtagsToTrack: req.app.get('tagsToTrack'),
        hashtagsInGroup: m.channels,
        config: config
    });
},
On the other hand, routes/admin.js will contain the code to execute when the /admin route is requested (just like the previous route):
      var express = require("express");
var config = require("../config");

var router = express.Router();

router.get("/", function(req, res, next) {
  req.app.get("pubnub").channelGroups.listChannels(
    {
      channelGroup: config.channelGroup
    },
    function(status, response) {
      if (status.error) {
        console.log(JSON.stringify(status));
        return;
      }

      res.render("admin", {
        hashtagsToTrack: req.app.get("tagsToTrack"),
        hashtagsInGroup: response.channels,
        config: config
      });
    }
  );
});
And the routes to add and remove channels:
      router.put("/add/:channel", function(req, res, next) {
  req.app.get("pubnub").channelGroups.addChannels(
    {
      channels: [req.params.channel],
      channelGroup: config.channelGroup
    },
    function(status) {
      if (status.error) {
        console.log(JSON.stringify(status));
        res.json({
          status: "Error"
        });
      } else {
        //console.log(JSON.stringify(m));
        res.json({
          status: "OK"
        });
      }
    }
  );
});

router.put("/remove/:channel", function(req, res, next) {
  req.app.get("pubnub").channelGroups.removeChannels(
    {
      channels: [req.params.channel],
      channelGroup: config.channelGroup
    },
    function(status) {
      if (status.error) {
        console.log(JSON.stringify(status));
        res.json({
          status: "Error"
        });
      } else {
        //console.log(JSON.stringify(m));
        res.json({
          status: "OK"
        });
      }
    }
  );
});

module.exports = router;
And that's it. The next section will explain how the views (for the client and admin) work.
Creating the user page
The index page (views/index.hbs) is simple:
      <!DOCTYPE html>
<html>
<head>
    <meta charset="utf-8">
    <title>Tweet Visualizer</title>

    <link rel="stylesheet" href="css/hashtags.css">
    <link rel="stylesheet" href="css/style.css">
</head>
<body>

    <header>
        <div class="menu">
            {{#each hashtagsToTrack}}
            {{#active this ../hashtagsInGroup}}
                {{#if @active}}
                    <div id="{{this}}" class="hashtag">
                {{else}}
                    <div id="{{this}}" class="hashtag" style="visibility:hidden;">
                {{/if}}
            {{/active}}
                <span class="swatch {{this}}"></span><span>#{{this}}</span>
            </div>
            {{/each}}
        </div>
        <h1>Tweet Visualizer</h1>
    </header>
    <div class="container">
        <div class="area"></div>
    </div>

    <script>
        var pubnubConfig = {
            subscribeKey: '{{config.pubnub.subscribe_key}}'
        };
        var channelGroup = '{{config.channelGroup}}';
        var channelUpdates = '{{config.channelUpdates}}';
    </script>
    <script src="https://code.jquery.com/jquery-2.2.4.min.js"></script>
    <script src="https://cdn.pubnub.com/sdk/javascript/pubnub.4.0.6.min.js"></script>
    <script src="js/index.js"></script>

</body>
</html>
In the menu div we iterate over the hashtags to track and, by using the active helper, only the active hashtags are shown (the inactive ones are hidden).
      <div class="menu">
    {{#each hashtagsToTrack}}
    {{#active this ../hashtagsInGroup}}
        {{#if @active}}
            <div id="{{this}}" class="hashtag">
        {{else}}
            <div id="{{this}}" class="hashtag" style="visibility:hidden;">
        {{/if}}
    {{/active}}
        <span class="swatch {{this}}"></span><span>#{{this}}</span>
    </div>
    {{/each}}
</div>
At the end of the page, you can see how the variables from the config.js file are printed in a <script> tag so they can be used in the client as well:
      <script>
	var pubnubConfig = {
		subscribeKey: '{{config.pubnub.subscribe_key}}'
	};
	var channelGroup = '{{config.channelGroup}}';
	var channelUpdates = '{{config.channelUpdates}}';
</script>
This way, we only have to deal with configuration data in one place (in config.js).
The file js/index.js contains the code that listens for updates and messages on the channel group:
      $(document).ready(function() {
  var pubnub = new PubNub(pubnubConfig);

  pubnub.addListener({
    message: function(data) {
      var m = data.message;

      if (data.subscribedChannel === channelUpdates) {
        // updates to the channel group
        console.log(m);

        if (m.add) {
          $("#" + m.hashtag).css("visibility", "visible"); // show the added hashtag
        } else {
          $("#" + m.hashtag).css("visibility", "hidden"); // hide the removed hashtag
          $("a." + m.hashtag).each(function() {
            // hide all the tweets shown that belong to that hashtag
            var $this = $(this);
            $this.hide();
          });
        }
      } else {
        // tweets to add to the window
        var x = Math.random() * 100;
        var y = Math.random() * 100;
        var style = "top:" + y + "%; left:" + x + "%;";
        (function(el) {
          setTimeout(function() {
            el.remove();
          }, 10000);
        })(
          $(
            '<a href="' +
              m.url +
              '" class="' +
              m.hashtag +
              '" title="' +
              m.text +
              '" style="' +
              style +
              '" target="_blank"></a>'
          ).appendTo(".area")
        );
      }
    }
  });

  // Listen for updates to the channel group
  pubnub.subscribe({
    channels: [channelUpdates]
  });

  // Listen for tweets to add to the window
  pubnub.subscribe({
    channelGroups: [channelGroup]
  });
});
When a tweet arrives, an a tag is appended to the area div. The name of the hashtag is configured as a CSS class in css/hashtags.css to give it a color:
      .news {
  background: #3498db;
}

.family {
  background: #9b59b6;
}

.quote {
  background: #e67e22;
}

.love {
  background: #f1c40f;
}

.today {
  background: #ff0000;
}

.programming {
  background: #eb0980;
}
Also, notice that a reference to this element is not saved, but passed as an argument (appendTo() returns the appended element) to a closure that removes it after 10 seconds:
      (function(el) {
  setTimeout(function() {
    el.remove();
  }, 10000);
})(
  $(
    '<a href="' +
      m.url +
      '" class="' +
      m.hashtag +
      '" title="' +
      m.text +
      '" style="' +
      style +
      '" target="_blank"></a>'
  ).appendTo(".area")
);
This a element is present as a circle thanks to the next CSS style defined in css/style.css:
      .area a {
  -moz-border-radius: 50%;
  -webkit-border-radius: 50%;
  border-radius: 50%;
  -moz-animation: heart 3s infinite;
  -webkit-animation: heart 3s infinite;
  animation: heart 3s infinite;
  position: absolute;
  width: 20px;
  height: 20px;
}
The pulsating animation (defined as heart) is done in three keyframes, changing the scale and opacity of the element in each step:
      @keyframes heart {
  0% {
    transform: scale(1);
    opacity: 1;
  }
  50% {
    transform: scale(2);
    opacity: 0.7;
  }
  100% {
    transform: scale(1);
    opacity: 1;
  }
}
The other part of js/index.js listens for updates to the channel group (adding/removing hashtags by the administrator) to show or hide the hashtag labels and their tweets:
      $(document).ready(function() {

    var pubnub = new PubNub(pubnubConfig);

    pubnub.addListener({
        message: function(data) {
            var m = data.message;

            if(data.subscribedChannel === channelUpdates) { // updates to the channel group
                console.log(m);

                if(m.add) {
                    $('#' + m.hashtag).css("visibility", "visible"); // show the added hashtag
                } else {
                    $('#' + m.hashtag).css("visibility", "hidden"); // hide the removed hashtag
                    $('a.' + m.hashtag).each(function () { // hide all the tweets shown that belong to that hashtag
                        var $this = $(this);
                        $this.hide();
                    });
                }
            } else { // tweets to add to the window
                ...
            }
        }
    });

    // Listen for updates to the channel group
    pubnub.subscribe({
        channels: [channelUpdates]
    });

    ...
});
Creating the admin page
The admin page (views/admin.hbs) is simple too:
      <!DOCTYPE html>
<html>
<head>
    <meta charset="utf-8">
    <title>Tweet Visualizer Admin</title>

    <link rel="stylesheet" href="css/style.css">
    <link rel="stylesheet" href="css/admin.css">
    <link rel="stylesheet" href="css/switch.css">
</head>
<body>

    <header>
        <h1>Tweet Visualizer Admin</h1>
    </header>
    <div class="container">
        <div class="settings">
            {{#each hashtagsToTrack}}
            <div class="row">
                <div class="left">#{{this}}</div>
                <div class="right">
                    <div class="onoffswitch">
                        <input type="checkbox" name="onoffswitch" class="onoffswitch-checkbox" id="{{this}}"
                            {{#active this ../hashtagsInGroup}} {{#if @active}} checked {{/if}} {{/active}} />
                        <label class="onoffswitch-label" for="{{this}}"></label>
                    </div>
                </div>
            </div>
	        {{/each}}
        </div>
    </div>

    <script>
        var pubnubConfig = {
            subscribeKey: '{{config.pubnub.subscribe_key}}',
            publishKey: '{{config.pubnub.publish_key}}'
        };
        var channelGroup = '{{config.channelGroup}}';
        var channelUpdates = '{{config.channelUpdates}}';
    </script>
    <script src="https://code.jquery.com/jquery-2.2.4.min.js"></script>
    <script src="https://cdn.pubnub.com/sdk/javascript/pubnub.4.0.6.min.js"></script>
    <script src="js/admin.js"></script>

</body>
</html>
The HTML and CSS style for the checkboxes was generated on the following page:
https://proto.io/freebies/onoff/
Using the active helper, each checkbox is checked or unchecked depending whether the hashtag is active or not:
      <input type="checkbox" name="onoffswitch" class="onoffswitch-checkbox" id="{{this}}"
	{{#active this ../hashtagsInGroup}} {{#if @active}} checked {{/if}} {{/active}} />
Again, the pubnubConfig object and the channel names are configured at the end of the page with the values of config.js:
      <script>
	var pubnubConfig = {
		subscribeKey: '{{config.pubnub.subscribe_key}}',
		publishKey: '{{config.pubnub.publish_key}}'
	};
	var channelGroup = '{{config.channelGroup}}';
	var channelUpdates = '{{config.channelUpdates}}';
</script>
This way, the script in js/admin.js can add or remove a channel and publish a message when a hashtag is turned on/off:
      $(document).ready(function() {
  var pubnub = new PubNub(pubnubConfig);

  // Add/Remove a channel from the group and publish an event to notifiy users
  $('input[type="checkbox"]').change(function() {
    var hashtag = this.id;
    var isChecked = this.checked;
    var url = isChecked ? "/admin/add/" : "/admin/remove/";
    $.ajax({
      type: "PUT",
      url: url + hashtag,
      success: function(data) {
        pubnub.publish(
          {
            channel: channelUpdates,
            message: {
              hashtag: hashtag,
              add: isChecked
            }
          },
          function(m) {
            console.log(m);
          }
        );
      }
    });
  });
});
And that's all. The app is now complete.
Conclusion
Using the API of PubNub's Stream Controller for channel groups as the foundation, and with the help of some CSS3 styles, we have created a simple but nice visualization.
Now you can play with the app by changing the tracked hashtags, the size and color of the tweets, the time to delete them, etc.
I hope you find this tutorial useful. Remember that the code is on Github and thanks for reading.
Advance your tech skills today
Access courses on AI, cloud, data, security, and more—all led by industry experts.
