
- Lab
-
Libraries: If you want this lab, consider one of these libraries.
- Cloud
Automatic Device Management with Device Twins in Azure
Managing one or two IoT devices is really no big deal. But what if you had 100 devices? 1000? Then things get a little more interesting. And by interesting, we mean excruciatingly painful. But help is on the way, in the form of Automatic Device Management in Azure IoT Hub. We can use this handy feature to manage properties and tags on hundreds of IoT devices at the same time!
Lab Info
Table of Contents
-
Challenge
Register and Configure the Device with an Azure IoT Hub
Configure Cloud Shell
- Access Azure Cloud Shell using the credentials provided in the lab.
- Choose the Bash environment.
- Select Show advanced settings.
- Use the existing storage account that resides in the resource group location and the existing
cloudshellfile share name. - Install the Azure IoT extension for CLI:
az extension add --name azure-iot
Register and Configure the IoT device
The following steps are configured with the CLI in Cloud Shell. Note that
XXXXXis the five-character suffix for the lab resources.-
Register the device in the IoT Hub identity registry:
az iot hub device-identity create --device-id IoTDevice1 --hub-name iothub-XXXXX -
Obtain the connection string for the device application:
az iot hub device-identity connection-string show --hub-name iothub-XXXXX --device-id IoTDevice1 --output table -
Copy the connection string to your clipboard and paste it into a text document.
-
Add tags to the IoT device twin:
az iot hub device-twin update --device-id IoTDevice1 --hub-name iothub-ycb3m --set tags='{"location":{"state":"TX","city":"Austin"}}'
-
Challenge
Create an IoT Device Management Configuration
Create the IoT device management configuration
The following steps will be configured in the Azure Portal. Note that
XXXXXis the five-character suffix for the lab resources.- Access the Azure Portal using the credentials provided in the lab.
- Click on the IoT Hub provisioned for this lab. It will be named IoTHub-XXXXX.
- Click on IoT device configuration in the IoTHub-XXXXX pane.
- Click + Add Device Configuration to create the configuration with the following settings:
- Name and Label:
- Name: This is descriptive, so name it anything. It has to be lowercase and the only special characters that can be used are
'-+%_\*. - Labels: You can specify a key/tag pair for this configuration, but it is not required.- Twin Settings:
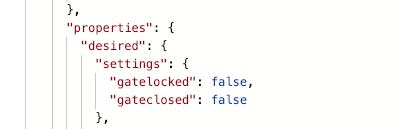
- Device Twin Property: Use properties.desired.settings.
- Device Twin Property Content: Use { "gatelocked": false, "gateclosed": false }.
- Metrics:
- Metric Name: Use nowReporting.
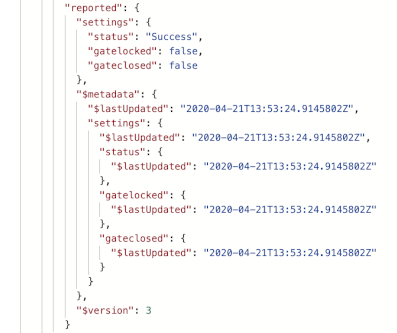
- Metric Criteria: Use SELECT deviceId FROM devices WHERE properties.reported.settings.status = 'Success'
- Target Devices:.
- Priority: Use 10.
- Target Condition: Use tags.location.city = 'Austin'.
- Twin Settings:
- Name and Label:
- Name: This is descriptive, so name it anything. It has to be lowercase and the only special characters that can be used are
Click Review + create and then Create to create the deployment.
Verify That the Configuration Was Applied
Once the configuration has been created, verify that it has been deployed to the test device.
- Click on IoT devices in the IoTHub-XXXXX pane and click on the device created in the first objective.
- Click on Device Twin to view the twin. Verify that the desired properties now reside within the twin.
-
Challenge
Download and Configure the Node.js Application
-
Access Azure Cloud Shell using the credentials provided in the lab.
-
Download the sample Node.js application by cloning the Git repository for this course:
git clone https://github.com/linuxacademy/content-AZ-220.git -
Change to the directory for the Device Twin lab:
cd content-AZ-220/samples/DeviceTwins/ -
Install the Node dependencies for the sample application:
npm install -
Modify
test_device_twins.jsin vi or nano, replacing<device-id>on line 6 with the device connection string copied in Objective 1.

-
-
Challenge
Run the Node.js Application to Apply Desired Properties
The sample node application acts as a simulated device. It reads the desired properties from the device twin and "sets" the properties as reported. This is how we use device twins to synchronize desired properties (from the back-end application) with the reported properties (from the Iot Devices).
To run the application, type the following in Cloud Shell:
node test_device_twins.jsThere will be output regarding the progress of the application. Once the application has reported successful changes, it may be exited by pressing CTRL+C.
Verify That the Reported Properties Were Applied
Verify that the desired properties are now reported properties in the device twin:
- Click on IoT devices in the IoTHub-XXXXX pane, then click on the device created in the first objective.
- Click on Device Twin to view the twin. Verify that the reported properties now reside within the twin.

Real skill practice before real-world application
Hands-on Labs are real environments created by industry experts to help you learn. These environments help you gain knowledge and experience, practice without compromising your system, test without risk, destroy without fear, and let you learn from your mistakes. Hands-on Labs: practice your skills before delivering in the real world.
Learn by doing
Engage hands-on with the tools and technologies you’re learning. You pick the skill, we provide the credentials and environment.
Follow your guide
All labs have detailed instructions and objectives, guiding you through the learning process and ensuring you understand every step.
Turn time into mastery
On average, you retain 75% more of your learning if you take time to practice. Hands-on labs set you up for success to make those skills stick.